The popularity of inflatable boats in our country is much higher than ordinary duralumin ones.
And there are many reasons for this. On the one hand, their price is much lower. On the other hand, you don’t need a separate garage for storage, and you don’t have to use special equipment during transportation.
At the same time, a rubber boat is capable of delivering its owner to any point on a lake or river, especially if a transom with at least a weak (2-3) horsepower) motor.
But, remembering the need for a transom to install the motor, many beginners completely forget about transom wheels for a PVC boat. This is a serious omission that would benefit from correction.
 Carrying a two- or three-seater rubber boat in an inflated state is quite easy - a man of average build can easily carry it several tens of meters, separating the car and the shore of a river or lake.
It is much more difficult to do this if the cockpit is filled with fishing gear and equipment, and an outboard motor is already attached to the transom. What to do?
Should I remove the motor and carry all the equipment separately if I need to cross a small sandbank where there is a danger of damaging the bottom of the boat? This is extremely difficult to do.
This is why many fishermen use special transom wheels. They allow you to transport even a heavily loaded inflatable boat with minimal effort.
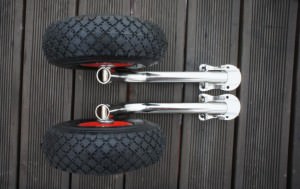
 Today you can find various wheels on sale. First of all, they differ in size and width.
Experienced fishermen advise choosing wide, medium-sized wheels. Thanks to them, you can easily cross both areas with dense soil and sandy beaches - the wide wheels will not get bogged down.
It is important that both the wheels and mounts are made of materials that are not afraid of moisture. After all, they will be in the water most of the time.
Where can I buy?
Many boat owners prefer to buy removable wheels for their boat, thereby saving their time and effort. Moreover, this is extremely easy to do - they are sold in almost any store specializing in the sale of boats, motors and related accessories.
 But some, looking at the prices, wonder – is it worth buying them at all? Oddly enough, with maximum simplicity of design and the use of fairly cheap materials (stainless steel and polyurethane are very inexpensive), the price of wheels is set quite high - on average from 4 to 10 thousand rubles, depending on the model and store.
People are simply surprised that the cost of wheels is approximately the same as the cost of their inflatable boats. As a result, many people find their way out of the situation - they decide to make wheels with their own hands.
We collect the necessary material and tools
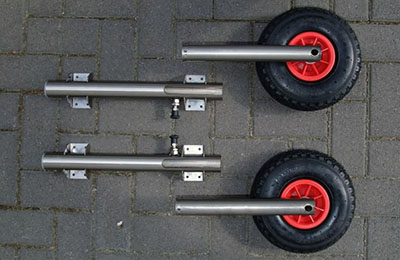
So, have you decided to make the wheels that will be installed on the hinged transom yourself? Quite commendable. Thus, you can save not only several thousand rubles, but also make wheels with mounts exactly what you need - length, width and wheel size.
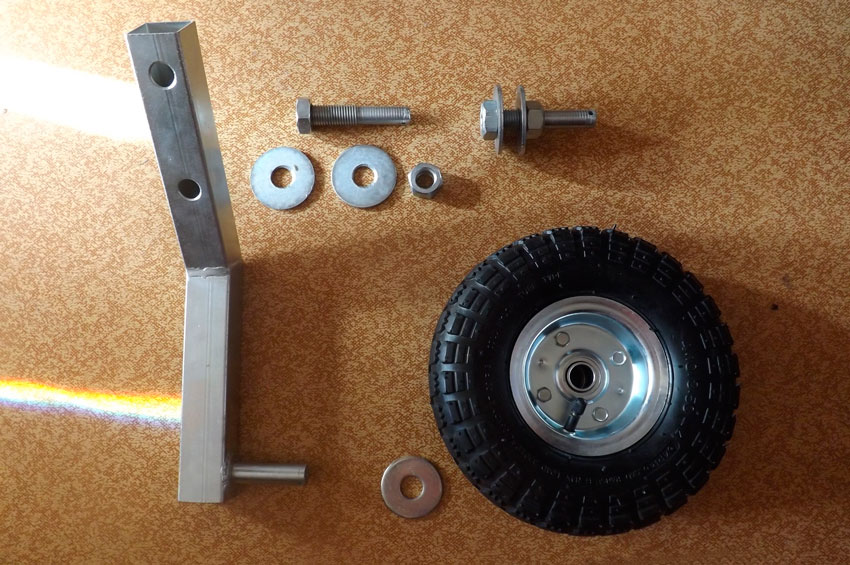
All you need to get the job done is:
- A pair of wheels with a diameter of about 35-35 centimeters and a width of 60-80 millimeters;
- Square profile with a cross section of 25x25 millimeters;
- Tube of diameter suitable for wheel mounting;
- Set of bolts, washers, nuts, cotter pins.
Of course, both the profile and fasteners must be made of stainless steel. You will have to overpay a little, but the wheels will last for many years, not just one season. In addition, you will need a hacksaw, an electric drill, and pliers or wrenches.
Also, you can’t do it without the help of a welder - but the work here is only for a few minutes, so you’ll have to pay at most a hundred rubles. The total cost of materials is unlikely to exceed 1-1.5 thousand rubles.
Let's work with our hands a little
 When all the materials have been collected, you can start working - the instructions are relatively simple. First of all, we will determine the place where the wheel profile will be attached to the hinged transom.
We remember that in no case should they interfere with the motor, even if the fasteners become loose and the fasteners dangle freely. Otherwise, you can say goodbye to the screw.
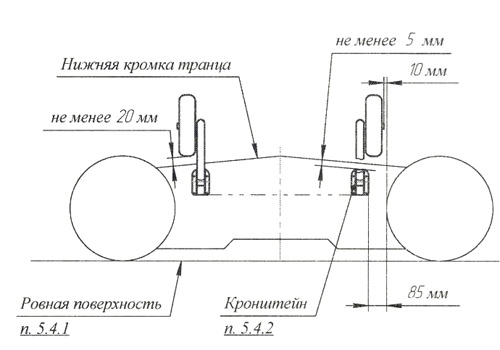
When the attachment points are determined, we set the segment down - the wheels themselves should be slightly below the lower edge of the transom - by the length of the radius plus 3-5 centimeters. This will provide the required level of safety and at the same time reduce resistance to water when moving. The brackets for mounting the wheels can be left straight, or they can be made at a slight angle.
The first option is good due to its strength and ease of manufacture - less work for the welder, and the monolithic bracket can withstand quite decent loads.
The brackets, welded at an angle, allow the wheels to be located under the bottom of the boat and not interfere with the operation of the motor. Let's consider the second option, as it is more complex.
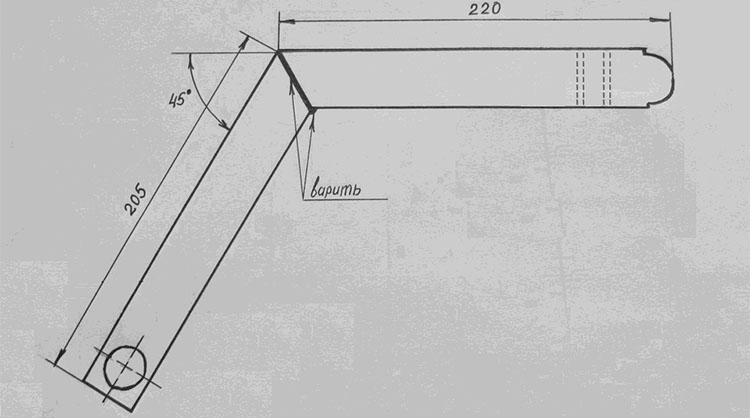
Let's cut off four sections from the profile - in this drawing they have certain dimensions, but you take those that are suitable specifically for your boat.
 Using a welding machine, attach the tubes on which the rings will be mounted to the bottom. You will have to make a small through hole in the tubes - here, using a cotter pin, the rings will be fixed.
In addition, immediately weld a nut of the appropriate diameter to the inner ring of the tube so that the wheels are not pressed against the mount.
It is advisable to plug the outer end of the tubes with plastic or rubber stoppers to prevent water from collecting, and simply for aesthetic reasons.
In the upper part, use a drill to make two small through holes - it is through them that you can later install the wheels on the transom.
 Now all that remains is to connect the two parts of the future fastening by welding. The angle between them can vary from 35 to 45 degrees.
Of course, the ends will have to be trimmed slightly so that they fit tightly together at this angle.
When the welding work is completed, all that remains is to put the wheels on the tubes and secure them with a washer and a cotter pin. That's all. Homemade transom wheels are ready. If desired, the mount can be painted with waterproof paint - just for beauty. It's time to move on to the next stage - installation on the transom.
Putting the wheels in place
Attaching wheels to the transom is a much more complex process than it might seem at first glance. So, you should approach this stage seriously. This is why this instruction was written.
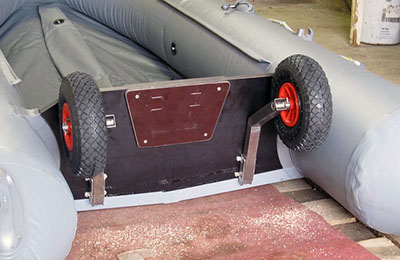
First of all, you need to attach the wheel mounts to the wooden transom. Make marks along the holes located at the top of the fasteners. Using a drill, drill holes of the desired diameter in the transom.
After this, take a small textolite, duralumin or aluminum sheet (the size of 2 matchboxes) and make exactly the same holes in it.
 Attach the resulting perforated sheet with inside transom and thread the bolts through the holes in it and the wood - the cap should be located on the side of the boat.
This metal sheet will allow you to evenly distribute the load over a large area. And the location of the bolts with their heads facing inward ensures that the rubber side of the boat will not be damaged by a sharp protrusion.
Place washers of the appropriate size on the protruding bolts. All that remains is to place the wheels with the holes on these bolts and secure with a nut and another washer.
Of course, do not forget to make sure that the wheels are under the transom (if you are using an angled wheel mounting system).
Repeat the procedure with the second wheel. The work is completed. You can safely install a hinged transom on your rubber boat and comfortably roll it to the shore - over stones, sand and mud.
Let's sum it up
 As you can see, making transom wheels is not difficult. Any person with at least a minimum of skills in working with tools, wood and iron can easily cope with all the work in a matter of hours.
Moreover, as a result, the price of new wheels will be at least 2-3 times lower than those purchased in a specialized store.
Perhaps some people found the instructions quite complicated. In fact, everything is much more complicated than it seems at first glance. So, you just need to get started and you won’t notice how time flies.
Well, after completion, you can rightfully boast to your friends about your skills in manufacturing and installing transom wheels.
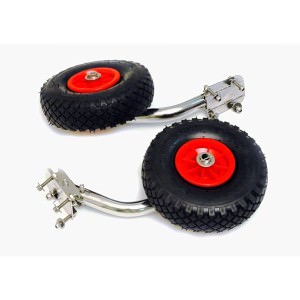
Modern fishing cannot do without high-quality watercraft. But to simplify the task of transporting a fisherman loaded with gear and equipment to a specific body of water, manufacturers of fishing accessories offer a wide range of transom wheels.
If you have the desire and opportunity, you can make wheels for moving the vessel yourself at home. It is especially important to have transom wheels when fishing alone.
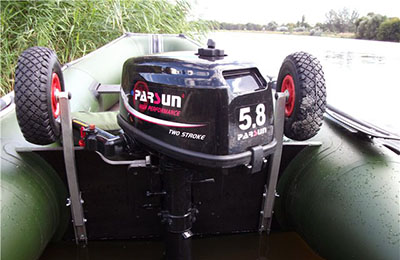
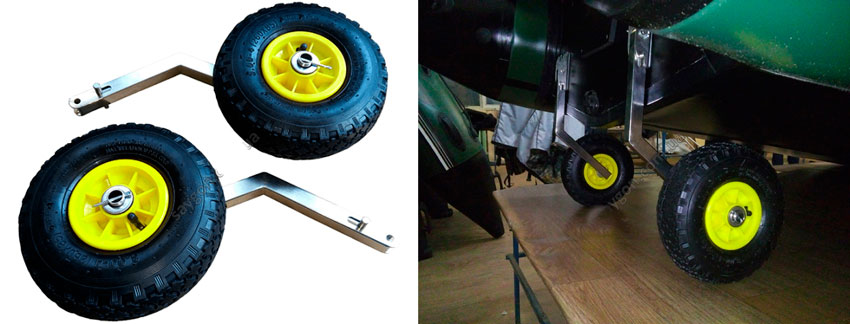
Transom wheels for PVC boats are transport chassis, for fastening of which brackets (2 pcs.) are used. It is the brackets that bring the wheels into working condition (up and down).
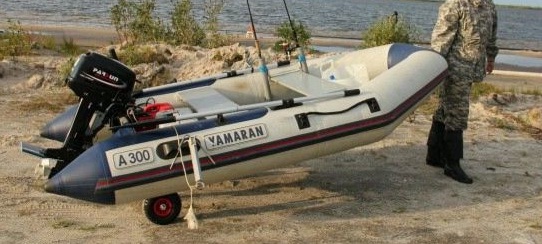
This functional accessory allows one person to freely move along the shore, launch and unload an inflated boat from the water onto land. The convenience of transom wheels is that there is no need to remove them after the watercraft splashes down; just lift them up and you can sail.
When installing the chassis, special attention should be paid to the placement of the brackets on the transom, since the running characteristics on the shore, as well as the turning ability of the motor when operating the boat, will depend on this.
Functions
 The functional tasks of transom wheels include:
- Simplify the process of delivering a boat from shore to water.
- Do mobile watercraft.
Considering the significant weight of a boat equipped with an outboard motor, lifting and moving it to the right place is already difficult for one person.
Of course, you can call for help, but why, when transom wheels are provided for such purposes.
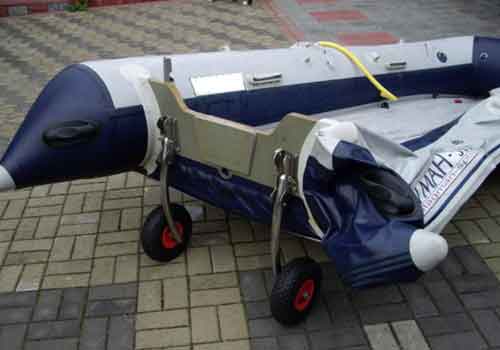
The name of the accessory determines their mounting location; they are installed on the rigid transom of an inflatable boat. Thanks to such a simple device, one person can easily do without outside help to launch an equipped vessel into the water and then lift it ashore.
The main thing is to correctly fix the fastenings to the transom once, so that you can use them without problems in the future.
Advantages and disadvantages
The positive qualities of wheels installed on the transom of the boat include:
- Convenience during operation.
- Good technical qualities.
- Functionality products.
- Compactness.
- Time savings to move a vessel from land to water and vice versa.
- Mobility.
- Simplicity of design and installation on the boat.
- Do not interfere with control vessel.
- Long service life services.
Negative points include:
- Accessory cost, but you can make it yourself.
Kinds
Transport chassis are available in the following varieties:
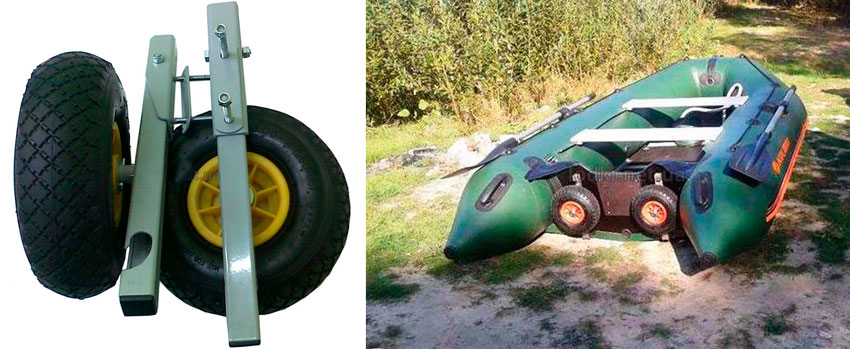
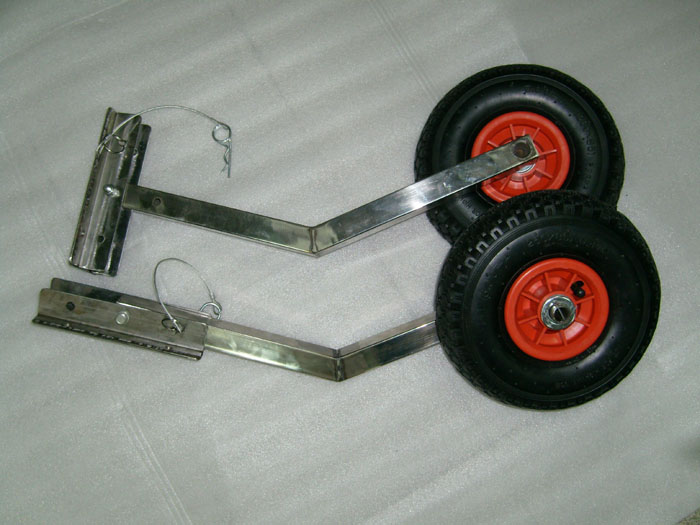
This model has a bolt design, where the chassis is mounted parallel to the boat transom in the folded position, allowing the inflatable craft to be packed without removing the chassis.
This design is very beneficial for the user: it is convenient, compact, and in the stowed position, the chassis is placed behind the transom and does not interfere with the control of the vessel.
Due to its functionality, the KT-5 design ensures comfortable movement of the boat by one person, where there is no need to seek outside help.
The material used for the base mounted on the transom of the vessel is steel with a thickness of 3 mm. For the wheel stand, a profile pipe with a system of grooves is used, which facilitates quick installation, removal or changing the position of the chassis from working to traveling.
The wheels of this type are equipped with an automatic spring mechanism, which allows you to move the boat over uneven surfaces (they do not form backlashes or rattles).
Automatic (KT-3N, KT-3NU)
This model is made from of stainless steel, equipped with an automatic locking system, is used for inflatable watercraft with a stationary transom, or for small boats with a rigid hull.
Advantages:
- High quality material, assemblies.
- Reliability.
- Great design.
- Optimal solution to move the vessel over long distances.
- Ease of use(easily and simply brought into operational position and also assembled).
In the production process of automatic wheels of the KT series, laser cutting is used, and the seams are welded by argon welding, resulting in high precision and original appearance.
This design is capable of supporting a loaded boat weighing 120 kg.
Folding
The product is installed on the outside of the transom, which allows you to easily fold the chassis both down and up. To fix the product, springs are used, located inside a stand made of stainless steel.
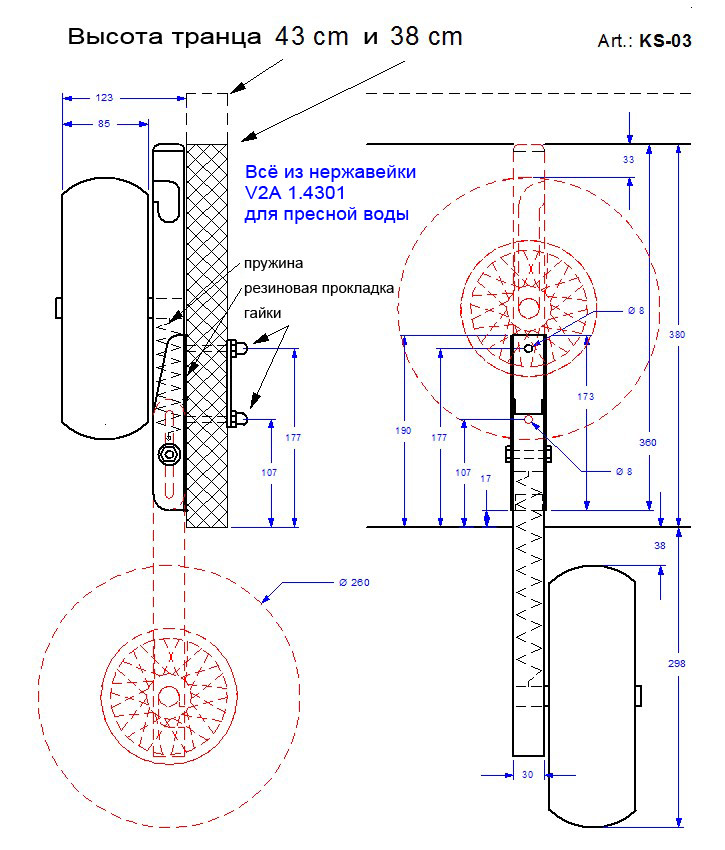
Not only the racks, but also other parts are made of stainless steel and are extremely durable, resistant to fresh (product KS-03) and sea (product KS-04) water.
Advantages:
Easy to remove and fold
No need to mount every time and dismantle the product
Manual fastening method, do not interfere with the control of the vessel
There is an option for packing a deflated boat together with wheels, suitable for all types of PVC inflatable boats, maximum load on wheels is 180 kg.
Tilt&Turn
The model is used to move an inflatable boat by one person over short distances.
Mounted to a plywood stationary transom using 4 bolts. Thanks to the rotating device, the position is adjusted both up and down due to the mounting pin.
To dismantle the accessory, simply remove the nut located on the side of the stand. Any car pump is suitable for inflating the chambers. The maximum load capacity of the chassis is 140 kg.
All parts are made of durable stainless steel, and the discs are made of high-grade plastic.
How to increase your fish catch?
Over 7 years of active fishing, I have found dozens of ways to improve the bite. Here are the most effective ones:
- Bite activator. This pheromone additive attracts fish most strongly in cold and warm water. .
- Promotion gear sensitivity. Read the appropriate manuals for your specific type of gear.
- Lures based pheromones.
How to do it yourself?
First of all, you need to decide on the available dimensions of a particular boat so that the installed chassis does not interfere with the control of the vessel.
Required materials and tools:
- 2 wheels with a diameter of 35 cm and a width of 60-80 mm.
- Square profile with a cross section of 25×25 mm made of stainless steel.
- Tube with suitable diameter for installing wheels.
- As fasteners Cotter pins, washers, bolts, and nuts are suitable.
- Hacksaw for metal, pliers, wrench, electric drill.
Step-by-step manufacturing guide:
- Determining the place for mounting on a square transom (without affecting the operation of the outboard motor).
- We measure the segment down taking into account that the wheels should be placed slightly below the lower edge of the transom by the length of the radius with an addition of 5 cm. This size will achieve the desired level of safety and reduce resistance while the vessel is moving.
- Bracket for mounting the chassis can be straight or at an appropriate angle. The first version is considered the most reliable and affordable in production. There is less welding work and the one-piece bracket can withstand heavy impact.
The second version, where the bracket is welded at an angle, assumes that the wheels are located under the bottom of the boat, without interfering with the operation of the outboard motor.
Here you need to cut off 4 pieces of suitable length from the profile for a specific watercraft. Using welding, weld the tubes (for attaching the rings) to the bottom of the profile.
Drill a through hole in the tubes to secure the rings using a cotter pin. In addition, a nut with a suitable diameter must be welded to the inner ring of the tube to prevent the product from being pressed against the fasteners.
It is better to install a plastic or rubber plug at the outer end to prevent moisture from getting inside.
In the upper part, an electric drill is used to make 2 holes through which the chassis is mounted on the transom.
2 finished parts of the fastening are connected by welding. The permissible angle between them is 35-45 degrees. If necessary, the ends can be trimmed.
Upon completion of all work, the chassis is mounted on the tubes and secured with washers. The product is ready. If possible, fasteners can be painted.
Drawing:
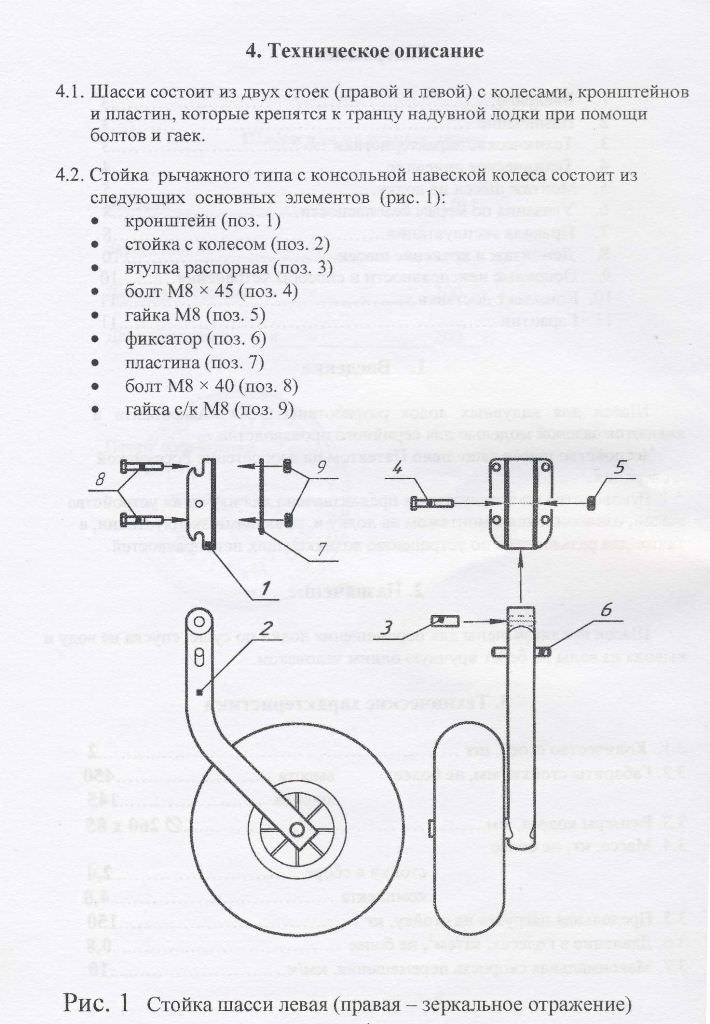
Design elements:
How to secure?
 To properly place the accessory on the transom, follow these steps:
- Fastening You need to place it on the wooden transom and draw marks along the holes. Using an electric drill, make a hole of the required diameter in the transom.
- At the next stage You will need a sheet of PCB, duralumin, aluminum of small sizes, on which similar holes are made. The prepared sheet must be attached to the inside of the transom and holes must be made as in wood.
- Install bolts more correctly, with caps on the inside of the boat.
- Wheels mounted on bolts and secured with a nut and washer.
- For easier transportation For an inflatable boat, it is more advisable to use transom wheels.
- To cut costs for the purchase finished product, you can make the product yourself.
- Fasteners must be made of stainless steel.
- Install the accessory on the transom Particular care must be taken to avoid damaging the sides of the boat and not interfering with the operation of the outboard motor.
Modern fishing is inextricably linked with the presence of a boat. It not only simplifies the fishing process, but also makes it effective. But it’s not enough to have a boat, you still need to move it to the fishing spot, which may be located at a considerable distance from home. In stores you can find special transom wheels that simplify the transportation process. It should be noted that there are various, very expensive products.
But in order not to pay extra money, you can make such wheels yourself, at home, especially since there are no particular difficulties. They are especially necessary in conditions where fishing is carried out alone, although, as a rule, fishermen go fishing in groups of several people.
Transom wheels for a PVC boat are a transport chassis that is secured using 2 brackets. With the help of these brackets, the wheels are moved to the transport position or vice versa.
The presence of transom wheels makes the boat more functional. Without outside help, it can be moved along the shore, pulled out of the water and launched into the water. Their advantage is that there is no need to remove them when launching: it is enough to move them to the appropriate position.
In the process of equipping a boat with such a device, special attention should be paid to the placement of fasteners on the transom. Their position can affect the maneuverability of the boat, both on water and on land.
The main purpose of having transom wheels comes down to:
- Simplifying the process of delivering a boat from land to water.
- Mobility of PVC boats, especially on land.
If the boat is equipped with a motor, then it is quite difficult for one person to move it. It’s not so much difficult as it is inconvenient due to its significant dimensions. The task is greatly simplified if two people fish together. If this is not possible, then transom wheels will help.
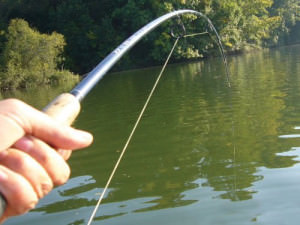
Their presence makes the fishing process especially interesting and effective. With the help of a boat, there is every chance to fish in places that cannot be reached from the shore. As a rule, fishing with a boat always means productive fishing and, as a result, a great mood.
The name of the wheels comes from the place where they are mounted - which is the transom. The transom is the rigid part of an inflatable boat where the motor is mounted. Thanks to the presence of transom wheels, one person, without assistance, will be able to move the PVC boat without much effort along the shore, as well as lower it into the water and pull it out of the water.
The main task is to securely and correctly fasten the device so that it does not fail during fishing.
Advantages and disadvantages of having transom wheels
Transom wheels installed on a PVC boat have a number of advantages. For example:
- Additional conveniences appear during operation.
- The boat acquires new technical qualities.
- The functionality of the watercraft increases.
- Transom wheels take up little space.
- Valuable time associated with moving the boat is saved.
- The mobility of the product increases.
- Simplicity of device and mounting.
- The presence of wheels does not affect the handling of the boat.
- Additional service life of the device.
The disadvantages of their presence include:
- If you buy them, they are expensive.
Making such a useful device yourself will help solve this drawback.
Types of transom wheels
Manufacturers produce several types of transport chassis. Here are the main ones.
This model has its own installation specifics. The chassis is attached to the transom in such a way that they can not be removed when transporting the boat in a folded state. This design has additional advantages related to ease of movement. When moving on water, they do not affect its maneuverability.
This chassis model allows one person to move the boat from place to place without much effort.
The main material of construction is steel, 3 mm thick. Used as wheel stands profile pipe special configuration. This allows you to quickly install the device and transfer it from the transport position to the working position.
In addition, the wheels have a spring mechanism that allows you to transport the boat over uneven surfaces.
The main material for the manufacture of such devices is stainless steel. Models are intended for inflatable boats with a rigidly fixed transom or for boats that have a rigid hull.
Advantages of automatic fixation:
- The device is made at a high technical level.
- Has high reliability.
- Features a modern design.
- Can serve as the best option when moving a boat over long distances.
- Easy to use.
In production automatic devices CT uses laser cutting followed by argon welding. The result is high accuracy, excellent quality and acceptable appearance.
These wheels can support a loaded craft weighing up to 120 kg.
The device is mounted on the outside of the transom, which allows you to easily fold the wheels from bottom to top. To fix the product, the design uses springs, which are located inside the racks and are made of stainless steel. It should be noted that the remaining parts of the folding wheels are made of stainless steel, which provides the structure with enviable strength and resistance to both fresh water (KS-03) and salt water (KS-04).
Advantages of this model:
- Easy to install, remove and operate.
- There is no need for constant removal and installation of the chassis.
- The fastening method does not interfere with the control of the vessel.
- There are packaging options available with the wheels installed. Can be installed on any model of PVC boat. Withstands loads up to 180 kg.
Swivel chassis, for PVC boats
Such designs are aimed at transporting a boat by one person over short distances. They are installed using 4 bolts to a transom made of plywood. It is possible to adjust the height of their installation due to the length of the mounting pin.
To remove the device, simply unscrew the nut, which is located on the side of the rack. The wheels are designed to move weights up to 140 kg.
The main parts are made of stainless steel, which indicates the durability of the product.
The size of the structure must match the size of the boat. The main task is to ensure that the chassis does not interfere with the maneuverability of the craft.
For manufacturing it is necessary to prepare the following materials and tools:
- A pair of wheels with a diameter of 350 mm and a width of 60-80 mm.
- Profile pipe, cross-section 25x25 mm, made of stainless steel.
- A pipe of suitable thickness for mounting the wheels.
- Fasteners: nuts, bolts, washers, etc.
- A hacksaw, electric drill, grinder, wrenches, pliers, etc.
Manufacturing stages:
- The installation location on the transom of a square profile is determined (so as not to interfere with the operation of the engine).
- Measure the distance down, paying attention to the fact that the wheels should be installed just below the lower edge of the transom, taking the radius of the wheels as a basis and adding 5 cm. This is the most optimal arrangement of the wheels, which will not affect the running capabilities of the craft.
- The bracket where the wheels are mounted can be made either at a right angle or at another angle. A right angle bracket is most preferable since its installation takes minimal time. In addition, this element is able to withstand heavy loads.
The second option is more technologically advanced, but also more optimal, since the wheels are placed under the bottom of the boat and do not interfere with the operation of the outboard motor.
To do this, 4 sections of the required length are sawn off from the profile and, using welding, they are attached to the bottom of the profile. A through hole should be drilled in the tubes so that the rings can be fixed. In addition, a nut of the required diameter is welded to the inside of the tube ring so that the product is not pressed against the fastener.
It is better to install plastic or rubber plugs on the outside to prevent water from getting inside.
In the upper part, 2 through holes should be drilled, which are provided for mounting the chassis to the transom.
The two parts of the fastening are welded together. The angle between them can be 35-45 degrees, otherwise the ends are adjusted.
After this, once all the preparatory work has been completed, the chassis is installed on the tubes and clamped with nuts and washers. So, the device is ready for use. If necessary, the structure can be painted. If the material is stainless steel, then this is not necessary.
Before going on a hike, you can take it off and throw it in the car, or you can leave it. It doesn't interfere with steering, except on sharp turns.
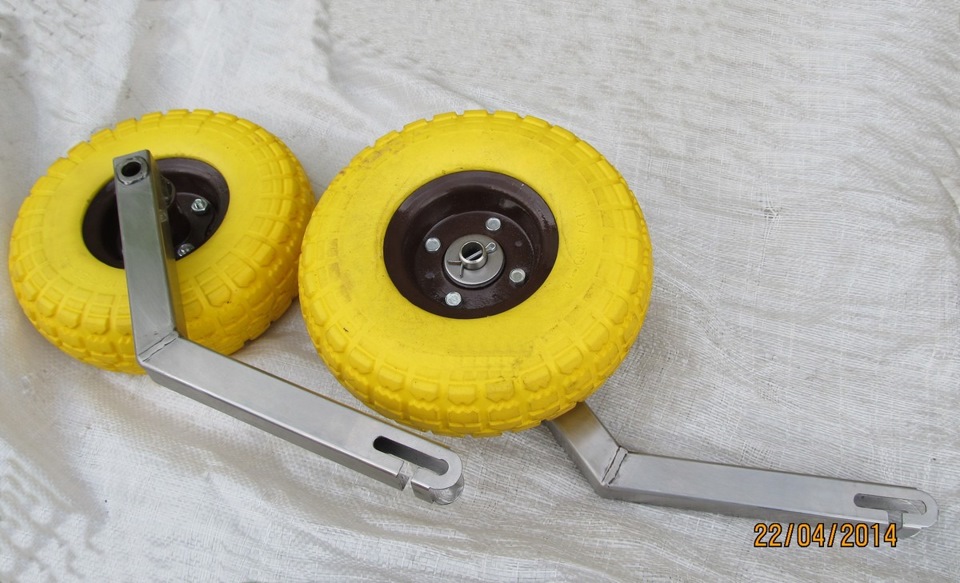
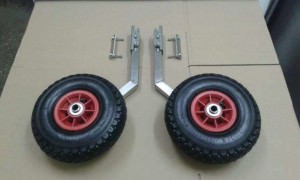
Let's call this a stand with a wheel.
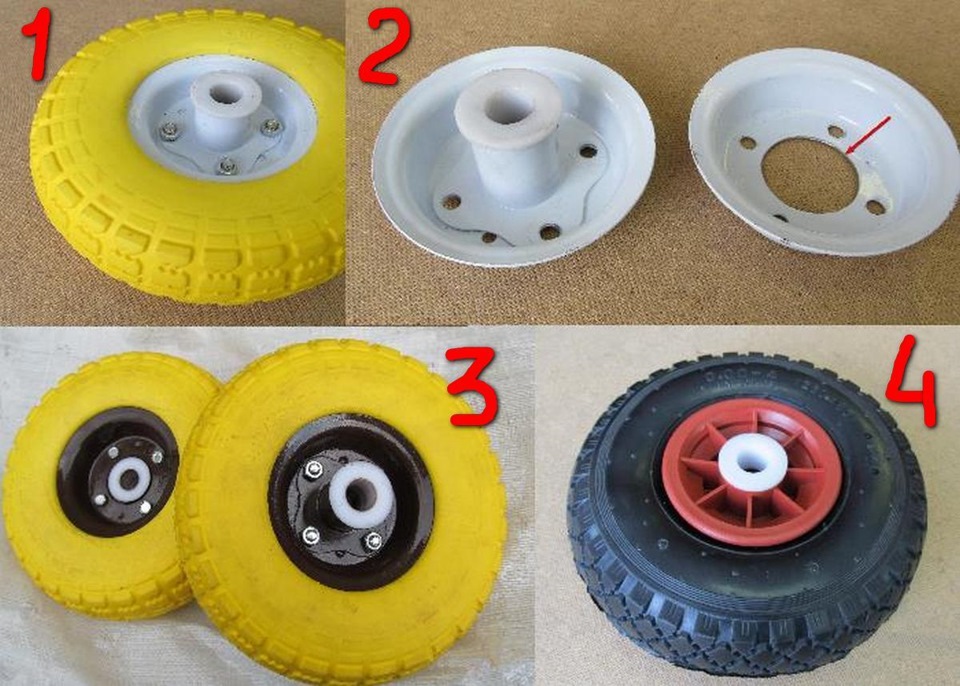
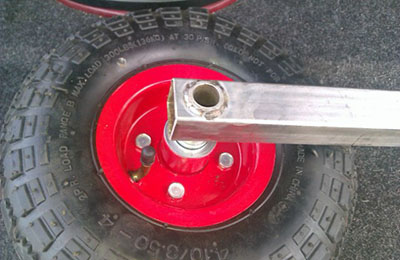
1. Capronite bushings must be pressed into place in a vice; under no circumstances should they be driven in with a hammer - they will burst. 2. One half of the rim needs to be bored out (red arrow) 3. The original paint is not great, and brown is even more beautiful. 4. Wheel with camera. Carefully knock out the bearings and install your bushings. By the way, racks with wheels do not sink, although this is a different association...
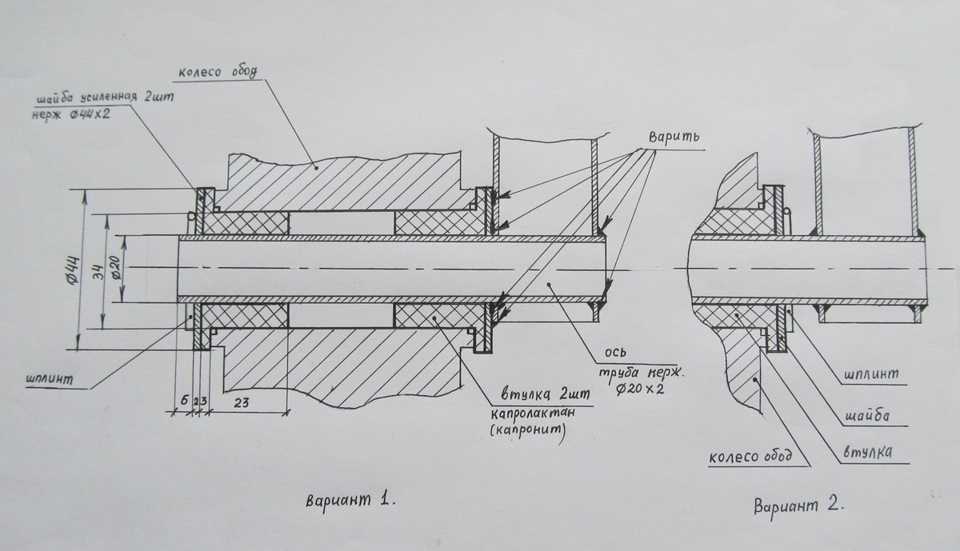
Two options for installing axles for different wheels.
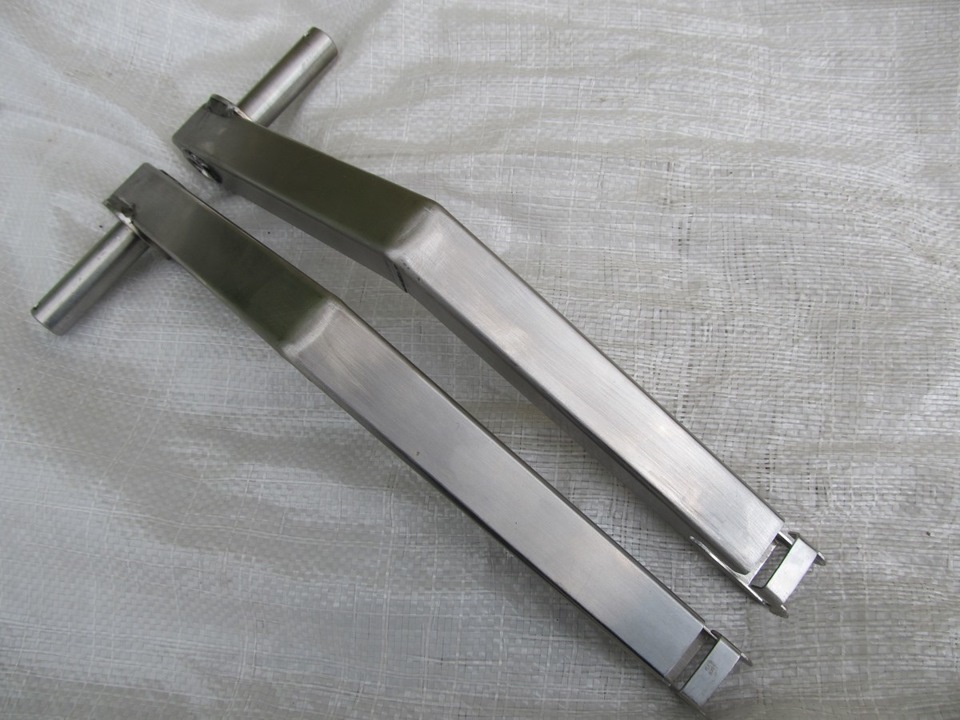
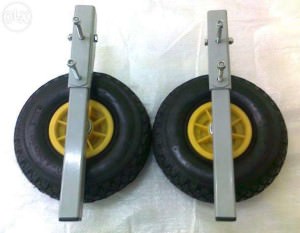
Finished racks: right and left (it is important not to confuse them)
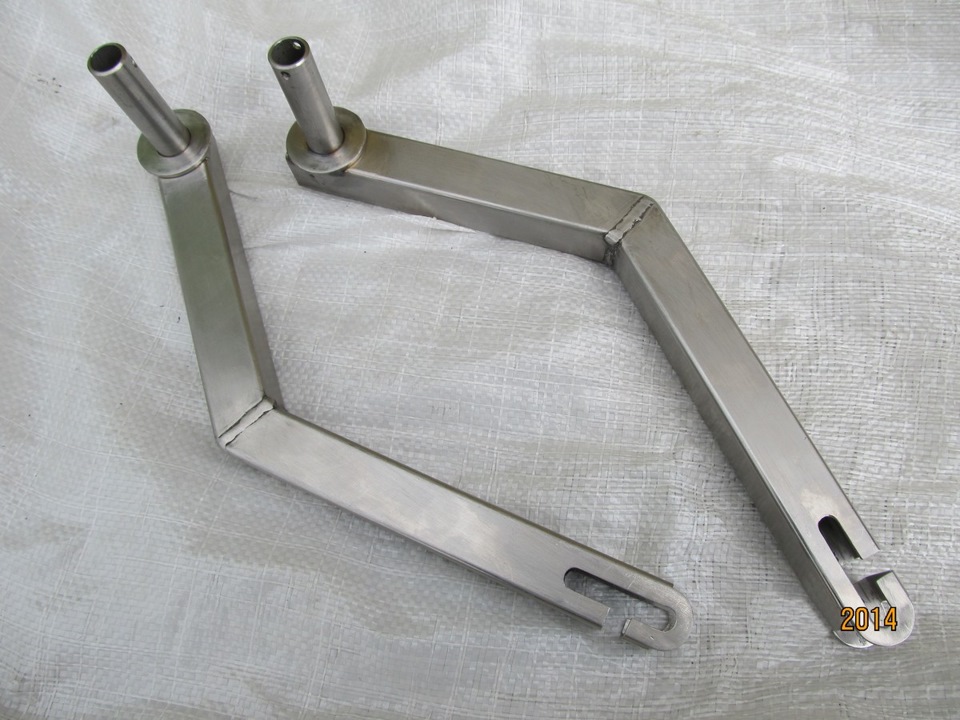
Stands included, side view.
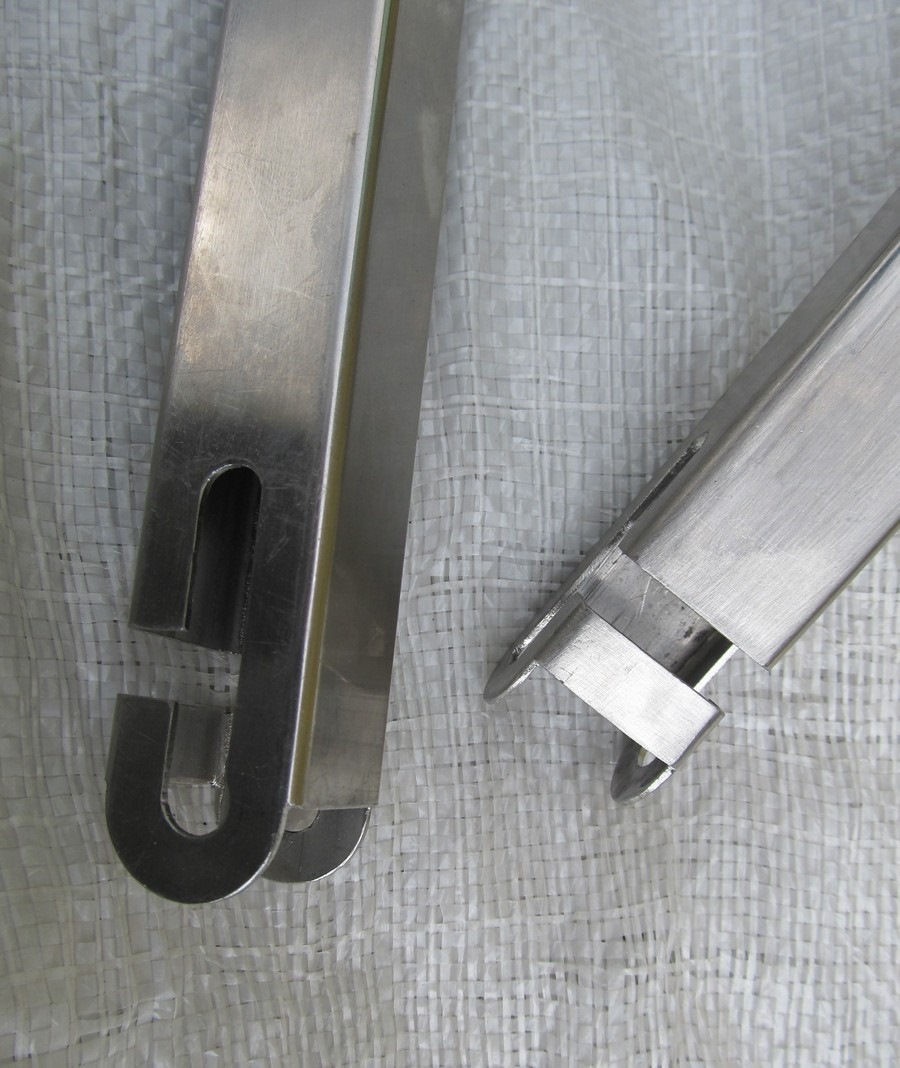
Shutter or latch. (that's what I'll call it)
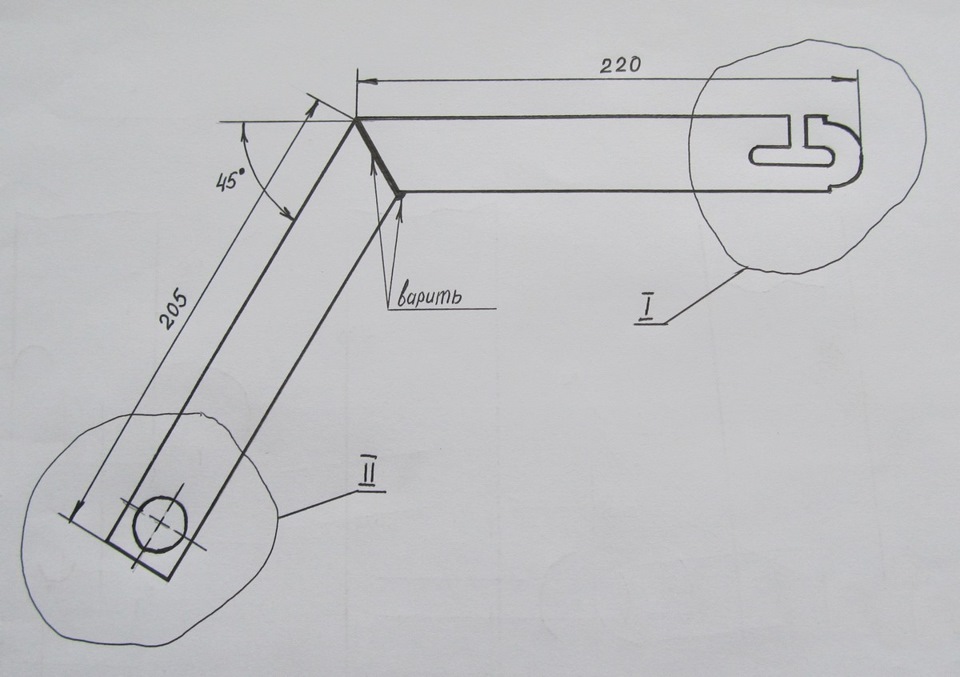
Rack drawing
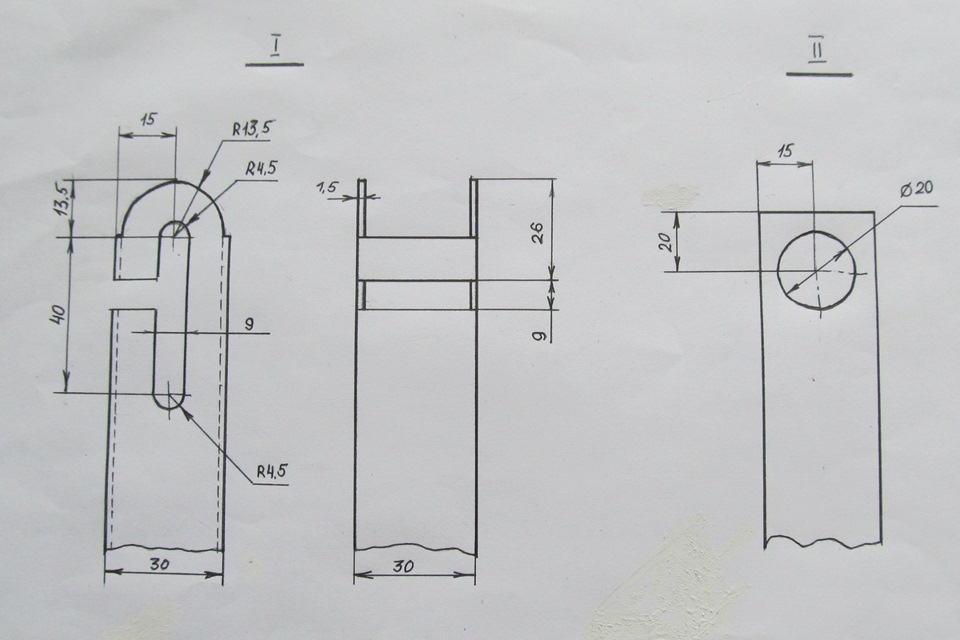
Continuation of the drawing of rack 1 - shutter. 2 - under the axle
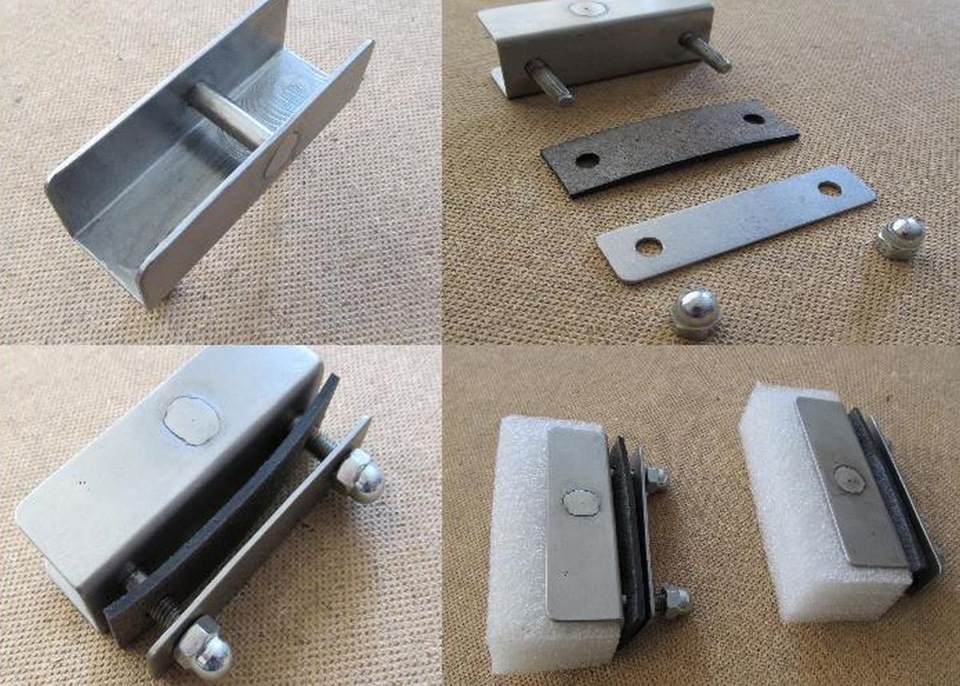
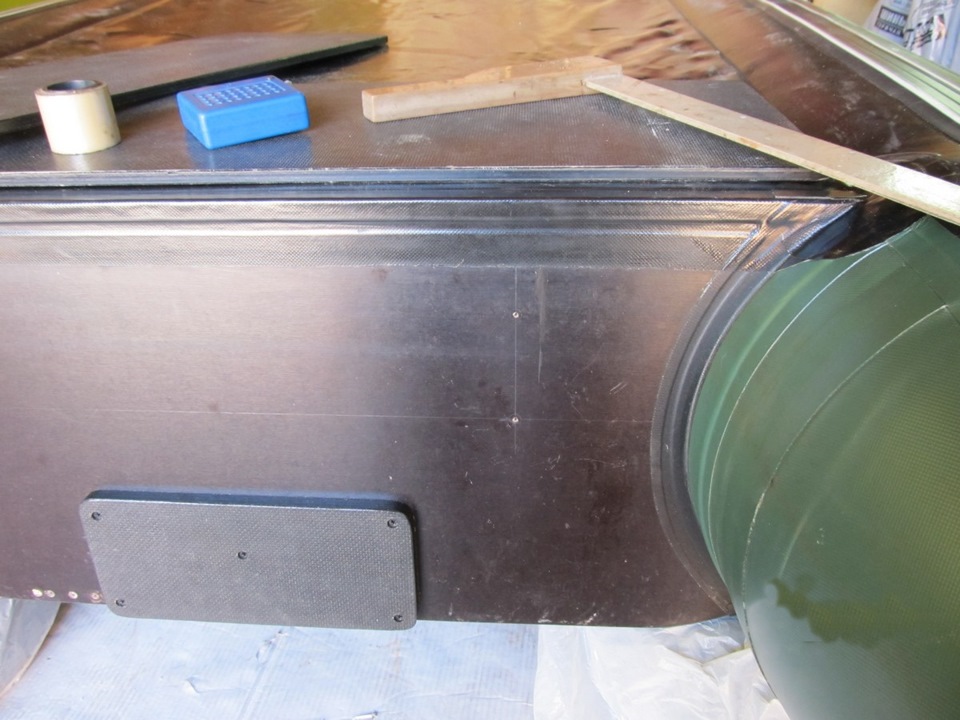
Bracket with a lock, disassembled, assembled and a plug made of foamed polyethylene (although all edges and edges are licked so as not to damage the PVC boat when folded)
![]()
Drawing of bracket, plate and rubber gasket.
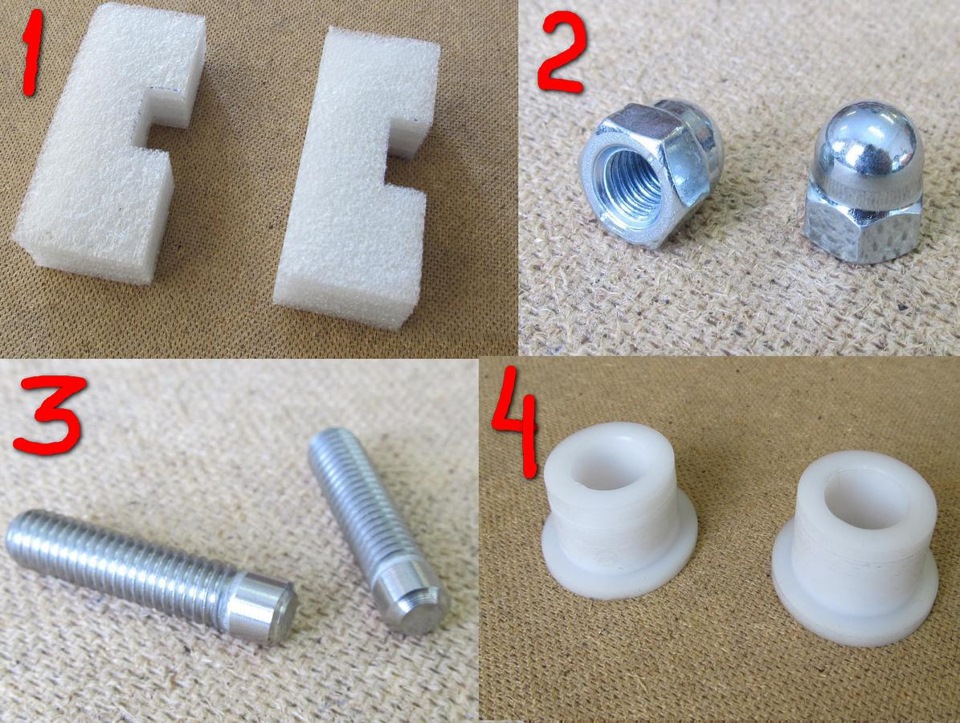
1. Bracket plug. 2. Cap nuts. 3. Bolt M8X33 mm with a ground head. 4. Capronite bushings.
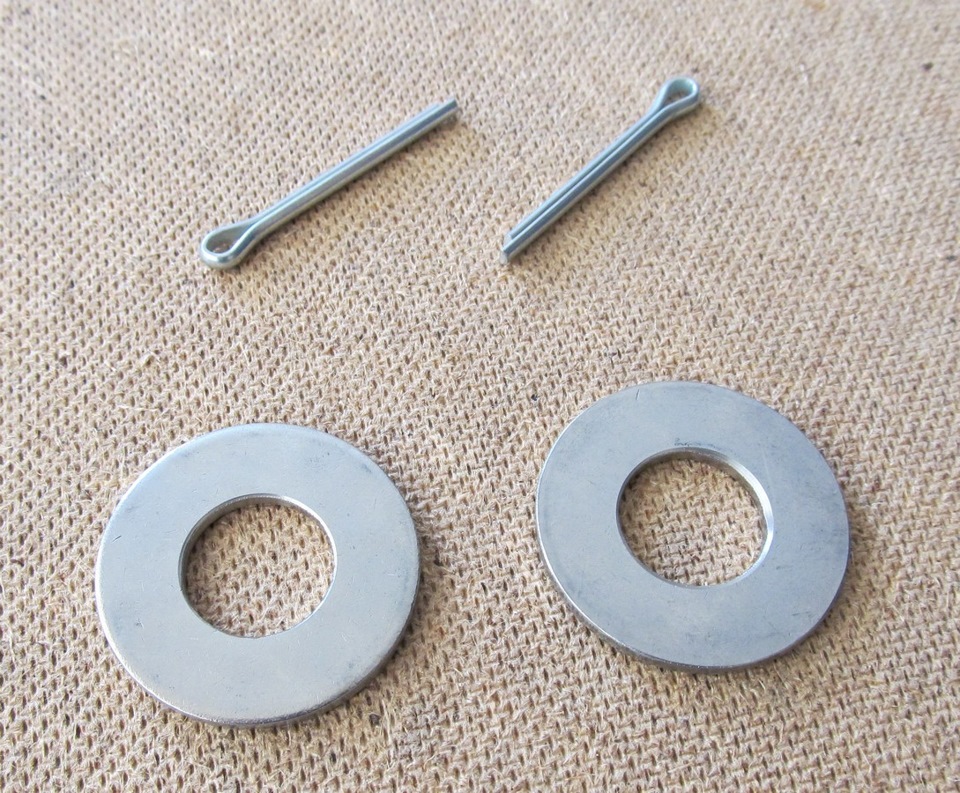
Cotter pins and reinforced washers (the inner diameter is machined to the size of the axle).
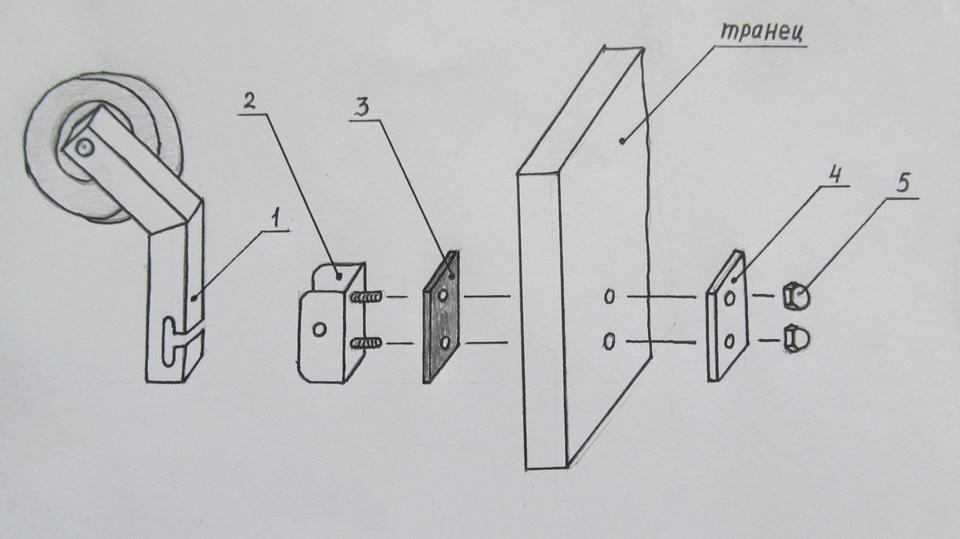
Installation drawing.
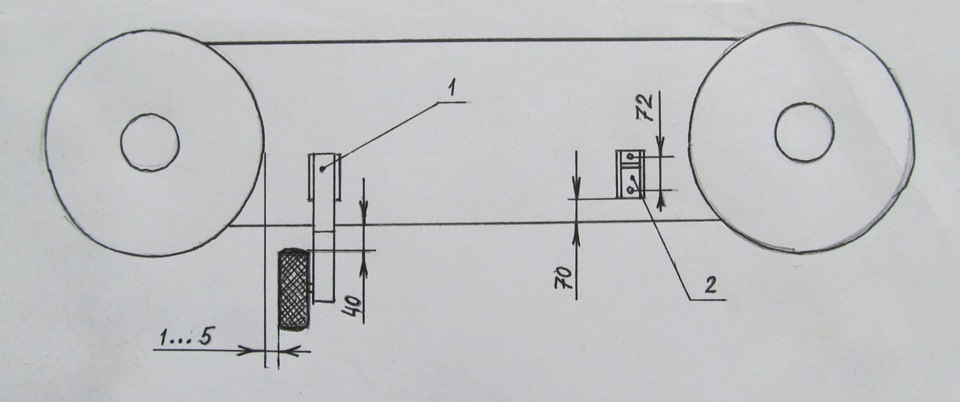
Installation drawing for transom.
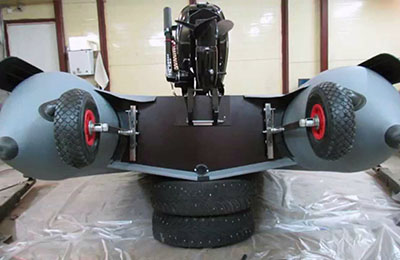
It is better to mount it upside down.
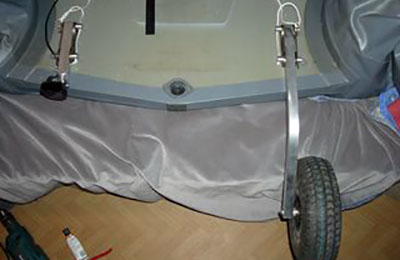
Stowed position.
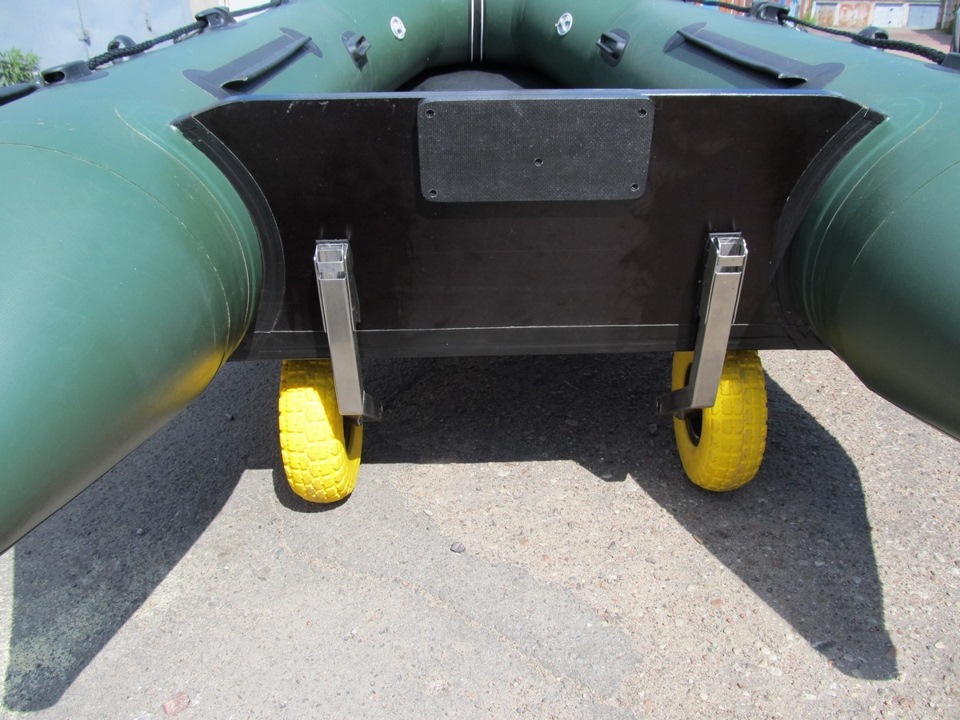
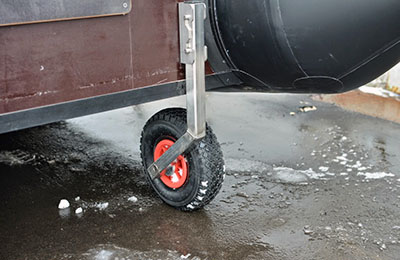
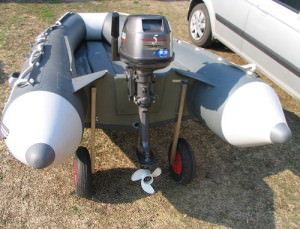
Working position.
Briefly about installation: 1. Inflate the boat and turn it over, put something under it, maybe a box. 2. Try it on to the transom, making sure that the reinforcements in the places where the transom is glued in, gussets, etc. do not interfere. 3. Make sure that the plate on the inside of the transom does not rest against the sling. 4. In the working position, the distance between the top point of the wheel and the bottom was at least 40 mm - so that the adhering soil did not rub against the bottom. 5. Set the maximum possible wheel track width, but so that the wheels do not touch the boat’s cylinders. 6. After marking the locations of future holes, mark them. drill holes in two stages: the first drill is D3mm, the second is D8mm. Do not press the drill too hard when drilling; there is no need for chips here. Place the drill strictly perpendicular to the transom. 7. Before installing the bracket, generously lubricate the bolts and holes with sealant; after tightening, remove excess sealant. ATTENTION! When tightening the nuts, do not overdo it, the brackets may become deformed, checked. 8. Install racks with wheels and check operation. How it all works is in YouTube. (tags - video, quick-release transom wheels.)
Operation: 1. Get the boat ready, inflate. 2. Connect the racks to the brackets with the wheels facing up. 3. Alternately raise the sides in the aft part and move the racks to the lower position. 4. Place the boat on its wheels and install the motor on the transom in the raised position.5. Lift the bow of the boat by the handle and guide the boat towards the water, stern first. 6.Sit in the boat, push off from the shore so that the wheels do not touch the bottom, move the racks to the upper position or remove them. 7. Lower the motor to working position. This is an approximate algorithm; during operation, adapt to yourself.
Finally, I want to offer one more homemade product, I posted it in the DIY (Do It Yourself) community, many people liked it, this is not self-promotion. It’s just that this insulated container can be quite useful when fishing, besides, not all fishermen are in the DIY (Do it yourself) community, here is a link to it: Isothermal container. The result exceeded expectations.
This is where I will finish my series of articles on Fisherman’s homemade products, there is also exclusive material on making wobblers and swimbaits, but it will be later, I don’t even know when.
Happy New Year and Merry Christmas!
Good luck, health, prosperity! NHNCH, NGNZH and smooth roads!