Buying a wooden boat is a rather expensive process that requires considerable investment. But its manufacture opens up to the creator a variety of options, shapes and style solutions in which the boat will be made; in addition, he will be able to save a little. A wooden boat made by yourself will be an excellent addition to fishing, hunting and just relaxing on the water. Let's look at how to build a wooden boat below.
Main types of boats
There are several types of materials suitable for building a boat. Among them:
- rubber-based fabric;
- plastic components;

- steel;
- tree;
- plywood.
Inflatable boats are also called fabric boats. For their manufacture, rubber or polymer compounds are used. They are unstable and do not float well on water. They crack easily and are not resistant to cold and frost. They require constant patching and are very dangerous because they get damaged at the most inopportune moment. The advantages of this type of boat are ease of transportation, compactness and ease of storage.
Plastic boats are primarily distinguished by their attractive appearance; they are produced in a wide variety of colors. In addition, if plastic boats are used correctly, they will serve their owner for decades.
Wooden boats made from planks are less durable than plastic ones. In addition, they require constant care in the form of applying moisture-repellent solutions. Some owners of wooden boats soak the device in water before using it to keep it in shape.
Wooden boats photo:

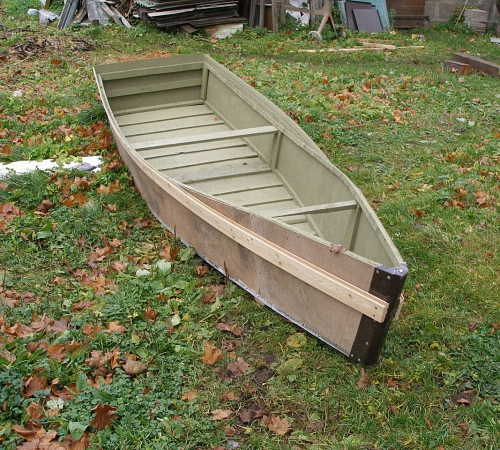
Plywood boats are the best option among wooden boats. Plywood is moisture resistant, resistant to heavy loads, strong and durable. The only drawback of plywood is the difficulty in bending it, so such boats do not have smooth lines, but are characterized by the presence of sharp corners.
For the manufacture of metal boats, duralumin is used, which has the properties of strength and resistance to wear. It is possible to use stainless steel to make a boat, but in this case, its transportation becomes impossible due to the enormous weight.
Homemade wooden boats: manufacturing features
For drawing drawings of wooden boats, there are special online programs that help calculate the dimensions of an individual part. With the help of a 3D designer, every detail of the boat is visible from all angles.
We suggest that you familiarize yourself with the equipment options for the boat of the following sizes:
- the lower length of the bow and stern is 200 and 850 cm, the upper length is 500 and 1120 mm, height is 150, 185 mm;
- dimensions of reinforcing ribs: 1st - bottom height, top and length - 830 mm, 510 mm, 295 mm;
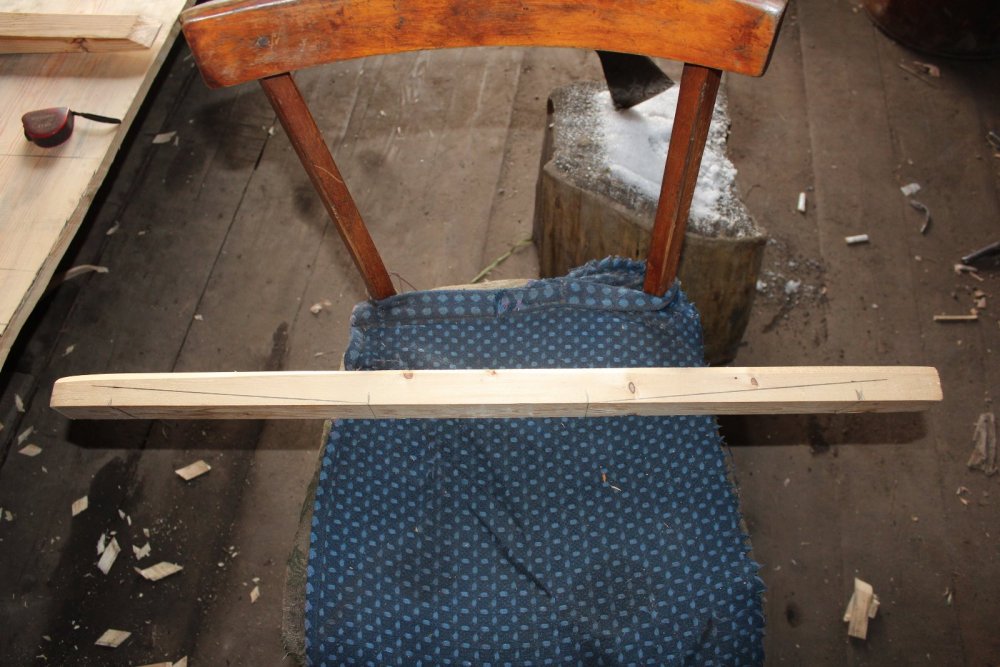
- the bead must be cut at an angle; to calculate it, it is better to use a calculator.
Advice: Before you start making a boat, study additional literature related to the number of main parts of the boat and their names.
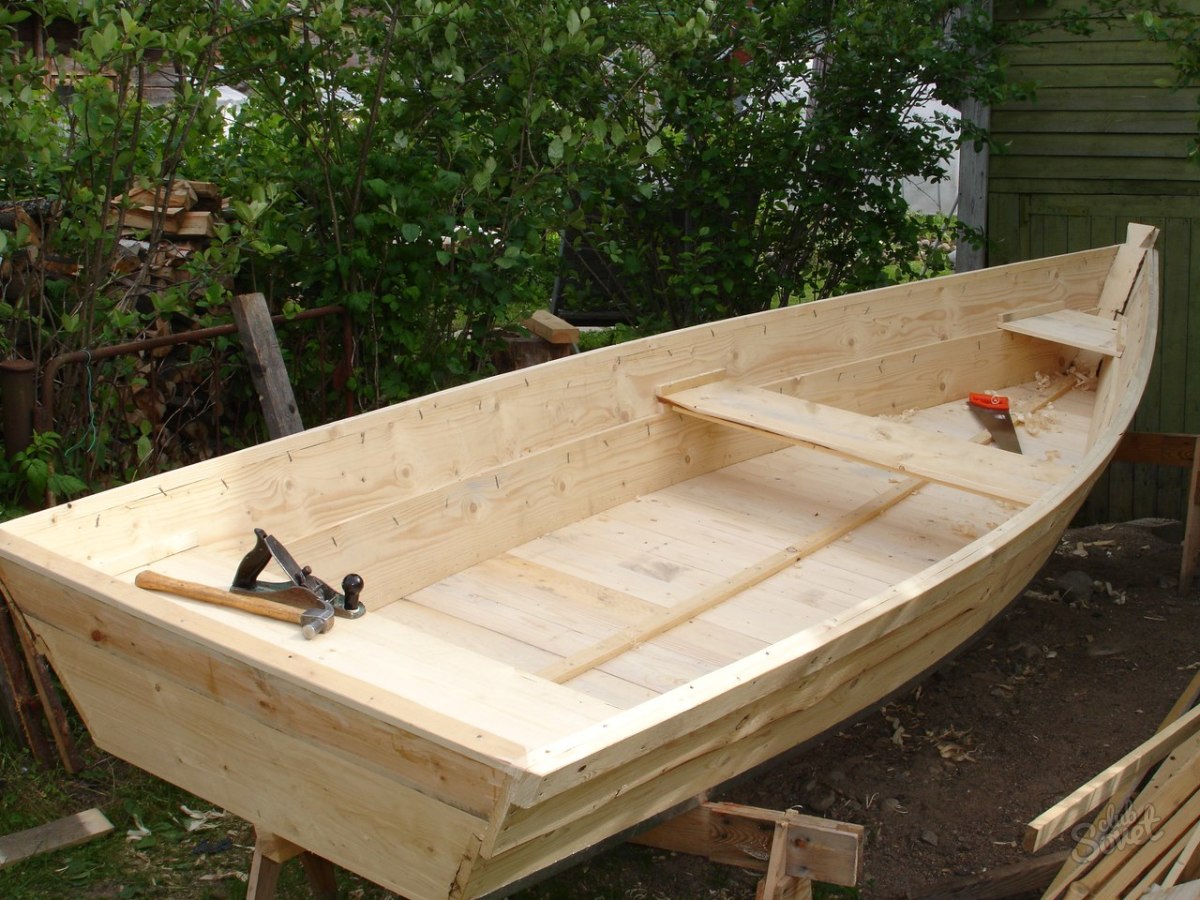
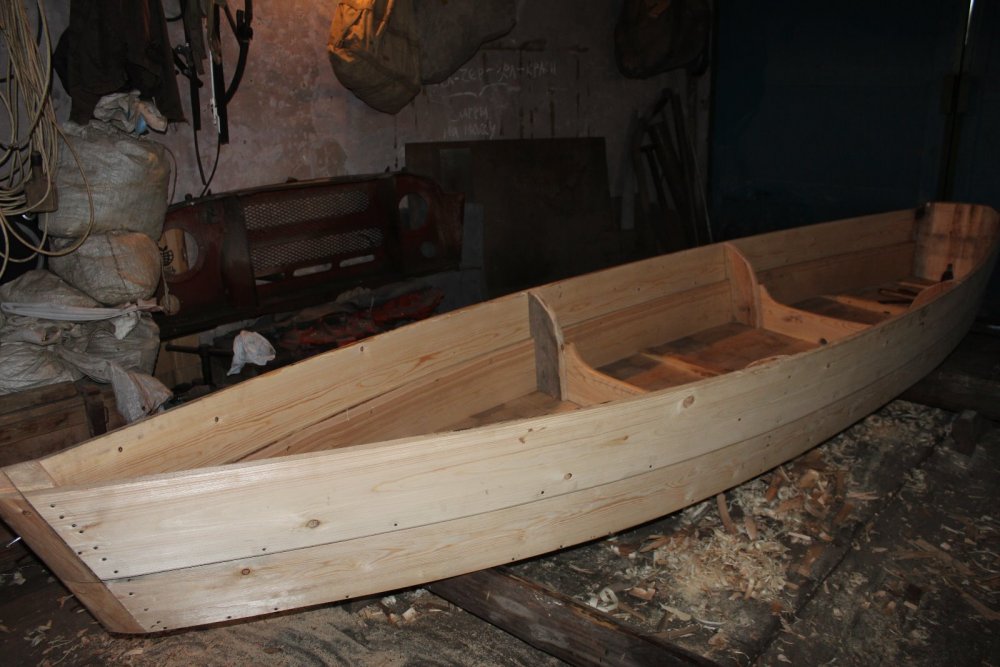
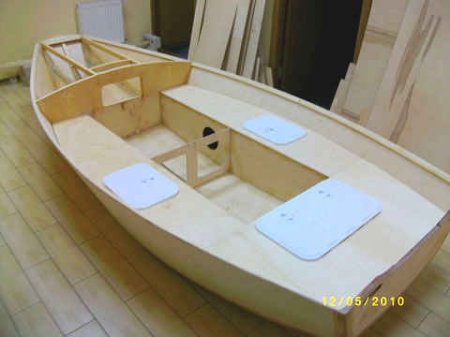
This boat is made of plywood, when purchasing which be sure to pay attention to moisture resistance. Such plywood will last several times longer and will not require additional costs for its repair and maintenance.
To make the bottom, use plywood with a thickness of 1.2 cm, and for the sides and other parts - 0.8 or 1 cm.
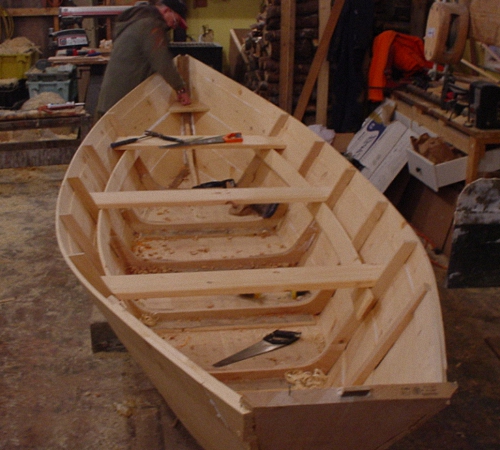
After purchasing the plywood, start making boat parts. To do this, you need to prepare special patterns. They are made on large sheets of paper, for example, on wallpaper. The shape of the pattern exactly matches the shape of the part.
Use an electric jigsaw to cut out the parts. Since the dimensions of the plywood do not allow constructing the entire bottom of the boat, it is necessary to resort to gluing it together from several parts. To do this, use EDP glue or any other adhesive solution that is resistant to moisture. The gluing procedure is carried out using overlays in the form of plywood strips, 10 cm long.
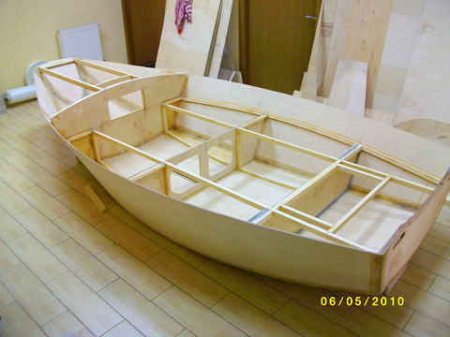
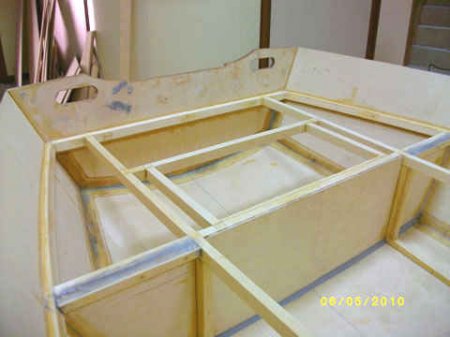
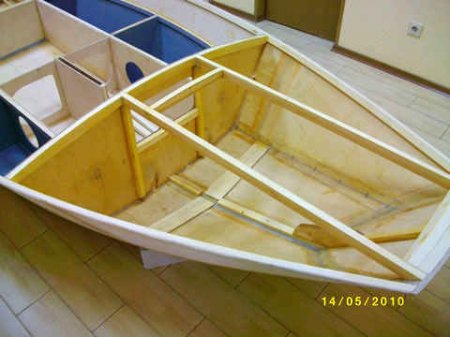
Birch beams are used to glue the internal stiffeners together. They are located inside the boat and have a certain angle of inclination. In some versions of the construction of a wooden boat, solid saddle beams are used, for gluing which two side parts are connected to a flat bench. This design allows you to significantly reduce the internal filling of the boat, and also increases the buoyancy property, even if the boat capsizes.
For beginners in boat building, the main problem is connecting several parts together, especially if it occurs at different angular inclinations. The simplest method is the so-called “stitching and gluing” method. In this case, the parts are connected to each other using wire made of steel or strong nylon thread. Before this, special holes are drilled in the edges of the parts; their diameter should not exceed four millimeters, and their location from the edge of the boat should not be more than five millimeters. When the body is connected using threads, it is time for the next process, which includes gluing all joints using fiberglass. It is fixed to the surface by impregnation with moisture-resistant glue or epoxy resin. It is recommended to carry out gluing both inside the boat and on its outer part.
Start assembling the boat hull from the side sections, which include the side, bow and stern. First, drill holes in relation to the indicated values, making sure that the drilling step is even. Tie these parts together using thread or wire. Monitor the relative position of the parts and the evenness of all corner joints. Self-tapping screws will help secure the stiffeners, and fiberglass provides additional fastening. Make sure that no air bubbles form under the fiberglass; if there are any, take care to remove them.
The bottom is attached to the body in the same way. It is necessary to glue mooring beams along the top of the sides. Its main function is to protect the boat from mechanical damage during its mooring at the pier or shore.
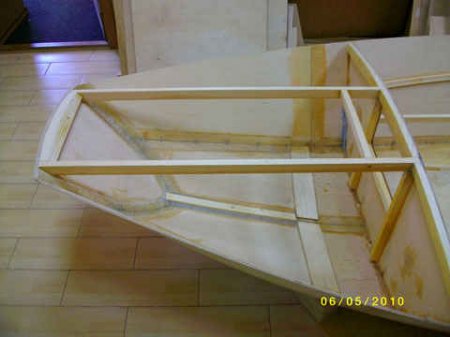
The keel is an essential element of the boat. He is responsible for the safe entry of the vessel into turns and for the stability of its side parts. Its fixation occurs along the central part of the bottom, and is installed along its central line.
To make a central keel, use not one, but a set of several slats. By additionally gluing parts into the bow or rear of the boat, its strength and stability increases.
We recommend that you take care of strengthening the transom - the rear part of the stern. After securing the main parts of the boat, it is recommended to open it with special impregnations. After they dry, proceed to testing the vessel. Transport the boat to a river or reservoir and lower it into the water; if there are no leaks, it is ready for use. It is also recommended to check the amount of cargo that it can transport. When all problems are corrected, paint the boat using oil paints. Painting must be done in several layers.
DIY wooden boat: manufacturing instructions
With the help of ordinary plywood and skillful hands you can build a good boat. The average cost of such a boat is about $20-30, which is significantly lower than purchasing alternative boats made of rubber or wood.
To make a boat of this type you will need:
- several sheets of plywood;
- polyurethane glue;
- nails;
- latex-based paints;
- silicone sealant;
- a syringe to help seal seams;
- sandpaper;
- jigsaw;
- paracord;
- clamp;
- screwdriver;
- roulette;
- drills;
- brushes for applying paint.
After preparing all the necessary tools, the process of preparing individual parts follows. To do this, the plywood sheet must be divided into three sections, which will act as the bottom and main parts. The first section is 460x610 mm, the second is 310x610 mm, the third is 610x1680 mm.
Two side panels are made in the size of 310x2440 mm. Use small blocks of 25x50x2400 mm as supports. The required number of supports is 3 pcs. To make the bow, it is recommended to use a block measuring 25x76x2400 mm. To build the body, the use of two bars 25x50x2400 mm is required. They are cut into several parts and fastened with paracord.

When all the parts have been cut, start assembling the wooden boat yourself. To carry out this process, the presence of nails and pins is necessary. Instructions for assembling a wooden boat with your own hands:
- installing the bottom and attaching the left side to it;
- fixing the stern on the left side and connecting to the bottom;
- attaching the right side to the bottom and stern;
- fixation of the nasal area.
Before fixing the boat with nails, first assemble it with glue. When the appearance of the boat satisfies its manufacturer, secure the joints with nails.
Next comes the stage of painting and polishing the finished product. After assembling the boat, begin polishing it to remove small roughness and irregularities. To do this you will need sandpaper or a sanding machine. Using silicone sealant, it is necessary to seal all the cracks formed during the assembly process. Leave the boat in an open area until it is completely dry. After a day, start painting the boat. Apply the first layer to the outer surface, and the second to the inner surface. After the paint has dried, you need to apply another layer inside the boat.
Now you should check the device during the swim. If there are minor defects, they need to be eliminated.

Wooden punt boat: main stages of manufacturing
Before studying the instructions for making wooden punt boats, let’s get acquainted with their advantages:
- minimal construction costs;
- light weight, which greatly simplifies its transportation;
- compactness - it will easily fit in the garage for the winter, and even in the trunk of a car during transportation;
- does not require special finishing or maintenance;
- easy to make with your own hands.
When choosing the length of the boat, you should take into account the number of people and cargo that will be placed on it; the interval between the optimal values for the length of a punt is from 1.8 to 3.8 m. At the same time, the width of such a boat varies from 1 to 1.5 m. The average value the height of the sides is half a meter. The weight of the boat depends on its size and is about 70 kg. The boat comfortably accommodates from one to four people.
It is possible to additionally install a motor or sail, which can simplify the operation of the boat. Let's look at how to make a wooden boat further.

1. The first stage of working on a boat is the selection of material for its construction.
To build a punt, you need two types of plywood:
- plywood with increased moisture resistance characteristics, the thickness of such material reaches two centimeters, this type of plywood is based on the use of an adhesive base, please note that it contains harmful substances, therefore it is not recommended to use it in residential premises, as an alternative we recommend purchasing multi-layer plywood laminated type, it is safer for health;
- five-layer aviation plywood - light in weight but highly durable; seats and transom are made from it.
There are certain rules for working with the material that underlies the construction of a punt, namely:
- to cut the material into parts, use a disk plate;
- if the thickness of the plywood does not exceed one centimeter, a stationery knife is enough to cut it;
- with a thickness of two to six centimeters, the best option is to use a jigsaw;
- It is not recommended to cut plywood across the grain, as there is a risk of cracks; if necessary, in this type of cutting, place weakening strips on the top layer of veneer;
- when arranging popular types of wooden boats, the parts are connected to each other using wire, self-tapping screws or epoxy resin; when fixing using self-tapping screws, you cannot drive them into the surface of the plywood, as this will damage it; it is recommended to first drill a hole of the appropriate diameter, and then install a self-tapping screw;
- if it is necessary to arrange a boat with curved shapes, you need to wet the plywood, bend it into the desired position and fix it until it dries completely, the duration of the procedure is about 15 hours;
- in the process of gluing parts, pay attention to the glue packaging; it contains general recommendations for drying it and working rules, which include cleaning, degreasing and treating the surface with glue;
- pay attention to the arrangement of fibers on the surface of two plywood parts; when they are parallel, the reliability of fastening increases several times;
- when plywood delaminates during the work, it is recommended to glue it; for this, a paper sheet soaked in glue is placed between the delaminated layers; such plywood is not suitable for building a boat, since it is defective.
2. The next stage involves choosing the optimal tool for the work. An electric saw or jigsaw will help you cut the material. Using an electric planer you can make the required bevel angle. It is allowed to use any electrical or mechanical tools for grinding. Using a screwdriver, install self-tapping screws and make holes for them.
3. The most optimal place to work is above the boat, since large parts will not fit on the table. Place the plywood sheet on the floor surface and transfer the pieces onto the surface using a square.
Tip: To significantly save material, you should make a preliminary sketch of the boat on paper. Experts recommend, if possible, building an exact copy of the boat from cardboard in order to have an idea of its original appearance.
There will be two options for making the boat. The first involves installing vertical sides that have straight lines. The second - classic option - is to install slightly narrowed sides. To make them, you will need to do some embedding. To do this, it is recommended to use an electric plane. Walk it over the surface of the parts once. Next, repeat the procedure using any grinding tool. If there are rods or other jumpers in the fender that increase rigidity, they are cut out at this stage.
Tip: To make assembly easier, use plastic cable ties. They become almost invisible after the boat is finished with epoxy resin.
When the frame is assembled, proceed to connecting the bottom. Its fixation is carried out with clamps or the same metal wire. Please note that the bottom must be properly sealed; for this it is filled with resin. If you use fiberglass lining, leaks cannot be avoided.
When all joints are dry, proceed to the next treatment. It includes sanding the seams. Next, the joints are covered with fiberglass coated with epoxy resin. The outer part is glued twice, and the inner part once.

4. Installation of additional components.
If it is necessary to install a sail, the vessel must be additionally strengthened, thereby increasing its stability. It is better to do this with the help of a centerboard. to make it you will need plywood 0.6 cm thick. In addition, the steering wheel is cut from this plywood. The number of centerboards depends on the size of the boat. The best option is to install two centerboards at the outermost parts of the vessel. The rudder is attached to the boat with several hinges, preferably of a non-removable nature.
A wooden boat is not a cheap pleasure. But if you are willing to work hard, you can create your own river transport with your own hands, saving a decent amount.
Prepare a diagram or drawing indicating dimensions. Perhaps, in your browser’s search engine for the query “wooden boat diagram”, among the proposed options you will find a suitable one, otherwise you will have to either combine the found options, or calculate it yourself, or seek help from a specialist. Based on the drawing, clearly determine the amount of materials needed. For the sides, choose high-quality pine or spruce boards - wide and long, without knots or cracks. Before building a boat, these boards must lie for a year on a flat, dry surface under pressure. Immediately before work, carefully inspect each board for defects. Start creating the bow of the boat:- Measure the required length of the board, saw off the edge on the nose side at an angle of 45°, and plan it. Bevel the sawn edges so that when you press, there is no gap between these boards. Coat these ends with a protective antiseptic.
- Make the base of the “bow” of the boat - a triangular block (its length is one and a half times the height of the boat). The block must be planed and treated with an antiseptic.
- Assemble the “bow” of the boat: lubricate the two sides and the base block with wood glue, firmly fasten them with nails or self-tapping screws.
- File off any excess excess at the top and bottom.

- Install the spacer in the right place, helpers slowly bend the side boards using a rope, and you apply the edges of the boards to the back board blank and make marks on them where and how long to chamfer so that all parts are connected without gaps, then remove the chamfer and try it on again. Adjust it several times to eliminate any gaps.
- Treat the joints with an antiseptic, fasten the sides with wood glue, as well as nails or screws.
- Saw off the excess at the bottom of the rear side, shape its top (arc, triangle, trapezoid, straight).
- Install permanent braces and seats. Before fastening them, you need to make holes in the sides with a small drill, this will prevent cracks from appearing.

- For the bottom you will need a galvanized sheet. Place the boat bottom down on it, circle with a marker with a margin of 1.5 cm and cut out with metal scissors.
- Turn the boat upside down, chamfer the sides and spacers on the side adjacent to the bottom. Treat the edges with an antiseptic. Wait for the impregnation and wood glue to dry.
- Apply silicone sealant continuously to the underside of the sides, lay special threads or tow on it in two rows, this will protect against leakage.
- Lay and level the cut metal blank of the bottom and attach it with galvanized self-tapping screws with a press washer or nails (1.8x32), moving from the middle of the boat to the edges.
- In places where the metal protrudes more than 5 mm, trim off the excess. Tap along the entire perimeter with a hammer, bending the sheet onto the side. Also protect the bow of a homemade boat with tin, having previously treated it with sealant and laid the thread.

This is not the only option for creating a wooden boat with your own hands, however, the entire operating principle and features of creating a floating craft are revealed here.
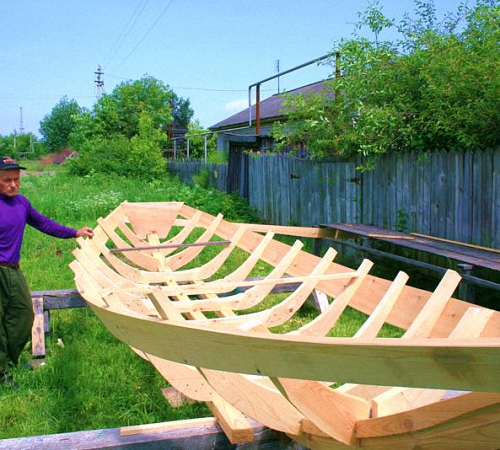
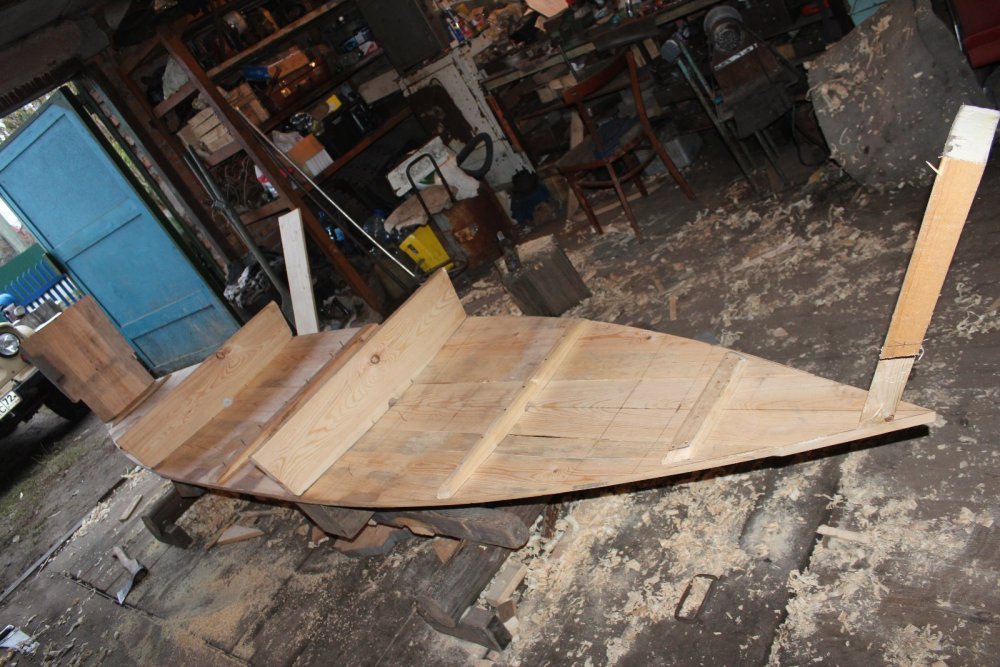
I have long wanted to create a record marking the main points in the manufacture of a boat, but it never worked out! Dad is getting older every year, but there are still no cheat sheets, although he and I have put together more than one pair of boats... And this year there was a need to expand our fleet, because the children are growing up and boats are required that are more stable and load-bearing, for reliability movement. I myself used to swim to the surface, but with my sons I have to be careful about this! The time has come to take out the previously stored boards, edge them, plan them, prepare nails, and one weekend we get down to business! (It’s better to use spruce boards, without knots, but you don’t always have what you need)
First of all, Dad sketched out a small drawing with dimensions, based on the requirements and previous construction projects
Then they laid out the boards for the bottom, drew a contour on them according to the dimensions, cut out the main parts with a jigsaw, leaving only the edges, this can be seen in the photographs.
When adjusting the boards to one another, we leave gaps in the stern and in the bow, but in the middle we fit them more or less tightly
When all the parts are prepared, we begin assembling the bottom, first tightly assembling the boards, sewing them with nails in the middle with a cross member, then using a rope and two crowbars we pull together the stern, sew them together with nails, and do the same with the bow
Due to the fact that the crossbars are rounded, and gaps were left between the boards in the bow and stern, when screeding and assembling, the bottom turns out to be a bit of a sphere both across and along its length. In the future, this gives the boat stability on the water. It is not necessary to adjust and tighten the bottom boards to microns, small cracks are quite acceptable, this will make it easier to caulk the bottom.
When the bottom is assembled, we line out the edges according to the planned dimensions and markings so that the edges are smooth, otherwise it will not be possible to bend the side boards clearly
The most interesting thing is ahead, you need to bend the sides at the same time on both sides, if bending one by one can warp and the boat will turn out to be skewed. We apply the side board to the bow on one side and sew it on, then do the same on the other side, then one presses it, bending the boards, the second pierces it with nails towards the stern.
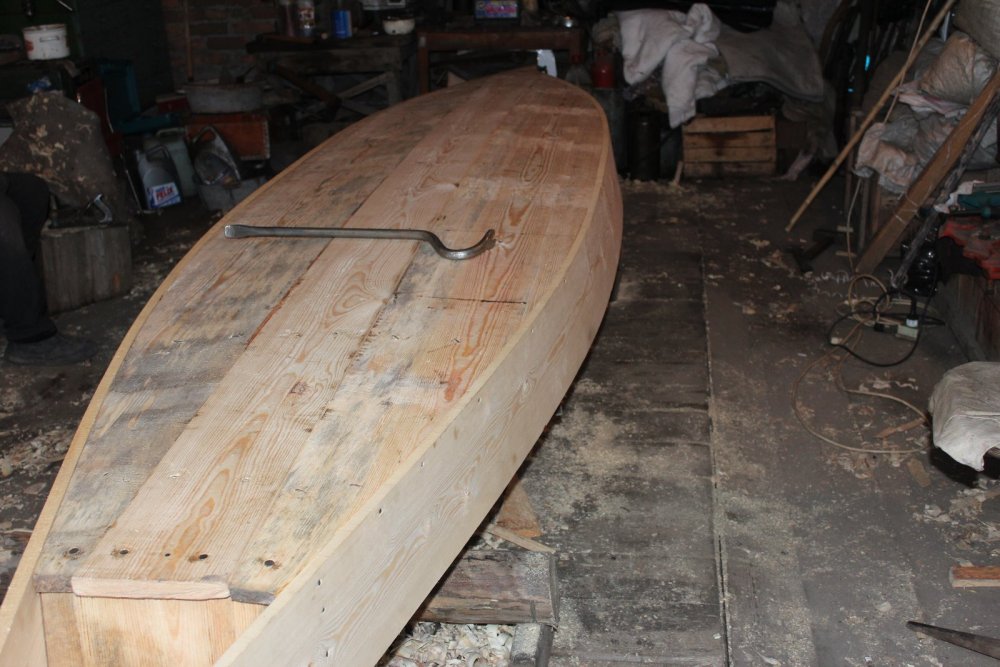
The boards were tied together in the same way as the bottom - with a rope. As a result, some kind of shape was drawn, then it’s easier. We bend the second row of side boards in the same way. We don’t hit a lot of nails when stitching because we still have to caulk! Next, we saw off the excess ends of the boards, both the side boards and the bow and stern. Then you adjust the front bow board.
After completing the assembly, you work with a plane, rounding where necessary, leveling it, going through the entire longboat, cutting out the frames beautifully. After making it beautiful, we caulk it, add nails in places, screw the rowlocks, resin the bottom, nail the strips to the bottom, resin them, then paint. We also make seats and paint them as you like. Our oars are transferable, we change boats, but the oars are the same. The oarlocks on all our boats are the same, so there are no problems.
In principle, I tried to take into account all the stages and subtleties in the photograph, so that it was clear. Two boats have now been put together, one for the opening, the second just recently. The boats were made identically, one was tested, the second was at the stage of completion of work.
If anyone has any questions, please ask, I’ll be sure to clarify! It’s true that questions usually arise when making things yourself, wondering if someone will take it and make a piece of wood. For those who live near the lake, a piece of wood is irreplaceable!
Thank you for your attention!
Drawings and photos


![]()
![]()


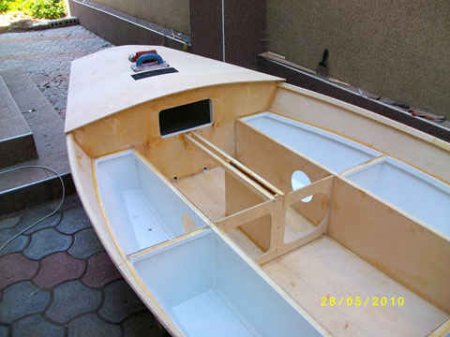
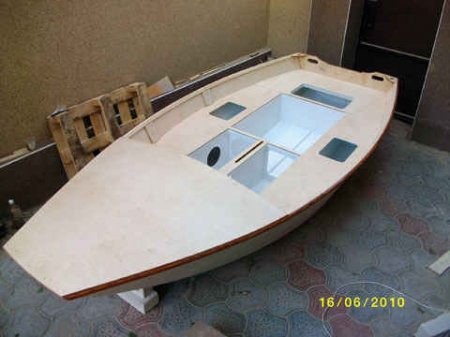
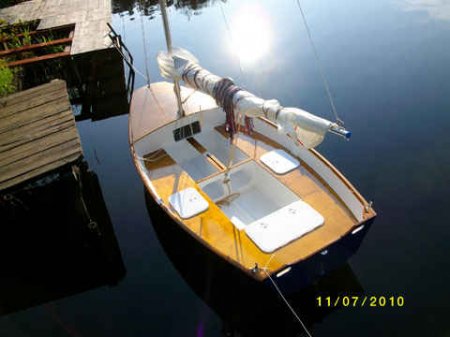
DIY plywood boat. How to make a boat from plywood. DIY boat. How to make a boat with your own hands. How to make a boat from plywood. And then an interesting idea came to me: shouldn’t I make a boat myself? Well, that’s basically something for everyone to decide for themselves. But I liked the idea. And I came across several sites on this topic. It was on one of them that I found an interesting constructor. A certain “WORKLOG” for the production of a small, but quite real boat.
Material - FSF plywood 6mm, 10mm, covered with fiberglass.
The seams are glued with epoxy glue and reinforced with glass tape.
The plywood is impregnated with the antiseptic composition against rotting and fungus "BIOSTOP".
The boat is coated with 2-component epoxy primer and painted blue.
The lower part of the hull is painted white, the cans (seats) and deck are varnished, the hatches are made in Italy (sealed, with a rubber seal, mounted on silicone and stainless steel fasteners).
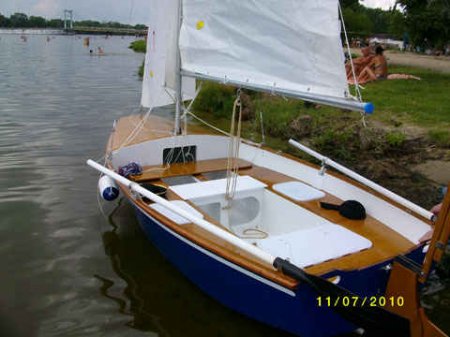
The mast is made from AMG6 45mm pipe, the sails (mainsail and staysail with a total area of 7.5 square meters) are made in the sailing workshop UA-SAIL, the mast stays are made from cable with a diameter of 3mm, oarlocks, under oarlocks, cleats, etc.
Length 3.37m
Width 1.53m
Side height at midship 0.5m
Freeboard height 0.37m
Hull draft 0.13m
Draft with centerboard 0.8m
Sailing rig 7.5 sq.m.: mainsail 5.5 sq.m., staysail 2 sq.m., possible installation of a spinnaker 5 sq.m.
Load capacity 230kg for use with sails, and 400kg for oars or motorized
Maximum outboard engine power 5 hp.
The estimated weight of the dinghy when fully armed is 85-90 kg.
The body blanks were cut from FSF 6mm plywood. Frames and forespigel made of 10 mm FSF plywood. Transom made of 2 layers of 10mm FSF plywood. The bottom blanks were glued together using overlay strips. The outside seam is taped with fiberglass.
The side blanks were glued end-to-end using fiberglass: on the outside in 2 layers, on the inside in one layer.
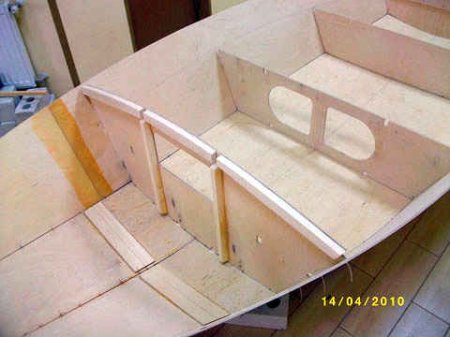
The case was assembled using copper clips with a diameter of 2 mm. The seams on the outside are taped with 60mm glass tape using CDA-HD epoxy glue.
The bottom along the keel line is glued in three layers: two layers of fiberglass with each overlapped by 2 cm and one layer of glass tape.
Under the glass tape you can see the stainless steel screws with which the transom was additionally secured.

The side stringers were glued on. They were fastened with screws, which were removed after polymerization of the glue, and the holes were filled with putty made of epoxy glue and Aerosil.
From the inside, in the bow, the forespigel and the bottom along the keel are glued with 2 layers of fiberglass and one layer of glass tape.
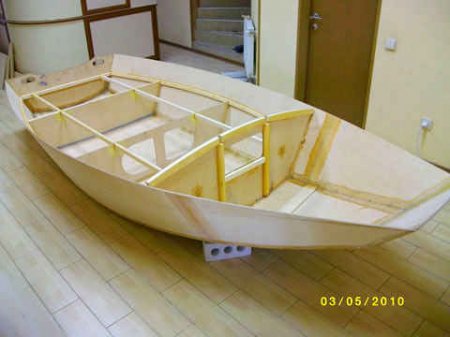
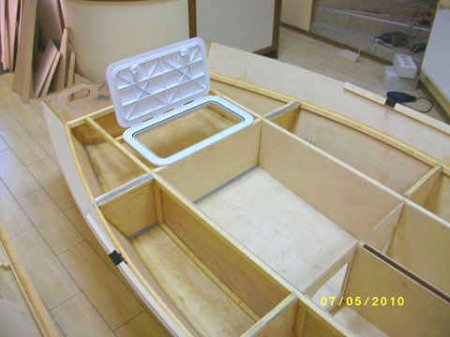
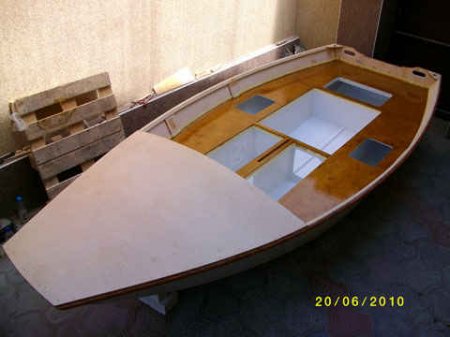
It was decided to sheathe the cans completely to make the dinghy unsinkable when capsized. For this purpose I ordered plastic sealed hatches.
Therefore, I had to glue a stinger on the bottom, and side strips on the frames.


The side cans are coated with epoxy primer.

All compartments that will be closed were painted in two layers.

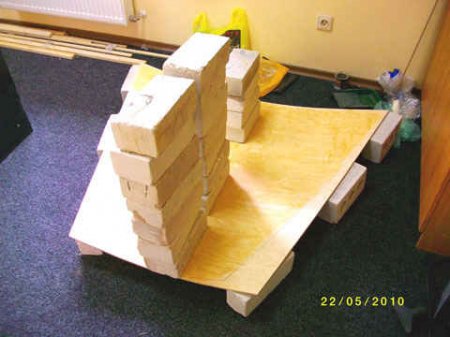
The front deck, pre-cut to excess, was placed on brick linings, moistened with water with a roller, a weight was placed on top and heated with a hairdryer in order to have a curved appearance. This will make it easier to install it on the case.
It was decided to lay the fabric from one side to the other, overlapping the bottom - I didn’t want to spoil the excess fabric. The necessary pieces of fabric were cut off, taking into account the overlap of the subsequent layer on the previous one. Although the fabric contained a direct silane lubricant, I annealed it with an industrial hair dryer for better impregnation. This was not done in vain; you will see the result of pasting with such a fabric, devoid of any lubricant, below.

The epoxy adhesive was applied using a low nap roller. This allows you to apply glue to a large surface quickly and evenly. Never apply too much glue in the hope that it will saturate the fiberglass and the excess will come out. Otherwise, you will get a wavy surface, which will cause a lot of trouble with puttying.
After gluing each strip, the fabric was smoothed with a wide spatula. After finishing the pasting and waiting a couple more hours until the epoxy began to polymerize, a layer of epoxy glue was applied to the pasted surface using a roller. The surface took on a more or less even shape. It took 7 hours to paste the body. With an assistant, things would move faster.

The next day, having removed obvious defects (protruding threads, moss along the edges of the fabric) using the scraping method, I began to putty the body. In general, you can talk a lot about puttying fiberglass, but there is one unshakable rule - puttying fiberglass does not mean removing irregularities, otherwise you will remove the fiberglass or damage its base (was it worth bothering with pasting at all?), but filling the recesses and depressions with putty.
This is where they remember that they put a lot of glue under the fiberglass and initially made the surface wavy like the sea. The more carefully you perform the pasting, the less headache with puttying. Experience comes with practice. and the surface after my pasting requires 2-3 thin layers of putty. The photo shows that the surface with putty made of Aerosil and epoxy resin applied in one layer is quite smooth and even.
For gluing, a modified CDA-HD epoxy resin was used with a long polymerization period and low heat generation during this process, which allows mixing large volumes without the risk of resin boiling.

Since we have to make kits for building a boat ourselves and in order to avoid dust in the room, cleaning the hull after each puttying, it was decided to take the hull out into the yard under a canopy. With the help of comrades and under the strict guidance of your humble servant, the body was brought into the light of day. It was sanded with sandpaper and puttied a second time. I was pleased with the result. Tomorrow I will decide whether it will be necessary to putty a third time, or whether only certain places require puttying.
I decided that two layers of putty would be enough. The body was sanded with #60 sandpaper. These tools were used for the job. No grinding machines can replace manual labor in terms of the quality of the final result. I spent two days cleaning the hull to an eggshell state.
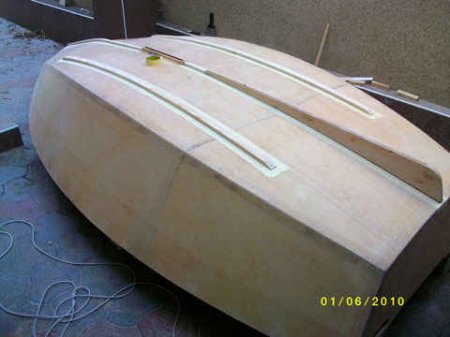
The deck was adjusted to size. Pre-bending the plywood made this work easier - for adjustment, I fixed it with only three screws, one at the front and two at the back corners. Excess plywood was removed with a belt sander.
On the bottom, along the keel line, slats were prepared and glued. This will give additional rigidity to the bottom and will provide a place to attach the bottom steps.

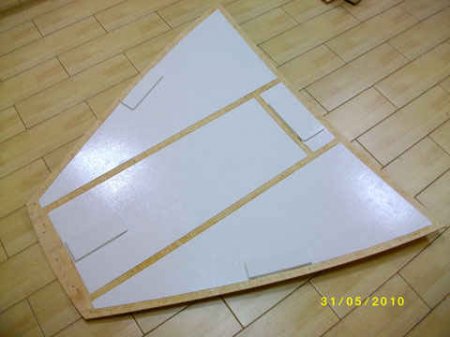
Reinforcements made of 10 mm plywood were glued to the lower part of the deck to accommodate the cleats, mast and stays. The areas where the glue will be applied were sealed with masking tape. The deck was impregnated with BIOSTOP antiseptic, after drying it was painted in two layers.
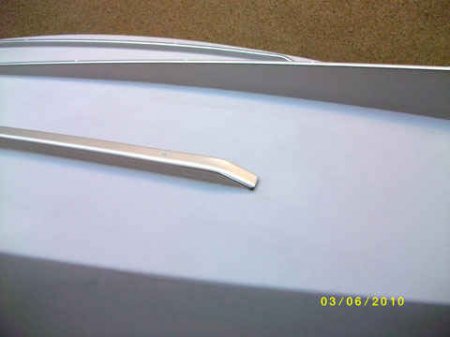
The bottom steps and keel were manufactured and adjusted to size.
Holes were previously made for fixing with screws for gluing. A 20x15mm rail was used for the central redan, and 30x15mm for the side ones. These dimensions are due to the fact that the keel was made of 10mm plywood, glued in half (20mm). In the future, to protect the slats from abrasion, aluminum thresholds 20mm and 30mm wide, which are used for fastening carpets and linoleum, will be screwed onto them. Construction stores have a wide variety of such profiles.
The work area where the epoxy glue will be applied was covered with masking tape. Don’t be too lazy to do this every time you work with glue - this will save you the tedious cleaning of glue residue and save time.

As you can see, the gluing area does not require further processing, and the adhesive seam looks very aesthetically pleasing. Tomorrow the screws will be removed and the holes will be filled with a mixture of epoxy resin and aerosil.

Today, aluminum profiles were purchased at the nearest building materials store to protect the bottom rails from wear. After 2 hours of work, the profile was adjusted to the required size and bent at the edges in the form of runners. I also decided to additionally protect the centerboard well, so I had to glue strips to it, on which protective strips would also be attached.
Having completed the priming and sanding of the hull, the hull was re-edged and the deck was glued in place. Fixation was carried out with stainless steel screws. The screw heads were puttied with a mixture of epoxy resin and Aerosil. Since we plan to varnish the deck, we had to limit the places where we putty the screw heads with masking tape.

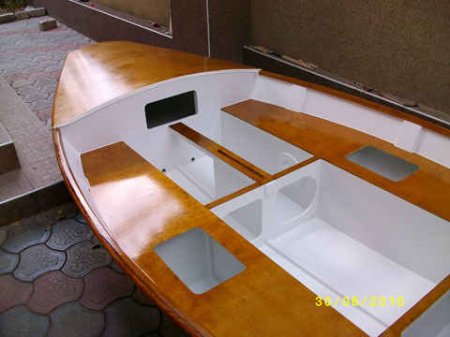
In the 9 days since the last photos, the boat has acquired some new features. As you can see, the fender beam, overlay strips on the centerboard well and the middle frame were glued in, the cockpit was soaked in antiseptic, primed and painted in 3 layers. The cans were sanded with 250-grit sandpaper to apply the stain and varnish. I decided on oak. Samples of this tone look quite decent, but doubts have crept in about what color to paint the body. Initially I planned to paint it white, but after thinking about the fact that the boat should have an elegant and attractive appearance, I am more and more inclined to paint the hull blue and the bottom white. This color scheme will give a contrast between the blue hull of the boat, the white cockpit, the banks and the varnished front deck.

The cans were given two coats of oak-toned stain and three coats of polyurethane varnish.
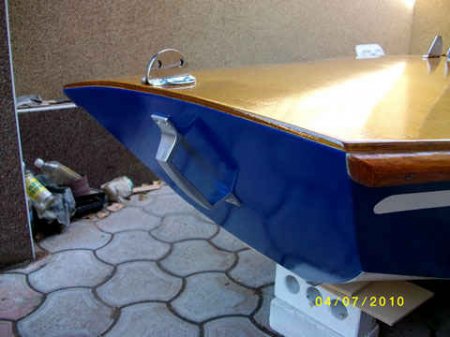
The bottom along the chine line was covered with paper masking tape to create a smooth border between the side and the bottom. The beams were also covered with masking tape. The sides, transom and forespigel were painted blue with three layers of paint.
After the paint had dried, white stripes were applied to the sides. To make them even with the least effort, 30mm wide paper masking tape was used. First of all, I glued the first strip of masking tape from the fender. Then I glued the second strip butt to the first tape, and then glued the third strip of masking tape to the second butt. After this, the second strip was removed, thus obtaining an even side strip for applying white paint. In order for the edges of the white stripe to be rounded, I bought some ORACAL film and printed four 30mm wide strips with rounded ends on it on a printer (done in AUTOCAD). Then I cut out these “masterpieces” of design with scissors and glued them along the edges of the places where the white stripe will be applied. I applied 2 layers of white paint and after it dried, I removed the masking tape and ORACAL film.
The deck was sanded with #120 and #200 sandpaper and covered with two coats of stain. After the stain had dried, I sanded it again with sandpaper No. 200 and coated it with three layers of polyurethane one-component yacht varnish. After the first two layers had dried, before applying the third, I sanded it with sandpaper No. 300, wiped the surface from dust with a damp rag and degreased it with white spirit.
The seats were covered with paper, and masking tape was glued along the contact line to the side to create an even transition line between the paint on the sides and the varnish on the seats. In a hardware store, I came across acrylic paint with a water-soluble base from DUFA. That is, while the liquid is diluted and washed off with water, but after drying (30 minutes) the water reaches only one place. The surface after drying is hard but elastic. In the evening I read on the Internet that these are now used for painting cars. After that, I regretted that I had not come across this product earlier, and would have covered the bottom with this paint.


All parts were secured with stainless steel screws. The hatches were sealed with silicone for sealing. To discourage the desire and temptation to dismantle any of the installed parts, the screw heads were filled with epoxy resin.


I installed the stay puttens (for attaching the bow guy on which the jib is attached) and mast steps (the base of the mast attachment).

A handle was installed on the forespigel to pull the boat ashore. Fixed with stainless steel screws and epoxy. I couldn’t find a suitable one anywhere, so I bought an aluminum door handle at the store and painted it with paint with a hint of chrome. Then, if I find somewhere, I’ll cover it with chrome using an electrochemical method.
![]()
An oarlock with an oarlock inserted into it.
At the end of the side, the sub-key is secured with four stainless steel screws. The slots of the screw heads are sealed with epoxy glue so that they cannot be removed.
![]()
Two drain plugs with a rubber seal were installed at the bottom of the front frame. Mounted on silicone and stainless steel screws.

Front side can with the sealed inspection hatch cover removed with a bayonet lock (rotating the lid 60 degrees in one direction or another allows you to install or remove it) The front cans are completely sealed and have a volume of 35 liters each.
In general, the hull has seven separate compartments (bow, two front side, two rear side, aft, and the cockpit itself), which gives greater survivability to the hull in emergency situations. The total volume of hermetically sealed compartments is about 180 liters or 180 kg of positive buoyancy when the boat hull is completely flooded with water.

A tiller was installed on the steering wheel. Consists of two parts connected by a hinge. All pieces of iron are made of stainless steel.

Talking about building a wooden boat is very important in any regard, because this is an integral part of our domestic fishing, its history, and we are obliged to remember and honor our master boatbuilders. Unfortunately, there is practically no continuity in this matter. The overwhelming majority of masters are already elderly, and young people are in no particular hurry to take up the baton. But let’s hope that boat craftsmen who create truly excellent fishing vessels will not be lost in our country.
For anyone who wants to make a wooden boat with their own hands, it is important to immediately decide what shape it needs. By and large, the choice comes from only two main options - keel and flat-bottomed. Everything else is nuances. Keelboats are valuable for their speed and require less effort from the rower. But the advantages specifically for fishing are not the most significant, especially in small bodies of water, and keel models have plenty of disadvantages. They are more difficult to manufacture, less stable, and have a higher chance of capsizing under some circumstances. On rivers, it is more difficult for keelboats to maintain a course in a fast current. In addition, they are poorly suited for fishing with wiring - the stream, escaping from under the keel, forms whirlpools at a great distance that interfere with normal fishing, and careful bites are hardly noticeable.
I, like most DIYers, make punts. The bottom is oval, with a curve towards the sides. This is the best universal option for lakes and rivers, very stable, quite easy to use. It all starts with choosing the right boards. In my opinion, of the most affordable wood, spruce is the best choice. Another good option is to put spruce on the bottom and aspen on the sides, which, when dry well, is light and quite durable.
My boat is within five meters long, and for the sides I will need four six-meter boards with a thickness of 30mm. I consider the optimal side to be 40-45cm high. Accordingly, two boards (about 25cm wide) are just enough for one side. Of course, it is advisable to take boards without knots, although this point is not as important as is often stated. Yes, if a knot is literally pushed out with your finger, then the board is not suitable, but often there are firmly seated healed knots that hold tightly, and with such “semi-defects” the board is suitable.
Another more important point is to calculate the outer side of the board and the inner one, only then will it bend as expected. Here I look at how the growth rings are located at the end of the board - the convex part should look outward, it is on this side that the outer part of the board will be. The board bends towards the concave part of the annual ring. If you bend it the other way around, the board may crack. The bend of the growth rings is visible the worse the boards are cut from thicker wood, and if in doubt, it is safer to contact an experienced carpenter to tell you where the outer part of the board is. By the way, if you know an experienced carpenter or carpenter, it is useful to get advice on incomprehensible aspects of working with wood, even if he doesn’t really know anything about making boats. He can tell you a lot.
An important question is whether to build a boat from dried or wet boards. This is a double-edged sword: it is much easier to bend everything from a damp one, but there is a higher chance that somewhere the boat will move after drying, if something is assembled incorrectly. I myself assemble the sides from raw wood without any problems - nothing happens to them, but I learned to make the bottom from dry wood. Moreover, I assemble the bottom in a non-standard way. Usually the boards along the bottom are laid along the boat; this technique gives a minimum number of cracks. I went the opposite way - I lay it across the longitudinal axis of the boat. This option gives the structure greater rigidity, and the boat can be made with a less powerful frame, reducing costs and, more importantly, weight.
If the boat will be operated without a motor, then when laying it transversely, ordinary spacers are sufficient to prevent the sides from moving apart (their angle of inclination is about 30 degrees), and due to the bottom, the entire structure turns out to be quite rigid and reliable. As for the bottom, on the contrary, I try not to lay the boards tightly together, I make a gap as thick as a match. During the assembly process, I fill these gaps with suitable twine. If you fold the boards tightly, the bottom may subsequently move. In a well-assembled boat, the bottom seams may not be sealed, and there will be no leaks; it’s just advisable to treat the joining areas with some kind of protective agent, then the boat will last longer.
 I do the final processing of all the wood when it is completely ready. I paint both the inside and the outside. Simple oil paint will do. It is advisable to first coat it in the old fashioned way with well-heated drying oil so that the paint adheres better. Once a season it is useful to carry out maintenance on the boat. As a rule, this is a small touch-up of the peeling areas, and it is always useful to pre-paint the seams to ensure against leaks.
Usually the width of my boat is about 1.2 m in the center, around the stern about 80 centimeters. I make the stern wide - two men can sit comfortably. In addition, a punt of this configuration is more stable and quite maneuverable, but I still always use two oars - with one oar, try to turn around somewhere on the spot, in the same reeds!