When purchasing a window, we plan that it will be able to serve well for many decades. However, this is only possible if the window is installed correctly. Almost all specialists have their own methods and secrets, but there are also special fixed standards - GOST and SNiP. It is the installation of PVC windows in accordance with GOST that can give the highest quality results.
Regulations
Installation of PVC windows in accordance with GOST will guarantee its long and trouble-free service. Today, all types of work related to this area are regulated by four main standards:
- GOST 30674-99. It contains general information on the issue and basic requirements for windows. There is practically no mention of the installation process itself in this GOST.
- GOST R52749-2007. This standard focuses on the process of installing windows using vapor-permeable, self-expanding sealing tape.
- GOST 30971-2012. This document contains the most detailed information on the issue. It also contains exact requirements for window sizes, device parameters and joint filling materials, methods of fastening structures and similar information. It also describes the requirements for regulatory documentation, some warranty obligations of the work contractor and general requirements for the performance of work. This standard was introduced at the beginning of 2014 and replaced the outdated GOST 30971-2002 for window installation.
- SNiP 02/23/2003. The standard sets the parameters for thermal protection of premises. Suffice it to mention that it requires the installation of a 3-chamber double-glazed window for most climatic zones of Russia and a 5-chamber double-glazed window for Siberia.
All of the above regulatory documents are valid, but not mandatory. The only exception was various requirements related to safety in one way or another.. Compliance with GOSTs only helps to achieve the highest quality window installation.
Preparing for installation
The installation of plastic windows according to GOST is not much different in general terms from the usual installation of a PVC window. The main differences lie in the nuances and compliance with a number of requirements. The technology for installing plastic windows is as follows:
Measurements
Before starting work, a number of measurements should be taken. The dimensions of the window are set as follows: the width of the window is the width of the window opening, from which the double width of the installation gap (which will be on both sides) is subtracted, the height is the same. According to GOST, the minimum width of such a gap is 2 cm, and in calculations the figure most often used is 2.5-3 cm.
 When installing a quarter window, measurements are taken from the outside
 If we are talking about installing a window in an opening with an external quarter, then all measurements should be made from the outside. The width will be the distance between the quarters, increased by the size of the frame plant per quarter, which ranges from 2.5 to 4 cm. The height is determined in the same way.
Preparatory work
After the windows have been manufactured and delivered to the customer, work should not begin immediately. It is recommended to first prepare the room: clear the space near the window for convenient work, remove unnecessary things and furniture, cover the walls and remaining objects with film or thick fabric. The doors are removed from the frame, and the cavity of the stand profile is filled with heat-insulating foam. It is recommended to do the latter one day before installation.
Particular attention should be paid to the opening itself - it must be cleaned of dirt and dust in advance. If there are noticeable irregularities, they are leveled with putty.
Fastening
GOST stipulates two main types of window fastening. The first is done in the mounting plane - self-tapping screws are attached directly through the frame. This option is used most often, but requires that the door leaves and double-glazed windows be removed from the frame in advance. The advantage of this method is the ease of installation in the opening.
 Most often, self-tapping screws are used for fastening
 The second option is based on the use of reinforcement mounted in the frame during production. The entire structure can be mounted. It should be noted that its weight will be quite large, so the process will require certain efforts and skills.
Installation work
Installation of plastic windows according to GOST provides for one important point: the frame is not installed on a bare brick or similar base. Instead, small wooden blocks impregnated with solutions are placed. They will help in aligning the window.
After this, either a separate frame or the entire structure is placed on them, which depends on the preferred type of fastening. For greater stability and reliability, the supports are left as part of the structure, and wedges are knocked out between the window and the wall on top for fixation. After this, the frame is attached from the sides in the same way. By controlling the process with a level, the frame is leveled, and adjustments are made by adding substrates.

The frame can be fastened, according to GOST, through pre-drilled fasteners. You should start from the bottom, gradually moving higher. To top it off, the structure is additionally checked for horizontalness and all screws and anchors are tightened.
Drain installation and window assembly
Most often, a special groove is provided on the outside of the window into which the drainage system is mounted. GOST states that during installation it must be foamed. If you need to create a more durable structure, the drainage system is additionally secured with screws.
 The drainage system is mounted in a special groove on the outside
 Upon completion, another control check of the entire structure is required: for strength, verticality and horizontality. After this, all that remains is to assemble the window. The assembly process takes place in the reverse order of disassembly: during the process, stops, handles and other accessories are returned to their places.
Filling gaps
GOSTs pay special attention to filling gaps. This procedure is almost always performed using polyurethane foam-based polyurethane foam. This material has been tested over years of work, but still has a number of disadvantages. First of all, its resistance to environmental influences and ultraviolet radiation leaves much to be desired. That is why GOST standards require maximum insulation of all seams on all sides - this will avoid destruction of the insulation, which can result in loss of tightness, fogging of windows and the penetration of cold from the street into the house.
The insulation procedure is as follows: waterproofing tape for PVC windows is glued from the inside around the entire perimeter. The tape must also have vapor-tight properties. A strip of foil is glued at the bottom, which will subsequently end up under the window sill board. They pass along the outside in a similar way. PSUL adhesive strip (moisture-resistant and vapor-tight). This membrane film can allow steam to pass out.
 Installation of windows in accordance with GOST requires mandatory waterproofing of gaps
 Both mentioned materials are characterized not only by the fact that they are not difficult to find on the construction market. They also differ in accessibility, that is, the final price of the work will not increase that much, but the quality will increase significantly. In addition, the structure mounted in this way will last several years longer.
To fill the gap when installing PVC windows according to GOST, the strips are slightly bent and the surface is wetted from the inside. Apply the composition using a pistol. Foam is used as a filler, intended for use all year round. According to GOST, ordinary foam can also be used, but only at temperatures up to 30 degrees below zero. Considering the conditions in most regions, such seam insulation in Russia turns out to be of little use.
Window sill installation
At the last stage of the work, the window sill is installed. This process is considered quite simple - you just need to adjust the size and, if necessary, trim the finished window sill so that it fits perfectly under the frame. According to GOST 30971, it is allowed for the window sill to extend onto the walls at a distance of 5 to 10 cm. Pegs are used to create a level, after which the cavity under the board is sealed with polyurethane foam or mortar. Experts recommend making a slope of 1-2 degrees towards the room during installation.
 When installing a window sill, it is necessary to adjust it to the correct size
 To decorate the window sill, plastic panels are used, which are attached to the initial profile using a clip. The casing, which wraps around the corner, is secured with self-tapping screws and covered with decorative film on top. All that remains is to put on the end caps and seal the seams with sealant.
Many construction companies interpret GOST and SNiP standards as they wish and can simply ignore them, and there is no need to say again what the consequences of incorrect installation are. There are two ways out: either carefully monitor the installation process and immediately notice violations, or install windows according to GOST on your own.
Until recently, exclusively wooden window frames were used in the glazing of residential buildings and industrial buildings. Today, many consider them relics of the past and are in a hurry to replace them with modern metal-plastic structures. Indeed, in addition to high performance characteristics, they are much cheaper than wooden frames. To install plastic windows with your own hands, you don’t need to have superpowers. Almost any person who can hold a tool in their hands can cope with such a task.
However, do not forget that each job requires certain skills and craftsmanship. Lack of experience in installing windows can lead to a number of troubles. These are systematic breakdowns, loose fit and high throughput of street air into the apartment.
To avoid the above points, in this article we will provide step-by-step instructions that will help you install your windows correctly and efficiently. If you still decide to trust professionals, know that some of them are not really professionals, and for a number of reasons they openly neglect certain stages of proper installation (some save time, others save money). Having an idea of the work being carried out, you can easily exercise independent control over the entire process. And subsequently you will enjoy the high-quality operation of your windows, which will bring joy to all family members.
The main stages of installing new windows:
- taking measurements;
- dismantling old windows;
- preparing openings;
- installation of a metal-plastic structure.
Not everyone knows that the manufacturer gives absolutely no guarantee for their services if they install windows on their own. Therefore, if various troubles arise during the installation process, you should not hope for a return or replacement. All metal-plastic structures are manufactured strictly according to pre-agreed dimensions. If you make a mistake, the window may not fit in the opening or may end up being much smaller. And it will only be your fault. The company's employees are solely responsible for the implementation of each stage of product installation.
Also, any inaccuracy made when installing a metal-plastic window will deprive you and your loved ones of all the advantages of a modern design and the expected level of comfort.
Window measurements
When taking the necessary measurements, you need to pay attention to the fact that window openings exist with and without a quarter. Accordingly, their formulas for calculating sizes are different. 
For the first case, we must measure the width of the opening between the existing quarters, this is done at the narrowest point. And then add 3-4 cm to the resulting figures - this will be the width of our plastic frame. In addition, it is important to check: the largest distance between the vertical quarters should not exceed the design width of the block.

The height is determined by measuring between the top quarter and bottom surface of the window opening.
If the window opening is without a quarter, the required values can be obtained by subtracting 5 cm from the vertical dimension (to place a window sill) and 3 cm from the horizontal dimension.

When determining the size of the window sill and ebb, it is worth considering the following details:
- Often the size of a window sill is chosen based on its functionality. It should cover the heating radiators and house flowers should be placed on it;
- The length of the window sill is taken to be 8-10 cm longer than the window opening, its edges should be recessed into the cavity of the slope by approximately 4-5 cm;
- The dimensions of the ebb are calculated taking into account the planned insulation. It is recommended to leave it protruding 5-10 cm from the wall.
Features of measuring balcony windows
When calculating the width of balcony windows, the length of the parapet is taken as a basis; the entire structure will rest on it. Also, on both sides it is necessary to subtract 6-7 cm, which will be needed for installing the corner profile; it is used to connect the window blocks of the front and side parts. The distance from the roof to the railing, with the exception of the difference of 2.5-3 cm, which is important to set aside for gaps for fastening, will be the height.
Regarding the side balcony frames, their dimensions are determined in the same way. The only thing is that you need to subtract 6-7 cm from the width to install the corner profile, as well as 2.5-3 cm for the gap from the wall to the window.

Features of window measurements in private houses and old buildings
When taking measurements of windows in private houses and old buildings, it is recommended to first knock off part of the slopes on both sides (in the measurement areas). This is done in order to see what the space occupied by the window opening is like. It often happens that there are dilapidated cement mortar and various insulation materials that can crumble during the process of dismantling the existing window. The positive point here is that the new plastic structure can be slightly enlarged by expanding the cleaned window opening. 
Ordering a metal-plastic window
Before contacting a company with an order, you should think about what type of double-glazed window is right for you. It can be one-, two- or three-chamber. As for fittings and fasteners, you can also choose them yourself.
The manufacturer's consultants will help you understand the technical characteristics of plastic windows that will be preferable for your home at the time of ordering.
Some important points during installation
When installing windows yourself, you should pay attention to the following:
- the metal-plastic structure must be well secured;
- the mounting foam used to fix the windows must be plastered on both sides (this will prevent it from sagging and deforming the frame in the future);
- It is very important to align the structure vertically and horizontally using a level (this will help avoid warping).
How to install metal-plastic windows with your own hands
Before starting installation, prepare everything you need for work:
- Window frame with fasteners;
- Building level;
- Polyurethane foam;
- Mount;
- Bulgarian;
- Windowsill.
The process of preparing a window block
Window preparation is an important stage of installation work that you carry out yourself. If necessary, the double-glazed windows and hinged sashes themselves are dismantled from the window structure. To release the double-glazed window, a chisel is used; very carefully, you need to use it to pick out the glazing bead (fastening) and after a light blow on the tool it will come out of the grooves. Then the vertical fasteners are removed, top and bottom. The released glazing beads will need to be marked; sometimes their sizes can differ significantly, which will lead to the formation of gaps of several millimeters. The glass unit will come out of the grooves on its own if you tilt the frame a little. Gently lean it against the wall, creating a slight angle.
Decorative plugs must also be removed from the swing doors, then unscrew the clamping bolts. If there is a transom opening system, release the top of the sash by turning the handle to the center and remove the hook from below.
Ultimately, you should end up with a free frame, on which there are only lintels separating and reinforcing the sashes. On the inner surface of the plastic frame, holes are cut along the contour for mounting anchors. The minimum number of such holes should be three for the sides, two for the lower and upper ends. For drilling, use metal drills, because the window is made of metal and plastic, and inside it has a metal inclusion for strength characteristics.
To fix the frame, it is preferable to take anchors with a diameter of 0.8-1 cm and metal drills of the same size.
Detailed instructions for installing windows

Finally, some tips for installation:
Comfort and coziness for you and your loved ones with new windows installed by yourself!
The desire to improve the exterior of your home and save money on heating prompted you to shop at a hardware store and now you want to know how to install plastic windows yourself? That's right, because it is very irrational to pay a lot of money to professional builders for something that you can do yourself in just a couple of hours.
The technology for installing plastic windows is simple, even a child can handle it (if you support the structure in the opening). All you need to do is learn a few basic steps of this process and remember the simple tips of the experts. Now we will look at a typical installation of a plastic window according to GOST, starting with dismantling the old frame and ending with finishing the slopes and installing fittings.
How to get the necessary measurements to order a window?
Let's say you are just going to replace old and scary windows with new and thermally efficient ones. To do this, you will need to correctly measure the window opening so that you don’t have to sit and expand the walls of the house with a chisel and a hammer drill. The easiest option is to call a measuring specialist, which is provided by many construction companies and window sellers. It’s clear that this costs money, even if they don’t charge you a penny for it (the amount is already included in the cost of the window). The second option is to find a plumber or carpenter with straight arms at the entrance and supply him with 0.5 liters of Stolichnaya.
In fact, measuring and installing plastic windows with your own hands is a simple matter. First you need to get the exact width and length of the window opening without taking into account debris (wooden frame, plaster, dirt). According to GOST, along the perimeter of the window structure we 20 mm should be left for thermal insulation, an additional 35 mm should be left for the window sill. That is, measure the width and height of the opening and tilt it 50 mm each– this will give you the necessary parameters for the new window.
There is also such a miracle of construction as quarter windows. What it is? A window with a small protrusion that increases heat loss around the perimeter of the window. Most often, such miracles can be found in houses made of foam concrete. Here we measure everything at the narrowest point and add 30 mm to the window width when ordering.
The technology for installing windows involves fixing the frame not in the center, but with a recess of 30% of the width of the wall in depth (looked from outside the house). In fact, you can move it anywhere. The main thing here is to take into account the width of the future window sill and the ebb, because you can arrange it in such a way that the ebb will cover the entire window, but there is nowhere to even put a vase inside. Fastening plastic windows according to GOST requires adding another 50 mm to the width of the window sill and ebb, but here it all depends on the characteristics of your home. Please note: the radiator should only close halfway.
Tip: keep in mind that when installed, the window sill and ebb will extend under the window by about 3 centimeters, as well as into the walls by 4 cm, so it is better to buy them with a length reserve of at least 70 mm and make them a little wider. You can always shorten it on the spot, the overpayment there is not much, but making something longer won’t work.
Dismantling old windows along with the frame and preparing for work
You have measured the opening, bought all the necessary materials and are ready to install, but you are faced with one small problem that needs to be eliminated with a hacksaw and a hammer or taiga hatchet– frame. There are 2 options for removing it - loyal and interesting. The first involves prolonged loosening, cutting and removal of the frame using a hacksaw, nail puller or pry bar. The second method involves active work with an ax or hammer.
Next, you need to remove the mounting foam, insulation, cement and other construction wonders that were used to secure the old window. A vacuum cleaner will not hurt, since installing windows yourself requires cleanliness for better adhesion of materials. You can blow out the dust with a compressor or immediately go through the sink, if possible.
Tip: polyurethane foam adheres much better to a damp surface, so heat loss will be much less after it hardens. It penetrates the structure of the material and does not interact with the layer of dust that covers the concrete or brick base.
Of course, a big advantage would be to knock out the window moderately carefully so that the supporting structure is not damaged. The smoother the window opening, the easier it will be for you to align everything and secure it.
Step-by-step instructions for installing plastic windows in a brick house
There is no need to break your back - call 1 auxiliary worker who will help lift this difficult structure and support it while you perform all the necessary operations with the frame and double-glazed windows. Do not remove the protective film from the window until installation is complete.. If there are sashes, you can remove them, it will be easier, and then put them on after the frame is level. Now let's look at the step-by-step installation of a plastic window.
STEP 1: install wooden blocks on the bottom and sides. Using a hacksaw, cut wooden rectangles 20 mm high and 5 centimeters long (the dimensions may be slightly larger, depending on the desired gap). It would be advisable to secure the bars (glue, foam) so that they do not all fall out while you are placing the window in the opening.
Important: wedges and bars must be installed near future anchors. This way, you can avoid frame deflection when installing plastic windows with your own hands, since measuring the pressure of the tool and tightening is almost impossible. You can screw an anchor or screw directly through a wooden block, but no further than 30 cm from it.
STEP 2: insert the frame into the opening. First, simply place it on the bars, then adjust and move the wedges until the entire structure is level. Measure it not only horizontally along the window sill, but also vertically using a plumb line along the slopes.
STEP 3: make markings for anchors or screws. You need to insert a nail through the holes in the window frame and draw a mark. Next, take a drill and make holes around the entire perimeter of the window at the locations of the marks, drill directly through the frame, or you can remove it for convenience - at your discretion.
STEP 4: installation of plastic windows according to GOST. We install the frame in place, measure the technological gaps of 20 mm, according to building codes, then “bait” the anchors without tightening them too much. If you wish to use anchor plates, then you simply need to bend them so that they touch the window. If the fastener protrudes 1 mm above the plastic, this is the optimal tightening. You can twist it a little harder so that it is flush with the surface. Check everything with a level after screwing, loosen or tighten the sides according to the readings of the device.
Correction: the instructions for installing plastic windows with your own hands are slightly different from those described above if you have a wooden house. Several operations are automatically eliminated, since fastening is carried out with ordinary long screws, which are screwed through the frame into wooden beams or logs. But they must be tightened with little effort and evenly along the entire perimeter of the frame so that it does not deform anywhere.
STEP 5: blow out everything with foam. Before installing plastic window sills, it is necessary to fill the entire perimeter of the window with foam, sparing no material (the excess can be cut off later). Make sure that it does not get on the window - it is difficult to wash. Wait 30 minutes and place the window sill under the window to a depth of 25 mm. You can make a minimum slope, say 3 degrees. Blow foam under the windowsill over its entire area so that there are no voids.
IMPORTANT: make grooves or grooves in the wall in advance for the window sill and remember that it is needed 8 centimeters longer than the window opening (it will extend 25 mm under the window and about 4 centimeters into the wall on the right and left).
At this step, the installation of plastic window sills ends; now you need to place 4 jars of cucumbers evenly across the entire window sill (so that it hardens evenly) and let the window rest from you for 3 days so that the foam finally hardens. You can put 3 bricks, it doesn’t matter, the main thing is to apply pressure of 10 kg or more. At an air temperature of +25, hardening will take 40 hours, but if it is cold and wet, then you should wait a little longer.
Do-it-yourself installation of ebbs and slopes on plastic windows
It is very easy to secure the ebb. We calculate its dimensions in exactly the same way as for the window sill, the only difference is a large slope from the window, so that the water does not linger and disappears immediately after entering. Fastening can be done with polyurethane foam or ordinary self-tapping screws; the ebb is screwed to the stand profile (the one on which the entire window stands). Do-it-yourself installation of the low tide can be considered complete; nothing else is needed, except to seal the gap between the low tide and the plastic with silicone if desired.
Now we smoothly move on to the slopes. They must be beautiful and thermally efficient, so we (and not only us) recommend using sandwich panels for this purpose (you can use drywall - it’s cheaper). If you think that it is very difficult to install a slope on a plastic window with your own hands, then you are mistaken. We take tape and foam. We blow out the entire sidewall or top with foam, lean the slope and tape the sandwich panel to the walls e. Seal the seam between the window and the panel with silicone or another miracle device that prevents heat loss and does not allow moisture to pass through.
Now all that remains is to install the fittings and blinds on the plastic windows with your own hands and you can start using the structure in 30 hours. It is necessary to wait until the polyurethane foam polymerizes and does not deform the sandwich panel and other elements of the plastic window.
And by tradition, we suggest watching a good video of installing a window with your own hands, it describes the process in detail and clearly shows all the fasteners:
How to install plastic windows yourself
At the moment, there are a huge number of intermediary companies that install translucent metal-plastic structures. Employees of these companies commit violations of installation technology, which cause serious problems later. The purpose of the article is to tell ordinary homeowners how to properly install plastic windows with their own hands, without paying for services of dubious quality.
Stages of installation work
As a rule, installers of metal-plastic windows offer the customer 2 installation options - budget and according to GOST, and the prices for services differ markedly. You shouldn’t use the first technology even at the dacha - after 3-5 years negative consequences will appear: freezing, cracks in the slopes or warping of the frame.
- Selecting a manufacturer, concluding a contract and inviting a specialist – a measurer.
- Purchase of additional materials.
- Dismantling old wooden structures (if necessary), preparing the opening.
- Installation and finishing of new PVC windows.
Advice. When choosing a company for the production of translucent structures, analyze various promotional offers. Products with short-lived aluminum fittings - handles, latches, and so on - are sold at too low a price. Parts break most quickly on an opening window sash or balcony door.
A company surveyor is needed for two reasons:
- an experienced specialist knows better how to take measurements correctly; The service is a prerequisite for maintaining the factory warranty on the product.
Basic dimensions for ordering PVC windows
When the master measures the opening and puts the dimensions on the drawing, make a copy of this sketch. Based on the finished picture, it is easier to calculate how much additional materials need to be purchased. After concluding the contract, you have 10-15 days to purchase them and carry out preparatory work.
List of related materials
The composition of the installation kit depends on the building materials from which the building is constructed. In stone houses, installation of plastic windows is carried out using 3 types of fasteners:
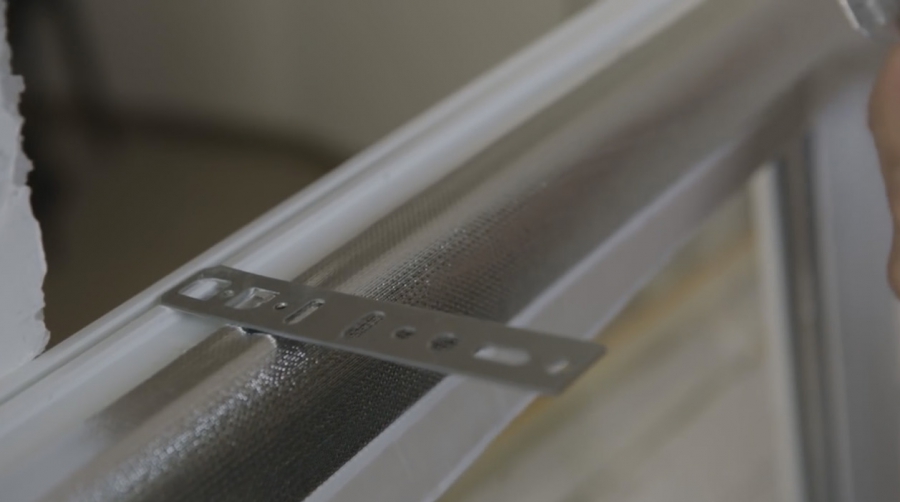
- anchor bolts through the frame - in brick and cinder block walls; with concrete screws (dowels) through the frame - in walls made of reinforced concrete panels; remote fastening with self-tapping screws on a metal plate - in structures made of porous materials - aerated concrete, foam blocks, and so on.
Fastening with anchors (left) and concrete screws (right)
Note. In wooden houses, metal-plastic windows are attached with special dowels to the casing. We will consider separately how to properly install the product in a wall made of timber and logs.
Fastening to perforated steel plates is used in cases where the installation line of the frame coincides with the insulation layer inside the wall - an anchor in foam plastic or mineral wool is useless. The structure is mounted on rigid steel plates 2 mm thick, screwed to the wall with self-tapping screws.
To independently insert a PVC window into the opening in accordance with GOST requirements, purchase the following materials:
- plastic stepped wedges for leveling the product in the opening; vapor barrier tape that protects the installation seam from moisture and ultraviolet radiation, which destroys polyurethane foam; the same, with a metallized layer for internal insulation;
- diffusion strip (allows moisture to pass in one direction and protects the joint from the outside); pre-compressed sealing tape (abbreviated as PSUL); polyurethane foam in a container, preferably in a professional version for a gun.
Important point. When performing work during the cold season, especially in winter, choose the appropriate type of polyurethane foam. There are 3 varieties: summer, all-season and winter.
For exterior finishing of slopes, purchase platbands that match the type of building cladding. It is better to frame the inside of a plastic window with PVC slopes, as the master advises in his video:
Preparing the opening - instructions for dummies
The main goal of dismantling work is to dismantle the old wooden window, minimally destroying the building structures. First of all, remove unnecessary things from the room, cover the furniture with plastic wrap, and also remove curtains and carpets.
Advice. Disassemble old windows upon delivery of new translucent structures, so that you do not have to cover the through hole at night.
The window opening should be thoroughly cleaned and any irregularities removed. If during disassembly the embedded parts are torn out of the walls, seal the recesses with cement-sand mortar. In order to strengthen and remove dust, treat all surfaces with a primer (2 times) or a special primer.
Installing a new window
As a rule, the manufacturer supplies products assembled. Before installing a plastic window, it should be disassembled - remove the opening sashes and remove the double-glazed windows that interfere with screwing in the dowels (anchors). An exception is the installation of PVC windows on metal plates; in this case, there is no need to remove the glass.
Disassembly is done as follows:
Important! Number the glazing beads as you remove them so that they can be put in their proper places when reassembling.
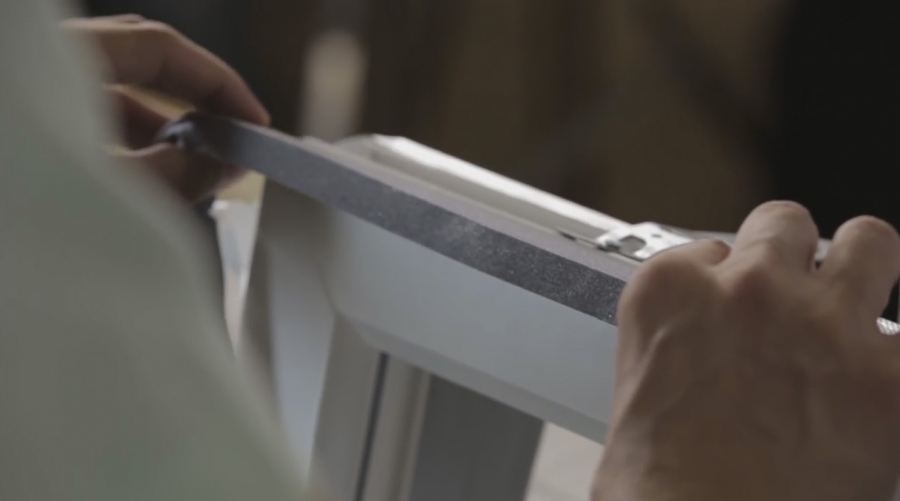
Before installing the frame into the opening, screw the plastic brackets of the mosquito net with self-tapping screws, since it is inconvenient to perform the operation from the outside. Moving the lower support profile to the side, separate it from the frame, cover it with PSUL tape and put it back. Cover the drainage holes of the windows with decorative inserts and proceed to installation in the following order:
- Assemble the frames into a single window block, screwing them together with self-tapping screws in increments of no more than 60 cm, the distance of the first and last fastening from the outer end is 200 mm. Before joining, seal the side parts of the frames with PSUL sealant.
- Keeping the same dimensions and indentations, make holes in the window profile for installing anchor bolts. Drilling is done from the outside so that the rotating chuck does not damage the EPDM sealing rubber.
Gluing the seal from the end (left) and from the front under the opening with a quarter (right)
The last stage is the installation of the ebb, window sill and plastic slopes on the window. The ebb is placed on a special compensation lining, in the budget version - on polyurethane foam. The fold that is bent upward is screwed with self-tapping screws to the stand profile. The window sill is mounted in the same way (don’t forget to cover the end with a decorative cap).
To finish the slopes, you need to insert plastic panels into the starting strip, place the casing on the inner plane of the wall and attach it with dowels. At the end, the joints of the window sill and slopes are sealed with silicone sealant, as demonstrated in the training video on installing plastic windows:
Features of installation in wooden houses
Walls made of timber or rounded logs tend to “shrink” after construction and “breathe” throughout the year. If you do not take these factors into account when installing a metal-plastic window with your own hands, the double-glazed windows will quickly crack from the load.
To compensate for the deformation of the wood, you need to make a frame for the window openings with a sliding beam:
Note. In frame houses, the shrinkage is not so great, so the casing is not made - the window is inserted into the finished opening.
Further installation of the window block is carried out using the technology described above, but with one caveat: the fastening pins should not pass through the casing boards and be screwed into the main wall. Otherwise, the sliding beam will not work and the window will pull along with the structure. Select the length of the dowels to match the thickness of the casing, which is described in detail in the video:
Conclusion
The technology for installing metal-plastic windows is not particularly difficult, but there are many little things that should not be forgotten. For example, if you do not glue the inner tape, then vapors from the room will get into the assembly seam, condensation will form, which will gradually destroy the foam due to freezing. A separate story is the installation of inclined roof windows. This work should not be done on your own; it is better to turn to professionals.
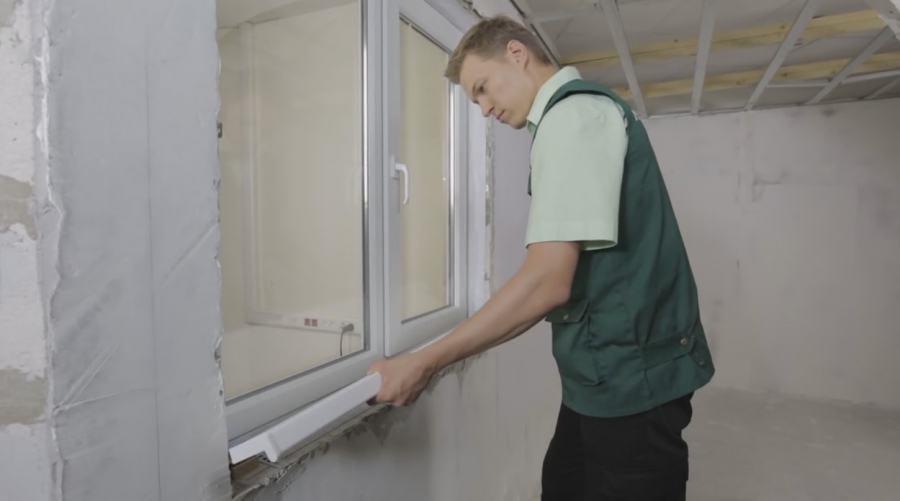
Installation of plastic windows
To independently install a plastic window in your apartment or house, you do not need to have any special skills or special tools. Even a self-taught installer can insert it correctly into the opening and secure it with anchor bolts. It is enough to know how to handle a building level and a hammer drill. Only the installation must be carried out strictly according to the rules prescribed in GOSTs and instructions from manufacturers of PVC window products. Otherwise, this transparent structure will not last long.
Required tools and materials
Installation of a plastic window is carried out in five stages:
- Removing the old window frame.
- Preparing the opening.
- Installation and level adjustment of a new frame with sashes.
- Fixing the drainage system on the outside of the window.
- Foaming the installation gaps and installing a window sill with slopes.
In addition to a hammer drill and a level, to install a window you will also need a hammer, a screwdriver, a water sprayer, a spatula, metal scissors and a pry bar. Consumable materials must be purchased in advance: polyurethane foam, silicone, anchor bolts or metal plates with self-tapping dowels and plastic construction wedges (or prepare small pieces of wood).

Required tools for installation
You will also need vapor-permeable self-adhesive and waterproofing tapes. Plus, the PVC window kit should include slopes, a stand profile, a window sill and a metal sill. If all this is available, then you can begin installation.
Dismantling an old PVC window and preparing the opening
To get rid of an old wooden or plastic window, you need to remove the sashes and make a cut on the side of its frame with a hacksaw. Then, using a pry bar, one of the resulting parts is pulled back and, by hand, pulled out of the wall together with fasteners. Afterwards, the procedure is repeated with all remaining fragments of the deleted window. Then the insulation is removed from the opening (if it is there) and everything that can fall off (for example, mortar).
Sectional design of plastic windows
As a result, only bare and even ends of the walls made of brick, concrete or wood should remain. If these surfaces have chips, cracks or potholes with a depth and size of more than 1 cm, then they must be repaired with concrete mortar. There is no need to do anything special to align it with the new plastic window; all the same, then the small cracks and recesses will be filled with polyurethane foam. However, it is not worth leaving deep noticeable defects without repair.
Possible errors with measurements
Before you continue to work and install a plastic window with your own hands, you need to remove dirt, dust and oil stains from the surfaces in the opening. If you have to install a window structure in winter, you also need to remove snow and frost, and then warm the ends of the wall with a hair dryer to remove moisture.
Window installation
Installation of PVC windows with fixation in the opening can be done in two ways:
- Anchor bolts through the frame profile.
- Plates secured to the side of the frame with self-tapping dowels.
The first option is more reliable. However, with this technology for installing plastic windows, the frame profile turns out to be drilled through. As a result, its thermal insulation efficiency decreases. If a window unit needs to be installed in a building erected in a region with a cold climate, then it would be best to abandon this method.
The second option for fastening plastic windows is considered less reliable and is not recommended in the presence of strong wind loads. But in winter, the heat will definitely not escape from the house through the holes in the profile into the street.

Installation of windows with different slope options
Holes for fastening PVC windows are drilled in the wall with a distance of 15–25 cm from the corners of the opening. Plus one or two more holes on the sides, bottom and top are made in the middle with a step of no more than 70 cm between them.
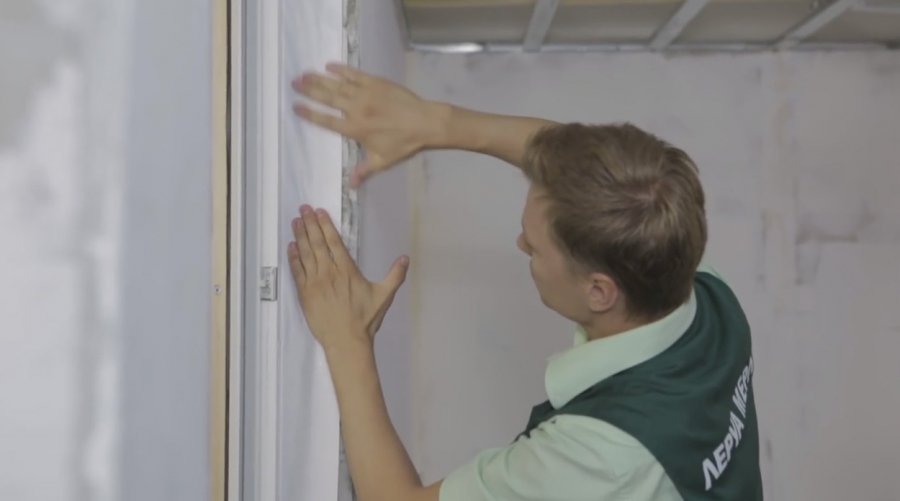
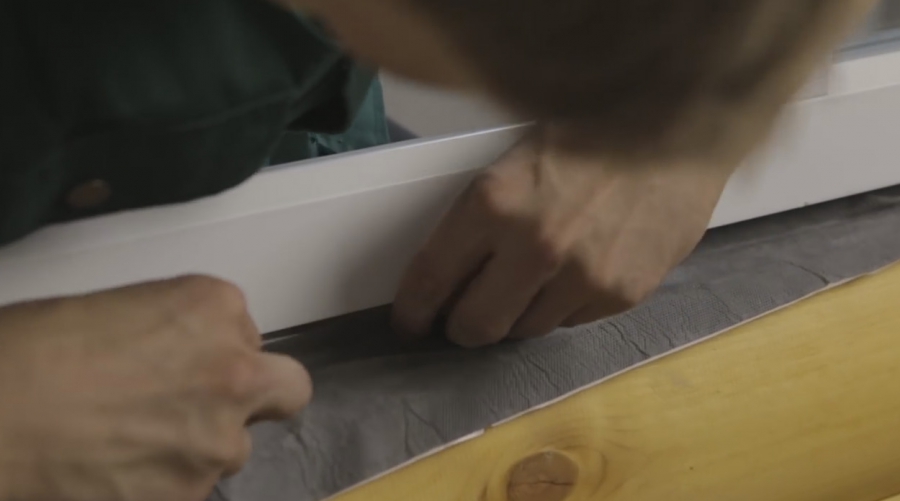
The new window is directly positioned in the opening using the stand profile and adjusting wedges. Plus, you will need to glue a vapor-permeable gasket (PSUL) around the outer side of the frame in advance. And you should not tighten the bolts or screws all the way immediately after leveling the structure in the opening using a level. First, you also need to secure the ebb and flow to drain rainwater and waterproofing.

How to position the window frame correctly
Drainage
The next step in installing a plastic window with your own hands is to attach the drainage system. It must be installed in any situation. Without this external element of the window unit, all the rain water will fall onto the foam and under the frame. The inevitable result will be the destruction of the installation seam and the formation of gaps between the profile and the wall.
The ebb is fastened with self-tapping screws not to the window itself, but to the stand profile under the frame. In this case, the waterproofing tape is first laid. And then a drainage system is placed on top of it and fixed in place. Then foam is sprayed under this metal strip.

How to position the drain correctly
By the way, if you don’t yet have electricity in your country house, we recommend reading the article about gas generators for your home, as well as the benefits of a gasoline generator for a private home.
Assembling a plastic window
Before installing a plastic window into an opening, all opening sashes must be removed from it so that they do not interfere with the installation work. Plus, the double-glazed window from the blind part of the structure is also removed. To do this, you need to pry up the plastic beads with a spatula and knock them out of the groove.
Reinstallation of sashes and double-glazed windows in plastic windows is carried out before foaming the gaps around the frame. If they are not put back in place, then the foam cannot be blown out. After spraying, polyurethane foam expands 1.5–2 times. Moreover, this happens with the creation of quite strong pressure on the frame profile. It can easily be bent so that later it is simply impossible to insert the sashes back.
Window sill installation
Installing a window sill on a window largely follows the same technology as installing a drainage system. Only instead of a waterproofing tape, a vapor barrier is used indoors. If the waterproofing on the outside prevents moisture from entering the assembly seam, then the vapor barrier on the inside is designed to evaporate it into the house.

Installation of windows with and without waterproofing
The foam in the gap should not get wet or freeze; this will instantly destroy it. The window sill is laid on wooden guide supports located perpendicular to the window and along its entire length in steps of 30–40 cm. In this case, an inward slope of 2–3 degrees must be maintained. This is necessary so that the resulting condensate drains from the window sill and does not stagnate in the corners.
After alignment and alignment of the window sill, it is inserted with pressure under the lower edge of the frame. Then the gap is foamed from below and a weight is placed on top of the plastic plate. Once the foam has hardened, it is securely fixed in place.
To prevent the installation of plastic windows with your own hands from ending in alterations, you should:
- make the PVC window sill a couple of centimeters shorter in length than the window opening (a centimeter of free space on each side should remain to compensate for the thermal expansion of the plastic);
- squeeze the foam out of the container evenly and without excess, otherwise when it expands it will deform the frame profile, as well as the slope and window sill plates;
- The final tightening of the bolts (self-tapping screws) should be carried out immediately before re-installing the sashes into plastic windows and foaming the installation seam;
- Before foaming, wet the surfaces of the opening and frame with a splash of water so that the foam sticks to them more firmly.

Where to use insulating materials when installing windows
Conclusion
Installation of PVC windows can be done independently. The main thing is not to overdo it with foam; if there is too much, it easily squeezes out the plastic. Compared to other construction work around the house, installing a roof or caisson for a well is much more difficult. With window structures everything is much simpler.
Do-it-yourself installation of plastic (PVC) windows.
No matter how old wooden windows are, they gradually deteriorate under the influence of precipitation and ultraviolet rays of the sun. Therefore, owners of apartments and houses are faced with the need to replace the blocks with modern ones. And quite often DIY installation of plastic windows becomes the optimal solution to the issue of residential renovation.
Necessary tools for installing plastic windows
Before starting any work, you should prepare the necessary tools. Without them, it will not be possible to perform a high-quality installation of a plastic window. The master must have:
- Mounting tool or nail puller;
- Hammer;
- Set of drill bits for concrete;
- Perforator chisel;
- Phillips and slotted screwdrivers;
- Building level;
- Tape measure and pencil;
- Chisel or hard spatula.
In addition to the listed tools, you may need pliers, a stationery knife and a hacksaw. Don't forget about polyurethane foam. It can be purchased either with a regular plastic tube or one designed for a special gun.
When choosing the second option, you need to take care of the flushing liquid sold in cylinders. If the gun is not treated with solvent, the foam inside will dry out and the tool can be thrown away.
What you need to measure to buy a plastic window
Before dismantling work begins, various measurements are taken. This is necessary in order not to get a block that is too large or small, which will fall out or not fit into the space allocated for it. Before measuring the window opening for installing a plastic window, you should carefully inspect it. The fact is that the design of each house is not always the same.
Measurements need to be taken in six places: three times in width and the same number in height. It is impossible to find out the size only from the edges, because although the openings were laid out according to GOST, they turn out different for each worker.
It is necessary to take the smallest indicator of all three dimensions as a basis. Another 10 to 15 mm should be subtracted from it. This size is taken for the installation seam filled with foam. In terms of height, you should take into account the presence of a stand profile on which the plastic window will stand.
Removing the old window
Before installing a plastic window correctly, you need to dismantle the old one. This work is simple in appearance. But it requires accuracy and caution. The window opening can be quite fragile and the dismantled parts of the frame can destroy part of the masonry. Typically, such a threat is present in rooms where the roof has leaked.
To remove the window frame without causing damage to the opening, you need to remove the nails that secure the block. After this operation, you need to saw the box in the middle so that the bars can be removed from the opening without effort. When the old block is completely removed, you can start installation of PVC windows.
Preparatory work before installing plastic windows
Removing glass and sashes
The opening is clear, which means it's time to move on to the next stage. To install plastic windows easily and efficiently, you need to remove the opening sashes and remove the blind double-glazed windows. This measure will significantly reduce the weight of the structure, simplifying its alignment in the opening. In addition, there will be a guarantee that the glass will not break during installation.
You can remove the glass unit only by removing the layout that securely holds it in the frame. To do this, you can use a sharp chisel or a hard metal spatula.
The layout is carefully lifted at the junction with the frame and removed from its groove. Work begins with long parts, because it is much easier to hook and remove them without damaging these components for plastic windows. It is important to remember that any careless movement can break this element.
It is better to sign the layout before removing it. Despite the fact that the dimensions of plastic windows should be clear and identical, there is often a discrepancy of 1 or 2 mm. Against the general background, this is unnoticeable, but for a layout such a difference is unacceptable, because a small gap will appear in the corners.
Preparation of fasteners
Once the frame is empty, it is time to prepare the fastenings. The user can choose from:
- Anchor bolts;
- Special plates.
If the first option was chosen, then it is necessary to drill holes in the window frame profile. The presence of a metal reinforcing element should be taken into account. At least three holes must be made on each side. Two of them are located 10 cm below the corners of the structure, and the third is in its center. This ensures a strong fixation of the plastic window in the opening.
The diameter of the anchor bolts is 8 - 10 mm. The hole for them must be appropriate.
When choosing metal plates, you will not have to drill anything. They are simply screwed with self-tapping screws to the outside of the profile. This fastening method is suitable for openings where the distance to the wall is greater than the usual installation gap.
The last thing to do during the preparation period is to screw support profile for PVC windows. It is inserted into special grooves located around the entire perimeter of the frame.
But before installing it in place, you should lay self-expanding insulation at the junction of the profiles. This will avoid the formation of cold bridges and condensation under the window.
Do-it-yourself installation of plastic windows, video:
Installing a PVC window in the opening
Installing a window by level
The process of installing a plastic window in an opening begins with laying wedges. They can be made from ordinary wood. Plastic pads are also used, with the help of which it will be easy to adjust the position of the frame.
Two wedges placed in the corners of the opening are sufficient. It is necessary to install a window frame on them. The pads must be installed strictly horizontally. The position must be checked with a building level. If there is no horizontal line, then you need to place a chip under one of the wedges.
As soon as the frame is in place, it is pressed against the ledge of the opening. Next, you need to check the vertical position of the window. To do this, the construction level is applied to the plane of the frame and its internal surfaces. Both sides are checked.
Fixing and fastening the frame
When the structure is leveled, it must be fixed in this position. This operation is necessary for ease of work, so that you can then freely drill holes in the slopes, and the installation of PVC windows is carried out with maximum quality. Wooden inserts are used as fasteners. They burst the frame at all corners. The structure must be firmly fixed.
The plastic window is fastened with anchor bolts through the profile or using special mounting plates. Holes are drilled for them according to the position of the window in the opening. Next, the anchors are inserted into the prepared places and tightened. The plates are attached using dowels and self-tapping screws.
When drilling through a profile, you need to be careful not to damage the seal for plastic windows. If this happens, it needs to be replaced with a new one. This way you can avoid the appearance of drafts in the house.
When the frame is completely secured, you need to fill all the voids between the window profile and the walls. This operation is performed with polyurethane foam. It should be served carefully. Foam expands well and its excess may end up on the inner surface of the window. This completes the installation stage.
Installation of sashes, double-glazed windows and window sills
When the foam has dried, it must be carefully trimmed along the plane of the frame so that it does not interfere with the operation of the sashes.
Then they move on to installing double-glazed windows. They need to be put in place and secured with a layout. Care must also be taken during this operation. The layout is beaten with a wooden mallet, but if you don’t have one, you can also use a metal hammer.
To install the sashes, it is necessary that the PVC window fittings are not dirty. Particular attention should be paid to the lubricant located on the hinges. If dust or other debris gets on them, then this substance should be replaced. This measure will protect the hinges from rapid wear.
The sashes should fit tightly and evenly one on top of the other. If a distortion is noticed, it must be eliminated. This is done by adjusting the hinges. Depending on the position of the gap, the upper or lower mechanism is adjusted.
When everything is ready you need to install PVC window trims. This decorative element will not only make the structure more attractive, but will also provide additional protection from drafts.
The time has come to install the window sill. It needs to be cut to the width of the window opening. This will be the length of the board. The width of the window sill should be such that its edge slightly overlaps the heating devices. The window sill can protrude 5 cm from the wall.
The finished board is inserted at the bottom of the window. The window sill must rest against the stand profile to the end. The correct installation is checked by the building level. It is necessary to make a slight slope, no more than 2 mm per 40 cm of window sill width. The board is snapped onto the support profile, and a support strip is installed at the edge. Often, metal perforated plates are used for this. With their help, you can firmly fix the window sill in the opening.
All voids underneath are filled with foam. It will serve not only as a retainer, but also as additional insulation. Sometimes the latch of the stand profile does not press the board down enough. In this case, a gap may form at the junction of these two elements. A special one will help eliminate it. sealant for plastic windows, which fills the resulting gap. They can also hide some defects that appeared during the installation process.
Do-it-yourself installation of PVC windows in a wooden house, video:
Installation of plastic windows in a wooden house
If in brick and panel houses there is a limiter on the window opening that does not allow the frame to move onto the street, then wooden residential buildings do not have such an element. The structure can move freely in any direction without falling into place. This complicates the installation of plastic windows in a wooden house.
The order of installation work in this case does not change. The only thing you need to take care of in advance is purchasing special metal fasteners. They are installed on the end parts of the vertical window profile. There must be at least three fasteners on each side.
First you need to attach the two upper fasteners. To do this, the window is placed at the same distance from the edge of the wall. When the upper points are aligned and fixed, they begin to work with the lower fasteners. For this purpose, the frame is leveled to maintain verticality. When it is achieved, the lower fastenings are also baited. Now the frame is positioned vertically relative to the wall.
Next, you need to adjust the window perpendicular to the horizon. To do this, the building level is alternately applied to the internal surfaces of the vertical profile. The achieved result is fixed with wooden inserts. After this, you can finally tighten the fasteners.
As soon as the last screw is in place, they begin to fill the free space between the window and the wall with polyurethane foam. This must be done carefully. If the pressure is exceeded, the foam may fly out and the work will have to be repeated. The balloon should be moved from the bottom up, gradually filling the void.
The window sill board is installed using corners. This way this element will be secured more securely and different objects can be placed on it. The space underneath should also be filled with foam.
Buying and installing new windows is not cheap, and a significant portion of the cost comes from installation fees. You can reduce costs by doing this part of the work yourself. We will tell you how to install a plastic window yourself, providing step-by-step instructions with photos.
Measurements required for the manufacture of a plastic window
The ease with which you will succeed or fail will subsequently depend on how correctly you take the measurements. After all, having made a larger window block, you will be forced to increase the opening, and if you make a smaller error with the dimensions, you will be forced to increase it.
It is necessary to determine the dimensions of the future frame based on the type of windows, which are:
- with a quarter, i.e. with a half-brick protrusion, which is located outside the opening and against which the window frame rests. Such windows are present in almost all typical buildings;
- ordinary, i.e. without protrusions. This design is used in buildings constructed according to individual projects.
Measurements of a regular window
Using a tape measure, measure the length and width of the window opening, add 5 cm to these indicators (per polyurethane foam) and write down the data obtained. In addition to the dimensions of the window frame, you need to measure the depth of the slopes, as well as the depth and length of the window sill. The last parameter is calculated based on the distance between the boundaries of the vertical slopes, to which 8-10 cm are added.
Quarter window measurements
In this case, you will have to measure the distances between the horizontal and vertical edges of the protrusion and add 5 cm per polyurethane foam to the resulting figures.
The video will tell you more about the nuances of measurements:
When ordering a metal-plastic window, do not forget to discuss with the manufacturer the number of double-glazed windows and the profile size, as well as the list and quantity of fittings and fasteners. If the climate of your area is not severe, and the windows do not face the roadway, feel free to order two double-glazed windows and a profile 6 cm wide. The lower the temperature outside the window and the more noise on the street, the greater the number of double-glazed windows and the size of the profile.
The procedure for dismantling the old frame
To install a plastic window yourself, you need to get rid of its wooden predecessor. Dismantling should be done carefully so as not to dismantle half of the wall, which will then have to be restored, wasting time, money and effort. At the same time, remember about safety precautions, because working with glass is very dangerous, and the slightest mistake can land you in a hospital bed.
First, remove the opening parts of the windows from their hinges. Remove the glass by first removing the glazing beads. Using a grinder or hacksaw, make cuts in the frame and other parts of the window unit.
Using a pry bar, remove the elements of the old structure from the opening, which is then thoroughly cleaned of construction debris and dust.
Now it's time to find out how to install a plastic window yourself.
Installing a plastic window with your own hands: instructions
To install a plastic window yourself, prepare the tools and materials you will need during installation:
- self-tapping screws (4x35 mm, 4x25 mm);
- screws (5x60 mm, 3.8x25 mm, 3.9x25 mm);
- anchor plates;
- polyurethane foam;
- waterproofing and vapor barrier tapes;
- mounting wedges;
- low tides;
- windowsill;
- plumb line;
- level;
- PSUL;
- perforator;
- screwdriver;
- screwdrivers;
- a hacksaw with a fine tooth for cutting the window sill;
- tin snips to trim the flashing.
Before installation, remove the sashes from the window block.

Install the mounting plates. The procedure is as follows: place the plate along the end of the window block, then turn it with the other end towards the room, fix it with a self-tapping screw (4x35 mm).
Please note: the distance between the plates should not exceed 600 mm.

Before you begin installing the structure in the opening, you need to apply marks for fasteners and PSUL. Align the position of the structure in the opening (this is why a plumb line and level are needed), taking into account the following: the maximum deviation from the horizontal or vertical should not be within 1.5 mm per 1 m of the structure, but not exceed 3 mm over the entire length or width of the product. Secure the frame using mounting wedges.

Bend the plates and mark with a pencil the places on the slope where they will be attached.

If your window is a quarter window, then mark the outline of the adjacent opening on the outside of the frame.

Remove the frame and drill holes in the places you marked, where the anchor wedges will then be inserted.

Drive dowels into the resulting holes.

Use a brush and vacuum cleaner to get rid of dust. Apply sealing tape to the frame. In the case when you are dealing with a quarter window, the tape is glued to the outer part of the frame at a distance of 3-5 mm from the previously outlined opening contour.
In windows without a quarter, the outer seam is insulated using special moisture-proofing sealants after the structure has been installed.
Secure the window block in the opening using mounting wedges and remembering to check the correct position.

Fix one top side plate at a time and measure the diagonals of the window block. Their difference should be within the following limits:

Screw on the remaining plates and remove the wedges, leaving only the bottom and diagonal ones, then proceed to foaming.

Trim off the excess foam and stick a vapor barrier tape on the side of the room, overlapping the wall by 10-20 mm.
Attach waterproofing tape to the outside.
Set the tide. Insert it into the groove and screw it using self-tapping screws (4x25 mm).

Hang the shutters and then install the window sill. Adjust the handles if necessary.
You see, install a plastic window yourself not that difficult. The main thing is to have the desire and follow our advice.
Take it for yourself and tell your friends!
Read also on our website:
show more
How to stick plastic windows into the skylight with your own hands
- Tools and materials
- Preparing the frame for installation
- Preparing the opening for work
- How to stick a window
- Adjusting the sashes
Nowadays, modern plastic windows are being installed more and more often, which are distinguished by their excellent quality, good thermal conductivity, and simple installation. Windows differ in the opening method, number of chambers, quality of plastic, and other features that significantly affect the cost. But you can’t save, as for any other equipment and building materials, windows must be reliable, perfectly protecting the room from heat loss, street noise, and dust.
Diagram of a plastic window.
A well-executed installation of plastic windows with your own hands is also important. Can this be done without the help of others? In this case, it is recommended to call a specialist if you have no installation experience. But there are detailed instructions, following them and having little experience in using construction tools, you can install an excellent and very reliable PVC window without the help of others.
Tools and materials
To install plastic windows with your own hands, you need to prepare the following tools and material:

Tools for installing plastic windows.
- a hammer drill, it is best to take a three-mode one, which drills, taps, drills;
- a jigsaw, it cuts plastic more efficiently than a regular hacksaw;
- electric drill and screwdriver;
- building level;
- tape measure, iron ruler, regular pencil;
- mounting gun for applying foam;
- iron angle 90°;
- hammer;
- fastening elements in the form of nails, screws, anchors;
- pliers;
- metal scissors;
- a pull that may be needed to dismantle an old frame;
- construction knife;
- assembled window frame;
- polyurethane foam;
- vapor barrier tape.
The window itself can be selected of any type and properties. It is fundamentally correct to find its dimensions; why should a diagram be drawn up in advance indicating the height, width of the window, and the number of sashes. Usually, special programs are used for this, which help to find an approximate price. The cost will very much depend on the color; an ordinary snow-white window is cheaper than one painted in the paste or having a special laminated surface. The quality of the fittings, which are selected separately, also matters; now there is a well-stocked assortment.
Preparing the frame for installation

Installation diagram of a plastic window frame.
Inserting the frame requires preparation, without which installation cannot begin. To do this, the window is disassembled, all sashes are removed, if they are not blind. It is important to position the frame correctly and evenly, without distortions. The sash can be easily removed; to do this, you need to dismantle the fasteners by removing the special caps. The handles and hinges are also removed. Next, the glass unit is removed; here you need to act more carefully so as not to destroy the rubber inserts and plastic, or scratch the glass. Usually the sealing rubber is removed first, after which the glass is carefully removed. To do this, use a regular knife and use it to pry off the elastic. Next, the stand profile is removed, to which the ebb will be attached during installation.
If the manufacturer does not provide technological holes in the frame, then you need to drill them yourself, but before doing this, make markings and make sure that they coincide with the installation plan. This is done with a drill, it is important to observe the following conditions:
- holes are drilled from the corner at a distance of 150-180 mm;
- from the middle bar by 120-180 mm;
- from the corner down by 150-180 mm;
- from the bottom corner at a distance of 700 mm from the extreme fastening.
Instructions for installing PVC windows
Small video installation instructions windows PVC. Small but practical installation tips windows PVC. What.
How to install a plastic window yourself
How to install plastic windows correctly AllWindows.
After this, a mosquito net is placed on the frame, if it is not removable, but experts recommend installing it after the final installation of the window so that distortions do not occur. It is important to attach such a mesh before the double-glazed window is put in place.
Preparing the opening for work

Window opening measurement diagram.
The window opening needs to be prepared. After dismantling the old frame, the surface should be completely cleaned of traces of old putty, nails, screws, and dust. Next, you need to check the dimensions of the frame according to preliminary measurements, using a chisel to remove excess mortar residues, if any remain. If there are chips, cracks and other defects, the depth of which is 10 mm or more, then they must be completely filled with waterproof putty. This must be done, since vapor barrier tape will be used for the work, and it cannot be attached to an uneven surface.
When all the preparatory work is completed, it is necessary to wipe the surface again with a damp cloth, carefully removing all dust and debris.
This is a mandatory action, since sharp fragments of mortar and other defects can scratch the plastic of the frame, even if it is durable. Experts do not recommend removing protective tapes from the frame, which prevent debris and putty from spoiling the appearance of the window. Such solutions harden quickly and are difficult to remove; they can leave unsightly stains on the surface.
How to insert a window
Do-it-yourself installation of plastic windows begins after all the preparatory work has been completed. Leveling is done using wooden blocks of small thickness; they are removed after the finishing work begins. Such plates are placed horizontally and vertically. The frame is set using a building level, since the opening itself cannot always boast of geometrically correct dimensions. Even when a specialist comes to take measurements, he will not be able to protect the opening itself from distortions. All this is already finalized during installation.

Scheme for adjusting plastic windows.
Before you begin installing double-glazed windows, you must perform the following steps:
- A hammer drill and drill are being prepared, the diameter of which is 10 mm and the working length is 200 mm. The full set of tools listed earlier is required.
- You should prepare bars for leveling and anchors for fastening the frame.
- A special strip is glued to the street side of the frame to protect the surface; it must not be bent.
Work begins with leveling. To do this, the frame is adjusted in depth and height using a level and wooden blocks. At the end, the horizontal position is adjusted. This ensures correct and accurate installation, normal use of the sashes, and the absence of cracks and other problems. You should start attaching the frame from the lower side part along the left edge, later you can move to the upper part. The same actions are taken for the right side of the frame. Fastening begins with drilling holes and attaching the frame to the surface of the opening.
The anchors are driven in carefully; you must first mark their position, check the position of the frame from the outside and the interior, after which you can drive them in all the way, but so that the caps do not damage the plastic. After this, it is recommended to check the horizontal position with a building level. When the window frame is ready, it is necessary to begin assembling the sashes, all the necessary fittings are installed, and their functionality is checked. Installing the shutters is not so difficult, but after this part of the work is completed, you need to check their opening and begin the process of adjusting the position.
Adjusting the sashes
After installing the double-glazed window, adjustments must be made. This is required for windows of any quality. If you neglect this stage, various problems will arise during use. If adjustments are not made, the doors will not close hermetically, all connections and fittings will gradually fail. Condensation appears on the slopes, and the glass itself quickly sweats. Adjusting a plastic window is not so difficult, but you must first check how the sash opens and closes, how it presses against the frame. You can try turning the handle a couple of times to check for smooth operation. The biggest problem during use is the sagging of the window.
This problem can be solved by simply raising the sash a little higher. For this purpose, a special adjustment screw is provided, which is located in the lower loop. It is tightened until it reaches the required value. Afterwards you need to check the condition of the rubber gasket. When adjusting windows yourself, you need to check the opening/closing of the sashes.
There is also a radical way to adjust windows with your own hands. The sash is pulled diagonally with special straightening plates. But this method is best done if the window structure is familiar, otherwise it can be damaged. To do this, special plates are placed diagonally in opposite corners; they hold the sash in the required position.
The following plate options are available:
- Bottom plates that are used to further expand the sash.
- Mid-side plates that act as excellent support for the sash.
How is the adjustment carried out? The bottom edge is raised first, after which the side plates are attached. The sash must be pulled carefully, without removing it from the frame.
For installation today, plastic windows are very popular, which have numerous advantages over traditional wooden ones, the cost of which is quite high. And plastic frames have a lower price, reliability and protection against heat loss are also at their best. Their installation is simple, although you must have certain skills, otherwise the window will be placed askew, the sashes will sag, cracks will appear, and condensation will collect on the glass.
When planning to replace old windows with new ones, many wonder how difficult it is to install them yourself. The answer is a job of medium complexity. In terms of time, replacing a medium-sized window with dismantling the old one takes about 3.5-4.5 hours. This is for a person with no experience. Company employees who do this all the time spend less than an hour on it. But the installation of plastic windows by the owner of the premises cannot be compared with the hasty work of “professionals”. They simplify the process to the point of indecency, arguing that prices have not been raised for 6 years and they have no time to waste time on trifles. If you are lucky to find truly masters, then you can entrust the installation to them. If not, take a weekend and install it yourself.
Construction of plastic windows
To properly understand the installation process, you need to have an understanding of window design. Let's start with materials and names. Plastic windows are made of polyvinyl chloride, which is abbreviated as PVC. Hence the second name - PVC windows.
The main element of any window is the frame. For plastic windows, the frame is made from a special multi-chamber profile. It is divided by partitions into a number of cells - chambers. The more of these cells, the warmer the window will be. When they talk about how many cameras there will be in a plastic window, they have the number of cells in the profile.
In the middle of the structure, in the largest chamber, a blue insert is visible. This is a reinforcing element of increased rigidity. It gives the profile the required strength. In plastic windows this insert is made of plastic, in metal-plastic windows it is made of metal (usually aluminum). That's the whole difference between them.

There is also a division of profiles into classes: economy, standard and premium. The best choice if you need normal windows is the standard class. In economy class, the partitions are too thin and they begin to freeze almost from the moment they are installed. Premium has a high price due to options that, in fact, are not needed.
If you want to have the best profile for plastic windows, take the standard class of any factory. There is no particular difference between products from different companies. They have long been standardized and all managers’ stories about the advantages are fairy tales. If they are made on factory equipment, there is no difference between them: all factory profiles have long been standardized.
Window profiles are white as standard, but can also be brown to match the color of any wood, and even pink on request. Windows made from colored profiles are more expensive than similar white ones.
Window structure
To understand what is being discussed in the description of the installation process, you need to know the name of each component of the structure.

It consists of:
- Frames. This is the base of the window.
- If the window consists of several parts, the frame is divided into parts by an impost - a vertical component. If the window is made of two parts, there is one impost; If there are three parts, there are two, etc.
- The opening part of the window is called the sash, the stationary part is called the capercaillie. A double-glazed window is inserted into them - two, three or more glasses, hermetically sealed together. A foil tape is laid between the glasses to ensure tightness. There are double-glazed windows with special properties: with reinforced glass, tinted and energy efficient, which, according to manufacturers, reduces heat loss through the windows. There are also double-glazed windows with inert gas pumped between the glass panes. It also reduces heat loss.
- Double-glazed windows are pressed to the frame with a cap - a thin plastic strip. The tightness of the connection is ensured by a rubber seal (it is usually black).
- Locking fittings are installed on the sashes. This is a specific set of mechanisms that provide opening and locking. They can be different, as they provide different functionality: opening, opening with ventilation, opening + ventilation + micro-ventilation.
- To ensure tightness, rubber seals are installed on all parts - frame, impost and sashes.
At the bottom of the outer side of the frame (the one facing the street) there are drainage holes that are closed with special caps. Through them, condensation that forms inside due to the difference in temperature outside and indoors is discharged outside.

The window also has a sill - a board on the outside that removes precipitation and a window sill on the inside. Side and top parts from the street and indoors. They can also be made of plastic or made using a different technology.
How to measure a plastic window
When ordering windows, you will be asked for six sizes: the height and width of the window, the length and width of the window sill and slope. To measure everything correctly, you need to determine whether your window opening is made with a quarter or without.

Inspect the opening. If the outer part of the window is narrower, the opening is a quarter. In this case, measurements are taken at the narrowest point: openings rarely have ideal geometry, so you will have to measure at several points. Find the smallest value, add 3 cm to it. Transmit the height as it is.
If the opening is smooth, the calculation proceeds differently. Measure the width and height. Subtract 3 cm from the measured width and 5 cm from the height. This will be the height and width of your window. We remove 3 cm in width, since a gap of at least 1.5 cm is required on both sides under the mounting foam. We subtract 5 cm in height, since the same 1.5 cm is needed on top, and 3.5 cm on the bottom will be used to install the window sill.
The length of the window sill and ebb is taken with a margin - 5-10 cm more than the width of the window opening. During installation, both the ebb and the window sill are “recessed” a little into the adjacent walls, and the excess will go there. The width of the tides is standard, so the nearest larger one is chosen. On window sills the situation is different. Its width is chosen arbitrarily - at the request of the owner. Some people like them wide so they can put something, others prefer them flush with the wall. So there are no rules here.
When ordering, you will need to indicate how many and what parts will be in your window: whether there is a capercaillie or not, where it is located, how many sashes, which side they are on, how they should open. You will need to indicate the type of fittings (ventilation, micro-ventilation).
Preparation
If you are replacing windows, installing plastic windows yourself begins with dismantling the old one. Problems usually do not arise: breaking does not build. After dismantling, it is necessary to inspect the opening: remove everything that can fall off. If there are any protruding parts, they must be removed - using a hammer, chisel or power tool. When the plane is leveled, all construction debris must be removed. Ideally, sweep everything away, even the dust, otherwise during installation the foam will not “grab” well on the wall.

If there are too large potholes or cavities, it is better to cover them with cement mortar. The smoother the opening, the easier the installation will be. If the wall material is loose, they can be treated with binding compounds: penetrating adhesive primers.
How to install correctly: choosing an installation method
There are two different methods: with and without unpacking (disassembling) the window. When unpacking, holes are drilled through the frame and anchors are driven through them into the wall. This method is more complicated, but the fastening is more reliable.

This is an anchor bolt installation. There are three of them on each side.
When installing without unpacking, metal plates are attached to the outside of the frame, and then they are attached to the walls. This is naturally faster, but the fastening is very unreliable: under significant wind loads, the frame will warp or it will sag.

If you really don’t want to disassemble the window, you can mount it on a plate, but use not narrow and thin ones, but thick and wide ones, which are often used when installing a rafter system.
In principle, small windows installed on mounting plates, provided there are no significant wind loads, can stand normally. If you live in a region with strong winds, and they blow mainly through your windows, if the apartment is located in a high-rise building, in these cases installation with unpacking is necessary.
Below, watch an emotional and intelligible video that explains why it is better to use anchors.
Do-it-yourself installation of plastic windows: step-by-step instructions
Let's describe both methods: suddenly you need a method with mounting on plates. It is used in buildings made of foam blocks, the load-bearing capacity of which is low and the load from the windows has to be distributed over a large surface. This method of installing plastic windows is also necessary if the building is built using “layered” technology. For example, there is concrete in front and behind, and a layer of insulation between them. If the window must stand in the soft layer, then it will need to be secured with plates. Installation of PVC windows in brick, cinder block, panel, etc. the house is desirable on the anchor.
Installation and unpacking
Do-it-yourself installation of plastic windows begins with measurements. Measure the frame and window opening to make sure they are compatible. Afterwards you can start working. The process begins with disassembling (unpacking) the PVC window. Here are the steps:
- Removing the window sash:
- Close the window (the handle is turned down).
- Remove the plastic covers on both hinges. They are pryed off with a screwdriver.
- There is a pin on the top hinge that provides a movable connection. It is located in the center and protrudes slightly. They press on it until it sinks (you can take a metal plate, rest it against the pin and lightly tap the plate). The pin will slide out from below. Now you can grab it with side cutters or pliers and pull it down and pull it out.
- Hold the door up and open the lock. To do this, place the handle in a horizontal position. Having tilted the upper part towards you slightly, lift the sash, removing it from the lower pin.
The entire sash has been removed. To make it clearer, watch the video. It describes in detail how to remove and install the sash on a plastic window.
- On the wood grouse, remove the glass unit. It is held in place by glazing beads. They need to be removed, then the glass unit itself will be removed without any problems. Remove the glazing beads like this:
- Something narrow and strong is inserted into the gap between the bead and the frame. If you don't have a special tool, it's best to use a small spatula. Disassembly begins from one of the long sides.
- The spatula is carefully pushed into the crack with a corner and the glazing bead is gradually moved away from the frame.
- Without removing the tool, move along a little, again pushing the glazing bead to the side.
- This goes along the entire length. As a result, the glazing bead is almost separated; it is simply removed.
- With the short side, everything is simpler: you pry up the free edge and, by turning the spatula, remove it from the groove. Grab the free edge with your hand and pull up.
Now you can try to remove the glass unit. Just be careful: it's heavy. If that doesn't work, remove another one of the beads. Just make sure that the window is tilted and the glass unit does not fall out. Now, if necessary, you can replace the double-glazed window yourself. Watch a video on how to remove glazing beads from PVC windows.
- Removing the window sash:
- The freed frame is covered with a special self-adhesive tape along the outer perimeter. Its installation is recommended by GOST. With it the window doesn't get so cold.

- Remove the protective tape with the campaign logo. If you leave it, it will fuse too much with the frame under the influence of the sun and it will be problematic to remove it.
- The prepared frame is inserted into the window opening. Mounting wedges are used to align it. They must be installed in the corners and under the impost. The rest are arranged as needed. By placing them, the window is set strictly level in three planes. The position of the window is pre-fixed. This is what you can use mounting plates for.

- Take a drill and a drill bit that matches the diameter of the anchors. Make holes for fasteners. 150-180 mm retreat from the top edge. This is the first hole. The bottom one is approximately the same distance from the bottom corner. Another anchor is installed between them in a standard window: the maximum distance between two fasteners should not be more than 700 mm.
- Having made a hole, check whether the frame has moved (level in all three planes), then hammer in the anchor and tighten it. You cannot overtighten: the profile should not sag. Repeat this operation the required number of times.

- Install ebb tides outside. To do this, first a vapor-permeable waterproofing is glued to the outer part of the frame (it is self-adhesive). Small grooves are made on the sides of the window opening, into which the edges of the tides are then inserted.

- A layer of foam is applied to the part of the window opening from the outside, where the ebb will rest on the wall. Sometimes, if the height difference is large, a lining profile is installed here. and then an olive is attached to it. The ebb, cut to size, is placed under the projection of the frame and there it is attached to the frame with self-tapping screws.

- Along the lower edge the ebb also foams.

- Next, foam the opening. When installing plastic windows in the summer, the gap between the frame and the window opening is sprayed with water from a spray bottle. This is necessary for better polymerization of the foam.
- A vapor-permeable heat-insulating strip is glued along the contour of the frame - it is also recommended by GOST.
- Take a balloon with foam and fill the existing gaps to 2/3 of the volume. If the gap is large - more than 2-3 cm - foam is applied in several stages. A time interval of 10-15 minutes is required between two layers. When the first layer is partially dry, it is also sprinkled with water and the second is applied. This is repeated until the volume is 2/3 filled.

When installing PVC windows with your own hands, foaming can be done in several stages - depending on the size of the gap
- Without waiting for complete polymerization, the free edge of the heat-insulating tape is glued to the window opening. Just note that when using tape, the slopes will need to be made of plastic: the plaster and mortar will not “stick” to it.
- Assemble all parts of the window. All that remains is the finishing work, and they are not a hindrance.
- A vapor barrier tape is also installed under the window sill in the lower part (also GOST recommendations). The window sill rests on support blocks made of hard wood treated with impregnation. The distance between them is 40-50 cm. They are made in such a way that the window sill is slightly inclined towards the room (about 5°).

Watch the video to learn how to correctly install a window sill when installing a plastic window. There are many secrets.
The last to be installed or sealed are the slopes. One more video on this matter.
Installation without unpacking
The main details are described above, so this chapter is short. Installation for this option begins with the installation of mounting plates. They are of two types: U-shaped and linear. It is important to choose the most reliable thick metal ones.

They are installed at the same distance as the anchors: 150-250 mm from the edge and no more than 700 mm between the middle ones. They are simply screwed to the profile with self-tapping screws.

Then installing plastic windows with your own hands with mounting plates is identical to that described above, starting from the moment the window is leveled in the opening. Only they attach not the frame, but the plates, and not to anchors, but to dowel-nails. Drill a hole, bend the plate, insert a dowel, put the plate in place and tighten the dowel. Further all actions are identical.
Now it’s clear why installers prefer them: a decent amount of work is spent on disassembly, anchoring, etc.: screws are much easier to tighten. True, if you take powerful plates, they will hold tightly. No worse than an anchor. For example, like in the video.