Not all owners of suburban plots are “lucky” with ideal hydrogeological conditions. It is often only during the process of cultivating the land or building that they realize that groundwater lies high and that during flood periods there are puddles for a long time. There is no need to worry, drainage will solve this problem. Agree, building it is much easier than looking for a perfect site.
The drainage system will remove excess moisture from the soil and plant layer, which will ensure the normal growth of cultivated green spaces. It will divert underground water from the foundation in case of contact, and protect the basement and inspection pit of the garage from flooding.
Those who want to arrange the drainage of a garden plot with their own hands or through the efforts of a team of landscape workers will find detailed answers to all sorts of questions from us. Our material describes in detail the options for groundwater drainage systems and methods for their construction.
A drainage system that collects and drains excess groundwater is necessary in the following cases:
- The plot is flat, i.e. there are no conditions for spontaneous movement of water downhill.
- Groundwater is noted at a level close to the earth's surface.
- The site is located in a lowland, river valley or drained swamp area.
- The soil-vegetative layer develops on clay soils with low filtration properties.
- The dacha was built on a slope, not far from its foot, which is why when precipitation falls on the site and around it, water accumulates and stagnates.
Installation of drainage is almost always necessary in areas with underlying clay soils: sandy loam, loam. During periods of heavy rainfall and snow melting, this type of rock allows water to pass through its thickness too slowly or does not allow it to pass at all.
Stagnation of water at the level of soil development is associated with waterlogging. In a humid environment, the fungus actively multiplies, infections and pests (slugs, snails, etc.) appear, which leads to diseases of vegetable crops, rotting of the roots of bushes, perennial flowers and trees.
Due to stagnation of water, the soil and plant layer becomes waterlogged, as a result of which plants die in a water-saturated environment and the appearance of the site deteriorates. The drainage system allows you to eliminate moisture instantly, preventing its long-term impact on the ground
If the problem of waterlogging of the soil is not addressed, erosion of the soil may occur over time. In frosty weather, soil layers containing water will swell, which can cause damage to the foundation, paved paths and other landscaping facilities.
To check whether drainage is necessary, you need to find out the throughput of the soil layers on the site. To do this, dig a small hole 60 cm deep and pour water into it to the maximum.
If the water is absorbed within a day, then the underlying soil has acceptable filtration properties. In this case, there is no need for drainage. If after two days the water does not go away, it means that clay rocks lie under the soil and plant layer, and there is a risk of waterlogging.

Due to the heaving of water-saturated rocks, the walls of residential structures may crack, as a result of which the building may become unsuitable for permanent residence
Image gallery
Owners of land in a lowland or on a steep slope are faced with a problem when water stagnates in the lowest place, when the water intake may be located higher. In this case, in the lower part of the territory it is necessary to build a storage well into which a drainage pump must be installed. With its help, water is pumped upward and discharged into a ditch, ravine or other water receiver.
If it is planned to build a absorption well on the site to utilize the collected water, then the work on its construction is carried out in the following sequence:
Image gallery
It is advisable to drain the site in cases where there is a high level of groundwater, water does not drain for a long time after rain or melting snow, and also when the site has clay or loamy soil.
First select the type of drainage
There are several main types of drainage:
All that remains is to choose the appropriate system.
Which pipes to use for the drainage system
In order to make drainage on the site with your own hands, you should use perforated plastic pipes.
Their diameter should be 63 or 110 mm.
Note!
The products have a corrugated outer surface, but inside they are perfectly smooth, due to which they have high throughput.

Perforated plastic pipes for drainage
So, it is better to choose products with a geofabric filter for sandy soil and with a coconut fiber filter for clay soil.
For crushed stone soil, ordinary drainage pipes are sufficient.
Such a do-it-yourself drainage arrangement on the site will be as effective as possible, because siltation is excluded.

Drainage pipe with geotextile filter
If products with a filter are not available, you can use regular perforated pipes.
They need to be laid on a layer of geotextile and a cushion of crushed stone, covered with the same geofabric on top. This way you can prevent silting of the system.

Laying drainage not geotextiles
The length of the drainage pipe is determined in each case separately and will depend on the volume of drainage.
The basis is productivity: 30 liters per day for each meter of product.

If you have a regular sewer pipe, you can learn how to make a drain pipe yourself.
To do this, you will need to drill holes in the product with a diameter of 0.5 cm at a distance of 10 cm from each other, evenly distributing them over the area of the pipe.
Do-it-yourself drainage installation on the site
If you decide to make drainage on the site yourself, you will need to do the following:

After this, it remains to figure out how to properly make drainage on the site with your own hands. To do this, you need to study the corresponding step-by-step instructions.
How is surface drainage done?
Let's start with the easiest work - arranging an open drainage system. Doing surface drainage of a site with your own hands is very simple.
You will need to do the following:
- dig main and auxiliary trenches. Trunk lines are usually located along the perimeter of the site; they have a slope towards the collector. Auxiliary trenches go from the place of water accumulation to the main ones; accordingly, the slope is made in this direction. It should be approximately 2 cm per meter of trench. The walls of the trench are made at an angle of 30 degrees;
- compact the walls of the trench. If necessary, they can be reinforced with metal mesh. When drainage is installed using special trays, a sand cushion 10 cm high is made, trays are installed on it, and sand catchers are installed in them;
- cover the ditches with special nets to improve their aesthetics and prevent large debris and branches from getting inside;
- if backfill drainage is done, then coarse crushed stone is filled to 2/3 of the depth of the trench, with crushed stone of a smaller fraction on top. Next, the turf is laid. To prevent siltation, crushed stone can be wrapped in geofabric.
Doing this kind of site drainage with your own hands is very easy and quick and allows you to drain excess water from the surface of the earth.
Deep drainage - how to do it yourself
There is more complex and time-consuming work ahead, but if you follow the step-by-step instructions, you can complete the task very quickly.
Let's look at how to make this type of drainage on a site:

Deep drainage of the site
- dig trenches with a slope towards the water intake well of 2 cm per meter. The depth will be approximately 1-1.5 meters for sandy soil, 80 cm for loam and 70-75 cm for clay soil;
- lay a sand cushion 10 cm high at the bottom of the trenches;
- lay a layer of geotextile, bring the edges of the material out;
- pour a layer of crushed stone of a fraction of 20-40 mm approximately 40 cm high;
- lay a drainage pipe on the crushed stone;
- connect all the pipes together using special adapters, connect the last drainage element to the well;
- cover with a 10-15 cm layer of crushed stone on top;
- cover with geotextile;
- pour a layer of soil on top.

Completion of deep drainage installation
When thinking about how to properly make drainage, it is important to take into account the fact that the drainage pipes should be located at least 50 cm below the foundation level, this will protect it from being washed out by groundwater.
They will only enter the drains, moving along them to the place where the water is drained.
Also, the pipes need to be deepened below the freezing level of the ground.
Drainage on a sloped area
If you are thinking about the question of how to do drainage on a site with a slope, then the sequence of work will be approximately the same as in previous cases.
But, there are some differences in the step-by-step instructions.
You will need to do the following:

Drainage of a site with a slope
- explore the area and determine its lowest point, in this place the drainage well will be located;
- determine the location of the main trench, preferably along the fence;
- dig a ditch of the required size;
- Arrange auxiliary trenches in a herringbone pattern - they should converge to the main ditch with the required slope. If the slope is not enough, it must be obtained by gradually deepening the trench to the point of its connection with the main ditch.

Drainage scheme with slope
It will be easier to complete the work if a drainage diagram for the land plot has been drawn up in advance, including data on the terrain.
Video
Some summer residents sleep and dream of how to bring water to their plot, while others - on the contrary, how to take it somewhere far away. Moreover, in the second case, it can be much more difficult to realize what is planned.
Fatal mistake
When buying a dacha, my wife and I made a major mistake - we looked at the plot in the winter (a very tempting price was indicated in the ad), and the seller, of course, only praised it. And in the spring it turned out that it was sort of in a lowland, and therefore, because of the melt water, everything turned into a solid swamp. It’s funny to say: it was difficult to get from home to the toilet in rubber boots. And the barn almost floated away to the neighbors...
I had to accept urgent measures to drain the site .
In a hurry, on a whim, I decided to dig ditches to drain water around the perimeter of the garden and even between the ridges. It seemed to work out: the flood subsided, the ground more or less dried out, and the wife sowed a lot of things. We rejoiced at our successes and spent all our free time in the garden. And then the rains came, and again we had to get into our boots, because all the carefully dug trenches overflowed with water and the flood (albeit on a smaller scale) repeated.
Then I realized my second mistake: I didn’t pay any attention to the fact that our soil is loam, and therefore all the water in the ditches stands rooted to the spot, not being absorbed into the soil. It even started to bloom.
It took about a month and a half to correct this miscalculation. To begin with, I drew a plan for the future drainage system, divided the garden into plots, drove in pegs and began work. And again I almost got into trouble: I didn’t take into account that I had to think about the place where the water would come out, and almost ruined all the work that had begun. Okay, I got over it.
I’ll say right away that you need to agree with your neighbors in advance so that they don’t experience any inconvenience from your drainage work, otherwise you might make enemies.
My neighbor Nikolai kindly allowed me to bring the drainage pipe into his drain from. He praised my “geodetic” research and suggested what to do next.
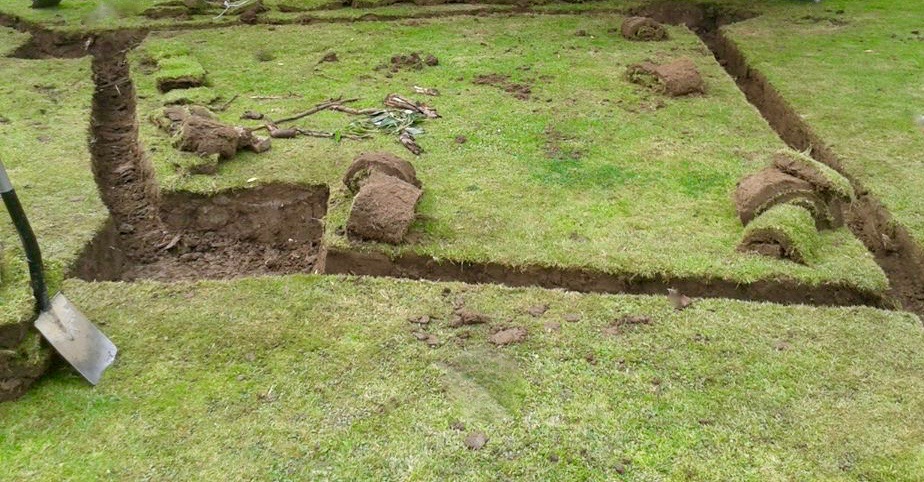
It turned out that there is no need to dig wide trenches at all - narrow and deep ones are enough. Especially for this work, I attached a long handle to the shovel. I dug alone, my wife helped whenever possible - she pulled away the earth. In general, the work was not that hard, it was just tedious.
The soil had to be put into a garden wheelbarrow and taken under the shed by the barn, otherwise the first rain that came would have turned everything into dirty slurry. Well, nothing, as they say, if you put it further away, you will take it closer. Again, at Nikolai’s prompting, I dug trenches to a solid layer: if you stop earlier, the water will stand under the drainage.
Cute grilles
For a long time I couldn’t think of anything to do with planting shrubs. Either the previous owners specially added clay to get rid of weeds, or they didn’t pay any attention to the berry fields at all. After some thought, I decided to completely remove the clay soil and add good fertile soil.
To drain water from the barn and gazebo, I left already dug ditches, only slightly increased the slope of the bottom and lined them with pieces of roofing felt. And I had to tinker with the house more. I combined the grooves dug around the perimeter of the foundation into one and also reinforced the bottom with roofing felt. Of course, the harmony was broken, and in order to hide the grooves, I covered them on top with gratings knocked together from bars. It turned out very nice, especially on the porch. My wife put all sorts of flower pots right on the grilles, and now it seems that everything has always been like this.
I decided to strengthen the bottom of the trenches in the garden using a homemade sledgehammer with a long handle.
And then - the highlight of the whole project - he poured ordinary crushed stone and crushed brick there. I laid pipes on the resulting coating. I wrapped the joints with rubber from bicycle inner tubes and tightened them with wire. And he covered everything on top with fertile soil.
Yes, all these ditches with pipes are reduced to one main drain, and that, accordingly, goes to the drain on the border with neighbor Nikolai. We now have it in common with him. I suggested covering it with a lattice too. Kolya really liked this idea. Now on this lattice we have a whole fabulous clearing of giant mushrooms cut out by a neighbor from logs (my wife, getting emotional, gave old bowls for hats for them).
I would like to drain the area...
Of course, I am not a master, but I am proud that I did everything myself. It was a little clumsy, but the next year everything somehow straightened out by itself and the places where the pipes were laid became invisible. And most importantly, our swamp has disappeared! It cannot be said that after the rains it is completely dry, but the water quickly seeps in and goes away. It doesn’t stand at all under the bushes, although I just left small grooves there towards the slope.
Every spring I come to the garden immediately after the snow melts and check the operation of my drainage system. I can’t say that everything remains at a high level; here and there we have to make adjustments and dig temporary trenches, but the design itself does not fail. But it was worth working without extension just once!
And now our site is already six years old, and it’s impossible to say that there used to be a swamp here. During this time, we became friends with Nikolai’s family, we even removed the common fence, and we are thinking of starting a small pond.
So are we masters now or not? The most important thing I wanted to say is that simple drainage in the garden can be done by yourself, if only you have the desire.
©Vladimir Vasilievich PLETNEV, Kolchugino Vladimir.
 100% Herbal Therapy Lymphatic Drainage Ginger Oil for Drop Shipping…
140.97 rub.
Free shipping★★ ★★ ★★ ★★ ★★ (4.80) | Orders (114)
 10 pieces. wild bees Venom massage essential oil patches for...
Many have encountered such a common problem as excess moisture in a suburban area. Clay soils do not drain water well, and in the spring, when the snow cover melts, they become heaving. Because of this, the foundations of buildings deteriorate and shift, and road surfaces are destroyed. There is an opinion that it is impossible to do site drainage on clay and loamy soils with your own hands. But this is a myth. Of course, it is better to entrust the drainage of the site to a competent and experienced specialist, but this is not always possible. We will try to figure out how to install a drainage system.
What for?
Excess moisture in the countryside is a serious problem. Its first clear sign is puddles that may not go away for several weeks in a row. This problem can cause the slow destruction of houses and other country buildings and the death of plantings. And few people find it comfortable to walk in rubber boots or constantly watch puddles.
Excess moisture is an unpleasant phenomenon
Often this problem occurs due to perched water. This is the name for a high level of underground (ground) water.

The easiest way
So, how to make drainage on the site? Some craftsmen who decide to make drainage at their dacha with their own hands simply dig ditches (popularly called “drains”) along the perimeter of the site. This is the simplest, most inexpensive and widespread method for removing excess moisture from the surface. And this sometimes solves the problem.


Unfortunately, if the territory is located below the lateral ones adjacent to it, such drainage arrangement will not help, only raising the general ground level will save it. To do this, you need to bring and add soil and level it. But what if the neighbors decide to raise the level too? Still, it is better to close this issue once and for all and initially carry out high-quality drainage of the dacha plot with your own hands, so as not to return to this issue again. Therefore, many people prefer to carefully figure out how to drain the area in order to forget about the problem, like a bad dream.
First thing's first - plan!
First of all, having taken up the construction of the drainage system, they draw a diagram of the future drainage. At this stage, it is important not to make a mistake and take into account all the features of your landscape. Each territory is unique. For example, drainage is also necessary, as on absolutely flat ground. Streams of water wash away the fertile layer and unevenly erode the soil. If you make gross miscalculations, you may have the opposite effect and the situation will not only not change, but will even worsen. This can be avoided by studying possible options, installation rules and principles, and then drawing your site drainage project.
First, determine what type of drainage system you will use: surface or deep site drainage (pipes will be required for site drainage).
Surface drainage
Doing surface drainage of a site with your own hands is relatively easy. Shallow drainage is arranged when they want to protect primarily country buildings, be it a cellar, underground parking or basement. Term shallow is due to the fact that the entire system is in plain sight, on the surface. This system consists of various trays and storm inlets that collect water during rains, downpours and after heavy snowmelt. Surface drainage, in turn, is also divided into two types: linear And spot.
Linear type- this is a chain of trays laid in a certain way. An analogy can be drawn with a canal whose slope is directed towards a well. It is into this that all the water ultimately removed from the trays enters. A similar drainage arrangement on the site is carried out along paths or open parking areas, along the perimeter of sheds and garages. But most often, as a rule, it is the drainage of the house. Such a drainage system on the site has been known to us since Ancient Egypt. The principle is the same, only the materials are more advanced. Nowadays trays made of reinforced concrete or plastic are used. There is a grill built into the top that covers the gutter. There are also special waste bins built into the system to make cleaning easier.

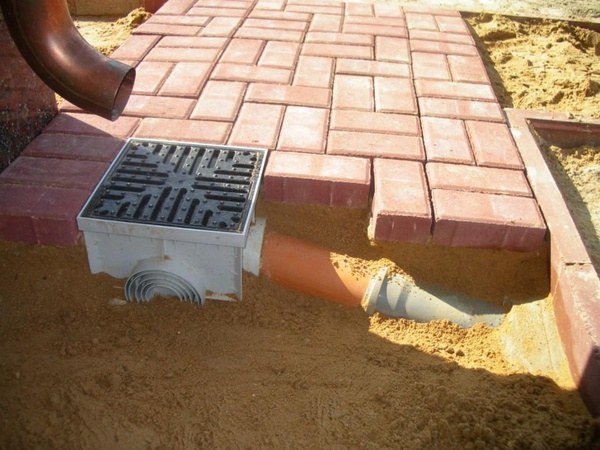
Spot type is a system of water collectors installed in places where it is necessary locally collect water. Catchments are usually installed under taps and in deep depressions, but primarily under gutters. If this is not done, water from the roof will flow to the ground and then penetrate into the soil, destroying the foundation and underground rooms, if any.
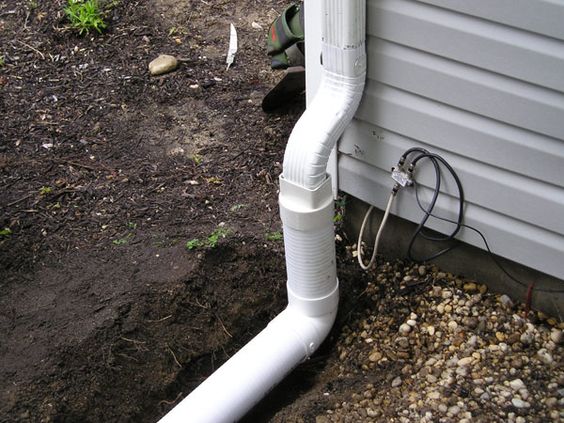
Water collectors are installed in the ground so that they are on the same surface as the general soil level. Pipes are led from them to the sewer system. The top of the catchment area is covered with a grille, which also serves as protection against debris and can act as a decorative element. Drainage basins require cleaning periodically. To do this, you just need to lift the grate and remove the accumulated debris.

Both of these types are often used in pairs for the most efficient drainage system design. The surface type (without pipes) can also include open drainage. In this option, ditches are dug and remain open (in rare cases, they are covered with grates that protect them from large debris). And in order to prevent the walls of the ditch from collapsing and crumbling, they are made at an angle of 30 degrees and laid out with cobblestones or planted with ground cover plants. It is even possible to fill it with crushed stone to prevent destruction, but this will reduce its throughput. Even a beginner can do this kind of drainage with his own hands.
Deep drainage
It is better to install such a system at the initial stage of improvement, simultaneously with the construction of the house. In this case, it is better to start draining the land by determining the direction of water flows during rainstorms. Having solved this problem, purchase drainage pipes and geotextiles.

The top layout of the pipes should resemble a herringbone pattern.
Previously, drainage pipes ( drains) were made of asbestos cement and ceramics, but in our time they have given way to plastic: HDPE (low-density polyethylene), LDPE (high-density polyethylene) and PVC (polyvinyl chloride). They come in single-layer and double-layer, with a diameter of 100-190 mm. Water-permeable holes of up to 3-5 mm are made across the entire surface. To prevent the perforation from becoming clogged and silting, pipes are most often sold already wrapped in geotextile, which performs a filtration function. On clays and loams it is better to have 2-3 layers of fabric for reliability, since the particles in such soil are smaller and clog the system faster than on sandy loam soils. Drains are laid in the soil to a depth of 1.5-6 m, depending on the requirements. The drainage depth is calculated taking into account the groundwater level.
Wells are installed in places where there are sharp turns or connections between several pipes. They are needed for convenient cleaning of the system in case of unexpected blockage and for inspecting the condition of the drainage pipes. Ultimately, the entire chain of inspection wells and pipes should lead to a common collector well (at the lowest point of the land), from where the water is sent by gravity to a drain outside the territory or is forcibly pumped out manually.

In order for the water to flow in the direction you need, you need to lay pipes at a certain angle. Ideally, you need to make the angle as small as possible, since with rapid water flow, siltation occurs earlier.
As a rule, they do slope from 0.5 to 3 cm per meter pipes.
You can set this angle using a level, a water level, or using improvised materials - an ordinary board and a building level. In the latter case, the board is laid at the bottom of the trench, and a level is placed on top and measured, and adjusted if necessary.
Now let's figure out how to properly install a drainage ditch. To begin with, we dig trenches (drainage ditches) of the required depth, compact the bottom, and maintain the correct slope (at this stage it can be approximate). Next, pour a 10 cm layer of coarse river sand, spill it and compact it. We carry out the leveling, maintaining the exact slope. Then we lay a layer of geotextile on top with a density not exceeding 200 g per square meter. m. The edges of the fabric should go along the sides of the trench so that they can then be wrapped inside. We pour washed crushed stone onto the geotextile: for clay soils we take a larger fraction (150-250), for sandy loams it can be smaller (up to 150).
Please note: the crushed stone should not be limestone, as it is highly susceptible to erosion and deformation under conditions of temperature changes.
We lay the drainage pipe and gradually fill it with crushed stone in layers and compact it thoroughly. There should be a 10-30 cm layer of crushed stone on top of the drain. We wrap the geotextile inside so that the overlap of the edges is at least 15 cm. Next, pour river sand, and at the very end - fertile soil. The drainage ditch is ready.

Installing a drainage ditch requires a certain investment of time and money, but this work is done once and for all, so it makes sense to do it with the utmost quality.