A country holiday at the dacha is, first of all, an opportunity to breathe the fresh air of a garden or forest twenty hours a day. It is impossible to relax and at the same time be in the stuffy box of a country house, so a summer resident who values his health sooner or later arranges with his own hands a full-fledged summer terrace with an awning or a roof. Building a terrace with your own hands is much simpler than a gazebo or veranda, so arranging a special area for a table and garden furniture, as a rule, does not require large investments, although the effect will be quite impressive.
What is the secret of the terrace
Despite a certain external similarity between the veranda and the terrace, the purpose of these buildings is different, as are the actual sizes and designs. A veranda is a part of a house with closed walls, windows and a full roof. The terrace is a landscaped outdoor area for relaxing on a sunny day with a canopy, canopy or awning. It’s easier to understand the difference if you look at photos or drawings of a classic terrace.

When choosing a place and method for building a terrace with your own hands, you can use classic techniques for arranging a recreation area:
- In close proximity to the house, using the platform and steps as a porch and platform in front of the entrance to the house;
- Take it out as a separate area and place it in a cozy, sunny and less windy place in the summer cottage. In this case, a prerequisite is the arrangement of a path, stairs or steps, with the help of which you can quickly get inside the house;
- Build a special type of roof or ceiling for a country house with your own hands, on which the recreation area will be located.
Important! It is clear that verandas and gazebos are not built this way, so any drawings and recommendations for the construction of terraces can be creatively processed, changing the dimensions to suit your wishes. The main thing is that the design is comfortable, durable and safe to use.
The dimensions of terraced areas, as a rule, can be several times larger than the dimensions of gazebo buildings, and even more so, verandas. Almost always, the base of the deck is built from wood or composite, raising the structure above the ground so that moisture and dampness do not affect the condition of the boardwalk.

Selecting the device, design and dimensions
The terrace is a one-of-a-kind building, designed not to create shade, but, on the contrary, aimed at providing the possibility of a comfortable and safe stay in the sun. Therefore, when choosing a project and site for constructing a terrace with your own hands, drawings and dimensions, you must take into account the following features:
- The design of a platform of any size, raised above the ground by more than 18-20 cm, must include fencing and railings for the terrace. For buildings that include several platforms located at different heights, intermediate steps and handrails are provided;
- The floor, railings and fences must be made of wood or a material with similar properties, for example, a polymer composite. The drawing must indicate the quality of wood processing and the type of coating applied - varnish or a protective composition based on epoxy resins;
- If there is a canopy or awning, one edge of the roof must be attached to the main wall of the house, the second rests on stationary supports embedded in the ground to a depth of at least 40 cm with a concrete blind area poured.
Important! Before choosing a diagram of how to make a terrace, it is important to choose the right material that best matches the design in the drawing.
The easiest way is to build a terrace at the corner junction of two walls of the house, as in the photo. In this case, we build a terrace and automatically get a platform in front of the entrance to the house.
Corner terrace design
The simplest option for a terrace would be to build a platform made of wood on a primitive foundation of concrete blocks or slabs, as in the drawing. The angular arrangement provides protection of the terrace area from wind and rain on both sides, so there is no need to install wind protection with polycarbonate sheets or wood panels.
If necessary, you can install a fabric awning, curtain or canopy over the terrace, the dimensions of which will be limited only by the dimensions of the walls of the house. The disadvantages of the design include the fact that if the slope is incorrect, the wooden platform can affect the distribution of rainwater, therefore the calculation and size of the slope of 3-4 degrees must be immediately recorded on the terrace drawing. The size of the foundation supports for the flooring must be calculated from a sketch or drawing, based on measurements of the entrance opening above the ground level.

For a lightweight frame structure of a terraced area, it will be enough to lay 12-15 concrete blocks or several dozen clinker tiles as a foundation. You will first need to remove the top layer of soil, fill it with fine gravel, compact it and lay a sand cushion. The most difficult thing will be to maintain the size and thickness of the sand base so that the height of the foundation columnar or slab supports does not exceed the calculated value according to the drawing.

Geotextiles can be laid on the sand, which effectively prevents the growth of weeds and grass. To fill the floor of the terrace, experts recommend first tying the supports with timber and laying joists made of wood. But in this case, you have to increase the vertical size of the terrace in height by 20-30 cm, which is not always convenient. In the simplest case, a beam measuring 60x60 mm is laid directly on the tile and fixed with pieces of reinforcement, driving it directly into the ground.
The most difficult stage of assembling a budget terrace structure will be covering the decking with boards. An oak or special decking board made of polypropylene and sawdust, 200x30 mm in size, is best suited.

For your information! The appearance and dimensions of the composite material are practically no different from processed natural boards. High resistance to moisture and absolute insensitivity to insects and pathogenic microorganisms make decking an excellent substitute for expensive oak wood.
When covering the platform frame, you must carefully follow the recommendations for installing decking boards given in the drawing. In a similar way, flooring can be made from ordinary boards pre-treated with an antiseptic.
Building a simple terrace on your own
The average size of the site is 4x2 m. We will install the wooden structure on wooden supports in a swinging pattern. Part of the terrace area will rest on pillars made of paired timber 120 cm long and 100x100 mm in size, the second part of the terrace will rest on the plank wall of the country house. To install the timber, we will drill holes in the ground with a diameter of 90 mm and hammer the supports with a sledgehammer.
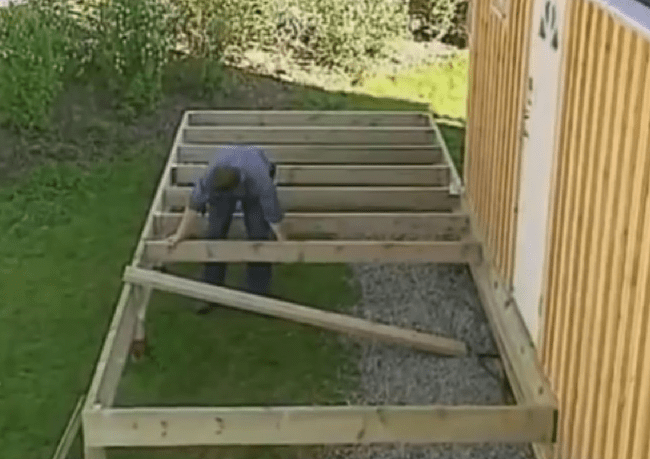
Next, the supports driven into the ground must be tied with a flat board or a sheet of thick plywood with a section size of 350x40 mm. When attaching boards, it is necessary to additionally control the horizontal position of the strapping sheet.
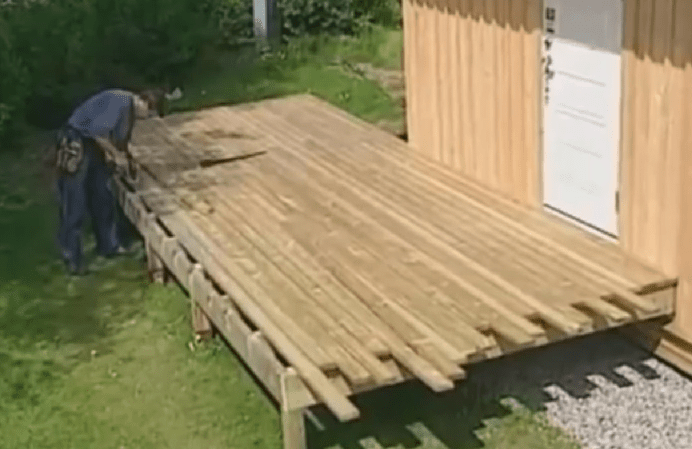
We attach the side trim boards directly to the walls of the wooden house; in the supports, you will need to cut down for installation of the longitudinal trim board.
After assembling the frame, transverse joists are installed, measuring 2.5 m with a cross-section of 100x40 mm, which will increase the rigidity of the base of the terrace platform and at the same time serve as a support for the floorboards.

At the next stage, the terrace fencing is assembled. Along the outer contour of the platform, grooves are cut out in the floorboards, after which, as in the drawing, supports are nailed under the railings. A vertical beam or board measuring 100x50 mm, 120 cm high is attached to the bottom board of the trim using self-tapping screws. A groove for the crossbars is filed on the inside of the racks, after which the lower bar and railings for the terrace area are installed.
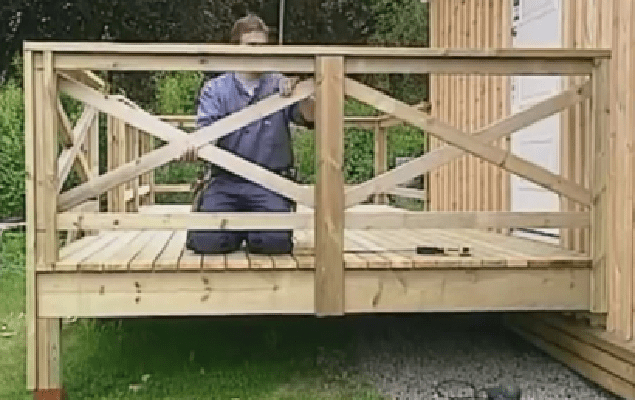
Diagonal spacers are placed between the posts, increasing the strength of the entire fence structure.
Conclusion
The above terrace design is simple and easy to build with your own hands. If desired, you can install a small fabric awning or a full-fledged canopy made of polycarbonate or light ondulin over the terrace area. The wooden structure must be treated with protective antiseptics, and the floor must be periodically treated with wax or paraffin mastics.
Summer living room, or how to plan a terrace
One of the basic principles of designing a country house is its harmonious inclusion in the surrounding landscape, merging with the garden. This is achieved using various techniques, among which the installation of terraces can be distinguished. Thanks to them, the boundaries of the house visually expand, as a result of which it smoothly transitions into the open space of the garden.
A terrace (from the Latin terra - “earth”) is a paved area raised above the ground, which is either adjacent to the house or located autonomously, in any convenient place. It is installed in areas with a warm and dry climate, where during the warm season it serves as a room (living room, dining room) in the fresh air. In the northern part of the country, it is impractical to create an open terrace adjacent to the house, so here it is usually fenced with walls and glazed, turning it into a veranda.
Why build a terrace?
Firstly, it will provide a flat area in the fresh air on which you can create an additional seating area.
Secondly, a terrace adjacent directly to the house or located at the level of the upper floors will increase the living space in the summer. And being included in the architectural ensemble of the house, it will become a decoration of the facade.
Where to place the terrace?
In the central and northern regions of the country, the terrace must be protected from the wind and illuminated by the sun, especially in the afternoon. In the southern regions, on the contrary, it is arranged in places where there are areas of constant shading during the hottest period of the day.

Covered terrace with grill, dining table and seating area
The traditional place for a terrace is an additional entrance to the house, which in most cases is located on the side opposite the main facade. The terrace can also be placed on the side of the main facade or attached to one of the side facades.
If funds for building a terrace are limited, then it is better to make it small than to save on materials for structural elements and finishing. Modern construction technologies make it possible to increase the size over time without any particular difficulties and ensure that the site being built on is adjusted to any landscape features and existing elements.
If the terrace is built at the same time as the house, in order to avoid various shrinkages, the foundation of it and the house is created structurally uniform, with the same depth and from the same material. If the terrace is added later, then its foundation is not connected to the foundation of the house.
It is important that the terrace adjacent to the house is interconnected with one or more rooms. If you plan to arrange it on the side of the main facade, then you need to think about the proportions, stylistic decisions, and materials for making the terrace at the initial stage of designing the house. This approach is also required when you are going to place it on any side of the house, but at the level of the second floor and above, and also if it must have a common roof with the house, because in these cases the terrace is its constant component.
When choosing a location, it is important to imagine whether there will be a good view from the terrace if you install a fence (screen, balustrade, etc.), and whether it will not spoil the appearance of the house and the surrounding space.
Do not forget to make sure that the terrace is made of high-quality and inexpensive material. Here, which consists of a part made of wood and PVC. This allows the board to be more durable and not require repairs.
What size should it be?
The size of the terrace depends on its functional purpose, the dimensions of the house and the composition of the garden. A small paved area on a large plot, like a bulky one, with an abundance of decorative elements on a tiny piece of land, is perceived as not being large-scale. True, in small gardens, especially in urban areas, the terrace sometimes occupies almost the entire area of the garden, so its attractiveness and convenience largely depend on the thoughtfulness of the layout and selection of landscaping elements.
When planning a terrace near the house, at the level of the second floor and above, you must take into account the dimensions of the building. That is, if the house is large and spacious, then the terrace should be appropriate. AND? on the contrary, for a small building it is logical to arrange a platform of modest size.

The terrace with a canopy made of cellular polycarbonate is protected from the sun and bad weather

Wicker furniture is ideal for the terrace
The size of the terrace also depends on its purpose. For example, it is quite enough to allocate an area of three by four meters for a place for quiet relaxation, but it is unlikely that it will be possible to organize receptions for guests here. A large family, owning a vast garden area, usually creates a real open-air room where they can cook food (for which they place a barbecue), sunbathe, and receive friends. For a comfortable stay, it is recommended to allocate an area of about three and a half square meters per person for the terrace, as well as provide various additional landscaping elements.
Terrace layout plans
Depending on the layout of the house and the landscape design of the site, you should also choose a terrace solution. It should connect the interior of the house and the garden.
The terrace with a dining table serves as a kind of summer dining room. It combines the interior with the garden space.

Terrace for relaxation among greenery. Shade from trees will protect you from the heat

The terrace along the front of the building is a classic solution that emphasizes the symmetry in the architecture of the house.

Sandbox for children, sun loungers for adults. Parents will be able to relax and look after their children.

The planning solution for the terrace clearly separates the entrance to the living room and dining area. Ornamental plants are actively used.

Terrace with a bench at the entrance to the house. A modern variation on the porch theme.

Choosing a form
The most common shape of a terrace adjacent to a house is rectangular. Despite the fact that it is perceived as quite austere, it goes well with the outline of the house, which in most cases has the same shape. To prevent the shape from seeming too conservative, when paving the terrace, several types of covering are used, various decorative elements are added, or it is made into several levels. Also, the terrace adjacent to the house can be semicircular, diamond-shaped or trapezoidal. If the recreation area is located at a distance from the house next to a pond or fountain, nothing prevents you from giving it smooth outlines, thanks to which it will fit organically into the garden. Interesting design solutions are obtained when constructing multi-level terraces, that is, when the site is combined with landscape stairs, bridges and passages.
Paving material
The construction market offers a wide variety of materials that can be used as terrace coverings. They should be selected depending on the appearance of the house, the topography and design of the garden area, the operational requirements for external coatings, the climate, as well as financial capabilities.
If the house is made in a modern style, then it is advisable to use porcelain stoneware or colored concrete slabs for paving. For a log or cobblestone house, wooden flooring is ideal. A terrace made of cobblestones or clinker bricks will look great next to a restored farmhouse. You can also use a combination of different materials, such as concrete slabs, cobblestones and clinker. A large area will especially benefit from such a design solution, since using different materials you can lay out stripes and patterns that will enliven the surface.
It is important that the paved surface is not only level, but also safe: it should not be slippery, and water should not stagnate on it after rain. In low-rise suburban construction, electric heating is often used to cover terraces. In this case, the site dries out quickly after rain, and in winter snow and ice do not accumulate there. So that it dries better and puddles do not appear on it, it is made with a slope of two percent from the house to the edges (a slope of 1% is formed at 1 cm of height per 1 m of length).
Construction of a wooden terrace
To cover areas, wood is often used in the form of flooring made from wide slats or garden “parquet” (usually in the form of square panels 50x50 cm). If you have chosen a wooden covering made from wide slats (planed boards), then it is important to determine in advance the direction of their laying. For example, if the shape of the site is close to a square, the slats can be laid both lengthwise and across. But if the terrace is long and narrow, it is more appropriate to place them along the short side. This choice will allow you to use slats of the same length (you won’t have to join them), will prevent sagging during operation, and the terrace will visually become wider.
When installing wooden flooring, a foundation is made (most often from concrete). To ensure that the wood does not get wet from below and dries quickly after rain, the surface of the terrace is raised above the ground and the space under the floor is made ventilated. The deck covering is usually supported by posts (wood, steel) or posts (brick, concrete) to which wooden blocks are attached. Floor beams (purlins) are laid on the support bars. To prevent the flooring from becoming crooked and skewed, you need to constantly check its horizontalness using a level. The covering boards are fastened over the beams, not tightly, with a distance of 6-12 millimeters between the slats. This is done so that water, which can get even onto a closed terrace, freely flows through the cracks into a specially arranged drainage system located under the floor of the terrace. All wooden elements are treated with a special impregnation that protects them from rotting.
Paving elements
Wooden decking is appropriate for a wooden house

Natural stone is a material that creates a “natural” mood

Clinker - durable traditional coating

Gres ceramic tiles have a non-slip surface

For wooden flooring, larch, which has high strength, moisture resistance and beautiful texture, is most often used, as well as exotic tree species: cumaru, ipe, jatoba, iroko. But teak is considered the best material for covering: a board of golden brown color, wear-resistant and durable (it is used for the decks of sea yachts and boats).
Fencing
To protect the site from the wind, in the northwestern regions a stationary canopy or roof and a side fence are provided. The roof of the terrace can be an independent element, a part or continuation of one of the roof slopes of the house, or it can be a specially made structure mounted on racks or walls. In the southern regions, in order to avoid exposure to the scorching summer sun, awnings, awnings, awnings, portable umbrellas are installed, and a pergola is built. To protect the terrace from the wind or prying eyes, various means are used - parapets, screens, trellises, balusters made of wood, forged metal, polymer concrete, as well as green spaces.
In the southern regions, it is advisable to create an open area, limited along the outer perimeter only by green spaces. Small terraces should not be enclosed with high walls, screens or trellises entwined with greenery, since all these elements visually reduce the space and make ventilation difficult. In this case, experts recommend setting up a narrow flower garden with low perennials around the perimeter.
Terraces on adjustable supports
Recently, construction sites in Ukraine began to install terraces on adjustable supports. This solution allows you to protect the waterproofing layer of the base from repeated mechanical loads, as well as to obtain a flat surface. The manufacturability and versatility of the system allow its use on sites of complex configuration with slopes in different directions, as well as on sites where there are, for example, steps.
The adjustable legs and the system as a whole are a rigid structure.

The system consists of adjustable polypropylene supports and cover plates made of various materials. Its main elements are height-adjustable (35-900 mm) polypropylene supports with a corrector that allows you to compensate for the slope of the terrace base up to five percent. They are created on the principle of a screw jack.
The adjustable support can support up to 1000 kg.

Thanks to the design features, the supports effectively distribute the load on the lower layer of the terrace and are capable of supporting a weight of more than 1000 kilograms each. The support is installed on any base (waterproofing, rigid insulation, soil, concrete). The design of the system provides for the removal of moisture from all its elements. All twisting parts of the support and the system as a whole are a rigid structure.
The system allows you to adjust the slope up to 5%.

The base of the support is either placed on the bottom layer of the terrace, or glued with polymer bitumen mastic, or secured with dowels to the base of the terrace structure. The strength of the cylinder is given by four to eight stiffening ribs, which serve to distribute weight more evenly and stabilize geometric shapes.
The tip for fixing the position of the plates allows you to set precise gaps between the plates. The plate can rotate 360 degrees, which makes laying the material much easier. The four floor slabs are fixed using a dowel, for which there is a hole in the center of the plate.
Stone slab coverings are suitable for front terraces.

The slope corrector allows you to adjust the slope of the surface by divisions on the supporting plane in accordance with the slope (up to 5%) in increments of half a percent, which must be compensated, that is, from zero to five centimeters per meter. The system is installed by simply rotating the corrector 360 degrees clockwise or counterclockwise, bringing the readings in the oval display window into line with the slope that needs to be compensated. The latch holds the selected value. Then it is necessary to position the support generally in the direction of the slope to be corrected, using the arrow marked on the surface of the corrector with the digital value of the slope that needs to be corrected.
Coating materials for the system can be combined.

This system allows the use of slabs made from a wide variety of materials for external covering: stone, wood, composite materials. They can be combined (for example, wood and glass slabs), obtaining the most original solutions. In fact, the choice of material and type of coating is unlimited and depends entirely on the designer’s imagination.
The composite board covering can withstand high humidity.

The terrace is an excellent option for a summer holiday in a country house. Agree, relaxing in the fresh air surrounded by greenery is much more pleasant, and what can I say in good weather, you can not only spend your free time there, but also have family lunches and dinners.
What is a terrace?
A terrace is basically an open space that is adjacent to the house. Thanks to the terrace, the area of the house itself expands. In cold weather, it can be turned into a veranda using a sliding glass panel, which can be removed in summer, as it can be easily rolled up using rollers.
Basically, the terrace is built on supports. Which can be made from reinforced concrete blocks, wood or metal, but the terrace itself is built mainly from wood. A backfill of pebbles or coarse sand is made directly under the supports; all this must be compacted and brought to the required level. After that, wooden logs are installed, on which the terrace will be located. An already finished terrace can be tiled or trimmed with wood. It is also worth considering the fact that wood is quite sensitive to moisture, so all wooden coverings can be made removable so that in bad weather they can be removed and stored in the utility room.
Before you start building a terrace, there are several important aspects to consider.
Before any construction, it is necessary to plan the site, what size the terrace will be, where exactly it will be located, and what is necessary for this. Plan the place where the foundation will be located (if necessary).
When concreting the foundation for the terrace, it is worth noting the fact that it is not necessary to bury it deep into the ground; the easiest way is to remove the plant layer of soil, this is necessary so that it does not sag after precipitation.
The construction of a terrace is unacceptable without a durable flooring; it is best to make it from deck boards, which are placed with a gap of three to five millimeters so that water can drain freely, and also so that the flooring can be ventilated after rain.
The most resistant to moisture and decay is a type of wood such as larch, which is what is used for flooring. In order for the terrace to have a canopy, it is necessary to install a base that will be designed to support it.
Sometimes the terrace is placed under the same roof as the house to which it is attached, or it is additionally attached to a base installed for this purpose.
Today, frames for terraces made of metal are often used; they are considered a fairly strong support for a canopy made of polycarbonate. This terrace model will seem airy.
 Each terrace raised above the ground requires fencing; for this, you can purchase ready-made plaques and railings at a hardware store.
Where is the best place to locate the terrace?
As for the location of the terrace, it is typical for the southern regions that the terrace would be located in a place where during the day, during the hottest periods, it would be shaded. In the northern and central regions, it is necessary to ensure that the terrace is protected from the wind and must be illuminated by the sun, especially in the afternoon.
Basically, the terrace is located on the opposite side of the main facade of the house, and sometimes an additional entrance to the house is located there. This is not to say that there is a specific place for the location of the terrace; it all depends on your desire.
In the case when the terrace is built simultaneously with the house, the foundation for them is created as a single one, in order to avoid various shrinkages, etc., and both the material and the depth of laying must be the same. In cases where the terrace is added much later, its foundation and the foundation of the house are not connected.
 One of the most important factors when building a terrace is whether the terrace will provide a good view, and whether it will spoil the appearance of the house itself.
Terrace size.
The size of the terrace directly depends on its functional purpose, the size of the house and the composition of the garden. The attractiveness of the future terrace depends on the selection of landscaping elements, as well as on the thoughtfulness of its layout.
If the terrace is designed as a place for quiet relaxation, then a lot of space is not required; an area of three by four meters is enough. If it is planned to receive guests, place a barbecue, etc., then in this case the area should be much larger.
Terrace shape.
Most often, a rectangular shape is chosen to build a terrace adjacent to the house. Although this shape is considered somewhat strict, it best suits the outline of the house, which is basically the same shape. To ensure that the terrace does not seem too conservative, when paving it, you can use several types of coating, add a variety of decorative elements, etc.
The terrace adjacent to the house can have a diamond, semicircular or trapezoidal shape. In cases where the recreation area is located at a distance from the house, it would not hurt to give it smooth outlines, thanks to which it will fit perfectly into the garden. 
Terrace paving material.
Today, there are many materials that can be used for paving a terrace. When choosing them, you should take into account the appearance of the house, as well as the design and topography of the garden area, climate, requirements for external coatings, etc.
When a house is built in a modern style, it is best to use colored concrete slabs or porcelain stoneware for its paving. For a house made of wood, wooden flooring is best.
When paving a terrace, it is very important that the surface is level and safe. Under no circumstances should it be slippery, and water after rain should not stagnate on it. Sometimes, when paving a terrace, electric heating is used; in this case, the terrace area dries out quickly after rains and snow does not accumulate on it in winter. For better drying, and to avoid the accumulation of puddles, it is mounted with a slope equal to two percent from the house to the edges.
In cases where wooden flooring is laid, to prevent the wood from getting wet, a foundation is made underneath, mostly made of concrete. In this case, the surface of the terrace is raised above the ground, and the space under the floor is made ventilated.
Construction of a wooden terrace.
If you nevertheless decide to build a terrace yourself, then the simplest option would be to build a wooden terrace.
As mentioned above, you first need to mark the area where the future terrace will be located. To do this, having decided on the size of the terrace, you need to drive stakes at the intersection of straight lines. After all the stakes are driven into the ground between them, it is necessary to tighten the string, directly securing it to each peg, thus creating the extreme boundaries of the future terrace.
Piles are dug along the perimeter of the future terrace; for this purpose, hardwood timber is used, which has dimensions of 100x150 or 150x150, its height should be limited to the level at which the floor logs will be located. The distance at which the piles should be located is about one  meters. In those places where the perimeter of the terrace is adjacent to the main building of a residential building and a load-bearing beam is installed at the corners of the building, its height should be equal to the height at which the future canopy will be located. The resulting structure is stitched together at ground level, at the level at which the floor will be located (the thickness of the floor board must be subtracted), and also at the level where the canopy will be located.
To do this, it is recommended to use a board made of a material such as larch; its size should be 150x50. The board must be fastened to the timber using M8 bolted connections with corrosion protection. Thus, having fastened all the necessary parts, you will get the frame of the future terrace.
After the terrace frame has been assembled, the floor can be laid. The level at which the lags will occur has already been set. The logs are attached along the length of the terrace in increments of one meter. For the logs, you must use the same board as for stitching the timber. Supports for the logs are located at a distance of one meter. For the floor, it is best to use a tongue-and-groove board made of coniferous wood, having a thickness of thirty-two millimeters to fifty millimeters. The board is attached to the joists using finishing nails through the groove. The ridges of the board must first be lubricated with PVA construction glue.
Once the floors are ready, you can begin the roof. For the rafters from which the terrace roof frame will be mounted, it is necessary to use boards that are lighter than for logs, for example, 40x100. They must be fastened “on edge” to boards that follow the level of the roof; the pitch should be equal to sixty centimeters. As for the rafter board, it is attached along the width of the terrace. A board twenty millimeters thick or plywood ten millimeters thick is laid across it. 
In principle, the canopy can be considered ready, all that remains is to put a protective layer against rain and snow. In this capacity, you can use galvanized sheets, metal tiles, soft tiles or other types of roofing material.
After completing the roofing of the terrace roof, it can be considered almost ready, all that remains is to install fences and stairs. You can purchase these materials at a hardware store; to continue the compositional plot, you can install wooden stairs and fences; you can, of course, give preference to forged ones, then you just need to entrust the craftsmen to take the dimensions and make these details of the terrace.
The wall of the house, to which the terrace mainly adjoins, is sheathed with a block house or clapboard. In order to protect the tree from pests and directly from rotting, it must be treated with a special antiseptic composition. For final finishing it is coated with varnish or paint.
The final stage of constructing a terrace will be the installation of benches, lamps, etc. The most popular furniture for the terrace today are rocking chairs, armchairs, chairs, tables, bedside tables, etc. assembled from rattan and wicker.
The veranda and gazebo are a stylish and functional decoration of a summer cottage.
But, if a gazebo is a separate structure that can be used in the summer, then a veranda is a room attached to the house that has a roof, walls and is intended for year-round use.
A warm veranda can serve as a corridor, hallway or recreation room, greenhouse, winter garden, you can even place a swimming pool in it
What is the difference between a veranda and a terrace? These concepts are often confused, although they have structural and visual differences. The presence of a roof and walls is what distinguishes a veranda from a terrace and porch.
The veranda is provided during the construction stage of the house, but more often it is completed during operation. Therefore, many are interested in how to attach a veranda to a house with their own hands. Below are step-by-step (step-by-step) instructions for building a veranda for a private house.
1. Veranda project
Any construction begins with the development of a project.
Summarizing the experience of constructing verandas, it can be noted that they differ in the following parameters:
Location (adjacent to the house):
- Corner.
- End
- Facade.


Degree of closure:
- Open.
- Closed (glazed.


By installing sliding doors for the veranda, you can transform a closed veranda into an open one.
Design feature:
- Built-in veranda (built together with the house, has a common foundation with it).
- Attached (added as needed, has its own foundation).


Veranda shape:
- A popular shape is the rectangle.
- Round (semicircular.
- Polygonal (hexagonal, octagonal).


The main purpose of the veranda is to make the house or cottage more spacious and decorate the building. The extension of the veranda also performs a purely utilitarian function - insulating the house. Therefore, the question naturally arises of how to attach a veranda to the house correctly. Despite the fact that the veranda is a summer structure, its construction requires the implementation of a number of rules.
What is included in the veranda construction project:
- location of the veranda. The main options are indicated above. It is important that the extension is a continuation of the house, representing a single architectural ensemble with it.
Note. It is better to place the veranda on the east or west side, then most of the time it will be out of direct sunlight. Also, it is worth taking into account the wind load in the region and on the site in particular.
- entry point to the veranda. The entrance can be from the street, from one of the rooms, or through, across the street into the house;
- door installation location. It is not advisable to place the entrance doors to the veranda and to the house opposite each other, otherwise drafts cannot be avoided;
- size of the veranda in the house. The length of the veranda is usually equal to the length of the wall along which it is built. The width ranges from 2.5 to 7 m. It is important here that the size of the veranda is proportional to the size of the house.
Advice from the master. There is no need to save on the project. Its high-quality execution guarantees that the veranda will be built correctly, and obtaining permits will not cause problems.
An example of a typical veranda design is shown in the diagram


How to attach a veranda to a wooden house
Any extension to a wooden house is carried out after the structure has settled. A house made of timber or logs shrinks over a certain period (the most active is the first 2-3 years). To avoid skewing of the walls, you need to wait this period, or consider a connection to the house that allows the frame to play.
2. Documents for the construction of a veranda (permission)
Adding a veranda refers to the remodeling of a house. Therefore, it requires obtaining permits.
To obtain permission to build a veranda (for an extension, reconstruction), you need to submit to the architecture department:
- a document confirming the ownership of the site;
- house project with a veranda;
- consent of all residents registered in the house;
- application for registration.
Note. You need to start processing documents 2-3 months before the planned construction work. According to user reviews, this procedure takes quite a lot of time.
In principle, it is possible to complete a veranda without documents, but when selling, renting, or inheriting, problems may arise with this property. The veranda is included in the total area of the residential building; the BTI may regard this as an “Unauthorized increase in living space.” Especially if the veranda is heated (warm veranda).
When building a veranda, you should not deviate from the dimensions indicated in the registered project. Any adjustment will entail a change in the project documentation and the payment of a fine. The consequences of unauthorized construction are spelled out in the Law of the Russian Federation “On Architectural Activities in the Russian Federation” and the Civil Code, an excerpt from which is given below.

The consequences for unauthorized construction are listed below

The last thing that will need to be done after the construction of the veranda is to legalize the construction with changes and obtain new documents.
3. Tools and materials for constructing a veranda
The tool depends on what material will be used in the construction of the extension. For wooden you need: a hacksaw, a screwdriver, a hammer and an axe, a sledgehammer, a tape measure, a plumb line, a level (construction and water level), a corner, a cord for marking, a shovel. For a metal frame, you will additionally need a grinder and a welding machine.
Material
The economy (budget) version of the veranda is a metal frame covered with plywood, OSB boards or plastic lining.
A veranda made of brick, natural stone or wood has a more presentable appearance. It is important here that the material of the extension matches the material from which the house or cottage is built or is in harmony (combined) with them.
To build a wooden veranda, you will need: lumber (log or timber, board, batten), fasteners (elements), protective solutions for wood, crushed stone, concrete, bitumen, drying oil or roofing felt, window and door systems, roofing material.
For a veranda with a metal frame: lumber will be replaced by metal corners and a steel profile, solutions for metal processing will be added, but otherwise the materials will be the same.
A polycarbonate veranda has proven itself well in that it allows you to unhinderedly admire the surrounding landscape. In addition, polycarbonate retains heat well, transmits light, and can be used for both walls and roofs. Plus, the cost of the material is quite reasonable. Cellular polycarbonate with a wall thickness of 14-18 mm is used.


Note. All materials requiring processing must be processed before work begins. Once the veranda is built, processing will be more difficult.
Preparation for construction
Construction of the veranda begins with preparing the site. The part of the site allocated for the veranda is turning into a construction site. Before starting work you need:
- remove the canopy over the entrance;
- dismantle the porch;
- clear the area of green spaces and debris;
- remove part of the turf;
- think over the place for laying building materials and construction waste.
4. Foundation for the veranda to the house
Before you start pouring the foundation, you need to determine its type. The most widespread is the columnar foundation for the veranda, since it makes it possible to attach a veranda without being tied to the main foundation of the house. However, a heavier veranda requires pouring a strip foundation.
An important point is soil analysis, which makes it possible to reasonably choose the foundation for the veranda of the house. The following are taken into account: the ability of the soil to absorb moisture, the homogeneity and composition of the soil, the level of freezing, the height of groundwater, and the stability of the soil.
In addition, the choice of base for the extension will be influenced by the design of the house’s foundation and the condition of the walls (wall material).
Having decided which foundation for the veranda is best to make, they make markings for a strip foundation or mark the location for installing pillars (supports) for a pile foundation.
Note. For a small wooden veranda, it is enough to install pillars at the corners of the structure. For long and wide ones, provide additional posts along the length/width of the base. The recommended installation spacing for supports is 500-600 mm.
How to make a columnar foundation for a veranda
- dig holes for the posts about 1 m deep. It is important to know that the depth of the foundation for the veranda depends on the depth of the foundation of the house (must be the same) and the level of soil freezing;
- At the bottom of the pit, a cushion is made from a mixture of crushed stone and sand. They can also be covered in layers, first with sand, then crushed stone or gravel;
- the concrete base is poured;
- support pillars for the columnar foundation are laid out/inserted:
Made of brick. If you need to add a veranda to a brick house;
From timber. For a wooden veranda;
From asbestos pipes, concrete pillars or metal supports. For a frame veranda.
 The ground part of the pillars is brought to the height of the main foundation of the house. If the base is high, you need to bring the extension to the level of the house.
Example in the photo (the first floor is used as a garage, the veranda is located at the level of the second floor).
 The installation site is covered with sand to eliminate and strengthen the gap between the post and the soil.
 The design of a veranda with a large mass requires pouring a strip foundation. To do this, you need to dig a trench, place the formwork (slightly higher than the required foundation height), and pour concrete. The process of complete hardening of concrete must be accompanied by periodic wetting with water to ensure uniform hardening of the concrete mixture.
5. Veranda frame
The installation of the frame begins with the completion of the bottom trim. To do this, timber is laid on the supports.


Note. The lower harness can have a double system. It is on this that the racks and floor joists will be attached in the future.
Next, supports are installed that form the frame of the veranda to the house. The frame of a wooden veranda is made of timber 120x80 or 100x100. When using logs, their diameter must exceed 120 mm. It is recommended to install supports at a distance of 500-600 mm, but in practice this is rare. However, supports must be installed in the corners and form door/window openings.
The height of the support is equal to the height of the veranda. In this case, the supports installed closer to the wall must be higher to form a pitched roof. Methods for attaching the racks to the bottom trim are shown in the figure.


Advice. The supports will be given rigidity by the jibs (braces) installed at the top and bottom.


When installing the frame, horizontal beams are installed, which will serve as the basis for installing the window sill board for glazing.
The installation of the veranda frame is completed by completing the top trim. It will serve as the basis for the formation of the rafter system, and will give the frame additional rigidity.
Note. To prevent the top trim from warping, the supports must be secured with temporary spacers.


Many people are interested in how to make a veranda frame from a log frame. Indeed, in this case, both the foundations of the buildings and the log house itself move. Therefore, all connections must be able to move (shift). Shrinkage compensators are installed from below, and from above the roof is firmly attached to the rafters of the log house.
6. Veranda roof
Part of the frame is the rafter system of the veranda. The installation of rafters and sheathing depends on what roofing material the veranda roof will be covered with.
From a design point of view, the following types of veranda roofs are distinguished:

Slope veranda roof.
The simplest and best option. In this case, the rafter system is mounted at an angle from the wall of the house, which allows rainwater or snow to flow down freely without causing damage to the building.
Note. A pitched roof is more convenient from the point of view of organizing drainage and, accordingly, installing a drainage system.

Gable roof veranda.
In this case, the veranda is attached to the house with a narrow part. It becomes like a passageway. This method has not found proper distribution. More often, such a roof is erected over a terrace.
The polygonal roof for the veranda is built in such a way that the angle of inclination is maintained for water drainage.
Installation of veranda rafter system
 A purlin board (beam 100x80 mm) is installed on the wall of the house. The timber is secured with anchor bolts. The upper parts of the rafter legs are mounted on it.
 A Mauerlat is installed around the perimeter of the frame. In small wooden extensions, this function is performed by the top trim boards. The lower parts of the rafter legs are installed on them.
 The lower part of the rafters is mounted so that it is possible to provide an overhang (removal) of the roofing material, which means protecting the veranda from the ingress of flowing water.
Note. The distance between the rafter legs depends on the slope of the roof, the width of the veranda, and the weight of the roofing material.
 When installing a polygonal veranda roofing system, a purlin board is additionally installed.
 Depending on the chosen material, they fill the lathing (for metal tiles, ondulin, slate) or make a continuous sheathing (for flexible roofing materials).
How to attach a veranda to a house - video instructions
7. Floor on the veranda
Construction procedure, materials, methods of fastening and processing.
DIY flooring technology:
Logs are installed on the bottom trim boards. The distance between adjacent logs should be no more than 1 m. The logs are installed perpendicular to how the floorboard will be laid.


Attaching the joist to the frame is an important point; the quality of its implementation determines the performance characteristics of the floor. The installation of the log is controlled by the level.

What to make floors from on an open veranda
Concrete flooring on the veranda is cheaper, plus it is durable and requires subsequent finishing. For example, you can lay tiles or lay linoleum. The wooden floor on the veranda, even painted, will deform over time. It is also recommended to use plastic baseboards with wood decor.
How to cover the floors on a closed veranda
The floor of the closed veranda is being laid. In this case, installation begins with the board furthest from the entrance. It is attached to the joists directly through the board.

Subsequent boards are mounted using the tongue-and-groove method, and the hardware is fastened through the groove.


How to fix a floorboard on a veranda
It is recommended to fasten floor boards with self-tapping screws. Their length should be twice the width of the board. The distance from the edge of the floorboard to the wall is 10-15 mm. This gap will compensate for the expansion of wood during the hot season.
How to cover the floor on the veranda (open, closed)
Wooden veranda flooring is one of the most popular and easiest to install. Therefore, the relevant question is how to treat the floor on the veranda in order to extend its service life and preserve its aesthetic properties.
Floorboards will last longer if they are additionally coated with solutions that prevent the appearance of fungus. As a finishing floor covering, a decorative layer of paint or stain is applied, covered with varnish on top.
A new product among paintwork materials is Dufa “Liquid Plastic” paint, intended for outdoor use (well suited for an open veranda).
Of the transparent coatings that have earned the respect of users:
- Tikkurila Valtti (wood oil);
- Pinotex Terrace Oil;
- Alpina Oel Terrassen Dunkel;
- Watco Danish Oil.;
- as well as epoxy varnishes (yacht varnishes), which are intended for use in damp environments.
- the product must be intended for wood;
- be resistant to abrasion;
- be resistant to environmental factors (water, temperature, ultraviolet).
It is worth noting that veranda floor coverings are quite expensive, but this is justified by their service life, without refinishing, and high aesthetic properties.
8. Roofing material for the veranda
As a roofing material, it is better to use a material for the veranda roof that is installed on the main building (house or cottage). Bituminous shingles have proven themselves well. They are installed in accordance with the manufacturer's recommendations.
 Note. To prevent water from flowing inside the veranda where the roof of the extension meets the wall of the house, you need to lay a joint strip on top of the roofing material.
 Correct installation of the joint strip involves making a gash in the wall of the house and inserting the narrow edge of the strip into it.
 You can admire the surrounding beauty in the warmth of the veranda by installing transparent roofs for the veranda. In this case, the role of roofing material is played by glass or cellular polycarbonate.
 Telescopic awning roofs or sliding roofs for the veranda are considered new.
). Installation of finishing materials depends on their type.
It is important to know that the wall of the veranda adjacent to the house is secured with embedded metal elements (parts). The fastening must be rigid.
Today, it is popular to cover veranda walls with sliding systems, the upper half of which is glass and the lower half is wooden.
Note. Before moving on to the external and internal decoration of the walls of the veranda, you need to give it time to settle. This is especially true for a wooden veranda.
10. Glazing of the veranda
Windows occupy a significant part of the veranda wall area. Due to the fact that the veranda is a summer structure, single wooden windows are usually installed, most often plastic or wooden. Aluminum windows with multi-chamber double-glazed windows are used.
The large veranda is equipped with both opening and fixed windows. The first allow for ventilation of the room, the second - save on glazing. Noteworthy are the sliding windows, which allow you to turn the veranda into an open terrace.
Among the new products, flexible windows for the veranda stand out. They allow you to extend the operational period of the summer veranda. The advantage of windows is their relatively low cost and the ability to quickly install and dismantle them for the winter. They make a high veranda safe for children to play without compromising its attractiveness.


Soft windows for the veranda are roller systems (PVC curtains), which allow you to glaze the veranda of any configuration (round, semicircular, oval).
Installation of soft windows - video
The veranda allows you to profitably expand the useful space of a residential building. In a properly constructed and well-equipped extension, you can comfortably spend time both in the warm and cold seasons.

It is best to build the extension so that it covers the entrance door to the main house. Therefore, you will not be able to build a veranda on any desired side of the already finished main building. Otherwise, the veranda will be separated from the main building and you will have to enter it from across the street.

The dimensions of the extension are selected individually. For a family of 3-6 people, a veranda measuring 3x4 m is enough. It is also important to take into account the general view from the street. For example, if you live in a large two- or even three-story house, and the veranda is very small, the overall architectural ensemble will turn out to be inharmonious. For compact houses, you can safely add verandas the width of the entire wall of the main building - it looks great.

Important note! Regardless of the chosen dimensions and the overall features of the extension, its construction must first be legalized. To do this, you must have a project on hand. You can find it in open sources or order it from a specialized company.
Take your project to your local architectural department. Department employees will study your project, make the necessary changes and issue a permit. Keep in mind that on average it takes about 2-3 months to review and approve a project, so it is best to resolve this issue in the winter, before the start of the construction season.


Construction site marking
We are starting to prepare our construction site.
First step. We remove about 150 mm of the top layer of soil from the perimeter of the future building and take it to the flower beds, vegetable garden or other place.
Second step. Align the resulting depression.
Third step. We carry out the markings. First, focusing on the project, we drive in metal or wooden pins at the corners of the site, then in the same way we drive in intermediate pegs every 1-1.5 m, and then we pull a rope between the pins. We will use it to guide us in the process of arranging the foundation.
Making the foundation
Most often, verandas are built on columnar or strip type foundations. The depth of the support is assumed to be equal to the depth of the foundation of the main house. It is strongly not recommended to connect the main support to the foundation of the extension, because these structures will have widely varying weights. Consequently, the degree of their shrinkage will also vary. To prevent a heavy house from dragging down a relatively light extension, the latter must be built on a separate foundation. To do this, leave approximately a 3-4 cm gap between the foundations.
Important point! When choosing the type of foundation, consider, first of all, the soil characteristics in your region and the total mass of the veranda. For the construction of heavy structures on heaving soils, monolithic ones are best suited. Lightweight structures, for example, made of wood, can be built on columnar supports.
Tape base
A strip-type foundation is optimally suited for the further construction of a veranda on it from building blocks or bricks. The thickness of the base, as already noted, is maintained equal to the thickness of the foundation of the house. If this is a new building, keep the thickness at 70-80 cm.
First step. We dig a trench around the perimeter of the walls of the extension.

Second step. We level the bottom and walls of the trench using wooden boards or panels to the height of the future concrete support.
Third step. We successively fill the bottom of the trench with a 10-centimeter layer of sand and the same layer of crushed stone, making sure to compact each ball of backfill.
Fourth step. We lay a reinforcing mesh of 10-12 mm bars. The recommended mesh size is 10x10 cm. This way the base will be as strong as possible.
Fifth step. We pour concrete prepared from a portion of cement, three portions of sand, 4-5 portions of crushed stone and water.
Carefully level the fill and leave it to dry and gain strength for 3-4 weeks. In hot weather, we pour concrete every day to prevent it from cracking.

Columnar base
Perfect for a veranda made of timber or polycarbonate. It is recommended to make holes for posts with a depth of 80-110 cm. If the veranda is small (up to about 3x4 m), it will be enough to install supports in the corners. However, professional builders recommend installing intermediate posts for any size veranda. We maintain the distance between supports within 0.8-1 m.

First step. We dig holes in the places where the pillars will be poured. The most convenient way to do this is with a drill.
Second step. We fill the bottom of each depression with a 15-20 cm layer of sand. Additionally, it is recommended to pour approximately 10 cm of crushed stone. We compact each layer.
Third step. Pour the concrete to the ground level and let it harden.
Fourth step. We coat the finished concrete supports with bitumen.
Fifth step. We fill the gaps between the ground and the supports with sand.

Sixth step. We erect the above-ground part of the pillars from brick. We make the height equal to the height of the foundation of the main house.


Making a subfloor
The floor can be wooden or concrete. For example, in a frame veranda made of wooden beams, a wooden floor would be more appropriate. Concrete pouring will best fit into a brick extension.

We make a wooden subfloor like this:
- We fix the beam of the lower trim on the foundation. We use suitable fasteners, for example, anchors. To connect the beams directly, we first make samples at the places of their joints and additionally fasten them with galvanized nails;
- We attach wooden logs to the bottom trim. We keep the step at 50 cm - this way the floor will definitely not fall through. We use the connection option described above;
- fill the space between the joists with expanded clay;
- We make the flooring from unedged boards or plywood about 50 mm thick. We attach the flooring elements to the joists with galvanized nails or self-tapping screws.
We make a concrete screed like this:
- fill the base with a 10-centimeter layer of sand;
- pour a layer on top;
- lay the reinforcing mesh. For the floor of the veranda, a mesh of rods with a diameter of 6-8 mm with cells of 25x25 cm is sufficient;
- pour concrete.
Important! The screed should be as even as possible. We carry out the work with the obligatory use of a level.
Building a wooden veranda
Basic properties of the material
Wood is one of the most popular and ancient building materials. Even after the appearance on the market of all kinds of blocks and other low-cost and easy-to-arrange elements, wood practically did not lose ground.
Almost anyone can handle the construction of a simple frame wooden veranda. You just need to properly mount the frame posts and cover them with shields, clapboard or other suitable material.
The undeniable advantages of wood are its environmental friendliness, beautiful appearance and relatively low weight. The latter property allows you to abandon the construction of expensive and difficult to construct foundations.
The main disadvantage of a wooden veranda is its fire hazard - installing a barbecue in such an extension or in close proximity to it is a very important undertaking that requires taking into account many nuances and details. Therefore, it is better to move the source of fire somewhere further outside the wooden veranda.
Another significant disadvantage of wood is its poor tolerance to high humidity, which is why the material requires serious pre-treatment with special ones. Without such preparation, the wood will rot very quickly.
Construction order

To build the frame, we use high-quality wooden beams with a cross-section of 100x100 mm. We already have the bottom trim and subfloor, so we continue to work, adhering to the instructions below.


First step. We cut grooves in the beam of the lower trim for installing vertical supports. We maintain a half-meter step.
Second step. We install vertical racks. To fasten the frame elements we use staples and screws or nails.

Important! The roof of our veranda, as noted, will be sloping. Therefore, we make the vertical beam installed at the bottom point of the slope 50 cm below the opposite posts.


Third step. We mount the beam of the upper trim. On higher racks no questions will arise - we perform the connections in exactly the same way as in the previous stages.
When installing the strapping of lower supports, we do the following: first we connect the pillars longitudinally with a strapping beam, and then we fix the transverse crossbars connecting the high and low posts at the height of the low posts. We fasten the crossbars to the high posts using pre-created samples and nails.
Fourth step. The top trim is ready. The resulting slope will allow us to lay the rafters for the roof. Additionally, we nail a girder near the roof slope. To fasten the beam to all supports, we use anchor bolts. For greater reliability, it is recommended to fasten the strapping beams with transverse boards or beams, if possible and necessary (we focus on the weight of the future roofing material). We will attach racks and struts to them for greater strength of the rafter system.
Fifth step. We install in increments of 50 cm. For this we use a wooden beam with a section of 100x200 mm. We connect structural elements using any of the previously discussed methods.


Sixth step. We cover the frame. Lining is perfect for interior cladding, and siding or other material for exterior cladding. We lay layers of hydro- and thermal insulation between the external and internal cladding materials. We attach the film to the frame. The position of the insulation is fixed by transverse slats. The finishing material is also attached to them. When covering, do not forget to leave openings for windows and doors.


Prices for various types of timber
Brick verandas
Basic information about building materials
Brick is excellent for constructing permanent verandas. A building made from this material will be cool in the summer and, provided the insulation is properly insulated, warm in the winter. Brickwork is durable, fireproof and easy to maintain.
The main disadvantage of a brick building is its heavy weight. Such structures are built exclusively on , which does not have the best effect on the total cost of construction.
The procedure for constructing a veranda
The foundation is ready and waterproofed, the screed is poured, the base is level and does not require any additional preparatory measures. Let's start laying out the walls.

We first select the appropriate type of masonry. The simplest options, perfect for constructing a veranda yourself, are as follows:
- spoon masonry. The final wall thickness will be 120 mm;
- bonded masonry. Wall thickness – 250 mm;
- chain laying. Allows you to obtain walls with a thickness of 380 mm.
First step. We attach a mooring cord to two opposite ends of the foundation with a tie. It should run along the edge of the base.
Second step. We place the corner bricks along the cord, and then fill the space between them in accordance with the chosen masonry method. To fasten building elements we use standard cement mortar.

Third step. We check the evenness of the first row and similarly lay out the walls to the required height, not forgetting to leave openings for doors and windows.
Important! will be inclined, so we make the wall at the bottom of the slope, as well as the side walls adjacent to it, a row lower compared to the wall supporting the top of the roof.
Having laid out the last row of walls, we arrange an armored belt. To do this, we fix formwork about 70 mm high on each wall along the upper surface of the walls, place anchor bolts in the corners, lay reinforcing bars and pour concrete.
We let the concrete harden, and then attach a strapping of wooden beams with a section of 10x10 cm to the anchor bolts. The further procedure for arranging the rafter system remains similar to the situation with
If the veranda is planned to be used throughout the year, the walls can be laid in two rows, filling the gap between the rows with thermal insulation material. With single masonry, insulation, moisture insulation and interior finishing are carried out by analogy with a wooden veranda. Exterior decoration is at your discretion. You can simply carefully unstitch the seams and call it a day.


| Masonry size | Length, L | Width, V | Height, N | Number of bricks excluding thickness mortar joint, PC. | Number of bricks taking into account thickness mortar joint 10 mm, PC. |
|---|---|---|---|---|---|
| 1 m3 single brick masonry | 250 | 120 | 65 | 512 | 394 |
| 1 m3 thickened brick masonry | 250 | 120 | 88 | 378 | 302 |
| 250 | 120 | 65 | 61 | 51 | |
| 1 sq. m of masonry in half a brick (masonry thickness 120 mm) | 250 | 120 | 88 | 45 | 39 |
| 1 sq. m of masonry in one brick (masonry thickness 250 mm) | 250 | 120 | 65 | 128 | 102 |
| 250 | 120 | 65 | 189 | 153 | |
| 1 sq. m of masonry of one and a half bricks (masonry thickness 380 mm) | 250 | 120 | 88 | 140 | 117 |
| 250 | 120 | 65 | 256 | 204 | |
| 1 sq. m of masonry in two bricks (masonry thickness 510 mm) | 250 | 120 | 88 | 190 | 156 |
| | 250 | 250 | 65 | 317 | 255 |
| 1 sq. m of masonry in two and a half bricks (masonry thickness 640 mm) | 250 | 250 | 88 | 235 | 195 |
Prices for construction and facing bricks
Construction and facing bricks
Making a veranda roof
And the rafters are installed. All that remains is to make the sheathing, install the insulating layers and lay the finishing roofing material.
The lathing can be solid (for rolled materials) and sparse (for sheet roofing). We make continuous sheathing from OSB boards. To do this, we attach them to the rafters with a 1-centimeter gap. We fasten the sparse sheathing beams at a pitch recommended by the manufacturer of the selected roofing material. On average, it is 30-35 cm. To attach the sheathing to the rafters, we use galvanized nails or self-tapping screws.
We fill the cells between the sheathing beams with mineral wool for thermal insulation. We lay a waterproofing film on top and attach it to the sheathing using a stapler with staples. In the case of arranging a continuous sheathing, we fix the thermal insulation from the inside of the room. We secure the insulation boards using transverse slats, nailing them to the sheathing.
Finally, all that remains is to mount. It is better that it matches the roof covering of the main house. For the rest, we focus on our preferences and available budget.


Finishing the floor
If the subfloor is wooden, we lay insulation in the space between them and fill the flooring from edged boards to the joists. We paint and varnish the boards.
You can also install a boardwalk on top of the concrete screed, similar to the previous method, or lay another material of your choice, for example, linoleum.


Finally, all that remains is the doors, furnishing at your discretion and connecting lighting if necessary. We won't pull the wiring. It is enough to remove the extension cord from the house and turn on the necessary lighting fixtures.

Good luck!
Video - DIY veranda