It's hard to find a person who doesn't like listening to music. To satisfy this desire, high-quality music centers, speakers and other devices are purchased. To get even more pleasure, many people think about creating special color effects that can decorate any sound and create a romantic atmosphere on a date or a fun mood when organizing a holiday party. Color music, like music centers, can be purchased, or you can make it yourself. The best option is to make color music using LEDs with your own hands according to one of the proposed schemes.
Advantages of LED products
The modern electronics market presents a wide variety of LED strips that have a wide variety of color effects. With their help, you can create high-quality spot lighting; it is possible to create light music with flashing or blurry effects.
Unlike conventional light bulbs, LEDs have many positive characteristics. Among the main advantages of LED strips are:
- wide and varied range of colors;
- rendering rich colors;
- different design options - rulers, modules, discrete elements, RGB strips;
- high response speed;
- minimum amount of energy consumed.
The ribbons can be used at home, in clubs and cafes, and can be used to effectively illuminate shop windows. This article will describe in more detail the option of LED color music for ordinary home use.
Simple circuit with one lamp
To begin with, it’s worth studying a simple color music scheme. This is a device that consists of one LED, transistor and resistor. Power for such color music can be supplied from a constant current source with a voltage of 6-12 volts. The device operates on the principle of an amplification stage with a common emitter. The impact in the form of a signal varying in frequency and amplitude arrives at the main base. As soon as the oscillation frequency exceeds a certain threshold value, the transistor opens and the LED immediately flashes.

This scheme of simple color music using LEDs has one drawback - the rate of blinking of the LED depends entirely on the level of the sound signal produced. In other words, the light effect will be activated only at a certain level of volume produced by the music center. When the sound intensity decreases, the glow will be constant with occasional winks.
Scheme with one-color ribbon
This color music on a transistor is assembled using an LED strip in the load. To organize such color music, you will need to increase the power supply to 12 V, find and install a transistor with a maximum collector current that exceeds the load current, and you will also need to recalculate the total value of the resistor. This color music is quite simple, made on one single-color LED strip and is ideal for beginner radio amateurs. You can assemble it without any problems at home.
Simple three-channel circuit
To get color music that is free of all the disadvantages listed above, you should use a special three-channel sound converter. Such a circuit is powered from an LED strip with a constant voltage of 9 V and is able to effectively illuminate one or two LEDs in each channel. Among the main structural elements that characterize such a color-musical scheme are:
- three independent amplifier stages, which are assembled using transistors of the KT315 (KT3102) category;
- LEDs of different colors are included in the transistor load;
- For the pre-amplification element, a network small step-down transformer can be used.

The incoming signal is fed to the secondary winding of the transformer, which in turn performs two main functions - it decouples two devices at the galvanic level, and also amplifies the sound from the main linear output. After this, the signal is fed to three parallel and connected filters assembled on the basis of RC circuits. They operate on an individual frequency band, which directly depends on the value of the capacitor and resistor.
Color music with RGB tape
This attachment circuit operates on 12 volts and is ideal for installation on a car. This color music optimally combines the main functions of the previously discussed schemes and is able to work both in the lamp mode and in the color music mode. The second mode is achieved through special non-contact control of the RGB strip via a microphone. As for the lamp mode, it is based on the simultaneous launch of the green, red and blue LED at full power. The mode can be selected using a special switch located on a special board.
To understand how this attachment works, it is worth studying its sequence of actions. The main source of the signal here is a microphone, which converts sound vibrations emanating from the phonogram. The received signal is insignificant and therefore requires amplification. This can be achieved by using a transistor or a special operational amplifier. After this, the automatic AGC level controller starts. It effectively keeps sound fluctuations within reasonable limits and prepares it for subsequent processing. Built-in filters divide the signal into three parts, each of which operates in one specific frequency range. Finally, you just need to amplify the previously prepared current signal. For this purpose, special transistors are used that operate in key mode.

Purchase of a ready-made CMU
If you don’t want to make a color music system for use at home, you can purchase a CMU, that is, a color music installation. This is a ready-made functional solution that includes a controller. It will process the sound, converting it into a light and music visual representation. In the process of reproducing the light, its intensity and color scheme will change, thereby creating the effect of a real disco. The CMU device also includes a panel with built-in diodes.
These devices may be based on a spectral decomposition into frequencies, where each of them will have a specific color scheme or preset adjustments with a variety of effects and their alternation. They can be configured using the included remote control.
Important! Modern CMUs are very simple to install and configure. This is an ideal solution for organizing a home party or disco.
Conclusion
There are quite a lot of schemes for independently performing color music settings. You can choose a fairly simple option, where the color of the RGB tape will simply change, to quite complex ones, which in the process of work will create a large number of different effects, overflows and attenuations. Depending on your skills, you can choose and execute the appropriate option. It is enough to work a little and create something truly unique; it will be lighting equipment that delights with the shimmer of a wide variety of color shades. Also, do not forget that there is always the opportunity to buy a ready-made color music solution and fill your home with color shades and joy.
Color music equipment that changes color, intensity, effects and rhythm is an integral attribute of a good party, capable of lifting and moving to the beat of the music of the laziest and most melancholy of the event participants. In this article we will discuss the nuances of LED color music, the possibilities of making it yourself and options for use in various conditions.
With the saturation of the market with LED lighting equipment, the scope of its application is expanding exponentially and is no longer limited solely to design delights in interior lighting, conciseness and efficiency in lighting offices and work lighting, or the desire to create durable and high-quality lighting for the exterior of buildings. LED lamps have penetrated into all areas where their colossal technological advancement, energy efficiency, minimal dimensions with maximum output can serve well and bring benefits or aesthetic pleasure - car tuning, phytolamps for growing home gardens, and, of course, color music.

Color music using LED components has a number of significant advantages over analogues using outdated lamps:
- The small size of LEDs, combined with energy efficiency, gives rise to an abundance of possible forms for creating light and music equipment, and we are talking not only about external form factors, but also about the possibilities of using LEDs in a wide variety of effects when working with light and its various colors, because the LED element can produce a point stream of light. Strobes, spotlights, disco balls and much more are available for use even at home.
- The safety of using color music or LED emitters is maximum, compared to outdated lamps - the operating temperature range of LED elements does not exceed 60 degrees Celsius, which means that there should simply be no concern about the fire of any home decor elements or materials. Let the colors fill your home along with the music without any of the hassle of using lights and music equipment.
- The long service life of color music for the home makes the purchase of such equipment advisable, because it is designed for 8,000-10,000 thousand hours of operation, that is, a whole year of uninterrupted service. And taking into account the fact that the number of switches on and off does not in any way affect the consumer properties of LED elements, and most people do not organize round-the-clock parties every day, home color music can delight its owner and his guests for many years.
- Quality of color and light transmission. LED lighting has the widest range of colors and shades, which is one of the main advantages for color music as such, because a variety of colors plays an important role in creating the atmosphere. Also, unlike laser color music, LED equipment is harmless to the eyes and cannot damage vision when the light flux directly hits the retina.
Options for creating light and music lighting at home
- The simplest option is to buy a special portable lamp or lamp that will change colors or use several colors at once, with one or more effects. There are a lot of such options, they are very common and budget-friendly. For an entry-level player, to please yourself and your friends with a simple but enjoyable game with bright lights and colors accompanied by music, it will be quite enough.
- The best quality option, if you don’t do it yourself using the most complex schemes, is to purchase a ready-made solution, the so-called CMU (Color Music Units). This is a ready-made solution that includes a controller that will process the sound signal, turning it into a light and music performance, changing the intensity and colors of light streams, creating the effect of a full-fledged disco, and directly panels with diodes. CMUs are easy to install, and if you want to create a disco at home with your own hands, this is a very good option. Such DMUs can be based on spectral decomposition by frequencies, when each frequency will have a corresponding color, or specified adjustments with all sorts of effects and their alternation, which can be configured using the included remote control.
- The third option is to assemble the color music yourself. There are a lot of detailed diagrams on the Internet, according to which a person with experience in working with electronics can make color music for the home with his own hands. You can do without circuits by using a separately purchased color and music controller and, say, several pieces of RGB tape. In fact, as for lighting devices for disco effects, created with your own hands, there can be a really huge variety of them. There are a lot of diagrams, as well as video instructions on how to assemble equipment using these diagrams. There are schemes using external microphones; lighting devices assembled according to these schemes will change color and effects exactly to the playing melody.
The schemes offered on the Internet for making color music with your own hands are as diverse as possible - from the simplest, when the color of the RGB tape will change, to the most complex, with many effects, attenuation and overflows. Depending on your skills, you can choose the appropriate option, find the right scheme and create something unique, lighting equipment that will delight you and your guests with the shimmer of all colors. If you are not ready to make LED color music yourself, with your own hands, then you can turn to the ready-made solutions market and fill your home with a variety of colors and joy.
Step-by-step assembly of a simple design of LED color music, with a passing study of amateur radio programs
Good afternoon, dear radio amateurs!
Welcome to the website ““
We assemble LED light music (color music).
Part 1.
At today's lesson in Beginning radio amateur school we will start collecting LED light music. During this lesson, we will not only assemble light music, but also study another amateur radio program "Cadsoft Eagle"– a simple, but at the same time powerful, comprehensive tool for the development of printed circuit boards and we will learn how to make printed circuit boards using film photoresist. Today we will choose a circuit, look at how it works, and select the details.
Light and music (color and music) devices were very popular during the Soviet Union. They were mainly three-colored (red, green or yellow and blue) and were most often assembled using the simplest circuits on more or less affordable KU202N thyristors (which, if my memory serves me correctly, cost more than 2 rubles in stores, i.e. were quite expensive) and the simplest audio frequency input filters on coils wound on sections of ferrite rods from radio receivers. They were made mainly in two versions - in the form of three-color spotlights on 220-volt light bulbs, or a special case was made in the form of a box, where a certain number of light bulbs of each color were located inside, and the front of the box was closed with frosted glass, which made it possible to obtain a fancy look on such a screen. light accompaniment of music. Also, ordinary glass was used for the screen, and small fragments of car glass were glued on top of it for better light scattering. It was such a difficult childhood. But today, in the age of the development of incomprehensible capitalism in our country, it is possible to assemble a light and sound device for every taste, which is what we will do.
We will take as a basis LED light circuit diagram published on the website:
To this diagram we will add two more elements:
1. . Since we will have a stereo signal at the input, and in order not to lose sound from any channel, or not to connect two channels directly to each other, we will use the following input node (taken from another light-music circuit):

2. Device power supply . We will supplement the light and music circuit with a power supply assembled on a KR142EN8 microcircuit stabilizer:

This is approximately the set of parts we need to assemble:

LEDs for this device can be used of any type, but they must be super-bright and of different colors. I will use ultra-bright, highly directional LEDs, the light from which will be directed towards the ceiling. You, of course, can use a different option for the light display of the sound signal and use a different type of LEDs:

How does this scheme work? . The stereo signal from the sound source is supplied to the input node, which sums the signals from the left and right channels and feeds it to variable resistances R6, R7, R8, which regulate the signal level for each channel. Next, the signal goes to three active filters, assembled according to an identical circuit using transistors VT1-VT3, which differ only in capacitor values. The meaning of these filters is that they pass through only a strictly defined band of the audio signal, cutting off the unnecessary frequency range of the audio signal from above and below. The upper (according to the diagram) filter passes the band 100-800 Hz, the middle one – 500-2000 Hz and the lower one – 1500-5000 Hz. Using trimming resistors R5, R12 and R16, you can shift the transmitted band in any direction. If you want to obtain other signal bandwidths of the filters, you can experiment with the values of the capacitors included in the filters. Next, the signals from the filters are sent to microcircuits A1-A3 - LM3915. What kind of microcircuits are these?
LM3914, LM3915 and LM3916 chips from National Semiconductors allow you to build LED indicators with various characteristics - linear, stretched linear, logarithmic, special for monitoring an audio signal. In this case, LM3914 is for a linear scale, LM3915 is for a logarithmic scale, and LM3916 is for a special scale. We use LM3915 chips - with a logarithmic scale for monitoring the audio signal.
The initial page of the microcircuit datasheet:

(327.0 KiB, 4,026 hits)
In general, I advise you that when faced with a new, unknown radio component, look for its datasheet on the Internet and study it, especially since there are also datasheets translated into Russian.
For example, what can we glean from the first sheet of the LM3915 datasheet (even with minimal knowledge of English, and in extreme cases, using a dictionary):
- this microcircuit is an analog signal level indicator with a logarithmic display scale and a step of 3 dB;
– you can connect both LEDs and LCD indicators;
– indication can be carried out in two modes: “dot” and “column”;
– maximum output current for each LED – 30 mA;
- and so on…
By the way, what is the difference between a “dot” and a “column”. In the “dot” mode, when the next LED is turned on, the previous one goes out, and in the “column” mode, the previous LEDs do not go out. To switch to the “point” mode, just disconnect pin 9 of the microcircuit from the “+” power source, or connect it to “ground”. By the way, these microcircuits can be used to assemble very useful and interesting circuits.
Let's continue. Since alternating voltage is supplied to the inputs of the microcircuits, the glowing column of LEDs will have uneven brightness, i.e. As the input signal level increases, not only will successive LEDs light up, but their brightness will also change. Below is a table of the threshold activation of each LED for different microcircuits in volts and decibels:

Characteristics and pinout of transistor KT315:

This concludes the first part of the lesson on assembling LED light music and begins to assemble the parts. In the next part of the lesson, we will study the PCB design program “Cadsoft Eagle” and make a printed circuit board for our device using film photoresist.
The other day I decided to assemble a color music installation. The local club really wanted to add lighting effects. After a good search on the Internet, I found a 3-channel CMU (color music unit). The circuit does not look complicated, and it turned out to be easy to solder. Here it is:This 3-channel DMU is very easy to manufacture, but has some disadvantages. This is, firstly, the high required input signal level, secondly, low input impedance, and thirdly, the sharp blinking of the lamps, caused by the lack of compression and the simplicity of the filters used. But for beginner radio amateurs, the scheme will be just right.
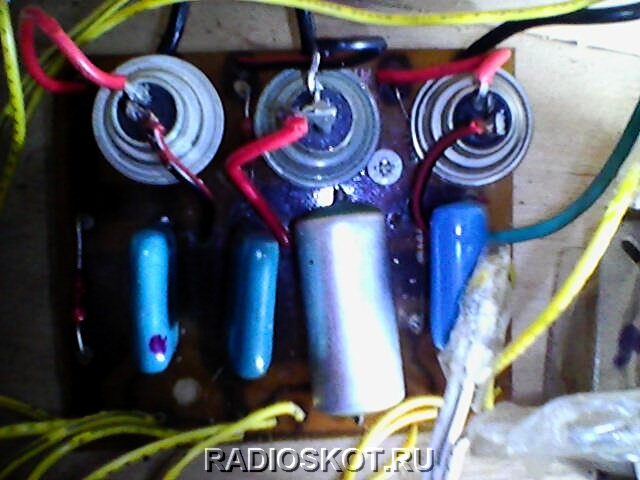
The flashes are controlled by thyristors. They can be placed in the KU202 series with the letters k, l, m, n. Of course, it’s better to take ones like those in the diagram. Power supply from 220V network. Each channel is adjusted using variable resistors. The circuit does not require any configuration; it works immediately after proper assembly. When working with color music, keep in mind that you need a fairly large music signal.

Transformer TP1 is made on a Ш16x24 core made of transformer steel. Winding I contains 60 turns of PEL 0.51 wire. Winding II - 100 turns PEL 0.51. Any other small-sized transformer (for example, from transistor receivers) with a ratio of turns in the windings close to 1:2 can be used. Thyristors must be installed on heat sinks if the total lamp power per channel exceeds 200 W.

Assembled and checked. Works very well. Here is the device itself in the case:

This is the arrangement of elements inside the box that I chose. It is better to turn it on via a diode bridge. It's cheap. But I think it’s not this that’s important to a radio amateur, but the repetition of the device itself. Even a beginner can solder the circuit. The finished color music device operates without interference, and does not strain the thyristors for a long time. They don't even heat up. Author of the material: Max.