Every mother can sew a doll for her daughter, says Emma Hardy, author of a new book. crafts. Or maybe we can get down to business together? A rag doll will become another character in children's games or a gift for loved ones. Here is a detailed master class with doll patterns and photos.
I was taught to sew when I was very little, and I spent many happy hours making outfits for my dolls. Having mastered the simplest stitches, I began to enjoy the fact that I could create clothes from scraps, and I was proud that my hands had made beautiful things.
As I got older, I started sewing clothes for myself and since then I have constantly used the skills I acquired in childhood. Now my daughters are learning to sew and enjoy it just as much as I once did.
Collect buttons and ribbons and store them in jars and boxes. Don't throw away old clothes. From all this you will then create amazing models. Don't be discouraged if everything doesn't work out right away: with practice, the stitches will become neater and smoother. And remember: when you can see that something was made with your own hands, this gives it special value.

Rag dolls
Add one of these adorable dolls to your toy collection. You'll need to get a large piece of plain fabric: white, nude, or even dark brown (if you want your doll to have a bronze tan). You will also need a one-color hair piece. Otherwise, you can get by with fabrics of any colors that you have on hand.
You will need:
- Paper and pencil
- Scissors
- Felt for torso, arms and legs
- Felt of a different color for hair
- Pins
- Floss and embroidery needle
- Fiber filler (or cotton wool)
- Felt pieces for eyes and mouth

How to make a pattern
Print out the template, place a sheet of tracing paper on top, through which the outline of the template will be visible. Trace the outline with a pencil and cut out the part. This is the pattern. Before attaching the pattern to the fabric with pins, lay the fabric out on a flat surface so that there are no wrinkles. If the fabric is wrinkled, iron it. Place the pattern close to the edges of the fabric to reduce waste. If you need two identical parts, then fold the fabric in half and then attach the pattern. Cut the pieces as close to the edges of the patterns as possible, then remove the pins and remove the patterns.
- Using the templates, cut out patterns for the torso, arms, legs and hair from paper. Set your hair patterns aside. Fold the felt in half for the torso, arms and legs. Pin the patterns onto it so that the long edges of the patterns fall on the fold of the fabric. Cut out two parts each for the torso, arms and legs. Don't forget to take out the pins and remove the patterns.

- Pin the two parts of the body together. Thread the floss into an embroidery needle. Make a puncture with a needle on the inside of the body and sew both parts with a hidden seam, but do not sew up the bottom. Secure the thread also on the inside of the body. Don't forget to take out the pins.
Blind seam
Used to join two layers of fabric or to sew up gaps in seams. Secure the thread with a few short stitches or tie it in a knot. Then pierce both layers of fabric with a needle and thread from the bottom up, a few millimeters from the edge, and pull the thread out. Use a needle to grab a few threads on the second layer of fabric, then pass the needle and thread through the first (closest to you) layer of fabric. You will get a stitch. Continue making the same stitches. They should be quite tiny. Do not tighten the thread too much, otherwise the stitches will be visible from the front side.

Discussion
For a child's development, creativity is a very important element of life. And creativity together with mom brings closer and improves relationships. Thanks for the interesting article!
Comment on the article "Do-it-yourself dolls - master class for mother and daughter. Patterns and photos"
mothers of girls 4-8 DOLLS
Mothers (21-45 years old), girls 4-8 years old, daughters who like to play with dolls (for example Barbie, Winx, My Little Pony or any others) are invited to participate in the survey. Do not participate in basic surveys for 6 months! schedule: 2.02 13:00-15:00 mothers of girls 4-5 years old 2.02 17:30-19:30 mothers of girls 4-5 years old 3.02 10:00-12:00 mothers of girls 4-5 years old 3.02 12:30-14 :30 mothers of girls 6-8 years old 4.02 10:30-12:30 mothers of girls 6-8 years old 4.02 12:30-14:30 mothers of girls 6-8 years old reward 2000 rubles/reserve 1000 rubles Send a photo along with your application...
The House of Family Creativity on the “Island of Masters” welcomes guests!
The winter festival “Journey to Christmas” turned Moscow into a real fairy-tale city, and Nikolskaya Street became the main craft street of the country - the real “Island of Masters” is located here. While walking around the “Island of Masters”, both adults and children can look into the House of Family Creativity. In the friendly atmosphere of a warm House, they will be able to warm up, as well as have an interesting and useful time by taking part in entertaining thematic master classes. Can not imagine...
Pregnant Anna Khilkevich: giving birth soon
29-year-old actress Anna Khilkevich is about to give birth to her first child. Khilkevich became famous after her roles in the series “Univer” and in the films “Yolki”; the actress also starred in a candid shoot for Maxim magazine - but recently “decided that this was my last photo shoot of this kind in my life.” Today, the expectant mother published a photo shoot of a completely different kind on social networks (author - @polinabertrand): Anna Khilkevich continues to attend parties and premieres, take care of herself... “Perhaps it seems strange to some...
Mother's Day in Manege 29/11
The charitable foundation "Volunteers to help orphans" invites you to visit the Manezh on November 29. On this day, every mother will be able to relax and take care of herself, and it is not at all necessary to leave the child at home. A beauty salon and lecture hall will operate in the Central Manege, while children will be busy with creative master classes and games. You can get a manicure and visit a makeup artist, get an image consultation and update your wardrobe, take part in culinary master classes, try your luck in the lottery and...
Newborn stroller from hand to hand: from Prince Andrew to Princess Charlotte
The stroller in which Kate Middleton carried her daughter, Princess Charlotte, to her christening attracted the attention of not only young mothers, but also vintage lovers. The Millson brand stroller is the Rolls Royce of strollers. The company, founded at the beginning of the 20th century, made strollers according to the same principles as luxury carriages - they were the embodiment of elegance and British style. At the end of the 60s, when the era of respectability and solidity finally faded away, the company also closed. Spacious and stable...
DIY doll "Leshka saffron milk cap"
Greetings, dear craft lovers. Today I want to tell you a short story and introduce you to its hero - the red-haired boy Alyosha. My sons often asked me why I only make dolls - girls, are boys worse? Of course not, boys also play with dolls, but their games are always different from girls’. The appearance, design and history of a doll for a boy is always more strict and serious, because we want to raise real men. It's best to create...
How to make a doll with your own hands
So, you are tired of the monotonous plastic toys that fill store windows, but you really want to become the owner of your own unique doll, and you immediately asked the question “How to make a doll with your own hands?” There are many answers to this question, and it all depends, first of all, on what kind of doll you want to make and for what purpose. And of course, the level of your skills as a needlewoman is important. There are many directions in modern puppetry...
Winx and Gulli TV channel announce a competition for mothers and daughters
The Winx fairies, known for the animated series “Winx Club: School of Sorceresses,” and the children’s and family TV channel Gulli are launching the “Adopt Mom to the Winx Club” competition. The Winx Club actively supports the friendship of mothers and daughters and gives a chance to win a common gift on International Women's Day! In order to take part in a creative competition on the channel’s website, you need to take a photo with your mother in the image of the Winx fairies and upload the photo to the website www.gulli.ru. The authors of the best photographs will have the opportunity to win one...
“World of Childhood” recommends soft dolls for your sweet daughter as a gift on March 8
What could be more desirable for a girl than a new doll? Especially if she is wearing an elegant bright dress. On this day, men are happy to give flowers to their beloved women, and World of Childhood advises giving cute textile dolls to their sweetheart daughters. Dolls are every girl's favorite first toys. You can walk with them, tell them your secrets and play daughter-mother. And if the doll is soft, without small sharp parts, then you can sleep with it and have only good dreams. “March 8 is a holiday...
How to achieve this?
Top 140 best handicraft sites
1. Domashny Ochag - women's magazine. [link-1] 2. Website dedicated to knitting [link-2] 3. Resource about knitting [link-3] 4. Darievna.ru: crocheting and knitting, embroidery and other types of needlework [link-4] 5. “World of Embroidery” [link-5] 6. Vyazhi.ru - Website about knitting. Exclusive models. [link-6] 7. Baubles.ru - Weaving baubles from floss; kumihimo, etc. [link-7] 8. Author's cross stitch patterns [link-8] 9. MiniBanda.ru - all about your children [link-9] 10. Riolis - kits and patterns for...
Maslenitsa fun with children: weaving a doll-amulet from bast
On Saturday, March 1 and Sunday, March 2, a one-and-a-half-hour Maslenitsa program will be held at the “Merry Port” playground in “Ogo-Gorod”, during which children will learn how to weave a Maslena talisman doll from bast. Now many have forgotten about Slavic traditions. But before, in every house there were amulets dolls made with their own hands. They carried the special energy of love and were made before the birth of a child, as a gift for newlyweds, for calendar holidays, and simply as a personal...
Japanese paper dolls-ANESAMA, master class
This is what the special Japanese paper for making such dolls looks like. It’s okay if you don’t have it on hand, you can use any beautiful paper, I’ll show you how I made it from ordinary napkins, I had experience making it from candy wrappers - it also looks good. Cut out the parts - the size will be determined by the markings of the mock-up rug. We connect two round blanks with a strip for the neck folded in half; in a Japanese doll, a stick is used instead of a strip. Glue it together. I used...
MASTER CLASS. MAKING A MOTANK DOLL part 2
MASTER CLASS If you are making a talisman, then you must follow certain rules: The threads must be natural: wool, flax or linen twine. It looks wonderful and even smells like grass. You can make a doll from straw or grass. The straw should be steamed in water, and the grass should be dried in the sun for flexibility. We wind the thread across the Sun, that is, we direct the energy towards growth and development. We say wishes for each knot tied. You can pray, you can simply “for health” for “welfare”, etc. When equalizing...
Crafts. From the history of Ukrainian folk dolls
Ukrainian folk toys have an extremely rich history. It combined everything: the life and way of life of the people, customs and traditions, rites and rituals. Toys were not made just like that, they were created by masters. In this way, they not only conveyed their impressions of everyday life, but also expressed their worldview. For example, before the wedding, wives were given a motanka doll, which served not only as a toy for future descendants, but also as a talisman for a young family, especially for a woman-mother...
Children's carnival costume Ladybug
Make a fun costume for your daughter. May the New Year be joyful! What you need for the costume: 1) yellow turtleneck, 2) yellow vest, 3) yellow tights, 4) yellow skirt, 5) yellow or red shoes, 6) red wings with black polka dots, 7) horns. View on Yandex.Photos View on Yandex.Photos We cut out foam rubber according to the pattern and 4 pieces according to the same pattern, only from red fleece, and seam allowances. Next, we sew the fleece parts together in twos and...
iHerb for babies and their mothers :)
Often we, women, have a question - what to give a friend on March 8, Easter or another holiday? It must be, of course, a pleasant, useful and memorable gift.
For example, such as our fabric apple. It can be used as a pincushion, for interior decoration, a soft or Christmas tree toy.
This apple can be sewn from any fabric - with a pattern or plain, thick or not very thick. It is very convenient to sew from felt, as it does not crumble.
Threads should be used to match the color of the fabric, since when turned inside out they may show through at the seam.
For embroidering veins on a leaf, threads darker or lighter than the color of the leaf itself are suitable.
To stuff an apple, you can use any filler, such as cotton wool, padding polyester, etc.
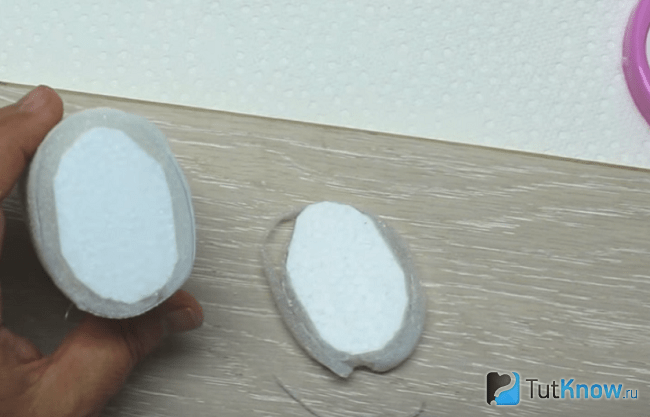
For the apple itself you will need a piece of fabric measuring 7 x 14cm. For a leaf 3.0 x 4.5 cm.
We take the apple template from the monitor or print it out (Fig. 1). To see the template in full size, click on the image. 
We cut out the details of the apple and leaf using it (Fig. 2)

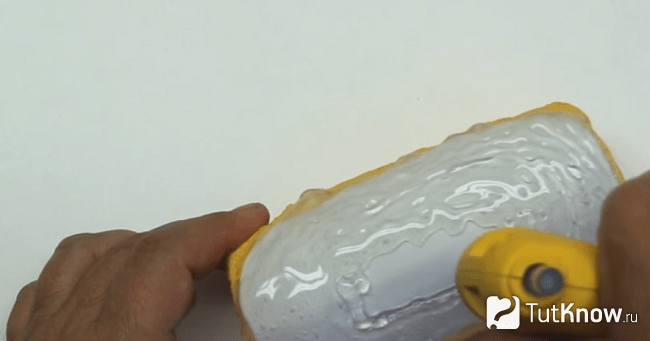
We put the apple parts together with the right side inward and sew them together by hand or using a machine (Fig. 3)

Turn the apple inside out (Fig. 4)

We fill it with padding polyester (Fig. 5)

We tighten the hole with thread (Fig. 6)

We turn the seam allowances inward, tighten the thread well and secure with several stitches (Fig. 7)

We hide the end of the thread in the apple itself: insert the needle into the top of the apple, and bring it out at the bottom, tighten the thread well and cut it close to the fabric (Fig. 8)

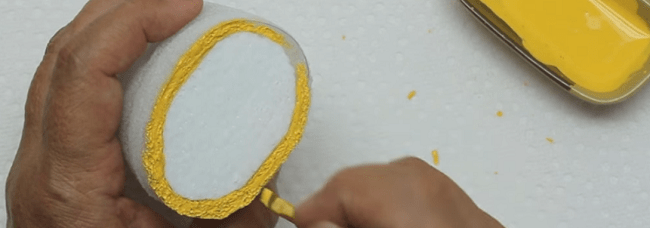
Let's start making the stem: take a brown thread, insert it into the bottom of the apple (Fig. 9), and then from top to bottom.

At the bottom we make a stitch with a length of 5 to 10 mm and bring the needle to the top of the apple. We repeat again. We get a beautifully decorated bottom of the apple (Fig. 10)

We perform the handle as an air loop for buttons, and thread the end of the thread through the handle and secure it at its base (Fig. 11)

We take the cut out leaf and select the thread by color (Fig. 12)

We embroider veins on the leaf. This way it will look more natural and prettier (Fig. 13)

Sew the leaf to the apple itself (Fig. 14)

The fabric apple is ready. As you noticed, it will take very little time and materials to make.
This work is not difficult, so it can be done together with children, introducing them to needlework and creativity. This will allow you to devote your time to children, because you will work hand in hand. If the child is small, then he can perfectly give you the necessary materials and tools, while simultaneously observing your actions. Older children can help thread the needle. Just show your imagination and decide for yourself what to entrust to your child.
I haven’t shown fabric crafts for a long time, today I’ll tell you and in the master class I’ll show you the correct pattern on how to sew an apple from fabric with your own hands. The homemade product is quite complex and requires some sewing skills. You can decorate any room with it or give it to your child as a toy.
For the fabric apple we need:
— Velvet (velor), base for crafts;
— Artificial velvet;
— Gabardine fabric for sheet;
- Scissors;
— Twisted cord, approximately 7 centimeters;
— Sintepon, padding polyester, holofiber, any filler;
— Extended needle;
- Sewing machine;
— Glue gun;
— Pins;
- Threads.

First you need to make the right pattern. Let's draw two such details on paper. On the edge where it says “fold”, we make a fold so that when the part is cut out, it will be mirrored.


These are the cut fabric pieces we will need.

On velvet, which is artificial, we create many deep cuts.

We make lines along the edges, on the apple itself, and also on the leaf. We don’t sew up 1 centimeter on the sheet; we put the filler through this hole.

We cut off the tip of the sheet, turn it inside out, and fill it just a little with synthetic padding.

We turn the apple blank inside out, fill it, then use a regular seam to make bastings. At the same time, retreating 1 centimeter.

Carefully pull the apple and hide the edges inside.

We thread a needle and thread from the side of the stamen, pull it out at the other end, and so on several times. Thus, this will give shape and stretch the end of the apple with a thread of resentment.

We roll the initial piece of artificial velvet into a tube and use a glue gun to attach the stamen to the apple.

We trim off the excess length.

We also glue the tail to the apple.

We also glue the leaf. For reliability, all these things can be additionally sewn.

This is the original fabric apple we managed to make.


Everything is just the most interesting! How to make eclairs, lemons from bottles, sew vegetables and berries, make them from papier-mâché.
Food is a pleasant topic for many. Products run out quite quickly, and only memories remain from delicious cakes and fruits. But you can make sure that they will always be before your eyes, and even decorate the interior. Don't believe me? Then find out how to achieve it.
How to make eclairs from plastic bottles?
Look how delicious the cakes look. But do not forget to warn your home and visiting guests that these eclairs cannot be eaten, they can only be admired.

To make such a sweet that will always be in the house, take:
- 3 plastic bottles of 0.5 l;
- foil;
- salt;
- PVA glue;
- acrylic paints;
- scotch;
- thin white foam rubber;
- Styrofoam;
- white fom;
- glue gun;
- tassels.

Unfold the foil, place this blank on it, and next to it another, but whole bottle without a cap. Wrap them in foil and place in the oven for two minutes. Homemade eclair also needs to be baked, but these pieces are placed in a hot place to make them more pliable. When you take them out of the oven, press down on the top of the foil until the bottles become oval.
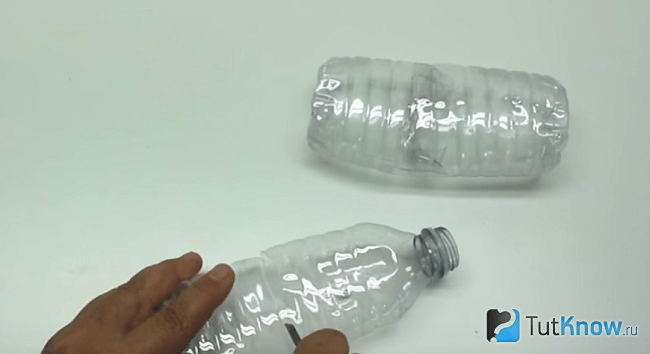
Cut the whole container in half, you only need the part with the bottom. She will play the role of half of the cake. A blank of two bottles must be taped at the junction.
Pour PVA glue into a convenient container. Sprinkle salt on the board. Lubricate the blank from a plastic bottle with a brush with glue, then roll it over the salt, which will stick well to this base.
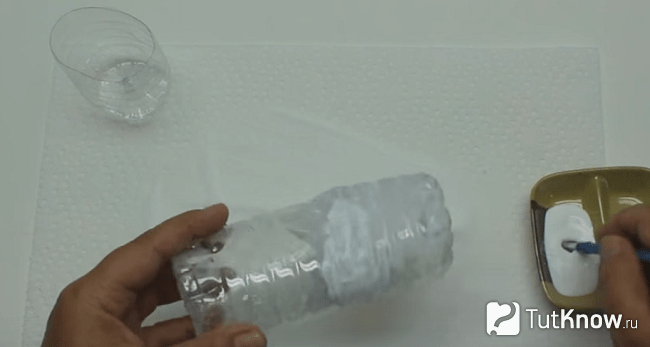
Set these future eclairs aside to dry. After this, you need to brush off the excess salt with your hands or a brush. Cut a small cone shape from the foam. Lubricating it with silicone from a glue gun, glue a sheet of thin white foam rubber here. You will need to wrap the foam piece around a couple of times.
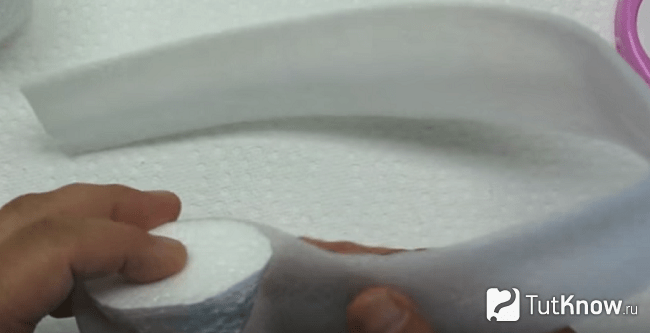
The strip of foam rubber will imitate the dough, and the foam will imitate the inner white cream.
Now insert this blank with the cone-shaped part inside the bottle. This part must fit firmly and well into it. Place the bottle on its side on the board, cut off the excess with a sharp knife to get a nice, even cut.
Now cover the surface of the cakes with yellow acrylic paint. To highlight the dough of the eclair halves with this color, apply it with a thin brush along the contour of the cut, painting here the white foam rubber.
Cut a rectangular blank from white foamirant and round the edges. Its shape practically repeats the appearance of the cake from above.
Glue this part using a glue gun, trim off the excess.
Now generously pour silicone here from the glue gun. To do this, prepare the silicone rods in advance so that they do not run out in the middle of the process.
Wait for this glue to dry, after which you need to paint over it with brown acrylic paint to create a delicious glaze. The photo clearly shows how to make such an eclair.
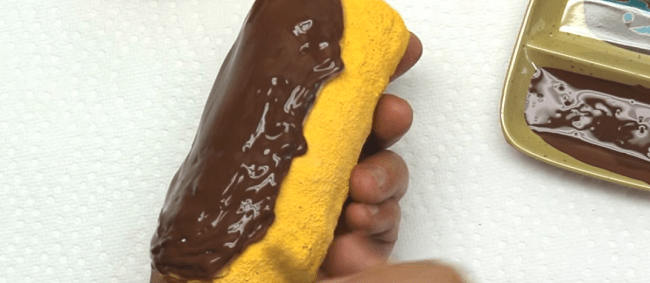
Make the icing for the second cake in the same way, after which you can place them on decorative dishes, but it is better to place them not on the table, but behind glass in a cabinet. After all, these cakes are so similar to the real thing, they look very appetizing, you need to be careful so that no one wants to try them “to taste.”
If you need to bring a craft to a competition in kindergarten, this will be an excellent way out. But the teacher must also be vigilant so that children cannot take such artificial sweets.
The next craft also looks like the real thing. Therefore, you also need to warn everyone who looks at it that it is not edible.
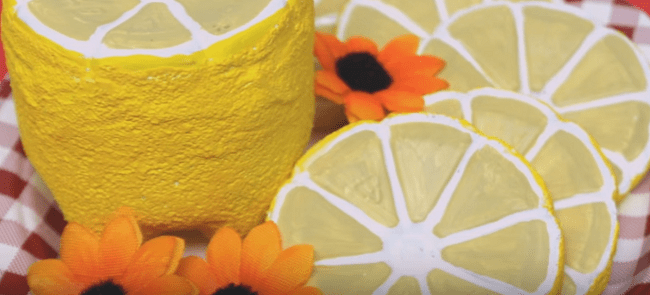
How to make lemon at home?
For this craft, take:
- small bottles;
- sharp knife;
- PVA glue;
- salt;
- acrylic paints;
- scotch;
- thin brush.

From the bottom of the bottle, cut a piece approximately 7 cm high; you can vary this value at your discretion to make a lemon of the desired size. Cut strips of it on top, the distance between them is 1 cm, their length is the same.

As in the first case, such a fringe will help to better fit the second part of the bottle onto this one. But from the second bottle you need to cut off the bottom, the height of which is very small, about 1.2 cm.
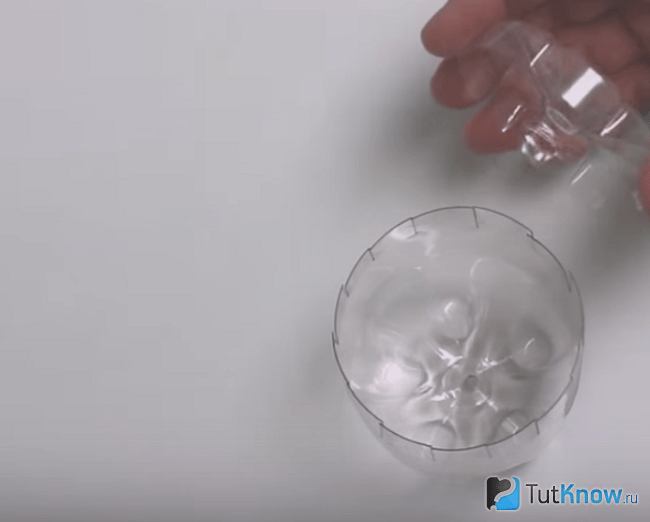
Compare these two blanks, seal the junction with tape. Lubricate the surface of one and the second bottle with glue and sprinkle with salt.

In this case, the bottom, which is inserted into this container, does not need to be lubricated. To make lemon wedges, cut the bottoms of plastic bottles so that the height of these blanks is about 1 cm or slightly less. Only the sides need to be coated with PVA glue and sprinkled with salt. While the glue dries, you can go about your business.

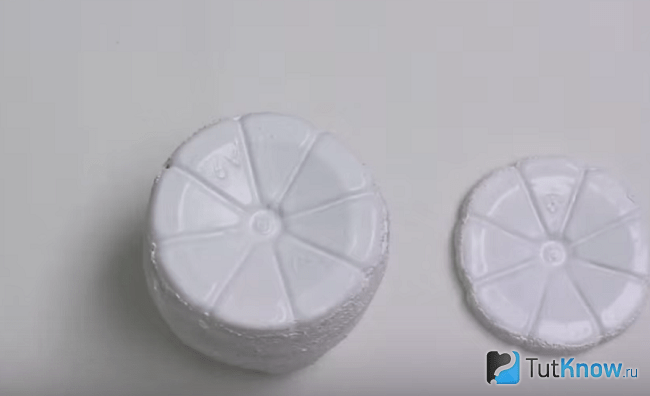
Then you need to remove excess salt with your hands. If this is not done, then the paint will fly off along with these grains when you cover the surface of the fruit with it.
To ensure the brightest color of the final work, it is better to first cover the surface with white acrylic paint; when it dries, use the one you need.
This is how elegant the blanks painted with white acrylic look.
Now the skin of the lemon and its slices need to be painted with bright, juicy yellow paint. To make the flesh have a realistic color, mix white and beige paint and add a little yellow. This composition should be applied with a thin brush to the lemon slices, but leave white veins and a light edging.
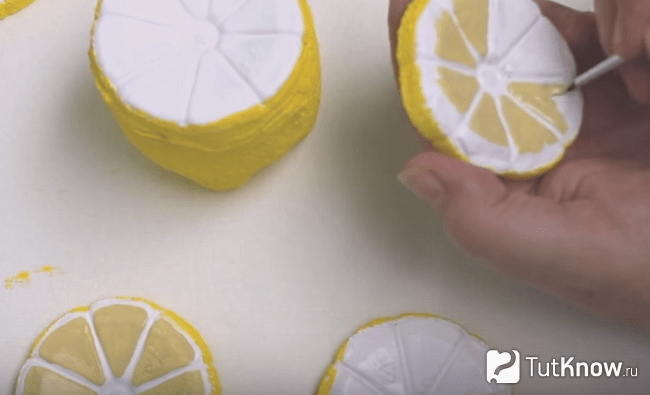
When the paint dries, place the juicy lemon and its slices on a plate. Let everyone who sees such beauty praise your golden hands and be surprised that such a bright, realistic lemon can be made from a plastic bottle.
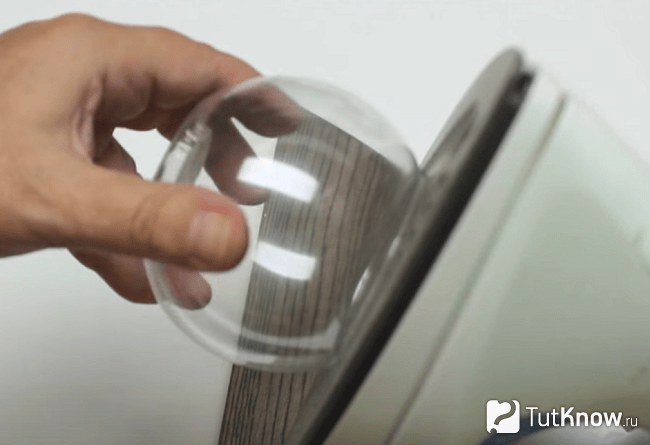
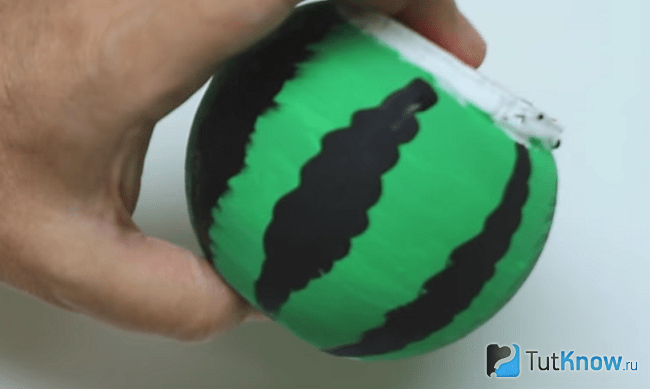
How to make a candle in the shape of a watermelon with your own hands?

The main component will also be a plastic bottle, but small and round in shape. Here's what you'll need to transform it:
- a piece of foam;
- sharp knife;
- small round candle;
- expanded clay;
- acrylic paints.

To round the edges of this container, making them less sharp, apply this cut to a heated iron for a few seconds.
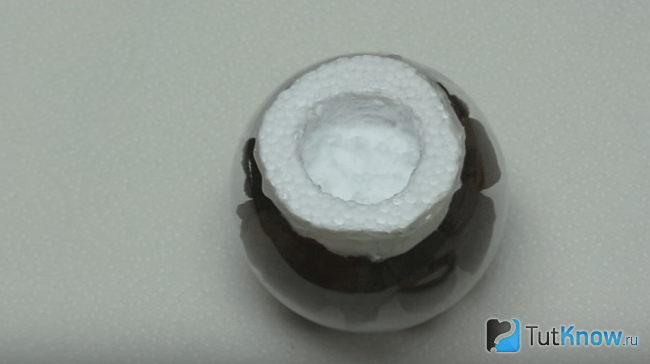
Place foam in front of you. Turn the blank over from the bottle, place it cut side down on this material, and draw a circle along these contours with a pencil. Cut it out, draw another circle inside, its diameter is equal to the diameter of the candle. Make this internal notch.

Pour expanded clay or other decorative stones into a plastic bottle and place a foam candle blank on top.
On the outside, paint the blank made from a plastic bottle, as well as from foam plastic, with white acrylic paint. Apply green on top of it, of course, when the previous layer has dried.

Cover the top of the white with red paint to create the pulp of the fruit.
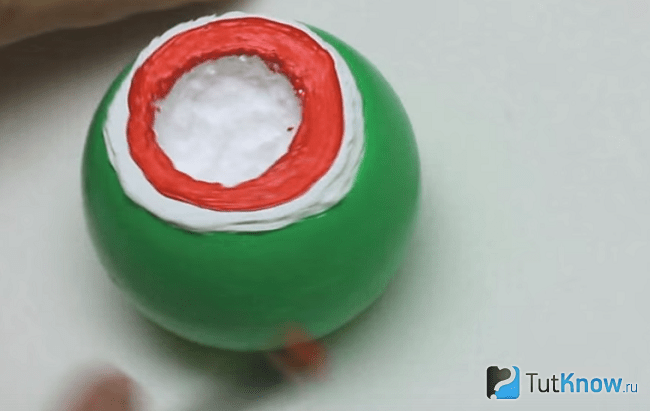
Now, on top of the dried green paint, you need to draw black stripes of the watermelon; they do not have to be straight, make them openwork.
All you have to do is put a candle inside, light the wick and you can indulge in romantic dreams by the fire.
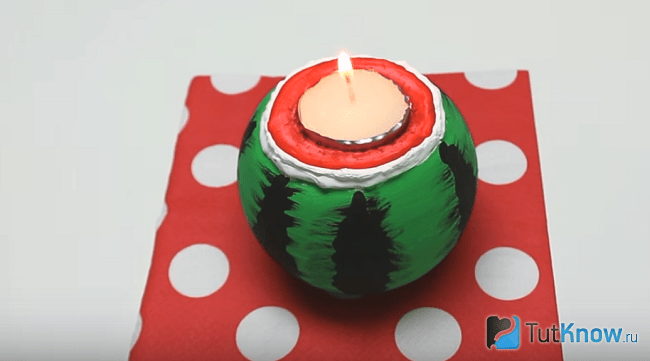
Here's how to make a candle at home from practically nothing.
How to make vegetables and fruits: master class
We will make them from papier-mâché. To do this, take:
- newspapers;
- paste or PVA glue;
- foil;
- scotch;
- colored or corrugated paper, or tissue paper.
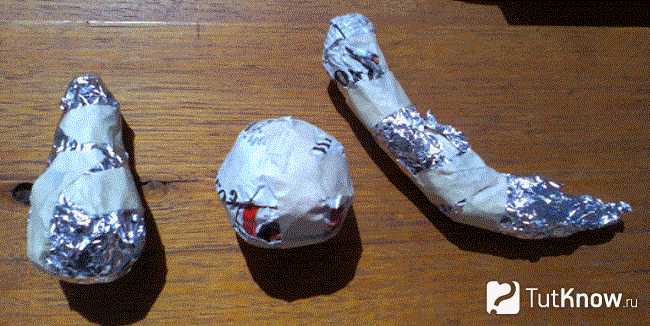
The next batch of newspaper sheets should also be kneaded well, then dipped in PVA or glue prepared with your own hands. To do this, you can mix flour or starch with water, put it on the fire, and bring to a boil with frequent stirring.
When this glue has cooled, you need to dip newspapers into it and distribute them over the surface of the foil fruit. Place the blanks on a tray and put them in a warm place, for example, under a radiator, to dry completely. Only then proceed to registration.
To do this, you need to generously grease colored, corrugated or tissue paper with paste or PVA, and paste these blanks over future fruits and vegetables.

Look what wonderful crafts you can make. Place them in a bowl. Place it on the table or nightstand for decoration.

There is another way that will tell you how to make fruits and vegetables with your own hands from papier-mâché.
- This requires real products. If you want to use them for food later, then use only natural paste made from flour or starch.
- Pour it into a bowl, place a torn paper napkin in it, and remove the mixture with a spoon with holes called a slotted spoon. Then the excess glue will flow off.
- The paper composition must be applied to the selected object, for example, a banana, orange or apple. The layer should be sufficient. Then also put the crafts in a warm place.
- When they are dry, carefully cut the paper layer of each fruit in the middle to remove the two halves of the hardened papier-mâché mass. To give them integrity, connect them again by gluing the cut area.
- Further, such blanks are designed at your own discretion. You can cover them with colored paper or paint them.

If you want to make halves of an apple, then you do not need to glue 2 pieces of paper together; on the contrary, you need to fill them with a mixture of newspaper or napkins mixed with glue. When the pieces are dry, prime them with putty. After this mass has dried, it must be sanded and then covered with acrylic paints.
For this type of work you will need:
- paper napkins;
- fruits and vegetables;
- paste;
- Bowl;
- sandpaper;
- acrylic paints;
- brush.
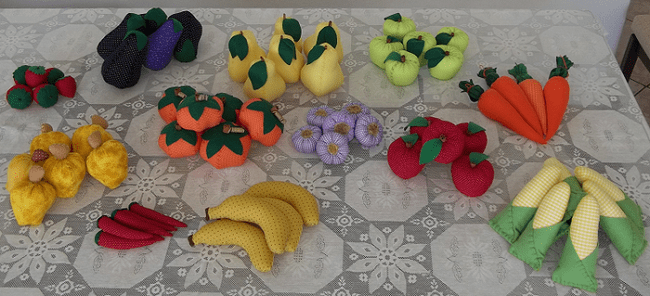
How to make artificial fruits and vegetables from fabric?
They can be voluminous or flat. Let's focus on the first option. If you were asked to bring toy fruits and vegetables to kindergarten, then you can sew them from leftover fabric.
Take:
- scraps of fabric;
- padding polyester;
- presented patterns;
- scissors;
- chalk or dry soap.
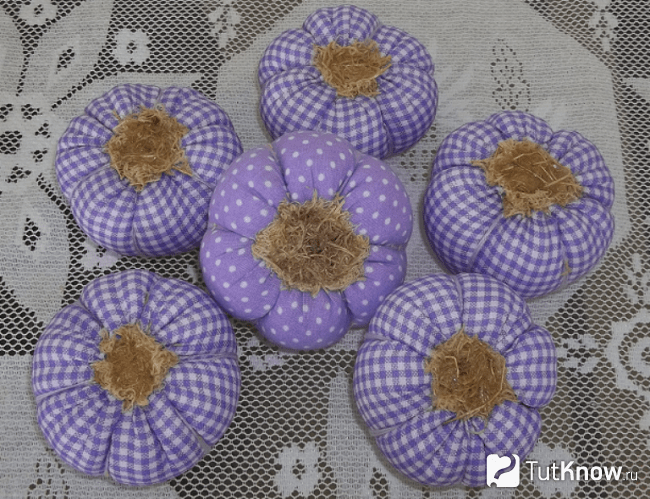
It consists of several slices, the following photo will tell you their pattern.
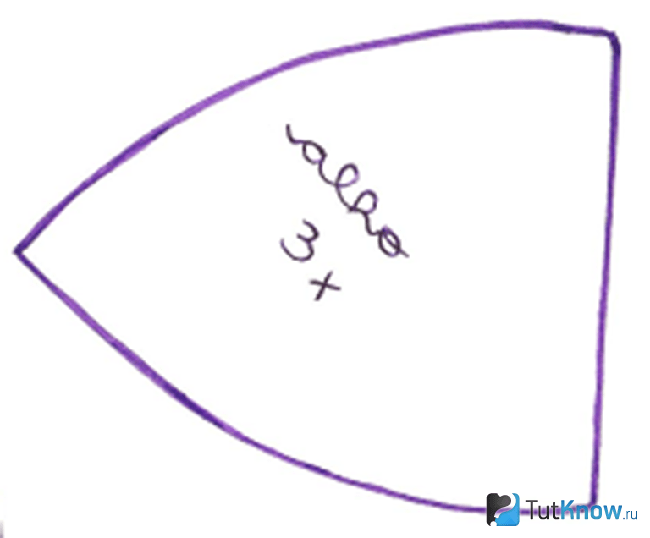
Based on this diagram, cut out 6 blanks; they need to be sewn into a single fabric. Stitch the second side of the last piece and the first side of the first. Fill the resulting bag with padding polyester, sew it on top, and tighten the thread. Sew up this hole, glue or attach tow on top with a thread and a needle.
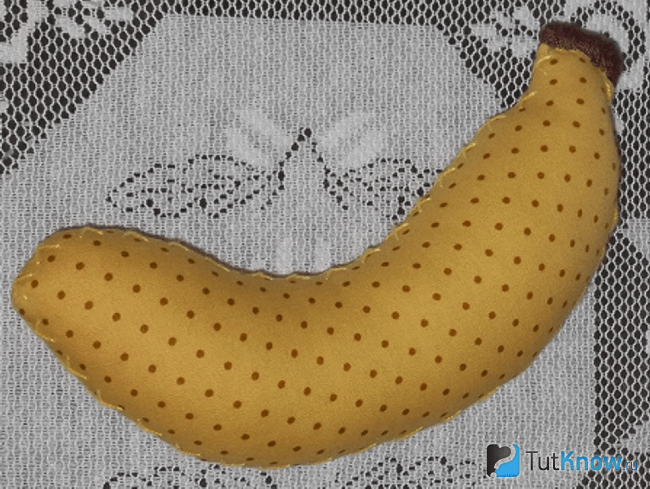
You can also sew a banana from fabric.
To do this you need to take:
- fabric of a suitable color;
- volumetric filler;
- threads with a needle.
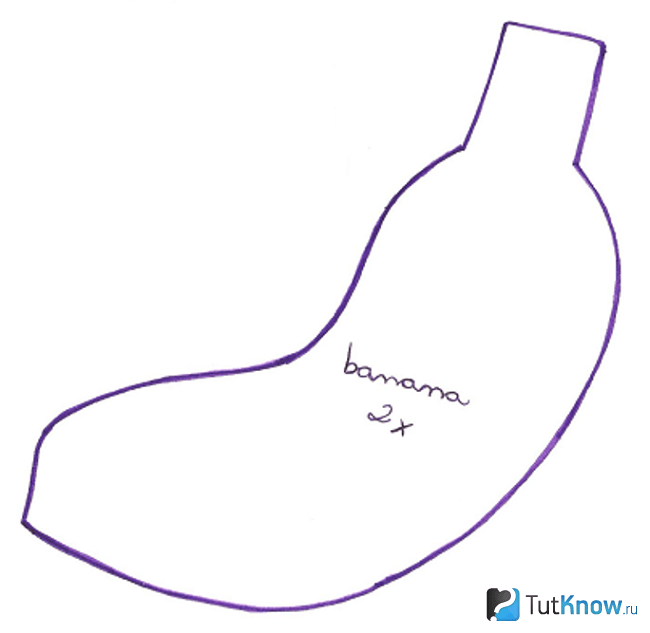
- Redraw the outlines of this fruit, attach this template to the yellow fabric, cut out two blanks.
- If you have a sewing machine and work skills, then sew both halves on it, leaving a small edge free on top.
- Through it you will stuff the banana with padding polyester. Cut a small rectangle from brown fabric, fold it in half like a ribbon, sew it here, closing this hole at the same time.
- If a sewing machine is not available, then you need to sweep both halves, using a seam over the edge. Even without this tool at hand, you can still make a banana.

Looking at such brightly colored carrots, you immediately remember summer and lift your spirits. Find fabric in a suitable color. As you can see, you can use not only plain orange, but also small white polka dots.

- Transfer this template to your chosen canvas. Connect the sides of this figure to form a cone. They can also be swept by machine or by hand.
- Fill this cone with padding polyester and sew greenery on top. To make it, cut out a circle from thick fabric of the same color. Using scissors, cut its edges almost to the middle. Lift them up, sew this part to the carrots.
- To give the greens the shape we need, tie them with thread.
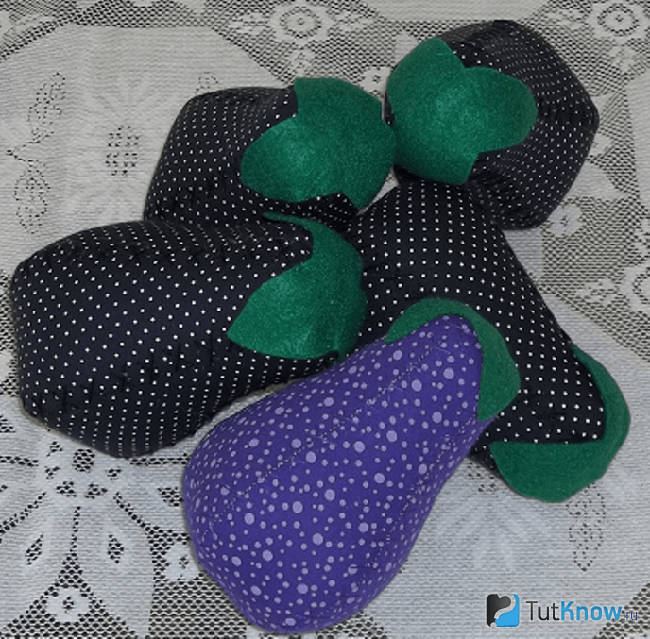
A pattern will also help you make this vegetable.

As you can see, the big part is the eggplant itself; you will need to cut out 5 identical ones. Small petal-shaped greens are a vegetable. Cut it out of fabric of this color. 5 identical wedges need to be sewn together to create a piece that looks like a cone. Through the top hole you will fill it with padding polyester and sew greenery here.
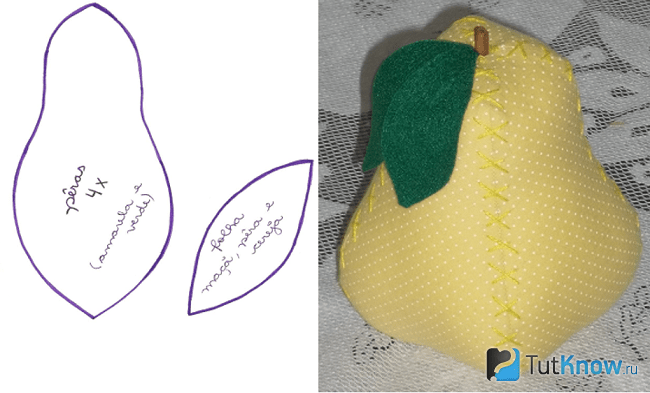
A pattern will also help you make quince.

The main part of this fruit is a large piece; you will need 3 of them, which need to be swept on the sides. You will make the quince tail from brown fabric, sewing 2 parts for this. Stuff the body of the fruit with padding polyester, sew a tail on top, covering the junction of these two elements.
Here's how to make a fabric apple. To do this, you need to cut out three identical parts and stitch them on the sides. Gather the resulting workpiece onto the thread and tighten.
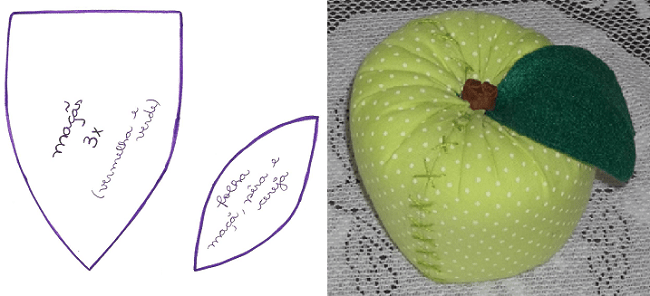
Cut out a leaf from a green drape or felt, a tail of a fruit from a brown one, attach these parts into place using a thread and a needle.
The pear consists of 4 pieces that need to be swept away. If you are doing this on your hands, use a cross stitch. To do this, first make parallel seams at an angle of 45°, then with an inclination in the other direction - seams perpendicular to them.
If you don't know how to make strawberries to add this berry to fruits and vegetables from fabric, then pay attention to the pattern.

Three almost triangular-shaped parts, sewn into a single fabric, will become a berry, if you then fill this semi-finished product with synthetic padding, gather it at the top, and sew the greens of the berry here.
- The grape bunches are created in a very interesting way. From fabric of a suitable color, cut out a triangle similar to the one you made for the carrots, but larger.
- Sew this piece on the side to create a wide cone. Fill it with padding polyester. Starting from the bottom, separate small pieces of fabric along with padding polyester, tie them with thread to make balls.
- Make these grapes all over the surface of the cone. Sew a green drape hat and a ponytail on top.

At the end you can add some spice by adding another vegetable. A pattern is also provided for it.
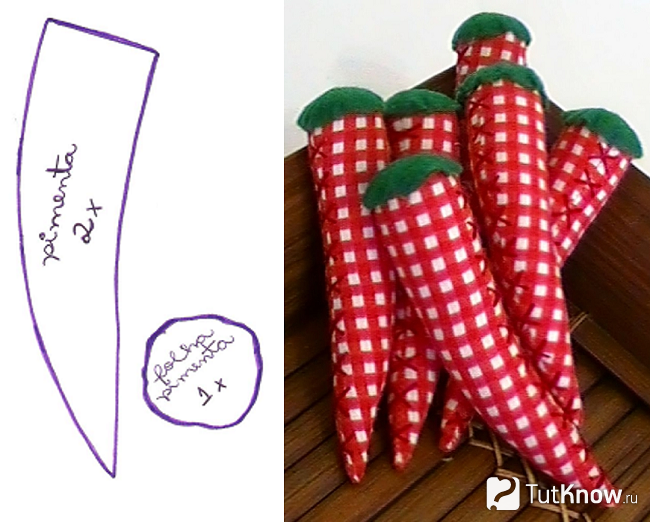
You can make hot peppers using a red cloth, plain or with fastenings. Cut out two identical acute-angled pieces and connect them at the sides using a seam. Fill with filler and cover the area with a green cap of fabric.
Here's how to make your own vegetables using scrap fabric, empty plastic bottles, old newspapers or paper towels.
We hope that you will be interested in seeing the process of making vegetables in the presented story.
How to make a sweet loved by many - lollipops - is described in the second video. You will create them from plastic bottles using interesting craft methods.