Instruction
Do not use improvised material. The material for a homemade motor boat must meet a number of indicators. It should be durable, lightweight and, preferably, not expensive. Based on these criteria, you can buy either durable plastic or not very thick metal. The advantage of the first is that if you break through the case, it is easy to fix it by melting a piece of the same plastic onto the crack. The advantage of metal is that it will be much more difficult to make a hole in it.
Wind 65 turns of wire on the second rib, with a diameter of 12 - 15 mm. This wire must also be well insulated with a heat-resistant material. This will be the secondary winding.
Make a plate out of a PCB sheet. It will need to be fixed on top of the transformer. Drill holes for the leads in it, fix the bolts in them and attach the ends of the wires to them.
Related videos
note
Do not use pure PVC insulated wires as when heated, it will begin to melt and an interturn short circuit will necessarily occur. Such wires need to be cleaned and wrapped with cotton insulation, or at worst, they can be wrapped without cleaning.
The secondary winding can be made of aluminum wire, but then its thickness should at least be one and a half times greater than the thickness of the copper wire.
To install correctly motor on boat, it is necessary to place it clearly in the center, well fixed on the hull of the boat. Then check the balance of the boat afloat and adjust the trim. Such a phased implementation of the installation work will ensure trouble-free operation and protect against future emergencies.
You will need
- Motor mounting tool.
Instruction
We adjust the trim of the boat depending on the type of boat and propeller.
note
During operation of the motor, it is necessary to periodically check the fixation of the clamps. Otherwise, when the motor is loosened, there is a danger of the unit moving, therefore, the possibility of an accident is not ruled out.
Attach a safety cable to the motor transom brace so that you do not lose the motor in an emergency.
Helpful advice
To create a minimum water resistance, it is necessary to ensure the smallest angle of deviation of the boat's waterline plane from the axis of the engine propeller. If the motor is set too high, then the propeller will rotate in the water-air environment, therefore, the boat will not be able to accelerate well, and the motor will start to overheat. If the motor is set too low, then the water resistance will be high, which means that the power loss will be large. The optimal position of the motor is when the distance between the bottom of the boat and the anti-cavitation plate of the motor is not more than 25 mm.
Sources:
- Description of the installation of the motor on the boat
Many lovers fishing desire to make one's own boat. It's not easy, but it's real. Manufacturing will not require you to spend a lot of money and will seem like a very exciting activity.
Instruction
Glue the plywood sheets together with epoxy to get the desired length. Cut out the details of the bottom and sides. Cut out the transom parts and glue them in the following order: the outer layer is plywood, then the fiberglass layer, then the oak board, again the fiberglass layer and the inner layer is plywood.
Make the required number of frames. To do this, cut out all the details, glue them and additionally fasten them with screws.
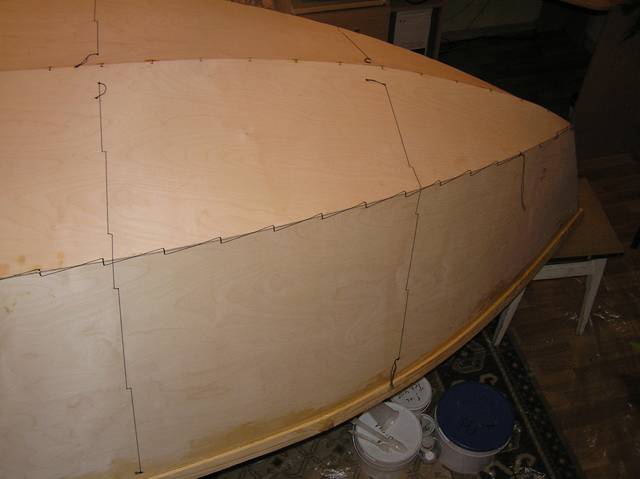
Start building the body. Assemble the bottom, put the transom and sides. When assembling the sides, install the central frame. Start installing the sides from the stern of the boat, not from the bow. Fasten the seams with twists and clamps. Remove the center frame and install wooden slats to give the correct position of the sides. Next, coat the joints with a solution of epoxy, hardener and aerosil. Such an adhesive composition will provide incredible strength of the seams. Glue the seams with fiberglass.
Make a markup for the frames and install them. Be very careful not to squeeze the side of the boat. Lubricate the joints with the same adhesive solution.
Install a mooring bar on the outer side of the sides. To do this, a wooden block must be dissolved into 3 parts using a jigsaw. Drill holes for screws. Starting at the nose, attach the first layer of batten with epoxy and screws. After complete drying, unscrew the screws and, following the same principle, fix the second and third layers of the rail.
Install 2 lockers in the stern and bow. Fasten with screws. Treat all seams with adhesive.
Sand and putty all surfaces of the boat. Bond the fiberglass to the top of the sides, moorings and lockers with a hardener. Smooth gently to completely remove air bubbles. flip boat. Putty and sand the sides and bottom. By the same principle, glue the bottom with fiberglass.
Start installing redans. Make them from the same block of wood that you used to make the fender. It is necessary to give the rails a triangular section.
Prime and paint boat. The boat is ready to be launched.
Related videos
If you are one of those who is going to buy a motor boat Advice - do not rush to make a purchase! When choosing, not only appearance and price. Comfort, motor power, material, the purpose of the motorboat play the most important role.

Instruction
Choosing boat, you should clearly know what it is for (fishing or hunting, short walks, long hikes). If comfort is not important for you, and you only need a boat for fishing, and you won’t take fellow travelers, the Kazanka duralumin boat will do ( the prototype is the flat-bottomed Yuzhanka). For one person, it is excellently suited: in terms of its dimensions, the boat is quite narrow and light. Max speed a little over forty kilometers an hour. Of the minuses, one can indicate insufficient stability, when cornering it is heavily splashed and, at the slightest disturbance of the water, it is poorly controlled.
Those who need a "softer", economical and safe, but easy-to-supply ship, can pay attention to duralumin boat"Ob". Here the bottom is slightly curved, and the cheekbone in the nose is raised, so the Ob is more seaworthy. Among other things, this boat is good for long-distance routes. In addition, the engine power on it is much higher.
Today, a follower of "Obi" - "Ob-M" is being produced.
For walks or fishing in large reservoirs or near the coast, you should choose larger motorboats that allow you to cope with waves and long distances. Here you need to pay attention, first of all, to the material from which the boat is made: it must be resistant to corrosion in sea water. Of all the variety, the heavy and durable Krym motor boat stands out, capable of moving away from the coast more than 3 kilometers. Such a boat is more comfortable (equipped with an awning, soft seats), and thanks to wide splash guards, it is slightly susceptible to splashing. Of the advantages, one can single out the fact that it is possible to install two motors.
Many men love fishing, and most prefer to fish while in a boat. Now, when the choice is so great that the eyes run wide. It would seem, come and choose. But many fishermen want to build a motor boat with their own hands from plywood or other material. Some are not satisfied with the prices, others just like to do everything themselves. Is it realistic to build a motor boat with your own hands from plywood?
Of course yes. Moreover, projects of similar boats have already been developed, just take it and implement it! The well-deserved popularity among fishermen was won by projects such as "Sew and Glue", such as "North 520", "Breeze 26" and "Breeze 42". The drawings for building these boats are sold in real scale, which greatly simplifies the manufacturing process. At the same time, you should definitely remember that a professional can handle the design: the need to accurately calculate the indicators, taking into account the slightest nuances, dictates its own rules. In general, you can build a boat with your own hands from plywood, you just need to find the drawings and desire. Of course, at least a little carpentry experience will not hurt. If you build only in free time, it will take about 10 days, and if you do it without looking off for other things, you can meet it in 2-3 days.
materials
You can purchase them at any hardware store. But do not forget that they must be of high quality!
1) Plywood. For building a boat with your own hands, only one type is suitable - “marine”, 4-5 mm thick. It is made from hardwood, which means that the boat will be built from birch veneer. The plywood sheet must be undamaged. The price will be slightly higher than usual, but quality is very important here, because the reliability of the product depends on it. The average cost of one such sheet is 250 rubles.
2) Planed boards 25-40 mm thick. The price of such a board starts from 11,000 rubles. per 1 sq.m.
3) Reiki. They will cost you about 2000 rubles.
4) Electric jigsaw. Price from 3000 rubles.
5) Steel wire. It costs from 80 rubles. per metre.
6) Epoxy resin. A bucket of this material will cost from 4500 rubles.
7) Varnish. It costs from 300 rubles. for the bank.
8) Glass cloth tape (thick T11 or thin T13). From 200 rub. for a skein
9) Drill and screwdriver. From 2000 rub. for each of the instruments.
10) Screws, self-tapping screws, brass nails and various clips (useful for gluing boat elements with your own hands). All together will cost you about 1000 rubles.
11) A set of clamps. They will need to spend about 1500 rubles.
12) Grinding machine (from 2000 rubles) or sandpaper (from 50 rubles per meter).

The structure of the future ship
The main element is the keel. It's like the backbone of a boat. Frames are responsible for transverse rigidity. Their lower part is the bottom of the boat. The frame of the boat is sheathed with plywood on top.

Construction algorithm
Despite the fact that there is nothing complicated in building a boat with your own hands, we offer a list of simple steps, thanks to which your boat will last more than one year!
1) View different drawings of boats and choose the one that you like the most.
2) Transfer the outlines of the pattern to the plywood sheet. To do this, you can use ready-made patterns made to order or make them yourself.
3) The workpieces are cut very carefully with a finishing saw. We cut the edges of the parts at an angle to reduce gaps. Treat all parts with a grinder or sandpaper.

4) Assembly. Connect the cut blanks of the boat with your own hands so that the sides and bottom of the future vessel are formed. Connect it all with screws and epoxy.
5) Sew all seams with wire. Connect the ends of the blanks until they completely match along the seam. Shape the hull with spacers installed between the sides.
6) On both sides of the middle of the boat at a distance of 3 cm from each other, 2 frames should be installed (there will be 9 pairs in total). 4 connecting elements are installed on the bow for attaching sheets and 2-3 elements will be needed for the stern ..
7) Turn the boat over with your own hands. Milling machine walk along the seam connecting the halves of the boat hull. The result is a flat gap for gluing the halves.
8) Taking out the frames one by one, pull off the hull halves, then install them on the tightened sheets, into the holes already made.
9) Glue the seam and the attachment points of the frames with epoxy glue.
10) Fit and glue the horizontal seams.
11) Connect the vertical seams of the sides.
13) A partition is installed between the frames, and support bars are attached to them. Then the gaps between the frames are sewn up, resulting in bow, row and stern cans.
14) All the joints of the boat are puttied and glued with fiberglass with their own hands.
15) The keel and longitudinal redans are attached.
16) Finishing: the entire surface of the boat is sanded and painted inside and out.

This completes the construction of the boat. It turns out easy, maneuverable, inexpensive and convenient. It is better to store it on land, and use it on calm lakes and rivers. It is necessary to carefully monitor the seams and the integrity of the vessel. Having built a motor boat from plywood with your own hands, it will not be difficult to operate it in the future. Transporting this boat is no problem: it is light and can even be transported on the roof of a car.
Careful attitude, proper storage and control will help to prolong its service life for a long time. And many pleasant memories associated with her will decorate life. And all you had to do was make up your mind and build a motor boat out of plywood with your own hands.
Not everyone can buy a finished boat, because the prices are very biting. In addition, not all designs meet the needs of different customers. If you take inflatable boat, then these are not very reliable models, since they can easily be damaged in difficult conditions. And this means that they are not very reliable. In such cases, a decision is made to make a boat with your own hands from plywood. The construction of a small boat begins with sketches, which are then transformed into very professional drawings.
This is a fascinating process and only those fishermen who are in constant creative search can do it. In addition, building a boat is like a factor of self-affirmation. But if you look at the process seriously, then there is nothing complicated.
A small boat, which is able to take on board 2-3 fishermen, which does not have a lot of weight, can be easily made from plywood, as one of the most affordable building materials. Moreover, the boat can move both with the help of oars and with the help of outboard motor or sails. This does not require special, professional training, which is quite feasible even for beginners.
Plywood is a strong enough material to build a small boat, not to mention expensive yachts, where plywood is widely used in their manufacture. In addition, it is simply amenable to processing, using electrical or manual devices.
In addition, if a motor is installed on such a boat, then it can develop a solid speed with good running characteristics. In addition, a plywood boat is much more reliable than an inflatable boat.
Materials and tools

Firstly, you will have to choose an appropriate room for mercy, where the boat could freely accommodate. It is desirable that the room be heated, since all work can take place in winter. In the summer, hardly anyone will start building a boat: in the summer you already need to sail on it. Moreover, the room must be ventilated, with the ability to maintain optimal temperature regime. Since you will have to work with wood, the humidity should be optimal.
To draw a diagram, you need to have:
- drawing accessories;
- pencils;
- gum;
- patterns;
- rulers and triangles;
- T-square;
- cardboard and drawing paper;
- glue for paper;
- calculator.
During the construction phase you will need:
- jigsaw;
- hammer;
- axe;
- clamps (up to 10 pieces, no less);
- brushes, spatulas (metal and rubber);
- screwdriver;
- electric and manual planer;
- screwdrivers;
- chisels;
- stapler;
- circular and hand saw.
Materials for the manufacture can serve as:

- plywood (sheet 1.5x1.5 meters), 4-5 mm thick;
- pine or oak boards;
- fiberglass for pasting the hull of the boat;
- putty for sealing cracks;
- waterproof glue;
- drying oil or water-repellent impregnation for wood;
- oil paint or waterproof enamel;
- nails, screws, self-tapping screws;
- metal strip, metal for various fasteners.
The main dimensions of the boat
If you use plywood with a thickness of 5 mm, then its dimensions will be optimal:
- The total length of the craft is 4.5 meters.
- The width of the craft (at its widest point) is 1.05 m.
- The depth of the boat is 0.4 meters.
What is the boat made of?

The boat consists of a key element - the keel, which serves as a base and to which other elements of the boat are attached. The bow of the boat is called the stem and on the reverse side is the sternpost. With the help of these components, the boat is given longitudinal rigidity. Similar structural details can be made from a single piece of wood or individual components connected by gluing, as well as knocked down with nails or twisted with screws.
The shape of the hull is determined by the presence of transverse power elements, which are called frames. The boards connected to the frames, stem and stern, form the sides of the boat.
If this frame is sheathed with plywood, then you get a boat. A deck is laid inside the boat - a sleigh, which is the lower deck, to protect the bottom of the boat.
Motor boats made of plywood

Motorized boats do not differ much in their design considerations compared to boats designed to move under oars or under sail. The difference lies only in the organization of a place for mounting the engine. As a rule, a transom board is attached to the stern, where the outboard motor is installed.
Separate designs of small boats are also equipped with other elements, such as a cockpit, deck stringers, side stringers, etc. To improve stability and unsinkability, special gaps are provided in the craft, which are filled with mounting foam. This approach eliminates the possibility of flooding the boat if it capsizes.
Working drawings of the boat

All boat building work begins with blueprints, which must be professionally drawn up. If this is not possible, then you can turn to the Internet for help, where you can find ready-made drawings. The main thing is that they correspond to the main imaginations. But even here you need to be careful not to miss the main stages of assembling the boat and making additional components.
As a rule, most drawings are drawn on graph paper. This will make it possible to calculate in detail all the nodes of the structure.
A large sketch of the drawing can be drawn according to the following algorithm:
- A line is drawn that conditionally divides the boat into two parts. This takes into account the fact that the two parts, left and right, must be symmetrical and exactly the same.
- The drawn line is divided into several equal segments. Subsequently, frames will be installed in these areas.
- Both a vertical display and a projection from above are drawn.
- According to the transverse marks, the shapes of the frames are drawn.
- The main dimensions of all components on the scale are checked.
- The shape of the frames is drawn on a scale of 1: 1 on cardboard or thick paper.
- The flexible lines of the boat shape are drawn using a ruler or template.
The resulting pattern is folded along the drawn line to check for symmetry. Both parts must repeat each other flawlessly.
Transferring a pattern to a piece of wood
After the next check of the drawings for correctness, they are transferred to cardboard. Thick and stiff paper will facilitate the stage of transferring drawings to blanks. The drawing is transferred to the workpiece, taking into account all the contours and contours exactly as it is drawn, without all kinds of overlaps, reductions and increases in size.
When copying patterns, the direction of the wood fibers should be taken into account. In this case, it all depends on the design of the elements of the boat. If the element is made of plywood, then the layers of plywood themselves are arranged in such a way that the fibers of each subsequent layer are perpendicular to the previous layer.
As for the manufacture of futoks, they can be made larger in height, since they can then be cut off.
Technological stages of manufacture
![]()
To build a plywood boat with your own hands, you need to do the following steps:
- transfer the drawing to the template;
- transfer drawings from templates to wood;
- install the keel and secure the stem;
- fix the frames;
- fix the stern post and transom board (for the motor);
- sheathe the bottom with plywood;
- sheathe the sides;
- seal joints and stringers;
- putty and paint the hull of the boat.
boat hull
The skeleton of the boat and its hull are assembled from prefabricated parts. The assembly process must be carried out carefully and carefully, in all planes.
The frames to the keel are first attached in advance, and only after the next control are they finally fixed. Moreover, the fastening must be reliable, since the boat will have to be turned over before sheathing it with plywood.
We collect the inner contour of the futoks

The strength of the structure, including the sides, depends on how reliable the fastening of the futoks is. Futoks are an integral part of the design of the frame, which consists of a floor timber and two futoks.
Floortimber is the lower part of the frame, which is designed to be attached to the keel. Futoks are the side parts of the frames to which the sides of the boat are attached. The fastening points of futoxes and floortimbers are structurally made somewhat wider, which increases the stability of the entire structure. This is especially important for watercraft, where engines will be installed, which increase the load on the structure as a whole and during movement in particular.
stem material

The stem has a complex shape, which is due to the loads acting on it during the movement of the boat. One of the most suitable materials for its manufacture can be oak, but, in extreme cases, you can use elm.
You'll be lucky if you can find a segment suitable tree having a natural curve. If this is not possible, then you can make a stem from individual elements by gluing. If you want to have a one-piece structure, then you need to take an ax and other tools, and cut it down according to the shape of the boat.
Keel design
The keel is the simplest component of the boat structure, and is a typical board, 25-30 mm thick and 3.5 m long.
side boards
To do this, choose healthy, even and knot-free boards, 150 mm wide and up to 5 m long.
Transom manufacturing

The transom is designed to mount the outboard motor. The transom board should be 25mm thick. If plywood is used, then it is better to glue several layers in order to end up with a suitable thickness (20-25 mm). The base for mounting the motor must be rigid, so its thickness must not be less than 20 mm. If necessary, the transom board is reinforced from above with a wooden bar. In this case, it all depends on the method of mounting the outboard motor.
Making a boat frame
The frame is assembled in the following sequence:
- the keel is installed;
- pins are installed;
- places of installation of frames are marked;
- installation of frames;
- fastening of frames, stems and transom to side boards;
- checking the correct installation of all elements, before their final fastening;
- it is desirable to treat the joints of structural elements with a waterproof composition or drying oil.
Plywood boat sheathing

According to the working drawing, blanks are cut out of plywood for sheathing the hull of the boat.
Subsequently:
- the frame of the boat capsizes upside down;
- all surfaces of the keel and frames are treated with emery cloth and made absolutely smooth;
- the details of the bottom of the boat are put in place and fixed with a stapler, after which the attachment points are pierced with nails;
- the side skin elements are first tried on, and then fixed in the same way as when attaching the bottom;
- when gluing blanks, you should pay attention to the direction of the fibers of the outer layer of plywood. They should be located along, not across the boat.
Working with glue

Work with glue is aimed at obtaining a solid structure, and, if necessary, filling seams or cracks with it. When working with plywood, all joints of the workpiece with the keel and frames are glued. After piercing with nails, the areas where the plywood is connected to the load-bearing elements are filled with glue if they do not fit snugly.
To improve the strength and driving performance of the craft, plywood sheathing is glued with fiberglass. Such protection of the wooden structure increases the durability of the boat. The fiberglass is evenly distributed over the plane of the skin, with no creases or blistering, which indicates poor workmanship. The fabric is glued from the keel, towards the side boards.
Painting

As soon as the surface of the boat dries well, proceed to the next stage - puttying and painting. Ready-made putty mixtures on an artificial basis are perfect. The boat is painted in two stages: first a primer layer is applied, and then one or two layers of paint.
Registration of a boat
To register a boat of your own manufacture, you must submit the following documents to the State Inspectorate for Small Vessels:
- passport;
- individual taxpayer number;
- the Certificate of primary technical examination of the floating craft approved and signed by the inspector with a conclusion on its suitability for operation;
- payment receipts for materials that were used in the construction process;
- receipts for payment of state duty for registration;
- registration card;
- registration application.
Samples of all documents with the estimated amount of payments can be found on the Internet.
Building a plywood boat is not very difficult, especially if you have experience working with wood and plywood. It will be much more difficult to register it, unfortunately. This is due to the fact that government agencies do not want to share responsibility, along with lovers of homemade designs. The ideal option is to use a homemade craft somewhere in the outback, away from all kinds of inspections.
Date of: 21/08/2007
Subject: Interesting
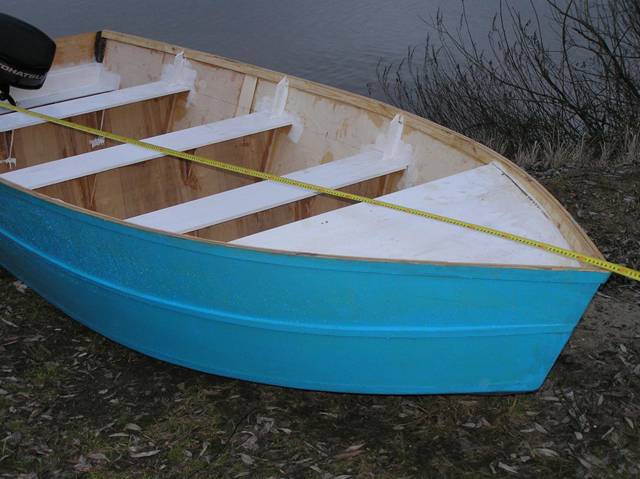
There are times when you want to go out into nature with a fishing rod, spinning, sometimes even with your family. The boat "Desnyanka", born in 1992, is even very suitable for this, but, due to its low carrying capacity, it is more for spending time intimate with nature. Little by little the boat wore out, rubbed, but walked.
And then one day, at the beginning of October 2006 from the Nativity of Christ, being in the middle of the Dnieper, I see how my boat begins to curl up under me, and the extraneous sounds made by the boat do not at all inspire confidence that I will get ashore dry. Having got out on the shore, almost dry and charged with adrenaline, I firmly decided to put the boat in order, but upon closer examination it turned out:
- Repair is not fast and does not guarantee safety in the future (more than 30% of the surface, or already passed or was about to emit air)
- Even restored, the boat could not provide for the needs of a family (4 people) in water trips, and such a need is increasingly arising.
- Installing a motor on it is possible, but does not guarantee safety (I don’t feel pleasure from walking on oars, especially against the current).
- Other essential minor things.
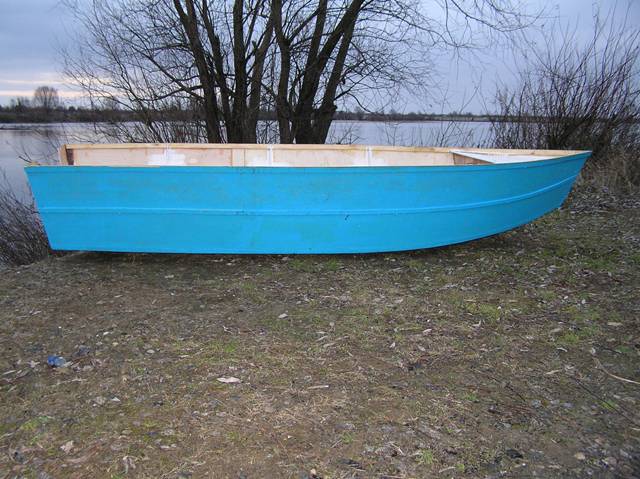
10/19/2006 came across information about self-build boats, interested. Since the boat was also planned for family vacations, his wife was involved in the discussion of the issue. She liked the idea of building a boat on her own: the husband is busy, the son does not hang out on the street, he does not spoil his eyes in front of the computer, plus "working together for my benefit - it unites." We looked at a lot of projects of boats such as "Salmon", "Catfish", "Burbot", "Perch", "Shark" and others. We read a lot of articles, including "In Search of a Fishing Ideal", "VITA Displacement Boat", "Building a Boat Using the Sew and Glue Method", "Is It Worth Building a Boat? Reflections". Uploaded literature on the construction of ships "15 ship projects", "Vessel type selection and construction", "Boat boats and motors in questions and answers", CARENE program. Taking the DIXI project as a basis, changed the linear dimensions to 3460 mm - length, 1350mm - width, board height was 500mm amidships - on the advice of fishermen, for the possibility of access to the Kiev reservoir I made a model of cardboard 265mm long (approximately 1:13), lowered it into the water (into the bath) - it does not sink! I began to load, since there is enough lead, 600gr - it does not sink, even the margin on the sides remained (the layout without a cutout on the transom): The family liked it.
10/25/2006 I looked at the boat, built by Oleg Melegov in the spring of 2006 in the garage and has been run in several times, including on the Kiev reservoir. I took a few pictures for a closer study, listened to a number of tips.
10/31/2006 finally matured! I ordered FSF 4mm plywood 1240x2450 - 3 sheets, transferred the pattern from CARENE to the wallpaper sheet, and started looking for a room.
11/10/2006 brought plywood.
11/15/2006 went to Kyiv (to the company "AEROLA"), bought 5 kg of epoxy resin - ED-531, 1 kg of hardener - Telalit, 2 liters of microspheres - Kobasil.
On 11/18/2006, a friend from the local yacht club, after giving some unprintable comments about the idea to build a boat, presented a roll of fiberglass, for which he was immediately forgiven. In addition, to facilitate my work with resin, he recommended using not scales, but medical syringes of different sizes, having previously drilled holes (with small volumes of the composition used - 20-100g, this is very convenient).
11/19/2006 - I couldn't find the premises, my hands itch: I persuaded my wife to let me into the hall for a couple of days to glue the plywood under the blanks, promised to cover everything with a film - for my own safety. The project has "officially" begun. I did not dare to glue on the "mustache", and there was nowhere to prepare plywood for gluing. As a load for gluing plywood, the wife allowed the use of home preservation, but she did not suspect that this would not end, and she had been reading the tale of the bast and ice hut to children for a long time.
On November 22, 2006, he transferred the bottom patterns from the wallpaper sheet to the plywood and, having promised his wife that after cutting the plywood, everything would be put in the garage until spring, he picked up a jigsaw. The wife, in order to minimize dust effects, suggested using a vacuum cleaner as a sawdust collector. Ignoring her advice and desire to help would be unwise on my part. The work continued, but with an assistant - the project, as planned, became a family one.

11/23/2006 - side elements are cut. In all operations where temporary fastening of elements was necessary: transferring a pattern from a wallpaper sheet to plywood, cutting out symmetrical body parts, gluing a fender, etc., binders of the appropriate size were used (taken from work for temporary use) - on the advice of Oleg Melegova.


On 11/24/2006, I processed the symmetrical elements of the boat hull with a planer, drilled holes at regular intervals (100mm) along the edges of the blanks (5mm from the edge), for further stitching of the hull. As a sawdust collector, when working with an electric planer, I used an ordinary construction glove, as it turned out to be quite effective. As supports, to hold the workpieces in a vertical position, I used clamps (3 pieces - everything that was available), fixed at the bottom, in opposite directions. I sewed two elements of the bottom with nylon thread, like boots are sewn, using a metal loop, and promised to transfer everything to the garage in the morning. The idea to use kapron thread arose for three reasons:

- natural laziness (too lazy to pick out glued metal brackets).
- rings made of nylon thread impregnated with epoxy resin will work as reinforcement.
- capron does not rust.
11/26/2006 purchased a sheet of plywood 10mm, made a transom. Taped, in one layer, fiberglass inner seam on the bottom. To avoid trouble, fiberglass was impregnated with epoxy resin in the attic, laying a film on the floor. The fiberglass impregnated with resin no longer crumbles, and the finished strips fit well on the primed surface.
On November 27, 2006, according to the already known technology with the use of child labor (daughter and son took an active part), they sewed the hull of the boat. In the evening, when the children had gone to bed, a transom was sewn on with epoxy glue. The epoxy work was carried out while the children were asleep and the door to the room was closed or they were not at home.
On 11/28/2006, internal side and transom seams were glued with fiberglass.
11/29/2006 purchased a sheet of plywood 6mm. Made solid frames.
11/30/2006 the frames are sewn in, glued.
Smoke break. Weekend. The family needs attention.
04.12.2006 jars were made and installed.


06-07.12.2006 the outer parts of the fender were made and glued. The fender was pressed along the entire length with 6 clamps at the control points and binders between them.
On 12/09/2006, the front frame and deck were sewn in from pre-prepared plywood residues.

On December 12-13, 2006, the inner parts of the fender were glued.
12/14/2006 glued: reinforcement of the transom board 25mm thick, 130mm wide, transom shelf 15mm wide, two vertical brackets to the knapsack board. Strengthening the transom board, while the epoxy resin dries, is fixed with screws.
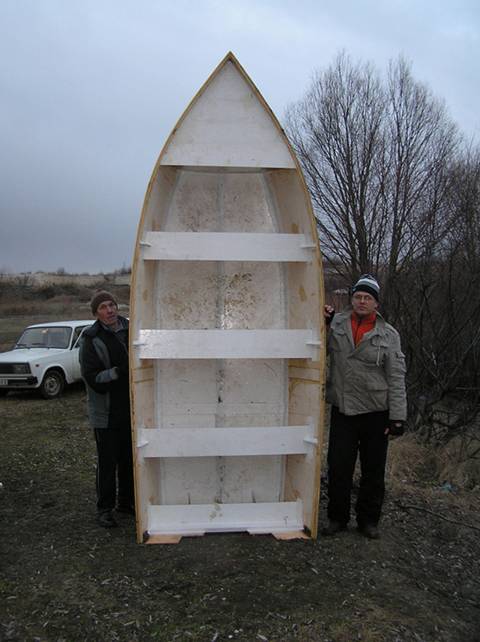
12/15/2006 the boat was turned over and installed on an impromptu slipway (from tied chairs in the stern and a stool in the bow). Knits are sewn and glued under the seats. The cans glued to the sides and frames were longitudinally unstable and had to be strengthened.
12/16/2006 the outer seams of the boat are pasted over with fiberglass in two layers. The screws have been removed from the transom. Seats screws are drilled, furniture chopsticks are glued in their place.

On 12/17/2006, the seams were processed under the vacuum cleaner. Made and installed on the glue bottom and side redans (fixed from the inside with screws).
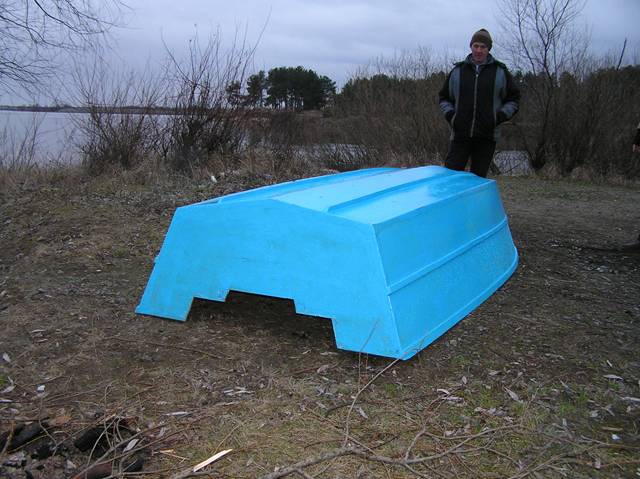
On 12/18/2006, screws were completely removed from the side steps and partially from the bottom ones. The boat is treated with epoxy on the outside.

12/20/2006 the boat is completely painted on the outside, on the inside - only the bottom part and the lower part of the side.
12/22/2006 the boat is set to normal position. The upper part of the fender was leveled with a planer, impregnated with epoxy resin.
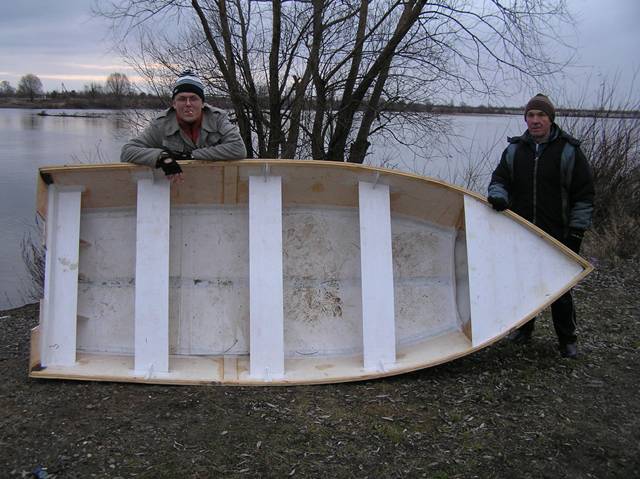
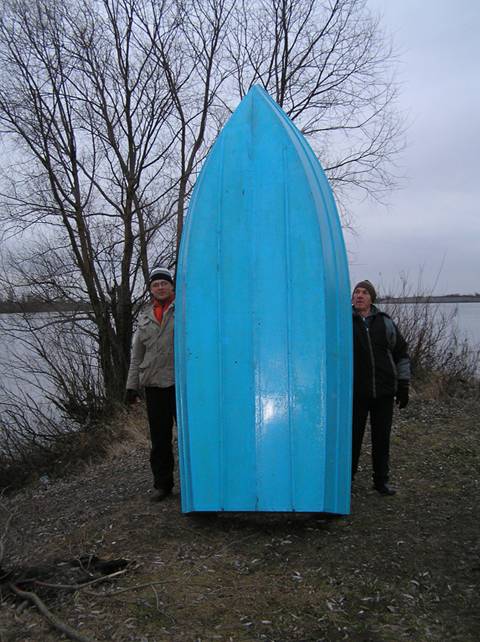
12/23/2006 removal of the body! Weight 44kg. The calculation was justified: the boat did not pass through the entrance! But through the attic to the roof - tyutelka in tyutelka! The descent from the roof of the watercraft did not cause much trouble: several tens of meters of rope, a four-seater tent - which became a temporary cover for the boat and half an hour of time for the whole procedure, along with packing and unpacking. Next car trailer, shore, launching.


The boat on the water did not present any surprises, there were no leaks, creaks, cracking of the seams were not observed.

Crimping is made on 410 kg. live weight (5 people with a photographer - son 9 years old) + 44kg. own weight of the boat + 20kg. engine. A full check of driving performance was not carried out for reasons: strong wind, not run-in motor (purchased the day before), the complete absence of personal experience boat control.
Identified on this stage remarks: a narrow cutout on the transom - a small tiller angle (the engine had to be moved closer to the starboard side), due to the lack of personal experience at the beginning of the project and the engine until its completion.
In the spring I will bring the boat to mind and conduct full sea trials. I hope repainting, installing practical things, the total weight of the boat will not increase much.
As is customary at the end of the story: special thanks to my family, they endured, did not kick me out, and most importantly, they helped as best they could. From my words, my wife recorded correctly. Signature.
And the hands are itching:
01/02/2007 - electric jigsaw, extension cord - the cutout on the transom became wider, half a meter of adhesive tape so that the fresh cut does not get wet, and we are again near the water. The face, profile and other material evidence, in the form of human footprints in the boat, is attached. Five horses at the stern! Few, Few. But according to the table, the allowable power is enough.


Yes, and I almost forgot, two-centimeter ice, 150 meters, in a deep backwater, they broke like an icebreaker - an experiment, you know. Adrenaline is more than enough, it's a pity the camera was on the shore, two kilometers from the scene. We came back - we are not afraid of anything! 4mm plywood in a keeled bottom + two redans = icebreaker! Now that's all.
Sincerely, Sergey Klepikov.
Encyclopedia of Technologies and Methods |
Boats, boats, yachts |
How to build a motor boat with your own hands
As a child, barefoot, I dreamed of riding a motor boat. It happened rarely and not for long. So the dream remained unfulfilled for many years. The turning point was a vacation spent with the family on the lake. Seliger in 2005. Then I managed to rent some kind of duralumin vessel, it seems that the Voronezh was of a very bearded year of manufacture. I hung on the transom, probably "Whirlwind", I can’t say more precisely, because on the engine, the cap was absent as a class. The engine was started by a rope wound around the flywheel. The distance creaked and crackled terribly, the engine did not work smoothly, the steering had play, like on a broken-down truck, it was very difficult to keep the right course, the boat went on the glider for a long time and tediously, but despite this I got great pleasure. True, there were many people of us - four adults and my little boy. An hour later, when I returned the boat to the owner, a phrase was uttered to which my wife then did not pay attention: "I want my own boat!". This thought was deeply embedded in my brain, and immediately upon my return to Moscow, I began to think over options for implementing that phrase. My wife looked at all my thoughts and searches somewhat skeptically, because. there was very little free finance and it was impossible to buy the whole set at once with a new one, in principle, even buying a used one was unbearable. I considered not new boats "Kazanka", "Crimea", "Voronezh" and so on. and so on. The purchase in the Moscow region of not even a new building cost at least 2 thousand bacazoids, which could not be acceptable. Somehow, by chance, the idea arose to build a boat on my own. Then the desire to make a boat with my own hands intensified and grew into confidence. Ivan Georgievich strengthened this confidence in every possible way, although he did not suspect it. The forum was read "from cover to cover", any article related to the construction of a boat with one's own hands was read and understood by the "cogs". In short, the decision to build a boat was made in the fall of 2005. This is where my wife got a bit worried. But the decision made is not yet a boat. I had to figure out what I wanted to do. The desire to have a big and beautiful boat struggled with the understanding that there was simply no experience in this matter. Although an engineering education (Moscow Aviation Institute, may God prolong his days) made it possible to assess all the difficulties of this matter, there were still many questions regarding the design and manufacturing technology of a small vessel. Dashing trouble began! Been looking for more information. The articles on the site motolodki.ru are interesting, but reflect the approach of a particular person to solving this problem, but I wanted to read something like a design textbook. I could not find such a book, but the site helped here too, Vitaly (the boat "Vita") turned out to be the happy owner of "15 projects of small boats" - they phoned, met and the book was with me. I read it - questions remain. On the website of Ivan Georgievich I found the book "300 Answers", read it - the questions remained. In short, I came to the conclusion that only "experience is the son of difficult mistakes" can solve all these remaining questions.
But I seem to have delayed the history of the issue. I turn to the issues of design and construction. Like many self-builders, he settled on the "sew and glue" method, which he later regretted greatly.
The design of the Som boat was adopted as the basic design. But I did not want to build a cabin version (although I may regret it). "Catfish" Ivan Georgievich really liked. The dimensions of the "Soma" seemed too small, and the length was increased by 200 mm. I tried to make a model according to the drawings from the project - it turned out crap. There are errors in the drawings and the model turned out to be crooked.
All this time searching for "Carene" hung on the desktop and at home and at work. A great many options have been worked out. I didn’t like everything - either the collapse of the sides did not fit the contours of the nose, then I didn’t like the height of the side, etc. And the new year 2006 is already in the yard. I feel that I need to stop at something, but I could not choose the contours according to the program to my taste. There is nothing to do - AutoCAD is a great thing. I generated in "Carena" the contours that I liked the most, AutoCAD sucked and began to twist and pull this three-dimensional boat.
Rice. 1. This is the original version, which I liked the side view, but the camber is very large, which could not satisfy.
It took a long time, but in the end something happened. Many will have a question: "How to make patterns?" The question is quite legitimate. But then the younger brother came to the rescue. He builds paragliders (they started together when they studied at the institute). He has a self-written program that draws sweeps using the triangulation method. They drove the body there and twisted it. Something happened. But there is no trust. Checked on Karen. The sweeps obtained in Karen were compared with the sweeps obtained using the brother program. The discrepancies were no more than 0.1 mm. In short, we decided that such accuracy would completely satisfy us. From the box from the designer "LEGO" embossed by the son, a model was glued together. It worked out well. The hull was scaled to a length of 4.6 m and a width of 1.75 m.
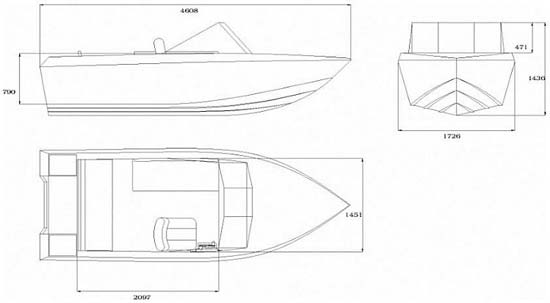
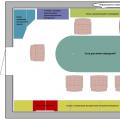
Rice. 2. This is the final version that was accepted into production.
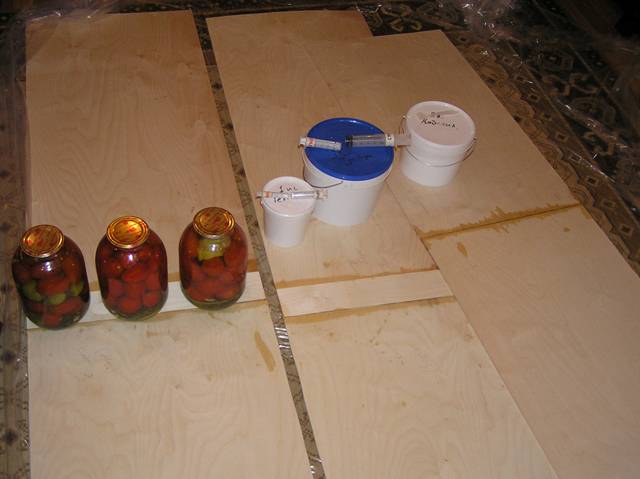
The pictures show the layout of the cockpit. The boat will be mainly used for rides and walks, and to a lesser extent for fishing. In doubts and questions, winter and spring passed, the project was overgrown with drawings and diagrams. It's time to buy materials. My wife was completely upset, because all summer I was going to build a boat, but, being a wise woman, she even supported me to some extent. I bought plywood, epoxy, fiberglass, some tools and started work.

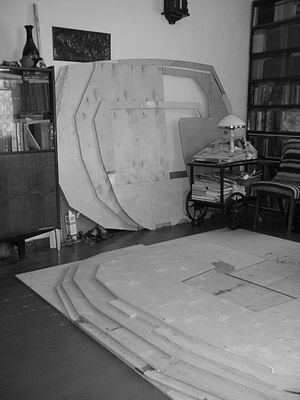
Rice. 3. Prepared materials and tools.
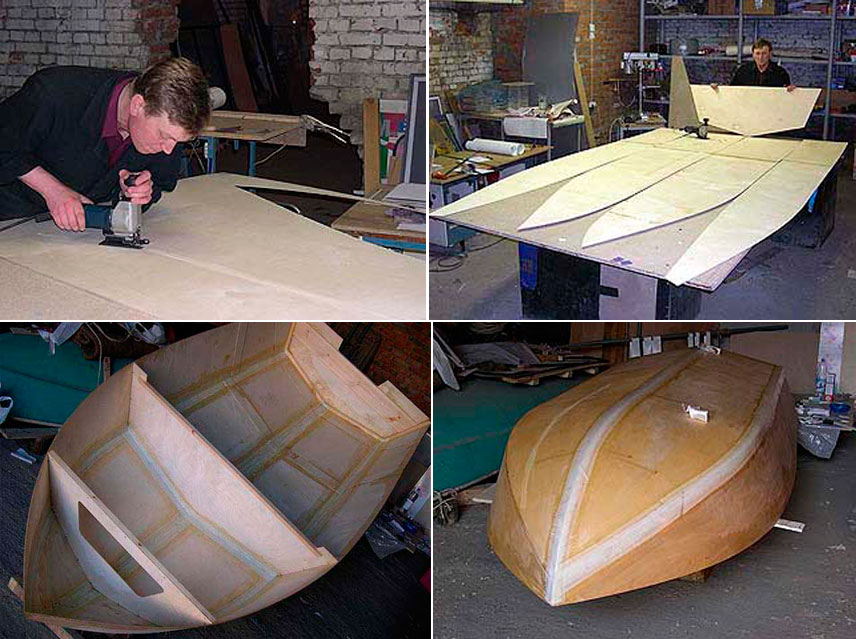
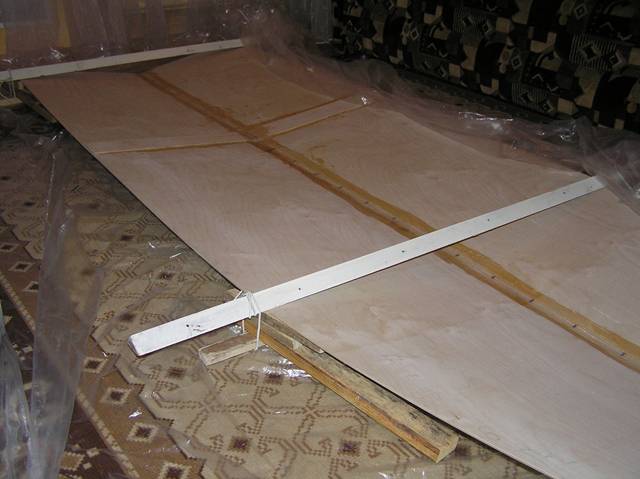
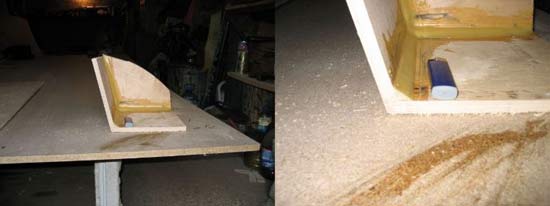
Joining plywood with a mustache did not become a problem, in two days 4 sheets 4.8 m long were glued together, because the patterns fit well along the length without waste. Details of the bottom and sides are cut out. The question arose with the transom - you simply cannot buy an oak board on the market. I searched for a long time, but I found where they sell edged boards of the required thickness. I cut out the details of the transom and glued them according to the following scheme - the outer layer is 8 mm. plywood, fiberglass layer, oak board, fiberglass layer, inner layer - 6 mm. plywood. It got hard. The oak board is not liftable. But what's done is done. I didn’t want to redo the transom, and a margin of safety never hurts.
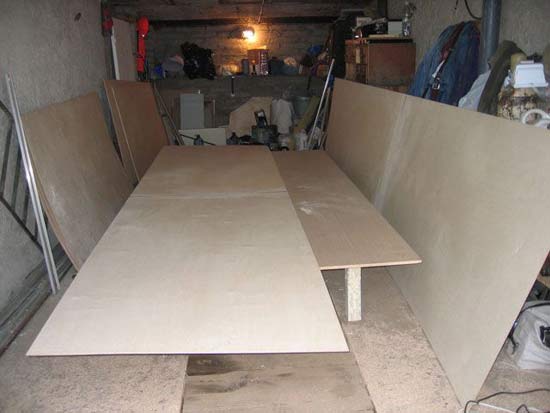
Rice. 4. Glued sheets. Everything is simple.

Rice. 5. There is a transom, heavy, bastard, it turned out.
But all this turned out to be flowers in comparison with the manufacturing process of all frames. Now I understand that with the number of frames it turned out to be too much (do not kick with your feet!), But then I wanted to make it stronger and more reliable. I fiddled with them for a long time, until you cut out all the details, until you glue them, until you wrap everything with screws - I thought I’d throw everything to hell! Patience was running out, but pride did not give up everything. The work continued slowly but surely. When the last frame was assembled, I really wanted to get drunk to hell, but daily driving did not allow it.

Rice. 6. A pair of frames, we need to make 8 more pieces.
The long-awaited moment has come when the boat can begin to take shape. Began to assemble the body. Of course, this process cannot be mastered alone. The brother was called to help. Assembly of the bottom did not cause the slightest question - everything gathered, twisted and decomposed with a bang!

Rice. 7. Bottom and transom. Everything came together as it should.
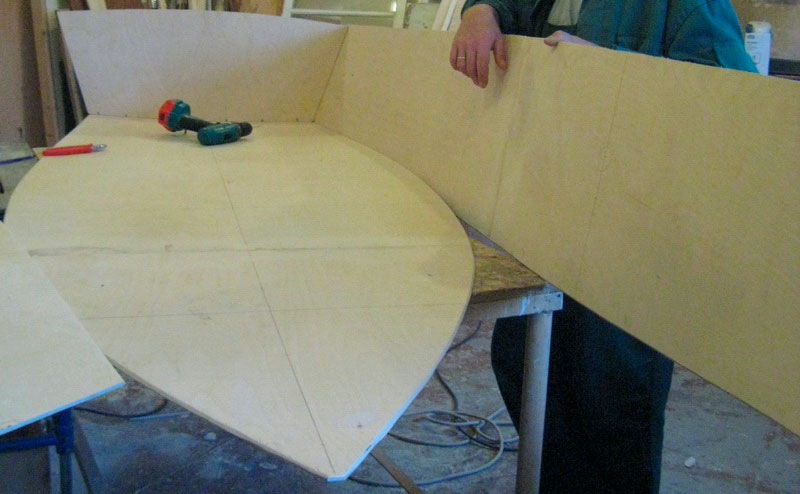
But with the sides had to suffer. It was not possible to put both sides at the same time - it is impossible to keep very large parts. They began to make one side. We started with the nose. We got a misalignment of 8 mm to the stern - well, I think everything is OK ..-pa! Sailed! Parts are either cut incorrectly or not designed correctly! But my brother is a calmer man, he suggested trying to put the second side from the stern. We tried it - everything fell millimeter to millimeter! So I think, therefore, the mistake is not in the details and drawings, but in crooked arms! The first board was removed and quickly reinstalled. Everything is up!

Rice. 8. Brother Michael adjusts the first board that was not set up correctly.
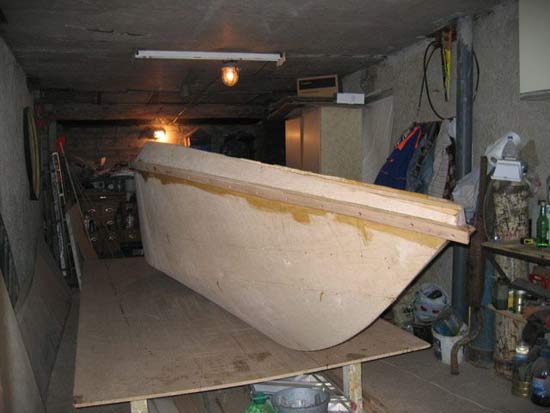
Beauty! When the hull was assembled, it was understood that the boat turned out to be big. Immediately, doubts began to overcome the correctness of the chosen dimensions, did you decide to build a very large boat? But there's nothing to do but move on. The wife came, looked, figured out where she and her son would sit in the boat, and said that she liked it! So, now I just have to finish the job!

Rice. 9. Everything is assembled so far only on twists, clamps are visible on the frames.

Rice. 10. Instead of a frame, slats are inserted to give the correct camber of the sides.
For an estimate, I inserted the central frame (Fig. 9) - I stood in place as if I were standing there. It gave strength and confidence. Now you need to make fillets at all seams, as more experienced comrades advise. To understand how to mix everything - I mean, epoxy and aerosil, I had to make a small corner of plywood. I prepared a special jar, poured epoxy, hardener and sprinkled aerosil. Yo-my, who knew that this aerosil flounders like water, and its weight is ten times lighter! In short, I interfered with the whole thing for about forty minutes - I got sick. It turned out to be a chore to mix Aerosil into epoxy.;
Rice. 11. Here is such a sample, here is such a fillet. Lighter for sizing.
But in the end, everything was mixed up and the experimental sample was stitched and glued. The design turned out to be quite strong - they broke it only with a blow of a dumbbell. Confidence that everything is possible is even stronger. Later, to mix epoxy and aerosil, a device from a water bottle and a mixer was used. After greasing all the seams, the body became somewhat stiffer, but still remained mobile.

Rice. 12. Such a device saves a lot of time when mixing epoxy and aerosil.

Rice. 13. The mixture resembles consistency mmm... probably village sour cream, i.e. thick cream.
Rice. 14. The right photo shows the markings for installing stringers.
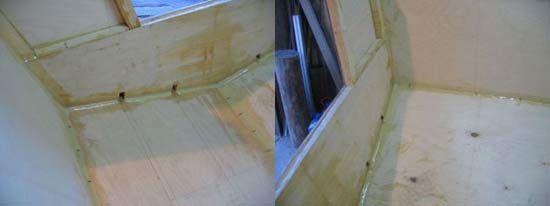
It's time to glue the seams with fiberglass. Fiberglass tapes could not be found, I had to cut from a roll. The case is also dreary, but he mastered it. After gluing, the rigidity of the body increased. Unfortunately, I don't have any photos of this process. Working with epoxy is not conducive to photography. Pasting frames is not a tricky business if there are no stringers.
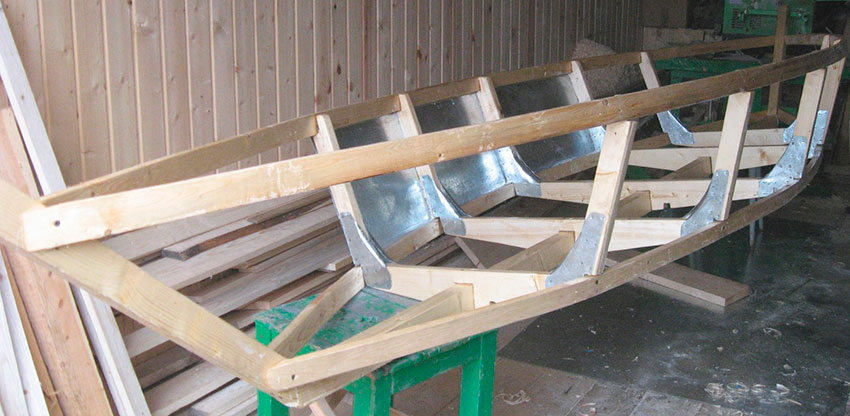
I was supposed to install four stringers on the bottom (2 stringers per half of the bottom) and one stringer on the side. This is where the real problems started. At the same time, bending 6 stringers and installing frames turned out to be a very difficult task. While the frames were being installed in the aft and central parts of the boat, everything was more or less normal. Then it came to the bow, where the curvature of the sides and bottom became large. It was here that I had to swear a lot and a lot, remembering with a "kind" word all this "sew and glue" technology. It was very difficult. More precisely, it is difficult to say!
The three of us installed the bow frames for three days. Smeared with glue from head to toe. In short, it was concluded that large boats with stringers should be assembled only on a slipway using classical technology.

Rice. 15. Here's what happened.
And, of course, it was not without jambs. When installing one of the bow frames, a warp was made and one side was squeezed out. These are the consequences of using the "sew and glue" technology - correctly installing the frames is a very meticulous business and does not tolerate haste. The saddest thing is that it was discovered only when installing the upper part of the sides. The left side stood up perfectly, without a strong tightening and other tricks. The right side in the bow did not rise, and only then was the jamb discovered.

Fig.16. Here is such a "jamb". The kink is clearly visible.
I had to detach the glued frame and reinstall it. I don’t want to dwell on this procedure in detail, but one thing is for sure - it’s always harder to redo it than to do it again. Especially when you do something for yourself, that is. conscience. Epoxy resin with aerosil proved to be a fairly strong bond. With the help of a chisel and "some mother" it was possible to tear off the frame and rearrange it to the right place.

Rice. 17. As you can see, as a result, the board straightened out and the gap between the parts disappeared.
Further work went like clockwork, although rather slowly due to the fact that he worked alone. After installing the part of the side that was littered inside, it was necessary to start manufacturing the fender. It was decided to make the fender bar external and power. Therefore, there are no stringer sides inside at the junction of the parts of the sides of the stringer. The role of the stringer will be performed by a fender, which will be made of oak. Oak extensions for doors with a section of 80x10 and a length of 2.3 m were purchased. Then he dissolved them in half with an electric jigsaw. It was from these rails that it was planned to make a fender.
Perhaps you can dwell on the installation of the fender bar in more detail. It was done like this - holes for screws were pre-drilled along the entire length of the rail. And starting from the nose, a rail was attached to the epoxy resin and screws. The screws were chosen to be thick and short with a large head that can withstand a serious effort when unscrewing after gluing. Every day, one layer of rails was installed. The screws came out the next day. The seal was assumed to be strong enough, so 3 layers of rails were installed. Each subsequent rail was installed with an upward shift of 8-10 mm. because the upper surface of the fender was assumed to be perpendicular to the diametral plane. After polymerizing the resin and removing the last screw with a planer and a belt grinder, the fender was given the correct shape.
Rice. 18. This is how the fender is installed.
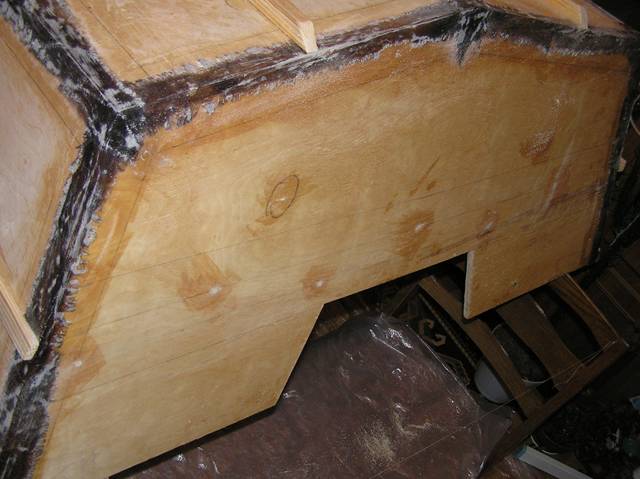
It took a week to install and finish the fender. The work is dreary, but the result pleased. Next came the turn of the installation of the deck. In the stern there are two lockers for the battery, ropes and other vital stuff. Installation was not carried out on pure epoxy. Aerosil was added. Such a composition has good strength, but it does not flow. The excess of this paste, after installing the deck parts, immediately went to fill the holes above the screw heads.
After the polymerization of the resin, everything was polished and the surface turned out to be smooth. An anchor box was supposed to be in the forward part of the deck. The installation of the bow of the deck also did not raise any questions, everything fell into place, assembled and screwed. Of course, the power piping of the anchor box was completed before the deck was installed. The photographs show that the size of the nose box should have been made larger. This understanding came only in the fall, when a friend gave me two anchors for my birthday. It turns out that my friend asked his brother for a long time what kind of boat, what weight, side height, etc. are supposed to be. because in the store he was tortured with similar questions. As a result, the anchors turned out to be impressive. 7 kilos each.

Rice. 19. One of the rear lockers.
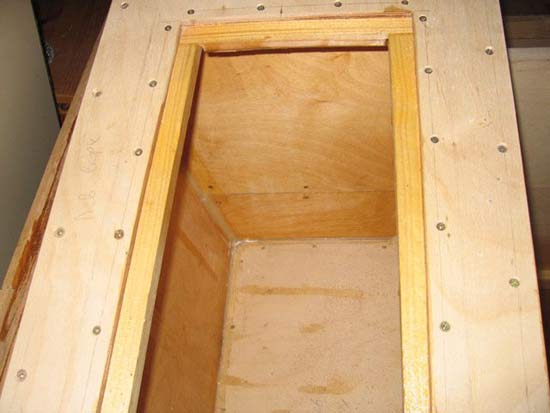
Rice. 20. The locker turned out to be quite deep. Whether this is good or bad remains to be seen.

Rice. 21. Recess, lockers and side floods.

Rice. 22. Bow anchor box.
Now the boat has acquired a more or less finished look. Once again, everything was puttied and sanded. It's time to glue the fiberglass to the top of the sides and deck. There are no photos of this process, because. when working with resin, hands do not allow you to take a camera. On this I will tell in words.
The hardener "Etal 45M" was purchased. Working with this hardener is much easier than with PEPA, but there are some features due to the greater fluidity of the resin. As a result, I can say that it is more convenient to paste over the case using the Etal 45M hardener due to greater fluidity and a later polymerization start time.
After applying the resin to the surface, I had about two more hours to smooth the fiberglass, remove air bubbles and other licks. But the traditional PEPA hardener should not be completely abandoned either. It is very convenient when gluing wood parts together, especially when adding aerosil. It turns out a fairly thick paste, which allows you to glue vertical surfaces. The resin simply does not flow and a neat fillet is immediately made.
I won’t say anything new about pasting - the process is not fast, it requires some experience, which is gained in the process. Very quickly comes the understanding of what is being done right and what is not. After pasting, it was time for puttying and sanding. This process is endless, and there is no way to finish it, therefore, at a certain stage, I simply stopped further mockery of myself.
It's time to turn the boat upside down keel. We can say one of the main stages of construction. How many times this happened in my head in reflection, and now it actually happened. But the deed is done, the boat is turned over and the work continues.
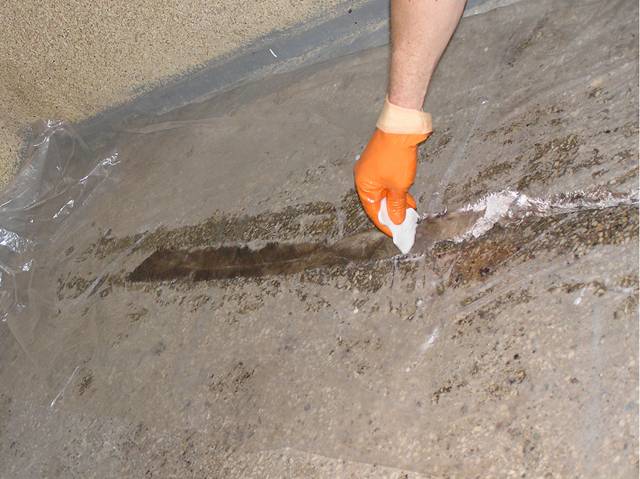
To begin with, the cap screws were overturned, which stuck out above the surface of the plywood. Then sanded and treated with a special solution of the place where the mold appeared. Last winter, due to an oversight, water got into the boat. Inside, everything was wiped dry and dried, but outside, under the bottom, water remained, which spoiled the surface.

Rice. 23. The process of the coup, front view.
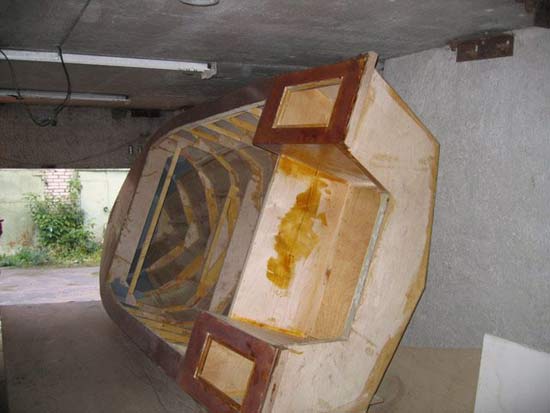
Fig.24. Also, rear view.
After puttying and sanding all the sides and the bottom, it was possible to start pasting the bottom with fiberglass. As noted above, this process does not contribute to the special cleanliness of the hands, so there are no photographs of the process itself either. I can say one thing: after the end of pasting, there was a great desire to drink properly and not to remember this process anymore.

Rice. 25. Bottom before puttying and sanding.
But, as you might guess, the process of pasting is not the most difficult and dreary task that you can imagine. Then began puttying and bringing the surface to a more or less suitable level. Of course, the surface is not perfect, but it more or less corresponds to my understanding of how to do it.

Rice. 26. Established draft redans.
Puttying and sanding can be continued indefinitely. As in the case of the deck, at a certain stage, just finished this process.
Further it was possible to be engaged in installation of redans. Redans were made from an oak plank from which a fender was made. The slats were glued on the mustache, and then loosened on a circular along the diagonal, so that a triangular slat was obtained. Then a planer and tape machine finished the job.

Rice. 27. The boat is puttied again.

Rice. 28. The bottom and sides are sanded and prepared for painting.
Further, according to the same technology, holes for screws and adhesive composition are prepared in advance. Then, according to the markup, we set the redans. After polymerization of the resin, the screws are removed, and the holes are filled with epoxy resin. Then again the skin, putty and a quiet mater periodically torn off the lips. Well, this is a very annoying thing.

Rice. 29. Boat after primer.
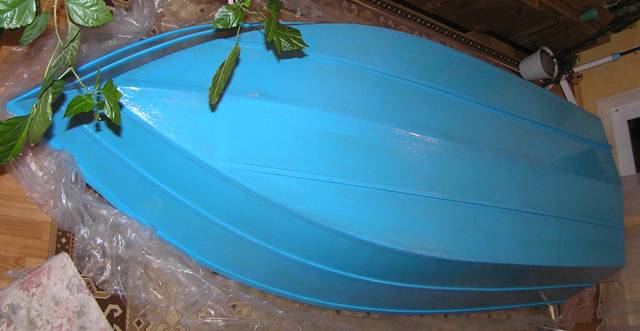
But, as they say, "patience and work will grind everything." Now it's time for me to start painting the hull. I want to say right away that a mistake was made in the choice of soil. The primer must be used on an epoxy basis, but I used the one that was advised in the store. Primer and Tikkurilov paint. According to the seller, the paint is very durable and hard. When installing the boat on the trailer, it turned out that this was not at all the case. But more on that later.
I painted everything with a compressor and a spray gun. It took 1 kg to paint. soil and 3 kg. paints "MIRANOL" produced by Tikkurilla. The results were more or less acceptable. The paint lay down more or less evenly, a large number of smudges were avoided. But they could not do without them at all, the lack of experience and probably not quite correctly selected nozzle diameter on the sprayer affected. The work of a painter requires good experience, which I certainly do not have. Although my conclusions do not say that it is not necessary to undertake, then what you cannot do - if you do nothing, then nothing will work.

Rice. 30. Painting.
When I took on the boat, I assumed that I would spend no more than 1.5-2 years on it. How wrong I was! By the end of the second summer, I only had time to paint the bottom, and there was still painting of the deck ahead, arrangement of the insides of the cockpit, installation of glass, instruments, etc. and so on. Of course, if you calculate the net time spent on construction, then it turns out not at all much, but the boat has not been completed yet.
Time cannot stop running and the second autumn of construction has inexorably come. Like last year, the kid was returned to Moscow and the working days of a Muscovite began again, troublesome and fussy. But the fuss with the boat was not over yet. Our garages Luzhkov is going to be demolished and it was necessary to prepare the boat for urgent evacuation. For this reason, a trailer was bought back in the summer, on which the ship was hoisted.

Rice. 31. Brother tries on the boat.
That's all for now. The next summer of 2008 should be marked by the launch. If I can't do this it will be very disappointing. Synula can’t wait to go boating, and his wife is already openly grumbling that she spent the second summer at home alone after work. Yes, and household chores for two summers are running a little.
And finally, a couple more pictures of the boat on the trailer.

Rice. 32. "Come on, let's see how you got up!"

Rice. 33. "Nothing like that, there are relatively many places."
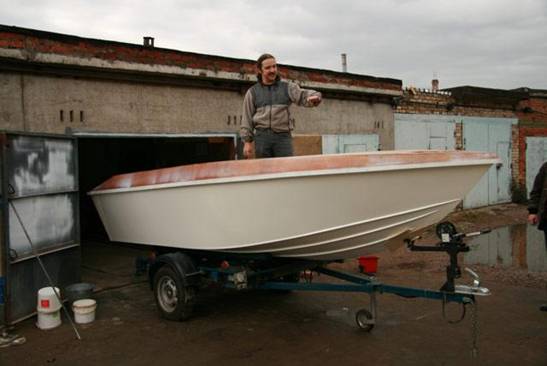
Rice. 34. "And the glass we will make here is such a height."
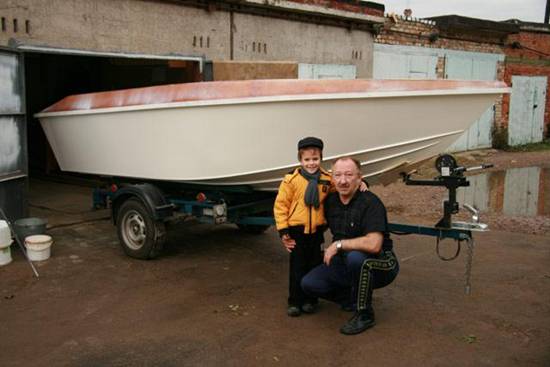
Rice. 35. Grandson with grandfather on the background of a father's product.