Throwing antifreeze out expansion tank- this is one of the signs indicating the need to change the cooling system pipes on your VAZ 2109.
Reasons for the release
The first step is to figure out why the coolant is being thrown out of the expansion tank.
- Wear of CO elements. In particular, we are talking about pipes and connecting hoses. They are under constant influence high pressure and temperatures. Therefore, over time, their wear and tear is a completely natural phenomenon. As a result, antifreeze begins to be thrown out.
- Low quality components. If natural wear and tear is typical for used cars and cooling systems that have been in operation for quite a long time, then when using low-quality components, even on a completely new or updated cooling system, serious problems can arise. An example is simple burrs on the neck of the expansion tank. Because of them, the lid does not fit tightly enough, which leads to a gap and the release of antifreeze.
- Expansion tank. Alas, the quality of the plastic from which expansion tanks for the VAZ 2109 are made today leaves much to be desired. Because of it, the plastic simply bursts under high pressure.
- Faulty engine. If the engine itself is not working correctly, the coolant may boil. This leads to damage to the thermostat, radiator, and pump.
From this we can conclude that the quality of the CO directly depends on the technical condition of the car and the quality of the components used.
Signs of coolant emission
It is important to understand that coolant can be thrown out not only through the expansion tank cap, but also inside the system. It is important to monitor the condition of the CO and identify signs of a leak in time.
Antifreeze evaporates very quickly, so traces of it are not always visible.
- If coolant is released through the reservoir, puddles immediately form under the car.
- If liquid enters the cabin due to a malfunction of the CO, this can be determined by the smell. It has a sweetish tint.
- Antifreeze also often leaks into the engine system. Such a breakdown is determined by white smoke emanating through the exhaust pipe.
- The most unpleasant and dangerous situation is the release of antifreeze into the engine crankcase. If this happens, a white emulsion will appear on the surface of the oil filler cap.
- Periodically checking the space under the timing belt cover will determine whether the pump has failed. If yes, then you will find high humidity there.
Signs of boiling
If there are problems with the engine, antifreeze may simply boil in the CO. There is nothing good about this, so it is important to detect the malfunction in time. There are five main signs of coolant boiling:
- The temperature gauge jumps to 130 degrees;
- White foam appears at the filler neck;
- The engine stops working properly;
- The coolant level in the expansion tank rises sharply;
- White smoke comes out of the exhaust pipe.
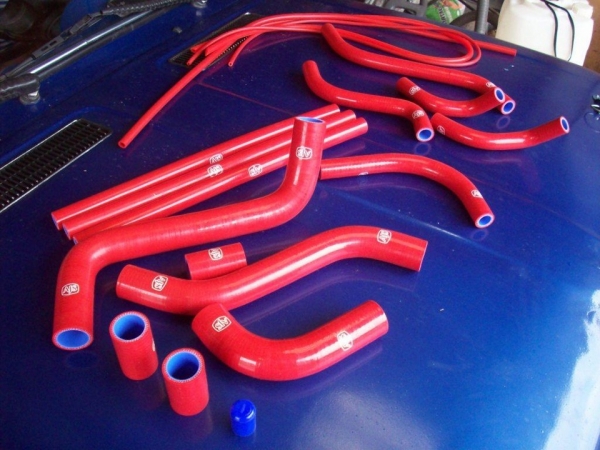
If problems arise with CO, you must first check it for leaks. According to recommendations, this should be done every 15 thousand kilometers. If a problem is discovered with hoses or pipes, they are replaced as a whole set, and not just those that have defects.
Replacing pipes
The entire process of replacing pipes is divided into two stages:
- Dismantling;
- Installation.
Let's start with dismantling work.
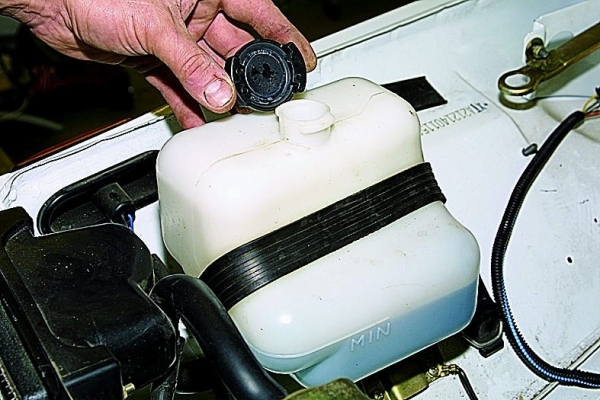
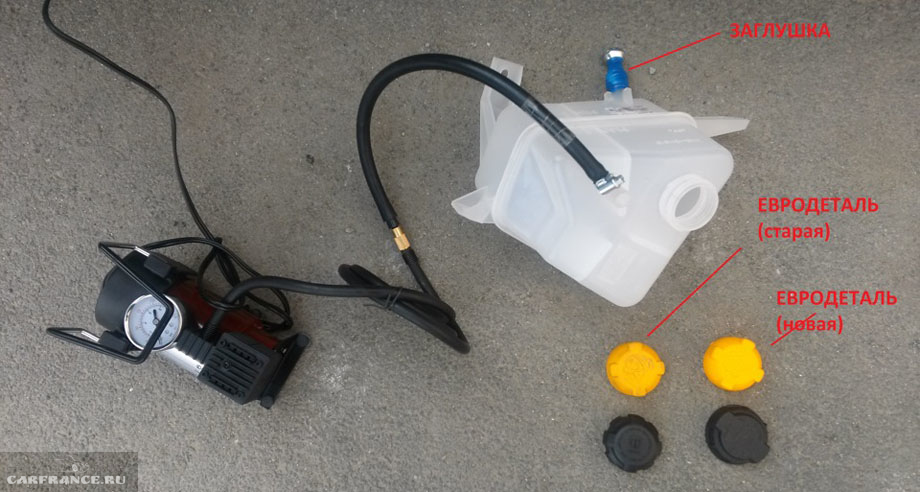
- Unscrew the expansion tank cap to allow air into the system.
- Open the heater tap inside the passenger compartment by turning the control all the way to the right.
- Remove the crankcase protection by unscrewing all the mounting bolts.
- Prepare a container where you will drain the old coolant. It must be made of plastic with a volume of at least 10 liters. Choose a clean container if you want to refill this antifreeze.
- Clean surfaces near drain plug on the cylinder block and radiator. This will prevent dirt from getting into the coolant drain container.
- Place the container under the radiator drain, unscrew the cap and wait until the antifreeze comes out.
- Drain the fluid from the cylinder block in the same way.
- Wait until all the coolant has come out, then tighten the plugs.
- Start working on the interior by unscrewing the dashboard fasteners and moving them to the side. Move the front seats as far back as possible. This way you will provide yourself with more or less comfortable conditions.
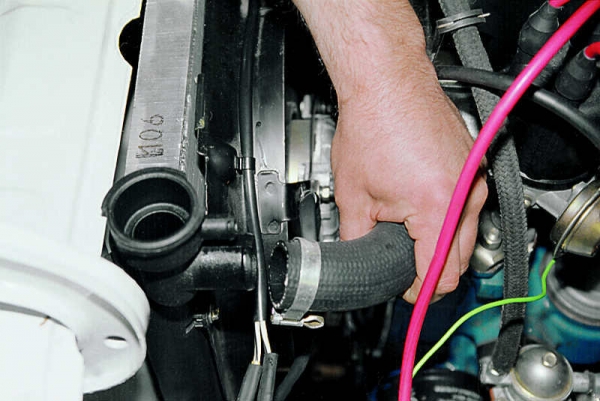
- Unscrew the clamps from the coolant supply and return pipes from the heater tap. You will find it in the partition between the passenger compartment and the engine compartment.
- Remove the rubber pipes. If they are difficult to remove, you can pull them to the sides or cut them with a knife. They are still being replaced. Due to the hot coolant, the rubber sticks to the metal fittings, which complicates their dismantling.
- Be careful and careful, do not pull the tubes too hard. Otherwise, you risk damaging the connections of the fittings. And this will entail much more expensive repairs.
- Use a flathead screwdriver to remove the valve from the engine compartment.
- Using pliers or pliers, disconnect the holder from the heater tap drive rod.
- Clean the faucet and blow out the inside of it with compressed air.
- Sequentially remove all remaining pipes from the radiator and engine. Be sure to remember the sequence of their location so that there are no problems with reassembly.
- Clean all joints using wire brushes. Process the circumference of each fitting. Proceed carefully, take your time;
- Use a dry cloth to remove any remaining dirt. Even the smallest debris can clog the cooling system;
- Finish the edges of the clamps with a fine file. This way you will make them less sharp, and therefore the risk of damage to the rubber pipes is minimized;
- First put the clamps on the pipes so that they remain in a free position for now;
- If you cannot pull the pipe onto the fitting, try lubricating its edges with soap. This will make it easier for him to accept the pipe;
- Tighten the pipe, working carefully and consistently. Make sure that the installation is carried out without distortions;
- After installing the elements in place, check the tightness of the fit. Sometimes the rubber is too elastic or the diameter of the pipe is larger than required. Here it is better to immediately go to the store for a new set than to risk the cooling system;
- After making sure that the pipes are seated securely, tighten the clamps;
- Install all the new tubes into place, make sure once again that everything is done correctly, without distortions, the clamps are tightened properly;
- Check that the coolant drain plugs are properly tightened;
- Fill the expansion tank with previously drained or purchased new coolant;
- Wait about 10 minutes, then add a little more liquid. During this time, the antifreeze will pass through the system, fill the stove, radiator, and cylinder block;
- Tighten the reservoir cap and start the engine;
- Monitor the temperature sensor readings. If they rise higher than expected, immediately turn off the engine;
- Carefully open the cap of the expansion tank with antifreeze and press with a certain force on the upper pipe from the radiator;
- This will help remove excess air from the system. Repeat the procedure several times;
- Add coolant to the tank so that the antifreeze is at the required level. Start the engine again and check the behavior of the sensor. If everything is fine, you can safely continue to operate your VAZ 2109.
In many ways, the efficiency, reliability and duration of operation of the CO depends on the quality of the components used when replacing pipes.
Price issue
If you decide to replace the pipes yourself, you will only have to spend money on them. Current prices today are as follows.
Plus, it’s far from a fact that they will do better for you there than you could do with your own hands.
The coolant in the system of a VAZ-2114 car can not only properly perform its tasks and heat the interior, but also create numerous problems. This is her nature.
Video with an analysis of the reasons why antifreeze presses into the expansion tank
Why is antifreeze leaking?
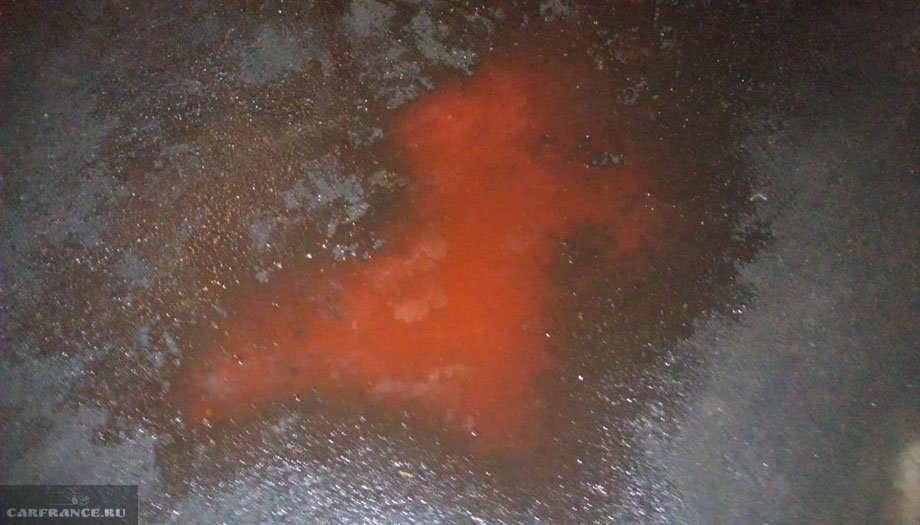
Any antifreeze has a very high fluidity coefficient, so even in those cooling systems where water was filled and there were no drips, they can easily appear with antifreeze. And it is difficult to detect these drips, since antifreeze tends to evaporate quickly.
But there is another fairly common problem - on the VAZ-2114 throws antifreeze out of the expansion tank.
Cooling tank design - looking for a leak on a VAZ-2114
We will not consider such situations when there is a crack in the tank the size of a finger, and antifreeze leaks out “in an impudent manner.”
Everything is clear here; it would be strange if it didn’t flow out. Much more surprising are situations when liquid is squeezed out of the reservoir of an almost new car. It is worth remembering here that The cooling system on the VAZ-2114, like other modern cars, is sealed, and it is designed in such a way that it is practically impossible for the liquid to boil.
Design
First, let's look at the design of the expansion tank.
The expansion tank is needed so that when the volume of liquid increases when heated, it does not create excess pressure in the system, at the same time, so that when the liquid cools, air locks do not form in the system.
The tank compensates for the lack of liquid when cooling and accepts its excess when heating. This is a plastic sealed container, nothing more.
But it must be sealed, then liquid will not flow out of it, no matter how much it is overheated. The weak point of the VAZ expansion tank is cover with safety valve . It is from there that antifreeze most often leaks.
Diagnostics of the condition of the coolant tank
In this case, it is necessary to carefully inspect the tank itself, if possible, check its tightness outside the cooling system and make sure that it has no mechanical damage. After this, you need to check the tightness of the hose connections. We pay special attention to the quality of the threads on the neck and lid.
Installing two clamps will help reduce leaks and get to the parking area and repairs.
There should be no burrs, the casting should be clean and without cavities.
Why does antifreeze squeeze out?
Clear signs of antifreeze leakage
At first glance, even a used tank looks very good. But this is only from the first. If an oil puddle regularly appears under the car after we have turned off the engine, the problem may be in the tank itself. The simplest thing is, but the new one may not be of the highest quality.
Another problem that many have encountered is the quality of the lid and the simple valve that is built into it.
In this simple way you can check the expansion tank cap
Under normal conditions, the valve ensures complete sealing of the system, but if so, there may not be so many reasons:
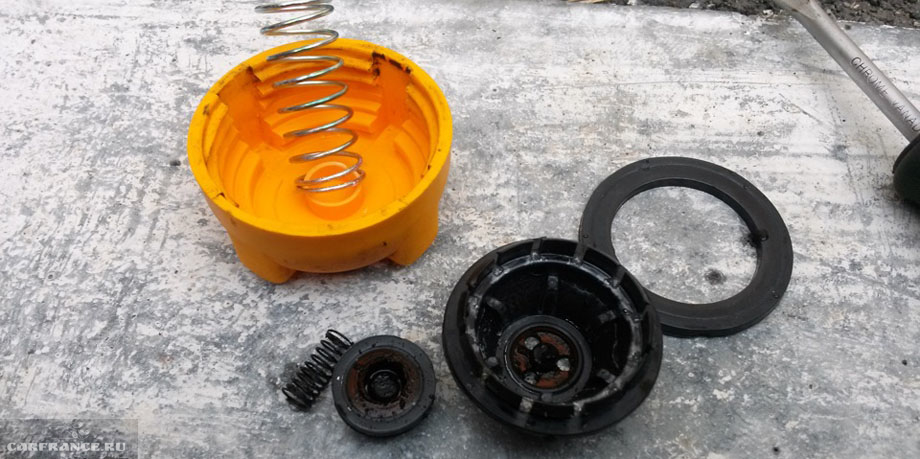
Disassembling and cleaning the expansion tank cap
Signs of an antifreeze leak
The most obvious signs of an antifreeze leak from the expansion tank are clear - a picturesque puddle appears under the car after a trip, and for the next trip you need to top up the fluid again until normal level. Nevertheless, antifreeze can escape through a leaky plug while driving, instantly evaporating, but there may be another reason with different symptoms:
After finding and repairing the leak, inspect the tank for foreign deposits. If they are present, then it will be required.
conclusions
However, in any case, even if the cooling system tank is partially malfunctioning, it is better not to waste a couple of hundred and buy a new tank, having previously chosen a known quality one. Good roads to everyone and stable temperatures!
Description of the malfunction
1. When the engine is idling, no problems are observed; when the crankshaft speed increases and while driving, the coolant is pushed out through the expansion tank.
2. At any engine speed or while driving, coolant is poured into the reservoir (it almost never cools back down).
Immediately after starting the engine, there is little flow, but over time, at high speeds, it is squeezed out of the reservoir and pours out. If the seal of the cooling system is broken, problems arise with squeezing out or leaking of coolant.
Possible malfunctions:
The cap may be faulty, although it would be more correct to specify the problem more broadly, that is, in general, a violation of the tightness of the expansion tank;
The cylinder head gasket (hereinafter referred to as the cylinder head) is burnt out, and there should not necessarily be bubbles; it can break in different directions;
Perhaps there is no circulation in the system, or perhaps it’s stuck airlock or pump malfunction;
The thermostat may be faulty, causing the temperature to rise and the pressure to rise.
Thus, having considered possible options faults, we come to the conclusion that any part of the car, one way or another, involved in cooling the car, can become a problem. Diagnosis must begin with the establishment of characteristic features. It is better, of course, to carry out diagnostics at the station Maintenance, otherwise they can easily slip 6 faulty caps from the expansion tank into our store. You will disassemble the entire engine because of this, but you will not solve the problem.
Features of the malfunction
The first feature is when at idle everything is fine, but when the speed increases or while driving, the tank overflows. The first scenario is most often associated with violations of the tightness of the expansion tank cap and its opening pressure characteristics:
If the cooling system operates stably at idle and does not push liquid into the expansion tank, then the expansion tank cap is to blame;
If the thermostat is faulty, when the speed increases, the fluid level will rise and overflow will begin;
The pump does not work, the pipes were torn, the antifreeze was expelled.
The second feature is when the transfer of liquid does not depend on the operating mode of the engine, and the intensity of the overflow depends only on the speed. The second option indicates larger problems and is more difficult to diagnose:
If the cylinder head gasket is broken, it will start to drive both at idle and on a cold engine, at first a little, as the engine warms up the extrusion will be greater, perhaps just look at the exhaust pipe at high speeds, steam will come out;
If water drips from the exhaust, you can taste the water on your tongue, sweet water is antifreeze, bitter water is antifreeze, without taste, it’s just condensation. To find the reasons, you should first be sure that the cylinder head bolts are tightened according to the instructions and the tightening force complies with the standards; you should not just tighten them yourself, you can easily strip the threads. The causes of gasket burnout in most cases are engine overheating:
Using low-quality antifreeze;
Thermostat or pump malfunction;
Presence of air in the system;
Increased scale deposits in the radiator;
Due to a malfunction of the exhaust pipe, for example its deformation leading to back pressure of the exhaust gases.
The reasons that cause engine overheating and, as a consequence, gasket burnout due to thermal heating, are most often a malfunction of the thermostat. One way or another, if the thermostat is working properly, then when the engine is warm, the upper pipe will be warm, the lower pipe will also be warm, but cooler than the top. If the thermostat malfunctions, the upper pipe will be cold and the lower pipe will be hot, since the coolant, expanding, will go into the radiator under pressure through the lower pipe. In the case of a radiator malfunction, determining its throughput and cooling capacity is much more difficult. The reasons for poor cooling of the liquid in the radiator may be the presence of deposits inside it or clogged external honeycombs.
What to do if a malfunction occurs
The principle of operation of cooling systems different brands car is the same, but Constructive decisions may differ from each other. If problems arise in the operation of the cooling system, in order to avoid more serious damage, it is recommended to contact a service center and entrust the troubleshooting to qualified specialists. They will efficiently, quickly and competently solve your problems and eliminate technical malfunctions of the car.