What independent adult has not encountered a common problem - a dripping or leaking faucet in the kitchen. In such a situation, many do not count on a plumber, so they try to solve the problem with their own hands - disassemble the faucet and eliminate the cause. Moreover, now there are enough instructions and recommendations, even with videos.
It is important to correctly understand the design of the mixer, then there will be no difficulties in disassembling and assembling.
It should be noted that the modern market offers consumers two types of mixers to choose from: valve or single-lever. Therefore, it is worth considering separately how to analyze each type.
Valve
If the faucet is leaking, the gasket most likely needs to be replaced. Buying one in a store or market is not difficult.
Actions
So, first we turn off the water supply to the apartment or to the kitchen, if there is a separate tap.
Next you need to remove the decorative cap on the faucet handles (using a flat-blade screwdriver). Then unscrew the screw securing the shank (using a Phillips screwdriver). To remove this nickel barrel you often have to use an adjustable wrench. Before doing this, it is recommended to wrap the part with a rag to avoid damaging the surface.

And then we put everything together in reverse order. If the mixer, in addition to leaking, also creates unpleasant sounds, then it is worth replacing the faucet axlebox. You just need to select it in identical sizes and shapes. Therefore, it is advisable to disassemble the crane and take the crane axle box with you to the store to buy exactly the same one.
Single lever
If a single-lever mixer is installed in the kitchen, you can disassemble it yourself. This is the most likely option if the installation was carried out not so long ago. After all, such products are now more popular than valve taps. Since their service life is long and they are easier to use.
However, there are times when such products need to be repaired. If water drips, the cartridge has probably failed. Therefore it will have to be replaced.
Actions
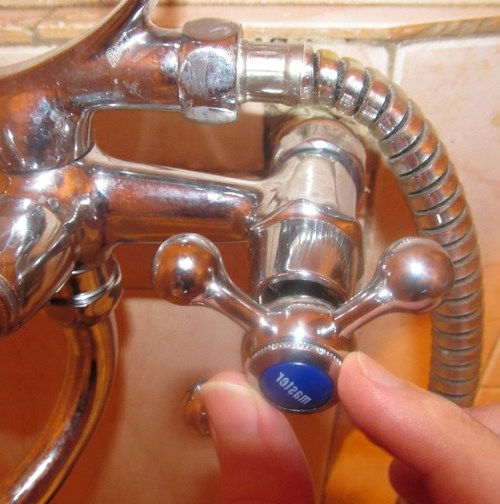
First you need to remove the plug that signals the supply of cold and hot water(has blue and red inserts). A flathead screwdriver is suitable for this. There is a screw under the plug. You need to unscrew it to remove the handle and get to the cartridge.

Under the handle there are decorative (upper) and cap (lower) nuts. The latter holds the cartridge, which needs to be replaced with a new one.
The installation must be done carefully so that the holes on the mixer seat and the holes on the cartridge match.
All that remains is to assemble the mixer. The union nut must be tightened carefully.
When buying a cartridge, you need to choose a model that is suitable for your faucet. After all, even devices from the same manufacturer can differ significantly in design.
Tips for extending the life of your kitchen faucet
After opening the tap, you do not need to try to make great efforts to close it. If you open the valve tap one turn, then you need to close it after one turn in the opposite direction. No need to try hard.
If the mixer is used intensively in the kitchen, it should be checked regularly (once every few months). technical repair. This will increase the service life of the device several times.
We should not forget that the water flowing in modern water pipes is, to put it mildly, not of super good quality. To avoid the possibility of rust and other solid particles getting into faucets or other devices in the apartment, you should install a filter rough cleaning water. This will also help extend the period of use of all devices that use water in their operation: water heater, washing machine, dishwasher, toilet, bathtub, and so on.
Nuances
As you can see, there is nothing difficult about disassembling a faucet in the kitchen. It is only important to take into account the features of the design that you have installed. And then follow the recommendations given, you can additionally watch the video. This will avoid possible mistakes. This means that the device will ultimately work for a very long time without breakdowns.
For minor everyday repairs, you need to know how to disassemble a bathroom faucet; The single-lever mixer has gained wide popularity relatively recently. Therefore, not every owner knows how to replace the gasket or perform other necessary operations to ensure trouble-free operation of the device.
General information
The single-handle faucet replaced the outdated herringbone and other similar designs. This type of faucet is easy to use and maintain, durable and reliable.

Stylish appearance single-handle faucet will transform the interior of the bathroom. Even the most ordinary bathroom will take on an elegant and modern look if you install a single-lever faucet in it.
The water temperature and flow rate in the single-jaw mixer are adjusted using 1 handle. This allows you to create pressure from very weak to very powerful, depending on the case.
Washing and cleaning single lever faucets is easy. This can be done using regular cleaning products and a soft sponge. At the same time, the faucet will always have an elegant and shiny appearance.
Single-handle mixer device
Single-grip cranes also need minor repairs. To repair such a device yourself, you need to know how to disassemble a single-lever mixer, what elements it consists of, etc.

The main components of a single-jaw mixer are:
- control handle (lever);
- spout that regulates the stream;
- frame;
- fastening element;
- ball or cartridge element;
- gaskets made of rubber or silicone;
- circular nut;
- elastic tubes (hoses) for supplying water.

The main difference between single-lever taps of different designs is the mixing chamber. It could be a hollow ball of stainless steel or a cartridge made of especially durable ceramics.
Through 2 holes, hot and cold water. There is an additional passage for the jet to exit. Water circulation, pressure and temperature adjustment of the stream inside the chamber are carried out using the working handle.
The ball mixing chamber is subject to minor repairs, cleaning, etc. during operation. The ceramic cartridge chamber must be replaced in case of malfunction. Special filters through which water will be supplied from the water supply will help extend the service life of such faucets.
Self-disassembly of single-lever taps is carried out to eliminate such malfunctions as:
- cartridge leakage;
- weak water supply when the ball mixer is turned on at full power;
- Push-button switch malfunction;
- simultaneous supply of water to the shower head and spout.
To eliminate more serious problems, it is better to invite a specialist. The faucet may need to be completely replaced. However, such situations occur infrequently when the device is used correctly.
Preparing for work
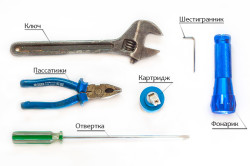
For the repair to go smoothly, you need to prepare everything you need in advance. To work you will need:
- pliers;
- pliers;
- Screwdriver Set;
- metal rod;
- technical knife;
- wrench - adjustable and wrench;
- set of hexagons;
- hammer;
- flashlight;
- rags.

Before disassembling the mixer, it is necessary to turn off the water supply.
Disassembling the cartridge mixer
Dismantling the mixer is easy. It will take 15-20 minutes to work. The main thing to remember is that you need to act carefully, choosing the right tool in size. Particular care should be taken if there are recesses in the nut.
We disassemble the mixer in the following order:

After the mixer is disassembled, troubleshooting can be carried out.
How to fix a leak? Leaking faucets most often begin when the cartridge chamber malfunctions. The most common reason such situations - the entry and accumulation of solid particles of debris and/or accidentally falling small objects in the interdisk space.
To avoid mistakes when buying a new cartridge, you need to take the used element with you as a sample or template. Such mixing chambers differ in the diameter of the holes (3 or 4 cm), as well as the fixing elements on the bottom plate.
It is advisable to choose silicone gaskets rather than rubber ones. This material deteriorates less when exposed to moisture. Therefore, a silicone gasket will last longer than a rubber one and will provide a more reliable sealing of the mixer.
After purchasing a cartridge, it must be placed in the housing, aligning all the holes. Then the mixer is assembled in reverse order. All parts must be carefully installed in place and the nuts carefully tightened. Now you can run the water to check the result of the repair.
How to disassemble the “faucet/shower” switch
The main reason for such a malfunction is wear of the gaskets installed inside the device. They are shaped like a ring. Spare gaskets are sold complete with the single lever faucet. You can make them yourself using rubber at least 3 or 4 cm thick. The worn gasket will serve as a template. 
Work to replace a worn element must be carried out in the following order:
- Set the handle to the “closed” position.
- Remove the flexible shower hose.
- Remove the decorative cap (lid).
- Remove the screw fastener.
- Remove the switch button with pliers or pliers.
- Unscrew the adapter from the spout using a screwdriver or rod.
- Remove worn rubber.
- Install new gaskets, pre-lubricated with sealant.
- Reassemble the mixer in reverse order.

The chrome surface of the faucet can be easily damaged with a metal tool. Therefore, for work you need to prepare a small piece of soft, dense fabric. This will preserve the appearance of the faucet.
Disassembling the mixer to replace the spring
The spring in the single-grip faucet switch may stretch with use. In this case, the button does not return to the starting position. To replace a stretched spring, the tap is disassembled in the following order:
- The adapter is dismantled.
- The rod with the spring is removed.
- The stretched spring is removed.
- A new spring is screwed onto the rod using pliers.
- The switch is assembled and installed in place.
Important! When purchasing a new spring, you should remember that its diameter should be slightly smaller than that of the used element. Best material for such products - steel with galvanic coating. This spring will last longer.
Disassembling the ball valve
The design of a ball mixer is much simpler than a cartridge single-lever faucet. This ensures the durability of the device and easy dismantling to replace individual worn elements and/or eliminate low water pressure.

Before disassembling the ball valve, it is necessary to prepare tools and accessories for work according to the above list. Be sure to shut off the flow of water from the water supply pipe!
The ball valve must be disassembled in the following order:
- Carefully unscrew the fixing nut.
- Remove the ball valve jib.
- Remove the nut holding the strainer in the spout nozzle.
- Rinse the removed filter with running water and blow it in the opposite direction.
- Rinse the gander thoroughly with running water and/or clean it.
- Carefully assemble all structural elements, proceeding in reverse order.
When performing work, it is advisable to take your time and protect the chrome surfaces of the mixer from damage by metal tools. To avoid mistakes, you can use photo and video materials.

To replace the upper seal, the ball valve is dismantled in the following order:
- removing the handle;
- removing the two-component shield-shaped part from plastic;
- washing the black side of the removed part, i.e. the seal itself.
To replace the lower seal to eliminate a leak, you must:
- dismantle the ball device;
- remove the seal located at the bottom;
- place a ball mechanism inside the device;
- secure the seals with a special plastic nut;
- reinstall the handle.
Now you can open the water and check the quality of work. To improve tightness and increase service life rubber seals, you can use silicone grease.
Preventive measures
By following simple handling rules, you can significantly increase the trouble-free operation life of single-lever mixers. The following measures will help you avoid breakdowns and other troubles:

If you do not have sufficient skill and/or experience in handling the working tool, it is better to invite a knowledgeable specialist.
Video instruction
- Types of taps
- Disassembly process
- Replacing parts
- Mechanism repair
All plumbing fixtures have a certain service life, which depends on the conditions of their correct operation and maintenance. Water taps are no exception. If you know how to disassemble water tap correctly, then you can increase the service life of this device several times.
Types of taps
To understand the design of cranes, you need to know what types they are divided into. At the moment, there are 2 main types of taps that provide water supply:
- valve;
- lever
To be able to disassemble any water taps, you need to know their structure. All valves have various mechanisms to shut off the flow of liquid. Older models have a fairly simple device, which is equipped with a rubber gasket that blocks the water flow hole.
Such rubber gaskets wear out quite quickly, but replacing them is not very difficult. Modern ball valve designs feature ceramic closure devices that are highly wear-resistant and easy to replace.

The lever mechanisms contain a special locking device, which is called a cartridge. By its design, such a faucet is a more complex mechanism, in contrast to a valve mixer. The advantages of such a device are the ability to adjust the temperature and speed of water supply using one hand. In the event that both hands are dirty, you can always open the tap using your elbow.
Moreover, such a device allows for smooth adjustment of water and is more durable. Repairing such a lever valve is quite simple; to do this, you need to remove the damaged cartridge and replace it with a new one. Difficulty may arise if the cartridge becomes sour, which may make it impossible to remove it. To avoid this, you must first moisten it with kerosene and wait 30-40 minutes.
Return to contents
Disassembly process
Modern valve mixers are made of special locking axle boxes (faucet axle box). To disassemble a water tap, you need to stock up on the following tools:
- adjustable wrench;
- slotted screwdriver;
- crosshead screwdriver;
Such a tool should be available in every home, so there should not be any difficulties with its availability. It is better not to use other available means, so as not to tear the gaskets and crush the threaded branches.

Initially, you need to remove the plastic plug that covers the valve mounting screws. Then, in order to, you need to unfasten the valve. It can be attached not only with screws, but also with plastic rings.
After the valve is removed, you need to use an adjustable wrench. Using it, you need to unscrew the valve axle. This is done in the opposite direction of the clockwise movement. Before that, you need to shut off the supply of cold and hot water to the risers.
A rubber gasket must be installed in the lower part of the ball valve (axlebox), it provides sealing properties. When a faucet has a small leak, it most often requires replacement. This gasket is secured using screw connections. By unscrewing them, you can replace it.
Return to contents
Replacing parts
Such a gasket must be replaced exactly according to its dimensions, because deviation in any direction may result in water leakage. If replacing the ball valve gasket did not help eliminate the problem, then you need to disassemble the axle box itself. It often happens that debris, which is present in large quantities in the water, gets between the ceramic parts of the faucet axlebox. Such debris can prevent the ceramic parts from closing tightly and cause a gap to appear between them. A gap the size of a human hair can cause large water leaks.
But it is necessary to remove such contaminants from the body of the axlebox as quickly as possible so that nadir does not form on the ceramic parts. If this happens, it will be impossible to save the crane axle box. It will need to be completely replaced.
Older ball valve designs are equipped with plastic gaskets that prevent possible water leaks between the axle box and the mixer. This gasket is not repairable and requires complete replacement.
After replacing damaged parts or the entire axlebox, reassemble the mixer in the reverse order. The entire mechanism should not be tightened too tightly, so as not to interfere with its disassembly and damage the threads.
- Tools and materials
- Removing the cartridge and lever
- Other elements
Difficulty adjusting temperature and water pressure, irregularly shaped flow, and leaky faucet connections cause a persistent desire to replace it. But if you are completely satisfied with its external data and characteristics, there is no need to change the device completely. and replacing its individual components is within the power of everyone. Let's look at the features of this work using the example of a single-lever mixer.
Tools and materials
To disassemble a single lever faucet, you do not need any specific tools. The required minimum is available in almost every home.
List of tools:
- spanners;
- pipe wrench;
- hexagons;
- screwdrivers;
- hammer;
- flashlight.
Running spare parts for a lever mixer are available in every decent hardware store.
List of materials:
- cartridge;
- mixer lever;
- aerator;
- supply hoses or O-rings for them;
- spout;
- switch and shower hose.
All other parts of the mixer rarely require replacement. The case may develop cracks over time or lose its chrome plating in places, but replacing it is equivalent to installing a new device. Removing the cartridge and supply hoses requires turning off the water to the mixer. The lever, spout and aerator can be unscrewed without this.
Return to contents
Removing the cartridge and lever
It is the cartridge that is responsible for regulating the water pressure and setting a comfortable temperature. If the lever no longer moves smoothly, or water drips from the spout or under the lever, it’s time to install a new mechanism.
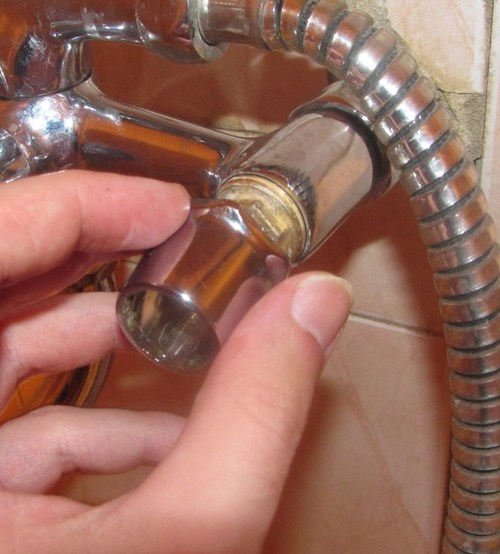
The adjustment lever is mounted on the cartridge rod. The fit is sealed with a small screw. Access to it opens after removing the red-blue decorative trim, which indicates the correct direction for adjusting the water temperature. It is enough to pry up the cover with a small flat-tipped screwdriver and it will be in your hands.
To loosen the screw, depending on the faucet model, you will need a hexagon or screwdriver. In most cases, you can see the screw head with a flashlight through the hole in the cover. Do not unscrew the screw completely, just loosen it a couple of turns; it can be difficult to screw it back in.
The cartridge clamping nut is located under the decorative threaded cap. Its surface is smooth, but it must be unscrewed by hand. It happens that the thread, after a long contact with water flowing from under the nut, turns sour and does not give in. In this case, you can carefully use a gas wrench to unscrew the cap using a cloth. You need to be careful when doing this. The thin plastic cover is easy to damage.

The difficulty of unscrewing the main nut depends on the depth of its seating. In some models of the mixer, the edges protrude above the body and are easily grabbed with a 30mm or gas wrench, in others they are recessed, and the process becomes more complicated. You have to look for a head of the appropriate size, which is not easy, or rip off the nut by tapping it with a screwdriver. The tip rests at an angle on the edge of one of the faces, and the nut is undermined by hitting the handle with a hammer. Next it goes by hand.
After these manipulations, the cartridge itself can be freely removed from the top. To purchase a new spare part, you need to measure the outer diameter of the part and remember the configuration of the mating plane. Depending on the model, cartridges of 28, 35, 40 and 46 mm may be suitable for a single-lever mixer. It happens that externally identical parts differ slightly in height, and the decorative cover does not screw completely into place. It is best to take the old consumable item with you to the store.
When assembling, the main thing is to get the protruding legs on the supporting surface into the seats.
Further assembly is performed in reverse order.
Every owner wants to know how to disassemble a faucet in the kitchen.
In the article you can find out how this is done.
First, we will describe how to install a faucet in the kitchen.
A task such as DIY or any other type of kitchen faucets requires a considerable set of tools. From an electric drill to a hex wrench for small screws.
In any case, you will need the following:
- an adjustable wrench of at least 35 mm, or a whole set of wrenches;
- Phillips screwdriver;
- roulette;
- level;
- faucet mounting kit.
Advice. Nowadays, sealing with tow and oil paint is outdated. One of the reasons is the difficulty of disassembling if necessary after many years. It is much better to use fluoroplastic tape for this, which is now sold everywhere.
A sealant must be used in every threaded connection. When winding, make sure that the tape is exactly along the thread. After installing the faucet, turn on the water and check all connections for leaks and drips.
In addition to the tape filler, a special thread is sold in a cassette, from where it is pulled by the tip.
If water oozes, don't be afraid to pass it on! Turn off the water again, unscrew the connection and do it again more carefully. When twisted, the seals become wrinkled, so you will have to use a new piece after disassembling.
Advice. Before twisting, coat the internal thread with technical petroleum jelly; this will make subsequent possible disassembly much easier after many years, and will additionally protect against corrosion.
Begin installation by carefully reading the instructions. As a rule, it contains an installation diagram. Do not rush to throw away the instructions; they may be useful for repairs.
For a hard fit, the mixer must have eccentrics to adjust the seating distance between the cold and hot water pipes.
If you included flexible metal-braided hoses with the mixer, you won’t have to adjust anything. However, do not save money; cracked, low-quality nuts and hoses always break at the most inopportune time.
Before tightening the nuts, lubricate internal thread technical Vaseline, as mentioned above.
Tighten the nuts with a wrench carefully: first tighten them by hand as much as possible. High-quality nuts should tighten easily. After this, use a wrench to tighten it one and a half to two turns, finishing according to the resistance of the rubber seal.
It's better to undertighten so that the nut doesn't crack. By turning on the water, you can tighten the nut until the leak stops.
Try to install it level, strictly horizontally. Do not allow distortions, otherwise the mixer body may crack, because it is constantly exposed to mechanical stress.
Place the faucet on the sink, screw in the pin from the bottom, put a half washer and seal on it, and tighten it to the sink with a nut. Then screw the flexible hoses to the faucet and to the water supply.
Installation of a two-valve mixer
Two-valve mixers are available with a tee or with tubes. If you have the option with a tee, there is a collet at the bottom (a cut sleeve with a thread), and a nut is screwed onto it. This way the mixer is attached to the sink.
The mounting of the mixer with tubes is described in the previous paragraph.
Now you know everything about installing faucets; below is how to disassemble a kitchen faucet.
Crane dismantling
When you look at the faucet in the kitchen, it doesn’t have a single screw. How to disassemble a water tap? There are several secrets in this matter.
First, let's define the types of cranes.
You can often hear questions like these from people who are far from plumbing:
- how to disassemble a ball valve;
- how to disassemble a ball valve.
There is some confusion going on here. People often get confused Ball Valves mixers with main ball valves. Main valves are used to shut off water in the main or its branches, and modern main ball valves are non-separable.
The most common faucets nowadays are single lever faucets. Such a mixer may have a ball or ceramic cartridge with flat fitted plates in the body. The advantage of the latter is simple replacement.
Both this version of the tap and the other can fail if solid particles enter. Therefore, it is necessary to have mesh filters at the entrance of hot and cold water to the apartment.
The two-valve mixer is more familiar to many of us. Tap with two handles - hot and cold water. All of them have two valves (faucet axle boxes). The water is blocked with rubber or paronite gaskets. Modern options have ground ceramic discs.
Due to frequent replacement of gaskets and humming, the first option is losing popularity. In addition, the faucet is often torn off in an attempt to tighten the gasket that has begun to leak.
How to replace the cartridge in a lever mixer
If the faucet with the cartridge begins to leak, most likely the problem is not with the gaskets, but with solid particles getting between the ceramic plates or in a cracked cartridge body.
In both cases it needs to be replaced. How to disassemble a faucet with a cartridge?
The disassembly procedure (after turning off the water, both cold and hot!) is as follows.
Disassembling the ball mixer
(after turning off the water both cold and hot!) This is.
- Use a flat screwdriver to pry out the decorative trim on the lever handle. Hidden behind it is a screw securing the handle itself.
- Unscrew the screw inside the handle and remove it. The screws are different, for different screwdrivers or thin hex keys.
- Unscrew the decorative nut, which is under the handle; it covers the large nut, which actually secures the cartridge in the body;
- Unscrew the nut holding the cartridge. To do this, you will need an adjustable wrench or a hex socket of the required size; These nuts are quite fragile; there are reinforced replacement nuts on sale;
- remove the cartridge by moving the lever, check the condition of the plates, inspect the o-rings at its end and the body; if necessary, replace the cartridge;
- Reassemble in the reverse order, lubricating all connections with petroleum jelly.
Disassembling the ball mixer
How to disassemble a ball valve?
It looks like a faucet with a cartridge.
Advice. There are different types of taps available. For example, a number of faucets have small grooved indentations at the top of the dome. When disassembling it, take care not to injure your fingers from metal fragments.
Before assembly, lubricate all seals with silicone grease.
Well, now you know how to disassemble a ball valve.