Anyone wishing to install suspended ceilings must first consider the lighting option. A chandelier will be a good decoration for the interior of the room. Home craftsmen should learn how to install a chandelier on a suspended ceiling. A step-by-step editing video will help them with this work. Installing the lamp yourself is not particularly difficult. To avoid mistakes with mounting, buy the chandelier in advance.
All stages of installation must be calculated immediately, since after installation it will be very difficult to remove the lamp or replace it with a new one. Too bright light can cause the ceiling to heat up, darken and deform. When choosing a lamp, you need to consider the following requirements:

An important factor when choosing a chandelier will be how well it matches the interior of the room. The wrong choice can ruin the design of the room. You should not choose models with a wide base, as a lot of dust collects there, which will be very noticeably reflected on the ceiling surface. For large room use a large chandelier, and vice versa for a small one.
The use of the ceiling covering and the lamp installed on it depends on how correctly the installation was carried out. If the installation technology is violated, the canvas may tear along its entire length. You can hang a chandelier from a suspended ceiling different ways. Depending on the design of the chandelier, there are the following mounting options:
- hook mount;
- fixation on a cross-shaped panel;
- bolting;
- mounting on a strip.
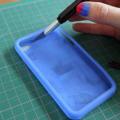
To prevent fabric ruptures, plastic protective rings are used. They are attached to the surface with glue. For gluing, you can use Moment glue. After firmly fixing the ring, cut a hole in the ceiling fabric for the hook and wires.
If new wiring is needed, a cable is used for it VVGng-LS or VVGng-LS that can withstand high loads. The cable can be laid openly, but to protect it from short circuits, it is placed in a corrugated casing and brought to the attachment point.
Hook installation
 The anchor hook is installed when installing the frame on a suspended ceiling. You can hang the chandelier when the canvas is stretched and dry. This is the most reliable installation method, but it requires attention and care.
If there is already a hook on the ceiling, you can use it to hang the lamp. A thermal ring is first installed on the ceiling. This is done to protect its fabric from damage in the place where the hole for the hook and wires will be cut.
 If the length of the existing hook is too short, then a new mount of a suitable size is installed to mount the chandelier. In this case, a hole is drilled with a drill to install an anchor with a hook. Anchor spacer must fit exactly into the hole, after which the suspension nut is tightened until the sleeve is completely loosened.
After this, the suspended ceiling is installed. When the work is finished, find a place to attach the hook and stick it there plastic ring. Its size is chosen so that it is completely covered by the chandelier cap. After the glue has dried, you can cut a hole, pull out the wires and attach the chandelier to the stretch ceiling. Then the wires are insulated and hidden under a hood.
With this installation method, you can easily replace the chandelier with a new one. When buying a new lamp, you need to make sure that its cap is no smaller than the old one.
 Many models of small modern lamps are designed for mounting on a strip. They are equipped with a large closing cap.
To lower the lamp to the level of the suspended ceiling, a wooden strip is fixed to the ceiling slab with dowels. Its thickness should be 5 mm less than the distance from the concrete to the canvas. This is necessary so that the bar does not stand out on the surface. Instead, you can use a piece of plywood with small metal legs attached to it.
After stretching and drying the ceiling sheet, a plastic ring is attached to the location of the strip. Then the inside is cut out of it. The lamp strip is attached to the base using self-tapping screws.
Next, they pull the wires out and insulate them, attach the lamp to the suspended ceiling and cover it with a cap. If it has a metal cap, then a material with low thermal conductivity is laid between it and the ceiling covering.
 For a heavy ceiling lamp, the method using a cross is more suitable. In this case, make five holes in the ceiling at once using thermal rings. Four of them are intended for the crosspiece, one for the chandelier. The crosspiece is installed when attaching the frame, after which the ceiling is stretched. The wires are pulled through the cut hole. The chandelier is mounted on a crosspiece, the connection is closed with a cap, which is secured with decorative nuts. You can also use an I-plate to install the lamp.
After installing the chandelier, you need to connect the electricity. At correct installation all the lamps light up, otherwise a mistake was made somewhere. Usually everything works out right away, since installing the lamp is not difficult. Sometimes when buying a new chandelier, it turns out that its cap is smaller than the old one. In this case, a decorative overlay helps.
The main thing when installing a ceiling lamp is accuracy and lack of haste. It is better not to save money and use energy-saving lamps that last a long time and do not heat the surface. This will help preserve the coating and increase its service life.
The installation of a stretch ceiling is in full swing, but you still don’t know which lamps to choose? Traditional lamps are a rather outdated way of lighting a room. Depending on how high the ceiling structure is, and the suspended ceiling inevitably takes up 10-15 cm of the total height of the room, the method of hanging a bulky chandelier is not relevant.
Firstly, when the light “falls” on your head, it’s not pleasant. Secondly, a suspended ceiling is a relatively fragile structure and from the powerful heating of the lamps it can even be damaged, read - melt. Thirdly, a chandelier, no matter how bright it is, will not be able to divide the room into functional zones and illuminate the dark corners of the room.
Such different lamps...
Any ceiling lamp should be chosen depending on the functional nature of the room, how serious a structure you are going to install and how much you are willing to spend.

Do you need quality lighting? Or maybe, on the contrary, you don’t want complex installation, but are interested in bright lighting?
Let's look at some types of lighting for stretch ceilings:
- Lamps made of steel or spotlights;
- Fluorescent lamps;
- Halogen lamps;
- Lamps with tungsten filament;
- Cardan lamps.
Halogen lamps have good performance characteristics and a strong light function, but small, spotlights have been developed specifically for suspended ceilings. They are let into the ceiling, thereby creating a neat “spot” illumination of the elements of the room where zoning into areas is necessary.
IMPORTANT! Working with traditional lamps requires certain skills and the participation of a specialist. There are also some power restrictions: for example, incandescent lamps up to 60 W, and halogen lamps up to 36 W.
If you are interested in installing lamps yourself, feel free to choose spotlights. It is interesting that spotlights are installed in suspended ceilings on their own, since installing the fixtures will not take much time; below we will explain how to do this (see).
Spotlights: installation instructions
What does the installation of lamps involve: suspended ceilings should first be prepared. First, find out whether you have installed all communications into the inter-ceiling space, whether the frame is tightly fixed and evaluate how realistic it is to install lighting.

Please note that all work at the preparatory stage is carried out even before the installation of the suspended ceiling!
You can mount spotlights on a finished ceiling if you do not connect all the wires in the ceiling structure in advance.
First step
- On the main ceiling, make markings for mounting lamps;
- Connect the necessary wires;
- Attach the racks on which the lamps will be mounted to the surface of the main ceiling;
- Mount the brackets in the marked places;
- Mount fasteners;
Typically, installation of lamps in a suspended ceiling occurs on reinforcement or a steel element fixed in the ceiling. To do this, make an incision, paste it around the perimeter with a special ring and let the wires out. The lights are connected to the ring and attached to the wiring.

Second step
Having finished with the fastenings and wiring, we will complete the installation of the suspended ceiling - we will remove the wires and begin preparing the holes for the lamp V:
- Using a building level, draw the lines with a pencil;
- Let's mark the locations of the lamps on the ceiling;
- We drill holes with a drill for ceilings made of plasterboard or chipboard, using a “crown” with a diameter as close as possible to the diameter of the lamp.

Please note that it is advisable to make the holes after painting the ceiling, and not before!
Installation of lamps
Having prepared the holes in the ceiling, you can proceed to installing a spotlight, for this:
- Let's take out the wires and connect them to the terminals of the light fixture, edge the hole with a decorative profile if desired;
- We press the spring fasteners to the body and insert them into the hole made;
- Let's adjust the lamp to the ceiling level - the springs should return to their original position, thereby ensuring reliable fastening of the light device;
- We will attach the rest of the lamps using this principle.
When connecting lamps, it is advisable to supply each with its own wire and make all connections in a junction box. Be sure to use gloves if using halogen lamps. The socket is inserted into the lamp and firmly fixed with a latch.
As you can see, this is not difficult, so installing lamps in a suspended ceiling occurs without any difficulties; you only need accuracy and safe installation of power wires. The designs of lamps are always different, but you now know the principle of connection (see).

Look how much the room has changed? Using spotlights you can achieve a smooth distribution of light throughout the room. Choose a higher lamp wattage if you do not plan to place many lamps. The ceiling coating should also be taken into account - the result may be too bright with a reflective surface or from varnishing.
Lamps have the ability to change the character of a room, unlike clumsy lamps, decorate any apartment interior - on the ceiling, in arches, frame protrusions and softly distribute light in some selective area. We hope that the instructions outlined above helped you learn the little secret of making repairs!
It’s not difficult to buy a chandelier you like, but is it suitable for a stretch ceiling? To answer this question, you need to figure out how to install lamps in a suspended ceiling, and is it possible to do it yourself?
First of all, you need to decide on the type of device and select it in accordance with the design of the room and operational requirements. It is better to choose lamps for a suspended ceiling before installing the ceiling itself, in order to immediately provide for all the technical aspects. If the ceiling is already installed, it will be much more difficult to hang a new chandelier, so it is better to immediately purchase lamps and designate a place for them.
For suspended ceilings, by and large, you can use any lamps, but it is better to give preference to models without sharp elements and with shades directed to the sides or down. Otherwise, you risk damaging the canvas. The material from which the chandelier or lamps are made should not become very hot, so as not to create a fire hazard.
The choice of light bulbs is also very important. For suspended ceilings, it is better not to use ordinary incandescent lamps, because they get very hot. But if there is no other option, make sure that the distance between the lamp and the canvas is as large as possible, and do not use products with a power exceeding 40 W. The ideal option would be energy-saving or halogen lamps.

A wide selection of lighting products allows you to find an option for any interior, but at the same time, a large assortment complicates the choice. A lamp can decorate a room, emphasizing its advantages and hiding its shortcomings, but if you choose it incorrectly, the effect will be exactly the opposite. In the case of suspended ceilings, it is necessary to choose a lamp based on the texture of the surface. So, if the room has a white matte ceiling, follow the classical rules for choosing lighting, since such a surface is almost identical to a regular whitewashed ceiling. If the canvas is glossy, then it will give glare and reflections. In this case, the lighting should be moderate, since the reflection on the ceiling will be a mirror copy of the light bulb.

But still, it is not the appearance of the lamp that is decisive, but the method of fixing it. A suspended ceiling by itself is unable to hold even the lightest appliances, and therefore you need to decide in advance on the mechanism for their installation.
Attaching the lamp to a suspended ceiling depends on the type of device:
- Surface-mounted ceiling lamps have the same fasteners as chandeliers, and installation takes place on the main ceiling.
- Recessed lamps for suspended ceilings are placed on the back side of the canvas, so that only the outer side of the lampshade remains outside, and the light bulb with the rest of the mechanism is located behind the canvas.
The latter type includes spotlights, which are very popular in Lately, especially for suspended ceilings. They are compact, bright, consume little electricity and are able to provide full functional lighting, while simultaneously decorating the interior. However, not all spotlights are suitable for installation. So, it is necessary to choose products with a round base part, and the shape of the outer part does not matter. It is also important that seat the device that will be located behind the canvas must be at least 10 mm. When installing spotlights, a thermally insulating rigid gasket must be placed between the outer part and the canvas, and the side of the lamp must be wide enough to cover this gasket.
Helpful advice: If you are going to install hidden devices, for example, to create an imitation of the starry sky, choose low-voltage products from well-known manufacturers. Quality in this case should come first, since dismantling or replacing a hidden lamp is quite difficult. For low-voltage 12 W devices, you will need to purchase a transformer. Ideally, each lamp needs a separate transformer.

Installation features
Before moving on to the description of the installation of lamps in suspended ceilings, we suggest that you familiarize yourself with a number of useful tips. They will help you better understand the specifics of the work and do everything without errors.
First of all, turn off the power in your house or apartment. But even in this case, do not neglect personal safety measures - wear rubber gloves. If at your home hidden wiring, find or make a plan for it in advance. You can find out the direction of the wires using a special device. This data is necessary so as not to disturb the main wiring while drilling the ceiling.

Do not tighten the fasteners all the way, otherwise you risk cutting the blade with the sharp edges of the rigid mounting strip. For a firm hold, always use plastic or rubberized spacers. When installing spotlights, self-tapping screws are often used. To safely screw them into the surface, glue small pieces of plastic in these places.
Mounting methods
There are two ways to attach lamps to a suspended ceiling: with bolts and screws or on a hook. The choice of each of them depends on the design of the lamp: its size, weight, performance characteristics. In both options, it is necessary to pre-install a mortgage - a special strip that will hold the lighting fixture. This is an ordinary wooden block attached to the main ceiling with anchor bolts or dowels. It allows you to attach lamps that weigh a lot.

If bolts or screws are used to fasten the lamp, a slot is made in the stretch ceiling fabric, the edges of which are glued with tape. After installation, the canvas is fixed around the chandelier with self-tapping screws. If you decide to mount the chandelier on a hook, it is first screwed into the mounting strip, and then a small slot is made in the stretch ceiling. After installing the chandelier, the slot is covered with a decorative cover.
For better fixation of lamps, it is recommended to use a reinforcing ring with a thickness of at least 5 mm and a diameter corresponding to the diameter of the device. It is glued to the film using transparent construction adhesive, and after it hardens, the canvas is cut out along the inner diameter and only then the lamp is mounted.
Spotlights
First of all, you need to determine the location of the lamps on the suspended ceiling. It is better to do this even before installing the tension fabric itself, and the wiring can be done after attaching the frame.

Step-by-step installation of spotlights on a suspended ceiling:
- Install the frame and mark the ceiling plane.
- Select the location where all lighting fixtures will be connected. The distribution box will be located at this point. A place must be allocated for it so that it can be accessed at any time even after installation of the canvas.
- Calculate the cross-section of the electrical wiring depending on the power consumption of the lighting fixtures. This article will help you figure this out. Take material (cables and wires) with a power reserve of 20% in case of installing additional devices.
- Make channels in the ceiling leading from the distribution panel to the connection points. To do this, use a grinder with a circular attachment for working with concrete. Keep in mind that it is better to place the wires in a corrugated tube for greater safety, so the dimensions of the channels must be appropriate.
- Connect the cables to the distribution panel and route them through the channels.
- Attach the wires to the ceiling. When creating connections, do not allow twists. It is better to use terminal blocks for this - they are safe and provide a more reliable connection.
- At the installation points of the lamps, make small allowances for the wires (about 10% more than the required length).
- Attach the mounting posts to the main ceiling, then use a hammer drill to secure the brackets.
- Connect the spotlights and check their operation. Evaluate not only the functioning of the wiring, but also the quality of lighting in the room - at this stage you can still change the position of the lamps, and after attaching the canvas it will be too late to correct anything.
- Keep in mind that if you use conventional incandescent lamps for lighting, the plane of the tension fabric will be lowered by 10 cm. We remind you once again that it is better not to use such lamps with a power of over 40 W for suspended ceilings. If the lamps contain energy-saving light bulbs, the blade will drop no more than 4 cm, and here you don’t have to comply with power restrictions - energy-saving lamps are unable to get very hot.
- Now you can stretch the canvas and mark the places where the lamps are installed.
- Glue a plastic ring along the installation contour of each lamp. You can buy it in a specialized store along with lighting fixtures or cut it yourself. These rings prevent the fabric from tearing due to the load provided by the lamps.
- Press the rings onto the film and wait until the glue dries completely. Only after this can you cut holes in the sheet along the inner diameter of the rings and connect the contacts to the terminals.
- Press the spring mount against the body, adjust the position of the device and align it with the level of the canvas.
Connect other devices using the same diagram. In this case, it is better to connect the wires to each of them separately, avoiding fastening on the same line. Then, if the light bulb burns out, only one lamp will go out, and not the entire branch.
Chandelier mount
Chandeliers are much heavier than spotlights, so a frame or ceiling hook (the easiest way) is used to mount them. Let's consider each of the methods in more detail.

Step-by-step installation of a chandelier on a ceiling hook:
- Use a hammer drill to make holes in the ceiling and attach the ceiling hook to the anchor bolts.
- Adjust its position so that it is slightly higher than the ceiling plane - this way the glass of the chandelier will fit snugly against the tension fabric.
- Try the chandelier on the ceiling, and if there are no gaps, hang it.
If there is an old hook on the ceiling, but you are not satisfied with its location, do not cut it off, but simply bend it - it may come in handy in the future.
The second method involves attaching a heavy lamp to the mounting bar. It can be made from any wooden block. Attach it with dowels to the main ceiling so that it is located at the ceiling level or slightly higher. After adjustment, you can screw the lamp to the bar with self-tapping screws or bolts.

Helpful Hint: To carefully and securely attach a mounting strip to a concrete ceiling, first drill holes in it, then attach it to the ceiling and mark the attachment points. All that remains is to drill holes in the ceiling and drive in dowels. This way you will be sure that the fastening points on the plank and in the ceiling will coincide.
After installation, the points where the lamps are attached to the canvas need to be decorated. For this purpose, special caps and sockets made of polyurethane resin are used. The products imitate gypsum stucco and fit very harmoniously into the interior. If this method does not suit you, cover the joint with a small piece of ceiling fabric - simply cut a circle out of it with a diameter slightly larger than the attachment point and place it on the glue. Also recently, interior vinyl stickers that imitate artistic painting have become popular.
The installation itself is not difficult. The main task is to do the wiring correctly. Finally, we suggest summarizing all the above information in the video about lamps for suspended ceilings:
Life, unfortunately, is designed in such a way that an expensive, beautiful thing can be ruined by small details. Same with suspended ceilings. Having added together significant finances and good taste, you can end up with a very beautiful ceiling. However, ill-conceived lighting can ruin all your efforts. Previously, we have already considered the questions: what type of lighting is suitable for the interior of the room and the type of stretched fabric (work “”) and how to calculate the number of lamps per room (material “”). Below we will consider methods for attaching lighting fixtures when installing a stretch ceiling.
Installation of recessed lamps in a suspended ceiling has a strict sequence of work:
- determining the layout of the cable route on the wall, switches, junction boxes and, if necessary, drivers;
- calculation of the cross-section of cables and wires;
- laying wiring on the wall, installing switches;
- drawing up a diagram for mounting lamps;
- ceiling markings;
- installation of a mortgage platform;
- lamp assembly;
- installation of a chandelier.
For information: the first three points will be discussed in a separate work.
Drawing up a diagram
You should begin work on installing lamps in a suspended ceiling with your own hands by developing a diagram of the location of distribution boxes, drivers, lamps, chandeliers and electrical wire routes, as well as the places where they are attached to the ceiling. In this case, you must follow some rules:
- The distance of lighting fixtures from the wall is at least 20 cm, from each other - 30 cm, from the seam on the film - 15 cm;
- The wires in relation to the walls and each other should run parallel or perpendicular. Diagonal routes are prohibited;
- The change in direction should only be at an angle of 90 o;
- After installing the tension fabric, there must be access to the distribution boxes - they cannot be under the baguette or on the wall in the inter-ceiling space;
- On the ceiling, not only the mounting locations for the lamps, but also the clamps for attaching the cables should be marked.
Required materials and tools
Installation of spotlights in a suspended ceiling requires the following materials, tools and devices:
- stepladders or strong table;
- cable VVGng;
- APPV wires;
- pliers with a narrow nose (“platypus”);
- indicator screwdriver;
- corrugated tube for wires if you plan to use an APPV cable;
- clamps for fastening a cable or corrugated tube;
- a hammer drill with a set of drills (for concrete with a pobedit tip) or an electric drill;
- laser level;
- dowels and self-tapping screws - for fastening clamps;
- dowel-nails for lamps;
- self-tapping screws “bug”;
- chandelier hook;
- Plastic rings for the embedded frame (platform), universal or for a specific size;
- perforated tape 12x0.7mm or a rigid stand with adjustable height (as an option, you can use direct hangers used to attach the ceiling profile);
- terminal blocks;
- crayons for marking the ceiling and tape for the floor;
- roulette;
- thermal rings made of heat-resistant ABS plastic 0.2 cm thick - protect the film from overheating and tearing (can also be square or rectangular);
- electrician's knife for stripping wires;
- construction knife;
- glue for PVC;
- Phillips screwdriver.
Marking
Installation of lamps in a suspended ceiling requires mandatory marking on the ceiling of the places where the light sources are attached, with the distances of each point from the wall and from each other recorded on the diagram.
This is done primarily so that after installing the canvas, it is possible to cut a hole for the light bulbs exactly under the mortgages. Working with a tape measure is labor-intensive and requires care - an error of 3-4 cm can be fatal, as a result of which it will not be possible to install the lamp.
Everything changed with the advent of modern laser levels. Markings began to be made not on the ceiling, but on the floor. Then, using laser beams, the installation location of the lamp is projected onto the ceiling with an accuracy of a few millimeters.
In this case, it makes no difference to the device where to project a mark from the floor, onto the ceiling or onto an already stretched canvas. By this time, some experience has already been accumulated:
- It is more convenient to measure distances on the floor not with a tape measure, but with a template with marks. This can be any long object, such as a mop handle or a piece of cable;
- It is not very convenient to place crosses on the floor with chalk or other coloring objects: the chalk may be erased during the installation of the ceiling, and traces of the felt-tip pen will have to be washed away. Markings made with adhesive tape do not create problems - it can be easily removed when work is completed.
The work on installing lighting in suspended ceilings is divided into two stages:
- Before installing the film ceiling, install racks (platforms);
- After installation - assembly of the lamp.
Installation of racks
The technology for installing a platform for mounting lamps has a strict sequence of work:
1. The embedded rings are connected to the stand. For this purpose, a universal platform is taken. Rings of smaller diameter are cut out of it with a knife - the hole left should be the same size as the body of the lamp (if everything is carefully cut out, the lamp should fit freely into the embedded ring). If the platforms were purchased for a specific lamp size, there is no need to cut anything.
At the next stage, the length of the perforated tape for the racks is calculated. It is equal to the outer diameter of the embedded ring and double the distance between the suspended ceiling and the ceiling (two racks), plus 2 cm for each rack.
Attention: many experts believe that before starting work it is necessary to install a baguette (mount for the tension fabric), and only then do the electrical work (helps to accurately calculate the length of the stand). But this scheme of work runs counter to the interests of the company installing the tension structure: the installers refuse to come to install the baguette, and then a day or two later to stretch the canvas. Rearranging the order of operations does not affect the quality of work of electricians - the racks can be installed longer, and then bent, reducing the length. After attaching the platform canvas, it is pulled down to the required size.
Attention: when determining the height of the interceiling space, it is necessary to take into account the type of light bulb (for an ice lamp with a GX53 base, it is enough to lower the film by 35-50 mm, for the rest 50-70 mm) (see photo).
The cut tape is bent in the shape of a “P”, where the top bar is equal to the size of the embedded ring and is screwed to it with “bug” self-tapping screws. In some types of platforms, fastening is done through slots in the body. A direct suspension (perforated tape) is passed through them and bent. Instead of punched paper tape, you can use an adjustable stand.
2. The finished platform is attached to the ceiling. To do this, a hole is drilled in the ceiling using an electric drill, a dowel is driven in and a platform is attached.
Installation of built-in light sources
The instructions on how to install a spotlight in a suspended ceiling contain only a few points:
- Using a laser level, the installation locations of built-in light sources are projected onto the stretched ceiling;
- The thermal ring is glued to the film with special glue so that the mark on the film is in its center. To do this, the ring is smeared with glue and applied to the ceiling. In this case, it should not be allowed to shift along the film;
Important: the maximum permissible internal diameter of the thermal ring is 15 cm.
- The film is cut out inside the ring with a knife;
- The platform extends down to the plane of the stretched ceiling;
- Terminals are attached to the wires;
- At the socket, the wires are stripped with an electrician's knife and secured in the terminal block. At a voltage of 220V, it is not necessary to observe the color of the wires; at a voltage of 12 or 24V, zero must be connected to zero (blue wire), phase to phase (black or red). If this requirement is not followed, many types of LED lamps will not work;
- The light bulb is inserted into the socket;
- The lamp springs are pressed against the base with your fingers and inserted into the platform ring.
The operation is repeated with each lamp until the last one.
Installation of an overhead lamp
The overhead lighting fixture is attached to the ceiling using the same technology as a chandelier on a frame - the instructions are identical. Track lamps, which are gaining popularity, are also mounted on a frame, but are mounted mainly on a suspended ceiling. On film or fabric it is difficult to disguise the places where the route is attached and the cable exit from the inter-ceiling space.
How to install a chandelier on a suspended ceiling
The chandelier can be mounted on a hook, as well as on linear or cross-shaped strips.
Hook. Depending on the number of shades in the chandelier, the hook may be threaded - screwed into a dowel or a plug hammered into a drilled hole. Used for chandeliers with 3-5 arms. For heavier lighting fixtures, use a butterfly hook. To do this, holes are drilled in the concrete floor to the internal cavity of the slab. A hook is driven into it until the petals open.
In order for the decorative cap to have a rigid stop and fix the lighting fixture above the stretched film, a rigid plywood frame is attached to the ceiling. To do this, a round hole is cut in the middle using a hammer drill or a drill with a crown attachment for wires and a suspension (cable or chain).
Then, using perforated dowel tape and self-tapping screws, the plywood is attached to the main ceiling so that the hook and cable are above the cut hole. The length of the direct suspension or perforated tape should be generous.
As in the case of built-in lamps, the platform is pressed against the ceiling with your hands so that after completing work on installing the stretch ceiling, it can be pulled down until it comes into contact with the polyvinyl chloride film or polyester fabric.
After installing the stretch ceiling, a hole is cut in the canvas, but only after gluing a plastic ring (it can be cut out yourself from any plastic, since thermal protection of the film is not required, but only to prevent it from breaking).
Through holes in the film and plywood, the chandelier is connected to the wires via a terminal block and then hung on a hook. If you hang it right away, it’s difficult to connect the wires. The process is completed by raising the decorative cap to the ceiling until it stops. If, however, the plywood does not lie tightly and the cap leaves a mark on the canvas, then you need to lower either the frame or the cap.
Plank. Manufacturers of chandeliers also use one or two strips (arranged in a cross at a right angle) to attach them to the ceiling. In this case, take a beam under each plank (a little longer so that the chandelier does not swing) and attach it to the ceiling with a perforated metal strip. But before that, a hole for a bolt is drilled in the middle of a solid beam.
If the chandelier is light, the bolt can be replaced with a self-tapping screw. Then there is no need to drill a hole. The second beam is cut in half and attached to the ceiling in the same way, and for greater stability, using corner fasteners, to the first plank. The length of the mounting posts should be generous so that, if necessary, the beam can be lowered down to the stretched ceiling.
After the PVC or polyester film has been stretched to install the chandelier, you must:
- wrap the ends of the planks with inserted bolts with electrical tape so that the ceiling fabric is not damaged;
- attach the overhead strip to the beam;
- connect the chandelier through the terminals to the electrical network;
- attach the chandelier body to the slats;
- Cover the attachment point with a decorative cap - raise it to the stretched ceiling.
The nuances of installing LED strip on a suspended ceiling
LED strip is used mainly as decorative lighting. With its help, you can add numerous lighting effects to the main lighting. Place the tape above or below the ceiling.
In the first case, the LED lamp is attached to the ceiling with PVA glue or double-sided tape. To ensure good adhesion of the glue or tape to the overlap, it is degreased and then primed along the route. The tapes are connected using a connector.
To install the tape under the stretched film or fabric, previously it was necessary to install a two-level ceiling system. The LEDs were mounted on a side strip that covered the space between the levels. Currently, special fastenings from profiles have been developed that can be placed along a stretched ceiling in any direction.
The LED strip is attached inside the profile. It is hidden from the observer by a special lampshade. Depending on the number of LEDs per linear meter, lighting can be auxiliary or primary - 240 crystals per linear meter are required.
Conclusion and summary
Having studied the above materials on how to install lamps in a suspended ceiling, you can do the work yourself before the ceiling installer goes to your apartment. The main thing is to adhere to a certain order of work:
- draw up a diagram of the location of point light sources and chandeliers, lay out routes for power cables;
- transfer the drawing to the ceiling;
- conduct and secure electrical wires;
- mount and then attach to the platform ceiling;
- Draw a diagram for attaching lamps along the stretched ceiling;
- under the platforms, glue thermal rings to the film or polyester and cut holes in them;
- connect the lamps to the power cables.
For a chandelier the process is simpler:
- attach the hook to the ceiling;
- glue a thermal ring to the stretched film and cut a hole in it;
- connect the chandelier wires to the supplied wires through the terminal block;
- hang the chandelier on a hook and cover the hole in the ceiling with a decorative cap.
Video on the topic
Despite the existing restrictions on suspended ceiling lamps, there are still many options for lighting system equipment. Installation of fiber optics, LED and fluorescent devices must be carried out strictly according to the instructions.
The content of the article:
Properly organized lighting divides the room into zones, visually expands the space and makes it more comfortable. Having decided on the type and location of the lamps in the suspended ceiling, you need to choose the correct fixation method, taking into account the characteristics of each device. There are several mounting methods, which depend on the type of lamps and their location relative to the tension fabric. However, before starting work, you should prepare the coating, draw up a diagram and carry out the wiring.
Preparatory work before installing lamps in a suspended ceiling

In order for the lighting system to perform all the functions assigned to it, it is necessary to carry out some preparatory work before stretching the canvas:
- Calculation of the number of lamps in a suspended ceiling. If you are planning the installation of spot products, then proceed from the calculation: one device - per 1.5-2 m 2. For example, in a room of 40 m2 it is optimal to use 27 lamps. However, when calculating, also take into account the power of the lamps and the purpose of the room. You may have additional lighting sources. Pay attention to the size of lamps for suspended ceilings; their number should be proportionate to the dimensions of the room.
- Preparing the wiring. If you plan to install more than 20 lamps in a room, then it is better to group them and connect them to different sources nutrition. All wiring must be in a corrugated sleeve and securely fixed to the ceiling. When using halogen lamps, you need to install an additional transformer.
- Preliminary ceiling marking. Even before fixing the canvas to the ceiling, you should decide how the light sources will be located. This is especially true for multi-level ceilings. It is necessary to allocate each tier into a separate lighting circuit. After this, the light sources need to be distributed accordingly. The places of the lamps should be distributed so as not to fall on the baguettes. A minimum distance of 25 mm is maintained from the nearest profile to the hole for the spotlight. When using a chandelier and spotlights at the same time, move them apart. Spotlights can be used to illuminate individual areas in the room.
Remember that oversaturation of a stretch ceiling with spotlights can not only negatively affect appearance suspended structure, but also lead to deformation of the canvas.
Features of installing suspended chandeliers in a suspended ceiling

It is recommended to install pendant lamps in a room with a high ceiling. In this case, it is advisable to give preference to models with downward-facing shades to prevent overheating of the material. The optimal distance from the lampshade to the canvas is 25-40 cm, depending on the type of lamps used.
Outdoor installation of the luminaire is one of the simplest, it can be done using a hook, mounting strip or plate. We carry out the work after de-energizing the room.
Features of installing a pendant chandelier using a mounting plate:
- We cut out a 15*15 cm plate from plywood and make a hole with a diameter of 2 cm in the center.
- We mount this part on hangers using dowels to the ceiling.
- We pull the bolt to determine the level of the located plate in relation to the ceiling moldings.
- We thread the wire through the hole and test the circuit.
- We stretch the fabric and glue the thermal ring in the place of the central hole of the plate.
- After gluing completely, cut out a circle around the perimeter inside the ring.
- We pull out the wire and connect it to the chandelier.
- Screw the holder to the mounting plate.
- We attach the chandelier and connect it to the network.
When installing using a hook, we perform the work in the same sequence, but instead of a mounting plate, a hook made of reinforcement is fixed. Using this method, you can make several fastenings of lamps in suspended ceilings.
Technology for fixing spotlights in tension fabric

Before placing lamps in a suspended ceiling, we determine the power of the lamps used. It should not exceed 40 W. We choose a lamp with wide sides.
During the installation process we follow the following instructions:
- We determine the location of the lamps in the suspended ceiling and draw up a diagram.
- After laying the wiring, we attach the adjustable posts to the base covering according to the drawing.
- Using a laser beam, we design a mark on the floor where the rack is fixed. This will be needed to easily locate the racks after installing the ceiling.
- We stretch the canvas.
- A day after installing the ceiling, we glue several thermal rings with superglue at the locations of the racks.
- After secure fixation, cut a hole inside the rings.
- We insert the tread ring and place it on the ceiling from the inside.
- We fasten the outer fastener strip.
- We take out the cable and connect it to the terminals of the device.
- We install the decorative profile and adjust the position of the lamp according to the height of the canvas.
- We press the spring fasteners to the body and pull them into the hole.
Rules for attaching LED strips to suspended ceilings

Placing lamps between the tension fabric and the main ceiling is rare, but this method is often used by designers to create original stylistic effects. For indoor installation An LED strip is optimal, but in this case the canvas itself must be made of reflective film.
We carry out the work before stretching the canvas in the following order:
- We calculate the required length of the tape and the power of the power supply. If it exceeds 10 meters, then it is more advisable to equip a parallel connection.
- We mount an RGB controller to control the color of the LEDs.
- We make marks at the fastening points.
- Remove the protective film and glue the tape according to the diagram to the main ceiling.
- We connect the diode strip and the power supply.
- We check the operation of the lighting system and proceed to stretching the fabric.
Do-it-yourself starry sky made of fiber optics on a suspended ceiling
Using optical fiber, you can recreate the effect of a burning flame or a starry sky.
You can make such lighting yourself using the following instructions:
- We attach baguettes to fix the canvas at a distance of five centimeters from the base ceiling.
- On the surface we draw the location of the fiber optic threads.
- Carefully, so as not to break, we fix the bundles with special staples.
- We fix the projectors and connect the threads to it.
- We stretch the canvas.
- We attach a thin wire to the tip of the soldering iron and make a hole in the place where the “star” is fixed.
- We pull the tip of the optical fiber through the hole, cut it to the required length and treat it with glue.
Please note that fiber optics are only suitable for creating decorative lighting, but are not used as the main lighting for a room.
Method of installing fluorescent lamps in a suspended ceiling

Bright and intense lighting can be achieved using fluorescent lamps. They can be used as main light sources. Disadvantages include uneven light output due to a broken connection.
Installation is carried out as follows:
- Before installing a lamp in a suspended ceiling with fluorescent lamp, draw a layout diagram.
- Before installing lighting fixtures, be sure to de-energize the room.
- We install the boxes according to the diagram on the base ceiling.
- Using a connecting cable, we connect the lamps to each other and mount them in the box.
- Connect to the power supply.
It is not advisable to install more than 12 devices of different power in one chain.
How to install a lamp in a suspended ceiling - watch the video:
Installing a lamp in a suspended ceiling requires a serious and responsible approach. Only taking into account the features of each type of device can you recreate a lighting system according to all the rules. The durability of the canvas and the serviceability of the entire system depend on proper installation.