How to block a computer from remote access, protect your computer, prohibit remote access to your computer?
Computer protection is the most important part of implementing an information security plan. Your information can be a tasty morsel not only for amateurs who want to go into your file system for fun and report about themselves in some perverted form. But also the usual theft of information, especially if you really have it. In addition, one should not exclude the possibility of revenge from competitors, which in our time is the main driver of theft and damage to information.
Of course, if your computer is not connected to the global Internet, then you have nothing to fear, you just need to set a password to access your account, which is done in two clicks. But if you actively use the Internet, it may be that someone wants to gain remote access to your computer and not in order to say hello to you and display a bouquet of flowers on your desktop. And here you just need it for greater security.
And so, you can close your computer from remote access very simply. This function is programmed into the system itself, but not everyone knows about it, or many ignore it.
To do this, you need to: go through the “Start Menu” button to the “My Computer” folder, or open the “My Computer” folder through a shortcut on the “Desktop”. Next, right-click and in the window that appears, select the “properties” menu, after which a window will open - "properties of the system", which is what we need, and go to the menu - "remote sessions".
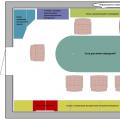
Here you need to do it as in the picture. Uncheck the boxes in the following checkboxes: "Allow sending an invitation to remote assistance" and at the point - "Allow remote access to the computer" !!!
In this simple way, you can prevent someone from stealing your information via the Internet, or harming you by stealing or damaging your files. As they say, safety starts with yourself!
| Mon | W | Wed | Thu | Fri | Sat | Sun |
|---|---|---|---|---|---|---|
| 1 | 2 | 3 | 4 | 5 | 6 | 7 |
| 8 | 9 | 10 | 11 | 12 | 13 | 14 |
| 15 | 16 | 17 | 18 | 19 | 20 | 21 |
| 22 | 23 | 24 | 25 | 26 | 27 | 28 |
| 29 | 30 | |||||
ADVERTISING
The include statement in PHP, the include_once statement in php, included files. When developing a simple dynamic website, or more advanced programs, it is impossible
The structure of the site engine, what the site engine consists of, the site control panel, the template engine. In the previous article it was described that
What is a website engine, how to make a website engine, a website management system in PHP. In order to understand what it is
What does the site consist of, where is the main directory of the site, the general structure of the website, the file system. To understand that - from
Hello! We continue to disassemble operating system Windows 10! Today you will learn how to set up remote access on a Windows 10 computer. You can allow or disable remote control of the computer. You can limit the time you use Remote Assistance. To set up remote access, open the Start menu at the bottom left of the screen. In the window that opens, in the list of all applications, at the bottom of the list, open the “Windows System” tab. In the list that opens, click on the “Control Panel” tab.


Next, the “System Properties” window will open. Here you can allow or deny the connection of Remote Assistance to your computer. Click on the Advanced button to view additional options.

Allow or deny remote control of your computer.
You can set a time limit for how long an invitation can remain open.
You can set invitation generation only for computers running Windows Vista or later.
After changing the parameters, click on the - OK button.

How to launch remote assistant Instructions Read Here!!!
Still have questions? Write a comment! Good luck!
Setting up remote access Windows 10 updated: February 11, 2017 by Ilya Zhuravlev
info-effect.ru
How to remotely access your desktop in Windows 10 using the Quick Help app
 Microsoft is improving the Windows 10 operating system, not only fixing various problems, but also adding new features. With the “Anniversary” update of the operating system (version above 1607), a new application was added - “Quick Help”. It makes it easy and quick to give a remote user access to your computer if they are also running the required version of Windows 10.
Why do you need the Quick Help utility on Windows 10?
The Quick Help program is a built-in analogue of many other applications that offer approximately similar functionality, namely, providing access to a computer for another user over the Internet. The most famous program with similar functions is TeamViewer. However, it is not pre-installed in the operating system and requires configuration, while Quick Help requires a simple Internet connection to work.
The Quick Help utility may be useful to a computer user:
- When contacting operating system support. Microsoft employees, if the user is poorly versed in Windows 10, will be able to remotely connect to his computer and take the necessary actions to fix the error, diagnose or configure the PC;
- To transfer control of the computer to another user. For example, if an employee is at home but needs work materials, another person can turn on his computer and activate remote access mode through the Quick Help application, which allows him not only to view files, but also to transfer them in both directions.
You can think of dozens of situations when you need to gain remote access to your computer, and the Quick Help app allows you to do this in a few clicks.
How to remotely access your computer using Quick Help
Since this utility is built into the Windows 10 operating system, you don’t need to download anything to start working with it. You just need to launch it by clicking “Start” - “Accessories” - “Windows” - “Quick Help” or by starting to type “Quick Assist” in the search (for a non-localized version of the system).
When the program is launched, you will need to do the following:

How to use Quick Help on Windows 10
When the remote user allows access to their computer, the other user's "work area" will open. In the middle of the Quick Help utility window, the image that is currently displayed on the remote computer will be displayed. A number of tools and service information will appear at the top, including:

In addition to the indicated and obvious functions, it is also worth noting the ability to transfer files. A user who has gained remote access can copy a file on his computer, then switch to the remote PC screen and paste the previously copied file into the desired directory.
It is important to note that at any time, a user who is providing remote access to their computer can close the Quick Help application to turn off the broadcast.
OkeyGeek.ru
Quick Help feature for remotely accessing your computer in Windows 10
Windows 10 allows you to remotely control other computers running the same version of the operating system. This feature is built into the system and is easier to use than in previous versions of Windows. No installation required additional programs, we can control someone else's computer or ask someone to remotely restore our operating system over the Internet.
Built-in remote control feature in Windows 10
Remote control of other computers is useful in many situations. For example, if you have problems with the operating system and you cannot solve them yourself, you can turn to an acquaintance or friend, who also does not have to come to your home. It is enough to give him remote access to your desktop so that he can connect and manage it via the Internet.
Typically, for such purposes, the TeamViewer program is used, which allows you to control a remote PC. But for users who have Windows 10 with the Anniversary Update installed, it will be much easier to gain remote access without installing additional programs. Remote Desktop is built into the OS, and Windows 10 makes it much easier to use than it once was in the form of Quick Help.
Setting up remote access in Windows 10
But before we begin, let's pay attention to the following. This feature requires both users to have the Anniversary Update installed.
Connecting in Windows 10 works a little differently than with programs like TeamViewer. TeamViewer operates on the principle that the user who provides access to his computer must register and receive an ID and password for it. He then sends the received data to a friend whom he wants to give remote access to.
In Windows 10, everything is reversed - a user who wants to connect to a remote computer takes the first step by registering as an assistance provider. In this way, you receive a unique 6-digit code that is valid for 10 minutes. Then the one who needs remote support enters the code at himself, thereby initiating a connection between the two computers. Let's look at the connection process step by step.
Step 1 - Actions for a user who wants to control a remote computer
A user who needs access to a remote PC needs to go to the Start menu - Accessories and select the "Quick Help" option. After enabling this function, you need to select the “Give assistance” option and log in under account Microsoft. Once logged in, a 6-digit code will be displayed.

The code is valid for 10 minutes and serves as a user ID required to connect to another computer. The code must be sent to someone who wants to provide remote access to their device.

Step 2 - Actions of the user who provides access to his PC
A user who wants to provide access to his computer needs to obtain and copy a 6-digit code. Then go to the Start menu - Accessories and select the "Quick Help" option. After enabling this option, you need to select “Get Help”.

A window will appear where you will need to enter the user ID to whom we want to provide remote access. After entering the 6-digit code, the connection process will begin. When a message appears asking if we want to allow other users to connect to our computer, select Allow.

Providing help in Windows 10
If 10 minutes have not passed and the code is still valid, then the connection between the computers will be established and the user from the first step will see on his screen the desktop of the person from the second step. Now you can control the mouse and keyboard and perform any operations on the remote PC.
As noted above, this function is primarily intended for receiving/providing quick help. If your friend has problems, for example with viruses, Windows operation or something doesn’t work out for him, instead of explaining it to him in Skype or another messenger, you should simply ask him for remote access and perform the appropriate actions for him.
The easiest way to connect to a remote computer
If you or someone you know has a different version of Windows or has problems installing the Anniversary Update, you will have to consider other connection options.
There are many applications and programs for remote desktop management. Some require fine tuning and are not very clear to novice users. However, there is one program that is very simple and amazingly effective.
We will talk about AnyDesk, which is very popular and stands out among similar programs. First of all, it is very easy to use, and the connection between computers is similar to a Skype call. The program does not require any settings (just dial the unique number of the user whose computer you want to connect to). In addition, the program is portable, which means that it can be run on any PC without installation, for example, from a flash drive.
After launching AnyDesk, the main window will open, divided into two parts - one concerns your computer, the second serves to seize control of another PC.
In the "Data" section workplace» is your AnyDesk address. It allows other users to connect to your computer. That is, in order for someone to gain remote access to your PC, give them this address. This address may also be required if you need to connect to your home computer, for example, from work.
The “Other Workplace” section is intended for establishing a connection with a remote PC. To establish a connection, simply enter the address (identifier) of the remote computer and click on the “Connect” button. A window will appear on the remote PC with information that someone is trying to establish a connection with it. The user must allow the connection by clicking on the “Accept” button.
The remote desktop will appear in the AnyDesk window. Now you can run programs on it, view files and perform any operations.
Connecting to a home computer
To remotely access your home PC, you need to enable the uncontrolled access feature. This function allows you to make a connection without confirmation of the call by the receiving party.
On your home computer, go to the program settings, and then to the “Security” tab. In the “Access while away” section, check the “Allow uncontrolled access” option and enter a strong password in the field.
Now, when you try to connect to your home PC desktop from your workstation, you will be prompted to enter a password. After entering it, you will gain full access to your home PC.
InstComputer.ru
How to enable remote access to administrative shares in Windows 10
I encountered the problem that I cannot remotely connect to the default administrative shares (the ones with the dollar) on a computer with Windows 10 under a user who is a member of the local administrators group. Moreover, under the built-in local administrator account (it is disabled by default), this access works.
A little more detail about what the problem looks like. I'm trying to access the built-in administrative resources from a remote computer Windows computer 10 member of a workgroup (with the firewall disabled) in this way:
- \\win10_pc\C$
- \\win10_pc\D$
- \\win10_pc\IPC$
- \\win10_pc\Admin$
In the authorization window I enter the name and password of an account that is a member of the Windows 10 local administrators group, to which an access error appears (Access is denied). However, access to shared network folders and printers on Windows 10 works fine. Access to administrative resources under the built-in administrator account also works. If this computer is included in the domain Active Directory, then under domain accounts with administrator rights, access to admin shares is also not blocked.
 The point is another aspect of the security policy that appeared in UAC - the so-called Remote UAC (User Account Control for remote connections), which filters the access tokens of local accounts and Microsoft accounts, blocking remote administrative access to such accounts. When accessing under a domain account, this restriction is not imposed.
You can disable Remote UAC by creating the LocalAccountTokenFilterPolicy parameter in the system registry
Advice. This operation slightly reduces the security level of the system. 
After downloading, try to remotely open the C$ administrative directory on your Windows 10 computer. Log in using an account that is a member of the local administrators group. An Explorer window should open with the contents of the C:\ drive.

So, we figured out how to use the LocalAccountTokenFilterPolicy parameter to allow remote access to hidden admin resources for all local administrators of a Windows computer. These instructions also apply to Windows 8.x, 7 and Vista.
winitpro.ru
How to set up Windows 10 Remote Desktop
Not every user knows how to properly connect a remote desktop and start working with it. Setting up such a useful tool makes working at the computer much easier. It is possible not to be at the location of the machine, but to control all important functions from a distance. This is especially true in large organizations and complex structures home network.
Therefore, we will consider the issue more carefully in the article below. Of course, you can also use special programs, which implement remote desktop, but you still need to know about standard Windows tools 10. After all, additional software is an extra load on axis resources, and the use of native utilities is already optimized. Setting up the desktop is not very complicated and is very similar to organizing the desktop in Windows 8. This is natural, because the 10th generation draws many positive aspects from previous versions.
Preparation
To implement this functionality, it is important to carry out preliminary preparation. It is important to configure the computers for successful communication. The connection within the desktop is carried out using the RDP protocol over one local network. At home, it’s a single router for all devices. It is also possible to implement a single table via a global network. To connect directly, you only need to find out the computer address (its IP). It is known that in a home environment such an address is constantly subject to change, so it’s worth making it static first:
- You should go to the control panel.
- Open Network and Sharing Center.
- Right click on connection local network and select Details from the context menu.
- Here we look at the IP address data.
- We exit the window and open Properties.
See also: Setting up tiles in Windows 10
- A list of components that support the selected connection will appear. Select Internet Protocol version 4.
- Click on the Properties button.
- Click OK, then OK again.
That's it, a static address has been assigned to the computer. If this is not done, then every time the IP is reset, the connection will be broken.
You can try to do this through a router. Almost all models allow you to assign a specific address to the equipment. Naturally, this topic is only for those people who are able to cope with such equipment. You can search for articles on the global network that will answer the question of how IP fixation is implemented in a particular router.
Permission
The remote desktop itself does not start on the Windows 10 operating system; it still needs to be allowed to connect via the RDP protocol:
- Go to the control panel and click on System.
- On the left there will be a list in which you need to select Setting up remote access.
The Settings window will open, in which you should click Allow remote connections to this computer and Allow remote assistance connections to this computer. It is better to specifically register those users who will connect to the machine. It is also possible to specifically create a user for whom desktop settings will be relevant.
Connection
Now you don't need to install additional software to use the remote desktop. Just go to the search for Windows 10 or any other operating system to find the remote desktop control. After this, the connection utility starts.
Windows 7 and previous versions of the operating system have a built-in Remote Assistance program. It allows you to control the computer of a user who needs help from another computer using a local network or an Internet connection.
Activating and deactivating the assistant
The technician can control the computer that needs to be repaired directly from his computer. When connecting via “Remote Assistance,” an image from another user’s computer appears on the wizard’s screen, and all actions performed by the wizard are transferred to this user’s computer and change its settings.
There are three ways to ensure a secure connection:
- for computers connected by a local network, you can send an invitation file, which is received by the user who needs help and passed on to the wizard;
- the same security file can be sent via e-mail if the connection will be made via the Internet;
- If the IPv6 protocol is configured, you can use a direct connection via the easy connect button.
When connecting, a mode is first activated that allows the master to observe the actions performed on the other user’s computer, but he cannot influence what is happening. To proceed to control, additional permission will be required.
To start using Remote Assistance, you must complete the following steps:
Also in Windows 7 there is the ability to enable voice connection, which will allow the master and the user to communicate during a session without third-party programs.
Video: setting up remote assistant
Connecting computers
After the computer has been configured, perform the following steps on it:
- Launch Remote Assistance from the Maintenance folder in the Start menu.
 Open “Remote Assistance” through the “Start” menu
 - Indicate that this computer needs assistance.
 Select the “Invite someone you trust to help” mode
 - Choose one of the ways to invite a master. For example, through a file.
 Choosing how to invite a master
 - Save the provided file.
 Save the file in a folder from which it will be most convenient to retrieve it
 - Send the resulting file in any convenient way to the computer of the master, and on the computer you are setting up a window will appear with the password that will be needed for the connection, remember it.
 It would be best to write down the connection password
 - Now go to the wizard's computer. There should already be an invitation file on it, open it.
 Open the invitation on the master’s computer
 - Enter the password received earlier on the user's computer.
 Enter the previously received password on the master’s computer
 - Return to the user's computer again and confirm that you allow the master to connect.
 We confirm by clicking the “Yes” button that the connection should be established
 - The connection is established, but the master can only observe. To start controlling the user’s computer, he must click on the “Take control” button.
 Click on the “Take control” button to start controlling another user’s computer
 - After this, the user must once again confirm that he trusts the wizard.
 We indicate that the master can control the computer
 - Terminate the connection using the “Stop remote control” button on one of the computers. To establish a voice connection, click on the “Conversation” button.
 Use the “Stop remote control” button to end the session
Video: Connecting to a Windows Remote Desktop
Establishing a connection without an invitation
There are times when sending a request from the user's computer to the master's computer is inconvenient or impossible. Therefore, there is a method that changes the parameters so that the master himself can send the request, that is, he does not need an invitation file for this.
A prerequisite for such a connection is that the master must be authorized in an account with a name and password identical to the account in which the user who needs help is authorized. The master's account should be in the administrators group, and the user's account should be in the remote assistants group, which is created automatically by the system after entering the help offer mode.
- On the master's computer, run a command prompt with administrator rights. To do this, go to the Start menu and search for Command Prompt.
 Open Command Prompt as Administrator from the Start menu
 - Use the mmc command in it to open the console.
 We register in command line mmc, press Enter
 - Expand the “File” menu and select “Add or remove snap-in”. In the window that opens, click on the “Add” button and add an object editor group policy. Save any changed settings and return to the console.
 You can add the Group Policy Editor to the management console using the “Add” button
 - Open the local computer policy, and in it “System Configuration” - “Administrative Templates” - “System” - “Remote Assistance”. In the final folder, expand the “Remote Help Request” file.
 Open the file “Remote Help Request”
 - Activate the function by checking “Enable” in the window that opens.
 We enable the “Request Remote Assistance” function by checking “Enable”
 - Return to the folder and open the “Offer remote assistance” function. Also activate it, and in the settings indicate that assistants can manage this computer. Click on the “Show” button.
 We enable the “Offer remote assistance” function and indicate that assistants can control this computer
 - Enter the name and password for the master account. Save all changes you have made.
 Specify the master who will have access to the user’s computer
 - Go to the master computer and start connection mode on it using the command C:\Windows\System32\msra.exe /offerra, executed as an administrator.
 Execute the command C:\Windows\System32\msra.exe /offerra
 - Enter the IP of the computer you want to connect to. You can either find it on the Internet by typing the appropriate request, or through “Start” - “Control Panel” - “Network and Internet” - “Network and Sharing Center” - “View network status and tasks” - under the inscription “network with access type: Internet" click on the link with the connection type - "Details" - in the "IPv4 Address" line and the IP you are looking for will be displayed.
 Specify the IP to which you need to connect
 - All subsequent actions are the same as those described above for a normal connection: the user must grant permission for the connection, and then for control. Disconnection is carried out using the standard method, through the “Stop remote control” button.
 Getting started with “Remote Assistance”
Video: “Remote Assistance” without an invitation outside the domain on Windows 7
Connect without permissions
Sometimes the wizard must connect to the user’s computer while he is away. But by default, you need user permission to start monitoring and controlling another computer. You can bypass these security steps by changing the helper code:

Done, the master can now connect to the user without confirmation from the user. The files that were modified above should end up looking like this:
- function LoadVariables()
{
;
try
{
if(parent.gIsURA)
{
idNormal.className = "sys-font-body sys-color-body DisplayNone";
idUnSolicited.className = "sys-font-body sys-color-body Display";
if (parent.gHelperName)
{
idUnSolicHelper.innerText = parent.gHelperName;
idUnSolicHelper1.innerText = parent.gHelperName;
}
}
else
{
if (parent.gHelperName)
{
idHelperName.innerText = parent.gHelperName;
}
}
}
catch(error)
{
parent.FatalError(parent.L_RCCTL_Text, error);
}
btnAccept.disabled = false;
btnDecline.disabled = false;
btnDecline.focus();
DoAccept();
;
}
function DoAccept() - function InitiateMsg()
{
var vArgs = window.dialogArguments;
try
{
idExpert1.innerText = vArgs;
idExpert2.innerText = vArgs;
idExpert3.innerText = vArgs;
}
catch(error)
{
idBody.style.visibility = "hidden";
alert(L_ERRACCESSDENIED_Text);
return;
}
onClickHandler(0);
return;
}
function onClickHandler(id)
What to do if the assistant does not work
There are instructions in case of connection or connection problems.
Access check
If the assistant is not found in the system or is inactive, this means that it may be blocked. To verify this, follow these steps:

Setting up a firewall
In Windows 7, the built-in firewall is configured automatically, but it can still cause problems. To avoid this, you should, firstly, disable third-party antiviruses, and secondly, follow these steps:
- You must disable the Firewall (or allow access to DCOM in exceptions) on your computer.
- On systems XP SP2 and higher, you need to change the security settings (this can be done using Group Policy). In the Computer Configuration/Windows Settings/Security Settings/Local Policies/Security Options/ node, change the permissions as follows:
- for DCOM: Machine Access Restrictions in Security Descriptor Definition Language (SDDL) syntax we give the Anonymous Logon and Everyone permissions Allow Local and Allow Remote Access;
- for DCOM: Machine Launch Restrictions in SDDL syntax, we give the Administrators group permissions Allow Local Launch, Allow Remote Launch, Allow Local Activation, Allow Remote Activation, and the Everyone group - Allow Local Launch, Allow Local Activation.
You can control another user's computer from your own computer by connecting through the built-in remote assistant. For standard connection an invitation file and agreements will be required on the part of the user seeking assistance. But these restrictions can be circumvented by changing the assistant code and Group Policy settings.
Computer security is based on three principles - secure storage of personal data and important documents, discipline when surfing the Internet and the most limited access to a PC from the outside. Some system settings violate the third principle by allowing other network users to control the PC. In this article we will figure out how to prohibit remote access to your computer.
As mentioned above, we will only change system settings that allow third-party users to view the contents of disks, change parameters and perform other actions on our PC. Keep in mind if you use remote desktops or the machine is part of a local network with shared devices and software, then the following actions may disrupt the operation of the entire system. The same applies to situations where you need to connect to remote computers or servers.
Disabling remote access is carried out in several stages or steps.
- General prohibition of remote control.
- Turn off the assistant.
- Disable relevant system services.
Step 1: General ban
With this action, we disable the ability to connect to your desktop using the built-in Windows feature.

Access is disabled, now third-party users will not be able to perform actions on your computer, but they will be able to view events using the assistant.
Step 2: Disable Assistant
Remote Assistance allows you to passively view your desktop, or rather, all the actions you perform - opening files and folders, launching programs and adjusting settings. In the same window where we disabled sharing, uncheck the box next to the item allowing the connection of remote assistant and click "Apply".

Step 3: Disable Services
At the previous stages, we prohibited performing operations and generally viewing our desktop, but do not rush to relax. Attackers, having gained access to a PC, may well change these settings. You can further increase your security level by disabling some system services.

All the steps above can only be performed under an administrator account or by entering the appropriate password. That is why, in order to prevent changes to system parameters from outside, it is necessary to work only under an “account” that has normal rights (not “administrator”).
More details:
Creating a new user on ,
Conclusion
Now you know how to disable remote control of your computer over the network. The steps described in this article will help improve system security and avoid many problems associated with network attacks and intrusions. True, there is no point in resting on your laurels, since no one has canceled virus-infected files that end up on a PC via the Internet. Be vigilant, and troubles will pass you by.
It's quite annoying when someone gains unauthorized access to your computer. If you think your computer has been hacked, disconnect it from the Internet. Then find the vulnerabilities that the attacker exploited to break into the system and fix them. Then take steps to avoid similar intrusions in the future.
Steps
Part 1
Blocking unauthorized access- An attacker could gain remote access to the computer, but this is unlikely. But some measures can be taken to prevent the attempted intrusion itself.
-
Look for obvious signs of remote access. If the cursor moves, programs are launched and files are deleted without your participation, someone has gained access to the computer. In this case, turn off the computer and disconnect the Ethernet cable.
- If you find unfamiliar programs or your Internet connection speed has dropped, this does not mean that your computer has been hacked.
- Many programs that update automatically open pop-up windows during the update process.
-
Disconnect your computer from the Internet. Do this if you think your computer has been hacked. Disconnect your computer not only from the Internet, but also from the local network to prevent unauthorized access to other computers.
- Turn off your router wireless network and disconnect the Ethernet cable from the computer.
-
Launch Task Manager or System Monitor. Using these utilities, you can determine active processes.
- On Windows, press Ctrl + ⇧ Shift + Esc.
- On Mac OS, open the Applications - Utilities folder and click System Monitor.
-
In the list of running programs, find programs for remote access. Also look in this list for any unfamiliar or suspicious programs. The following programs are popular remote access programs that are installed without the user's knowledge.
- VNC, RealVNC, TightVNC, UltraVNC, LogMeIn, GoToMyPC, and TeamViewer
- Also look for unfamiliar or suspicious programs. If you do not know the purpose of a particular active process, find information about it on the Internet.
-
Please note that the CPU load is abnormally high. It is displayed in the Task Manager or in System Monitor. High CPU usage is normal and does not indicate a computer hack, but if it occurs when no one is using the computer, most likely there are many processes running in the background, which is very suspicious. Keep in mind that high CPU usage occurs during background system updates or large file downloads (that you forgot about).
Scan your system with an antivirus program. Be sure to install an antivirus or do not turn it off Windows Defender. Open your antivirus program and run a scan of your operating system. A full scan will take about an hour.
- If your computer does not have an antivirus, download it on another computer and copy it to your computer using a USB drive. Install an antivirus and scan the system.
-
Delete files found by the antivirus. If your antivirus detects malware, remove it or send it to “quarantine” (this depends on the antivirus); in this case, the found programs will no longer harm the computer.
Download and install Malwarebytes Anti-Malware. This is a program that detects and neutralizes malware that is not found by the antivirus. Malwarebytes Anti-Malware can be downloaded for free from malwarebytes.org.
- Since your computer is disconnected from the Internet, download Malwarebytes Anti-Malware on another computer and copy it to your computer using a USB drive.
-
Scan your system with Anti-Malware. The full scan will take about 30 minutes. It is possible that Anti-Malware will detect a malicious program that is controlling your computer.
Send detected malware to “quarantine”. In this case, the found programs will no longer harm the computer.
Download and run Malwarebytes Anti-Rootkit Beta. This program can be downloaded for free from malwarebytes.org/antirootkit/. Anti-Rootkit Beta detects and removes rootkits, which are malicious programs that allow an attacker to gain a foothold in a system and hide traces of entry. A full system scan will take some time.
Monitor your computer's behavior after removing malware. Even if your antivirus and/or Anti-Malware program has found and removed malware, monitor your computer's behavior to determine whether there is hidden malware.
Change all passwords. If your computer is hacked, the attacker most likely obtained your passwords using a keylogger. In this case, change the passwords for various accounts. Do not use the same password for multiple accounts.
Log out of all accounts. Do this after changing your passwords. Sign out of your accounts on all devices on which you use these accounts. In this case, the attacker will not be able to use the old passwords.
-
Reinstall the operating system if you are unable to block unauthorized access to your computer. This is the only reliable way to prevent intrusion and get rid of all malicious files. Before reinstalling the system, create a backup copy of important data, as during the process of reinstalling the system, all information will be deleted.
- When backing up your data, scan every file because there is a risk that old files will lead to infection of the reinstalled system.
- Read on for more information on how to reinstall your Windows or Mac OS system.
Part 2
Preventing unauthorized access-
Set up automatic updates of your antivirus program. A modern antivirus detects malware before it reaches your computer. Windows comes pre-installed with Windows Defender, which is a good antivirus that runs and updates in the background. You can also download an excellent and free antivirus such as BitDefender, Avast! or AVG. Remember that you can only install one antivirus program on your computer.
- Read for more information on how to enable Windows Defender.
- Read
Keep in mind that your computer may turn on automatically to install updates. Majority latest versions operating systems are updated automatically; As a rule, this happens at night when no one is using the computer. If your computer turns on without your knowledge (that is, when you are not using it), it most likely woke up from sleep mode to install updates.