The presence of a drainage system is a prerequisite for all types of buildings, both residential and industrial, commercial or government. Manufacturing companies offer developers a huge selection of drainage systems that have their own design differences. But they consist mainly of minor changes in linear parameters, geometry and appearance, while the functional tasks remain unchanged.
This applies to all elements of gutters, except brackets. Their different types have fundamental differences and require completely different fixation methods. By the way, the type of brackets also influences the technology. There are brackets that must be installed before installing the roofing, but there are also those that can be installed at any time, both before and after installation of the roof.

Holders simultaneously perform several tasks, each of which has a big influence on the performance, safety and duration of operation of the drainage system. What functions do the brackets perform?

We will tell you below how to install the brackets correctly so that the drainage system works properly for a long time. First, you should familiarize yourself with the existing types of gutter holders.
Types of brackets
These elements must retain their original characteristics throughout the warranty period. During development, specialists pay attention to several important characteristics of the brackets. They are common to all types of products.
The holders are made of structural steel or polymers. Responsible manufacturers use structural steel sheets with a thickness of at least 1.5 mm, but there are also very low quality products on the market. In them, the sheet thickness does not exceed one millimeter, and the metal is low-quality low-carbon steel.
The same situation applies to plastic holders. They must be pressed only from virgin material with innovative additives that increase the material’s resistance to negative hard ultraviolet radiation. But not all companies act responsibly; some, in order to increase profits, use material obtained after recycling old products (recycled plastic) to make brackets. Accordingly, there is no need to talk about any high quality of such holders.

Table. Types of brackets.
| Holder type | Features and brief performance characteristics |
|---|---|
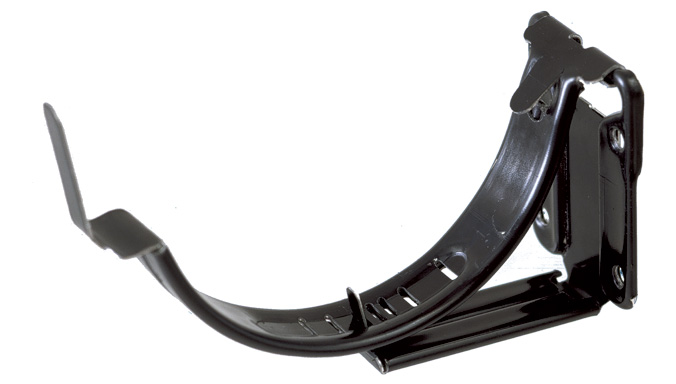
| They have special mounting strips that make it possible to attach elements to the sheathing or rafter legs. This fixation significantly increases the strength of the drainage system. The design feature influenced the technology roofing works- hooks must be installed before installing roofing coverings. In some cases, they should be fixed before the manufacture of the sheathing begins. The specific decision is made by the master roofer depending on the type of roof and the characteristics of the coatings. | |
| They are nailed to the front board and can be installed both before the installation of roofing coverings and after this work has been completed. Depending on the material they are made of, they can be plastic or metal, simple or complex. Complex brackets have several adjustments, which allows you to quickly and very accurately set the position of the gutter and ensure maximum functionality of the system. | |
| Relatively recently, engineers developed a new constructive solution short brackets. They have special grooves into which metal extensions are inserted. The mounting method of the brackets resembles hooks and is fixed to the sheathing or rafter legs. True, not all builders understand why these extension cords are needed; apart from increasing the cost of the system, they do not have any positive effect. The actual performance characteristics of brackets with extensions are lower in all respects than those of ordinary cheap hooks. The only situation that justifies the use of universal brackets with extensions is the roof is so complex that it is necessary to use both types of elements to attach the gutters. But such cases are extremely rare. |
The vast majority of drainage systems can be fixed either with long metal hooks or with short plastic brackets.

Prices for different types of gutter brackets
Bracket for gutter
General installation rules
To fix the elements you will need a tape measure, a screwdriver or screwdriver, twine, a bubble level, a construction marker and self-tapping screws of the appropriate size. What general rules for fixing brackets should be followed, regardless of the characteristics of the elements?

If you follow the general rules, you can be sure that the drainage system will always cope with the assigned tasks.
Prices for popular models of screwdrivers
Screwdrivers
Step-by-step instructions for fixing plastic holders
Before starting work, you need to decide on the number of elements and the distance between them. In this case, it is always necessary to take into account the location of the receiving funnels and connecting couplings. The fact is that here you have to attach additional hooks, regardless of the distance. Work can be done after the roof has been completely installed and the front board has been attached. If it is planned to cover it with decorative materials, then this work must also be done, and only then fix the brackets.
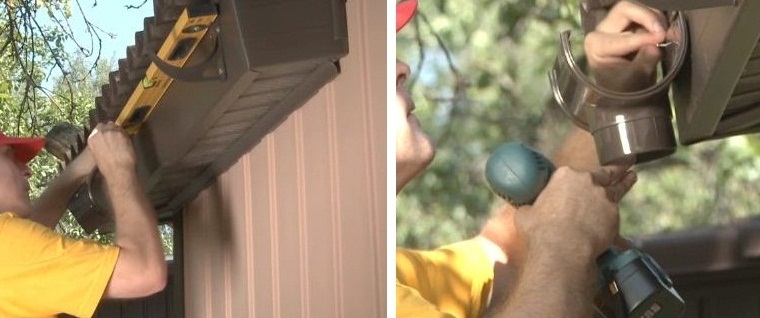
Step 1. Drill mounting holes for rubber washers in the finishing material. They are needed to compensate for thermal expansion of the plastic.

Step 2. Attach the outer brackets to the board with self-tapping screws. In this case, take into account the above recommendations regarding slope for water drainage and distance from the roof projection to prevent mechanical damage due to falling snow.

Step 3. Using a bubble level, mark the position of the funnel, do not forget to follow the slope recommended by the manufacturers. Secure the elements.
Practical advice. If the length of the slope is large, then you need to pull a rope between the outer brackets and place all the remaining elements along it.
Plastic brackets should not be tightened too tightly with self-tapping screws; control your efforts. Further installation of elements is carried out in the same way.

Step-by-step instructions for attaching long hooks
They are installed under roofing coverings with a maximum pitch of no more than 60 cm; additional elements must be fixed near the funnels. For such fastenings, it is necessary to bend the long part of the part, thereby ensuring the inclination of the gutter. Bending is done in the following sequence.
- Count the total number of brackets on one slope. Consider gutters and couplings, they increase the number of attachment points.

- Place all the elements side by side on a level area. Draw a diagonal line taking into account the required slope. For example, if the slope is within 3 mm per meter, and the length of the slope is 9 m, then the vertical distance between the first and last bracket should be 9 × 3 = 27 mm. This value can be rounded to three centimeters.

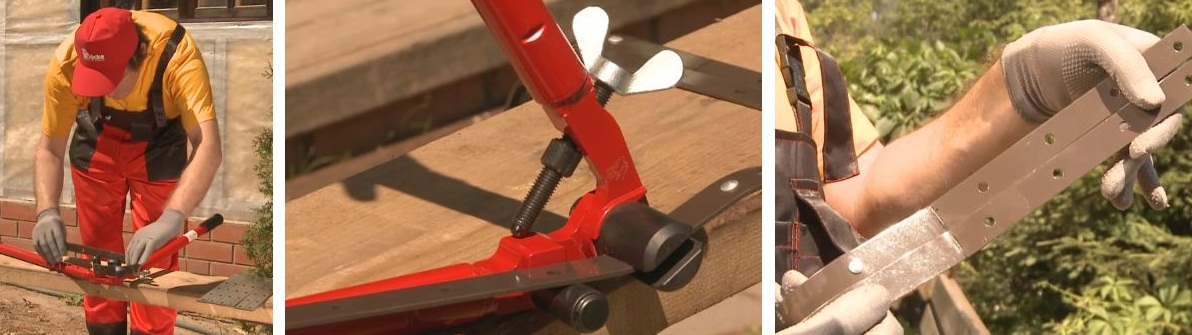
- Use a special bending machine to bend the brackets along the marked lines. It is important to know not only the location, but also the bend angle. It is equal to the angle between the slope plane and the horizontal. Do not confuse with the angle of inclination of the slopes; this parameter is determined by the position of the slope to the horizontal line. For example, if the angle of inclination of the slopes is 25°, then the brackets must be bent at 115°. This value is determined simply; you need to add 90° to the slope angle.
- On the roof slope, mark the places where the holders are attached, then screw the brackets, checking their position with a level.

Installation of gutters and funnels is carried out in the same way as on short brackets, but it is carried out only after.

Prices for gutters
Gutters
Conclusion
Most manufacturers of drainage systems sell brackets as a set, and you can immediately select the best option. Fastening can be done with metal hooks to the sheathing boards or rafter legs. When choosing a specific option, you need to know that there is no ideal solution. Each type has its own strengths and weaknesses.
Long brackets
They have high strength values, are not afraid of UV rays, and do not change their properties for a long period of time. These are advantages. Disadvantages are the complexity of installation and certain nuances during the installation of roofing coverings. The stronger the sheet steel, the more difficult it is to bend it at the desired angles.

Most often made of plastic. They are much easier to install, and some designs have the ability to precisely adjust the position of the gutter. This allows you to quickly correct mistakes made during installation and correct the position of the gutters. Disadvantages - there are no plastics in nature that are not afraid of hard ultraviolet rays. The service life of the elements does not meet the wishes of demanding developers.

Video - Installation of brackets for drainage
The correct selection and installation of brackets for gutters has great importance for the entire drainage system. But the functioning of the drain is also affected by other factors that must be taken into account when installing it. You can read about how to properly install a roof drainage system.
Gutter systems can be installed on any type of building. When choosing the type of drainage systems, as well as the method of its installation, the architectural features of the building, the material of the facade, the type roofing material, features of the roof topography, etc. Installation of gutters can be carried out at any time of the year, including winter.
In order to determine the approximate cost of installation of a drainage system, it is necessary to have a house project - a plan of facades and roofing. In order to determine the final cost of installation work, it is necessary for our specialist to visit the site.
1. Mark the places for installing the brackets on the bottom batten of the sheathing, according to the following rules:
a) If the pitch of the rafters is standard - 800-1000 mm, then the brackets are fastened to the rafters through one batten of the sheathing. One bracket is attached to the sheathing between the rafters.
b) If the pitch of the rafters is not standard, the decking is pre-nailed onto the rafters. The thickness of the board must be at least 300 cm from the edge. Brackets for gutters are installed on this flooring so that their distance from each other is 400-500 mm.
2. Gutter brackets are numbered starting from the middle of the gutter and moving toward the downspout. The overall slope of the gutter should be 2-5 mm per 1 meter of gutter length. The bend point is marked on each bracket. 
3. The first and last brackets are secured and then folded down. A cord is stretched between them, which will later serve as a guide. The remaining gutter brackets are attached and bent so that each one touches the cord.

4. If it is necessary to reduce the length of the gutter, use a hacksaw. For the outlet funnel, a V-shaped hole is marked and cut on the gutter, the width of which should be 100 mm. It is recommended to leave 150 mm from the edge of the gutter to the drainage outlet pipe.

5. The front edge of the funnel is wound along the outer bend of the gutter. The funnel must be pressed tightly against the gutter and fixed, for which the carved flange of the funnel is bent onto the rear edge of the gutter.

6. The gutter is inserted into the brackets and secured downwards. The eaves strip is attached to the sheathing so that its lower edge overlaps the edge of the gutter.
 |
 |
 |
7. In places where the gutters are connected to each other, as well as to the corners of the gutter, they are inserted into each other so that the overlap is 25-30 mm. A gutter connector is installed at the joints. To secure the gutter connector, the rear flange of the gutter connector is hooked onto the inside edge of the gutter, the front of the connector is pulled up against the gutter, and then the lock is engaged. The connection made in this way is hermetically sealed, and the connection point is reliably protected from corrosion and has an aesthetically finished appearance. appearance. A plug is installed at the end of the gutter.

8. The size of the connecting pipe of the drainage system is determined locally, the excess part of the pipe is sawed off with a hacksaw. There are two crimps on the pipe, which allows you to use sections of one pipe in two places where connections are made.
The final stage of the roof installation is the installation of the drainage system. Among the various systems, you need to choose the one that suits your requirements - metal with galvanic coating or plastic. Gutter manufacturers offer a full range of components. For information on how to perform the installation itself, read the article.
Calculation of components
Based on the size and shape of the roof, you can independently calculate how many pipes, gutters, brackets and other parts of the drainage system you will need.
Based on the size of the roof, we select the diameter of the gutters:
- If the roof area is less than 50 m2, gutters 100 mm wide and pipes 75 mm in diameter are used.
- Up to 100 m2, 125 mm gutters and 87 mm pipes are used.
- More than 100 m2 - gutters 150 mm and pipes 100 mm (the use of gutters 190 mm and pipes 120 mm is allowed).
When complex design roof gutters and pipes are determined by the largest projection size of a part of the roof.

The roof area, consisting of parts, is 160 m2. Considering that one drain pipe is enough to service 100 m2 of roofing in projection, for the roof in the example you will need 2 drain pipes located at the corners of the house. The number of funnels corresponds to the number of pipes, i.e. - 2 pieces.
The number of vertical pipes is determined depending on the distance from the cornice to the blind area. Subtract 30 cm from this distance - the height of the drain elbow above ground level.
For example, the height to the cornice is 7.5 m. Then 7.5 m -0.3 m = 7.2 m.
We will need 3 pipes of 3 m each on each side, which means 6 pipes on both sides.
The number of clamps will be 5 for each side (between the elbow and the pipe, between the pipe and the ebb, and between the pipes) and, accordingly, 10 pieces for the entire roof.

Calculation of the number of gutters
The most commonly used gutter size is 3 meters. The length of cornice A and cornice B is 10.3 m. This means we need:
- There are 4 gutters on cornice A (3m + 3m + 3m + 1.3m). This will leave us with another 1.7 m of unused gutter.
- On cornice B there are 3 gutters and the remainder (1.7 m) from cornice A.
- For eaves C and D we use 2 gutters each, that is 4 pieces on both sides.
- In total, 11 gutters of 3 m each for the entire roof.
The number of gutter corners corresponds to the number of roof corners, in our example there are 4.
Calculation of the number of brackets and gutter locks
The brackets are installed at the rate of 1 piece per approximately 50-60 cm. We take 50 cm and carry out the calculations.
Having summed up the numbers in the last column, we find out that in order to attach the gutters, we will need 58 brackets.

The number of locks between the gutters is equal to the number of joints. In our case, this is 16 pcs.
The number of ebbs (marks) is equal to the number of funnels. In this case, you need 2 times more knees for each funnel. Then for 2 funnels you need:
- 4 knees;
- Low tide 2.
If the facade is not level, but has protrusions, you need to purchase elbows to go around it. The figure below will help you determine their number.

List of required items
In total for this drainage system you will need:
- Gutter (3 m) – 8 pcs.
- Gutter (2.5 m) – 2 pcs.
- Gutter (1.3 m) – 2 pcs.
- Gutter lock – 16 pcs.
- Gutter angle – 4 pcs.
- Bracket – 58 pcs.
- Knee – 4 pcs.
- Drain elbow (mark) – 2 pcs.
- Pipe (3m) – 6 pcs.
- Funnel – 2 pcs.
- Clamp (with pin) – 10 pcs.
Pro tip:
Installation of brackets and gutters
Fastening the drainage system begins with marking the installation locations of the brackets using a marking thread.
The center of the gutter should be located below the bottom edge of the roof. The gap between the line (shown in dotted lines in the diagram) of the continuation of the roof and the top of the gutter holder must be at least 25 mm.

The funnel is installed above the storm drain. The funnel must be secured to two brackets or at two points. The location of the funnel can be in the center or at the edge (set in the project). A hole is cut in the gutter using a hacksaw to the size of the funnel.

The brackets are fixed to the gutter line (the slope of the gutter line towards the funnel is from 2 to 5%). The installation pitch of the brackets is from 0.5 to 0.75 m (for selection, use the manufacturer’s “Installation Instructions for the Drainage System”). The extreme bracket is attached at a distance of 25-30 cm from the plug at the end of the gutter. The distance from the corner element to the bracket is no more than 15 cm.
The gutters are inserted into the brackets, starting from the rear, and plugs are installed at the ends. The joints of the gutters are fixed with special locks or connecting elements. The ends of the gutters should be located 50-100 mm behind the side edge of the roof. If the roof span is more than 8 m, an expansion element must be installed between the gutters.
Types of fastening and material of brackets
- The brackets are installed on the rafter leg. Metal brackets are used.
- When using a frontal (gable) board, plastic brackets are used.
- The brackets are attached to the deck using metal extensions. Use plastic or metal brackets.

Possible errors and consequences
- An increased pitch between the brackets leads to sagging of the gutters.
- The mismatch between the edge of the roof and the middle of the gutter leads to overflow.
- Increasing the gap between the gutter line and the edge of the roof - splashing and overflow.
Pro tip:
When cutting gutters and pipes, the use of angle grinders is not allowed, as the coating is damaged and burrs remain. Cutting is done with a hacksaw for metal. It is recommended to clean the cut ends with a file.
Installation of the figured part and drainage pipes
Laying a drain involves installing pipes from top to bottom, with the elbow, coupling and drain installed with the socket towards the top.

Installation is done as follows:
- A piece of straight pipe of at least 60 mm is inserted into the knee-knee joint (depending on the distance between the front board and the wall).
- Next, the necessary shaped part is assembled into which the upper end of the pipe is inserted.
- The system is attached to the wall using clamps, the distance between which is up to 1.8 m. Only one clamp is fixing, the second is a guide. In some systems, the manufacturer recommends the use of clamps - thermal expansion compensators. The clamp is attached under the connector.
- The pipe is positioned strictly vertically using a plumb line.
- A drain elbow is installed at the lower end of the pipe secured with clamps (the lower edge is at a distance of 25-30 cm from the blind area).
- If there drainage system or a storm drain, then the lower end of the pipe goes there. The pipes are connected using a coupling (connector).
- Each subsequent pipe is inserted into the connector installed on the previous one.
- A clamp is attached under each connection.

- Depending on the design features of the installation site, an elbow of the desired shape or coupling is attached to the funnel. If the roof protrudes beyond the facade, two elbows and a piece of pipe are used. If the roof does not have a protrusion, then use a coupling.
Installation of roof drains is carried out taking into account compensation for thermal expansion. For this function, manufacturers use expansion gaps. Thus, pipe connectors in some systems have installation lines. The edge of the pipe is set along these lines depending on the air temperature at the time of installation. Silicone-treated seals allow elements to slide smoothly during expansion. When using a pipe connector, leave an air gap of at least 0.6-2 cm.
Pro tip:
It is not recommended to assemble the drainage system at temperatures below -5.
This completes the installation of the drainage system. It is necessary to audit all installed elements. If the configuration of the drainage system fully complies with the design, is calculated and installed in accordance with the manufacturer’s recommendations, then all the water falling on the roof will exit only through the pipes, without splashing or overflowing over the edges of the gutters.
At the end of each season, it is advisable to inspect and flush the system (using a hose with water). When clearing any obstructions (leaves, debris), do not use sharp metal objects.
Imagine the roof of your house or cottage without a drainage system. This means that after melting winter snow and during every rain, the perimeter of the house will look like a waterfall. There is also a threat to the proper condition of the walls and foundation of the house.
So a system for draining rainwater from the roof is a must. And the way the gutter is fastened will determine the reliability of the entire system.
A good drainage system will last a long time and will not cause any trouble during operation. Of course, if you install plastic structures, you won’t have to rely on them for as long as on a system made of metal with a polymer coating. Here the main question becomes the question of financial capabilities at the moment.
In any case, only high-quality installation will allow the drain to work for the entire time for which it is designed. Therefore, homeowners often turn to professional companies to install the system. However, you can do all the work yourself.
If you have no idea about fixing gutters and other elements of the roof water drainage system, first carefully study the entire process of installing them.
When to start?
Ideally, the fastening of gutters will be carried out in a house under construction at the stage of roof construction, before its covering is completed. This provides ease of installation and simplifies some work. But, if you are dealing with a fully built house, this does not mean that installing a drainage system is impossible. You just have to find suitable options.
Please note: it is with the installation of fastenings and gutter installation that work begins on the overall installation of a system for collecting and draining rainwater from the roof.
Fastener selection
There are no special subtleties here. The brackets must match the diameter of the gutters you choose. Make sure the metal is of proper quality.
Some drainage systems from well-known manufacturers (metal coated with polymers) are supplied complete with all the necessary fasteners.
Calculation of fastenings
How many brackets are needed to install gutters depends on the material of the drainage system. For metal structures, a step of 0.5-0.6 meters is sufficient. It is advisable to attach plastic gutters for water drainage more often - three brackets per meter. If the roof is complex, with turns, external and internal corners, this must be taken into account. After all, each side may require “its own” bracket.
Please note: the distance from the water intake funnel to the nearest fastenings must be at least 0.15 m.
Where to attach it?

There are several ways to install fasteners for laying gutters:
- Attaching the drain to the front board. The choice of this method is most often dictated by two circumstances. Firstly, the installation of a water collection and drainage system is carried out with a completely finished roof. Second, you plan to install a plastic gutter system. However, it is not prohibited to fasten metal structures of the water drainage system in this way; it is advisable to use special short hooks.
- The next method is to use rafter legs as a base. This is possible if the rafter pitch is no more than 0.6 m. This method is very reliable and is excellent for large roofs. But it can only be applied before laying the roof covering.
- Long hooks or combination brackets can be attached to the roof sheathing, to its first strip. This method is optimal if the rafters are arranged in increments of more than 0.6 meters (if an ondulin or metal tile roof is planned).
- The last method is designed for cases when the previous three are not available. For example: how to attach a drain when there is no front roof board, as well as access to the rafters and sheathing. Then you need to install special crutches (metal) into the wall and attach the gutter to them using studs.
There is a very important question: how thick should the front board be to attach the drain? Some people use the regular twenty. There are also those who, for reliability, buy a board 4 cm thick. However, skilled builders consider 25-30 mm thick to be optimal.
Attention: slope
No water drainage system will work if the installation of a roof drain does not provide for the correct slope of the gutter. It is done in the direction from the highest point of the drain to the water intake funnel.

There are practical limits here:
- If the slope is insufficient, rain and melt water will stagnate in the gutters, and it may even overflow over the edges.
- If you install gutters with an excessive slope, there may be too much water flow that the funnel cannot handle.
- The optimal slope of the gutter per 1 meter of horizontal drainage should be maintained within the range of 0.2 - 0.7 mm.
How to maintain the slope of a drain
In order for the decrease in flow to be uniform, it is important to correctly arrange the first and last fastenings of the gutter.
The first gutter bracket is attached to the very high point drain. Depending on the final length of the gutter, you need to calculate the slope of the drain and calculate the lowest point. The last bracket is attached to it. Then, between them you need to stretch a thin rope or cord. Make all intermediate fastenings based on the resulting line.
What to do next

Once all the brackets are installed, you can begin laying the gutters. There is a specific point here: this is the connection of joints. First of all, it depends on the material and design of the drainage system. With any method you can find both disadvantages and advantages:
- adhesive joints are strong, but create problems when dismantling and repairing the drain;
- rubber seals will ensure tightness, but may become deformed due to sudden temperature changes;
- The cold welding method requires that the drainage system be protected from serious mechanical stress.
Fastening each gutter is a responsible and serious matter. Knowledge about the installation process of the entire system is very useful and important. If desired and necessary, you can independently arrange water drainage from the roof or simply carefully monitor the work of invited specialists.

The final step in arranging the roof is the installation of a drain, and it is desirable that it copes well with the task, eliminating excessive moisture in the walls and surrounding area. This material describes in detail the procedure from choosing a suitable drain to a convenient plan for how to attach the gutter and pipe without rearranging the ladder again.
To install a drain from scratch you will need:
- Decide on the type of drain (manufacturer, material, color).
- Determine the configuration of gutters and risers and their distribution.
- Select the required drainage size.
- Count the amount of materials and purchase them.
- Install the system.
Any hardware store offers ready-made sets of gutters made of PVC or galvanized steel with a special coating, square or round cross-section and a wide range of colors. These characteristics must be selected in accordance with the type of roofing material so that the drain fits harmoniously into the overall picture. For now, it’s enough to take a brochure with you from the store listing the elements of the drain you like and its brief description. But then you need to arm yourself with paper and pencil.
 Elements of a watercourse. 1. Gutter. 2. Knee. 3. Pipe. 4. Tee. 5. External corner of the gutter. 6. Gutter connector. 7. Inner corner of the gutter. 8. Funnel. 9. Gutter plug. 10. Gutter pipe bracket. 11. Knee bend
How to distribute gutters and pipes
To calculate the required materials, it is necessary to determine the number and positions of vertical drainpipes (risers) and gutters that fit at an angle to each riser.
A drain is installed along the lower edge of each roof slope. For a roof length of up to 10 m, one riser with a funnel at the edge of the gutter is sufficient. For slopes 11-25 m long, the funnels are spaced along two edges, and the slope of the gutter is formed in two directions approximately from the middle of the section. It is better to indicate the boundary at a point from which a whole number of gutters can be laid to at least one funnel, taking into account their length - three meters.
For a hipped or roll roof, gutters can be drawn from two adjacent sides of the roof into one funnel, but the total length of the gutters, converging at one point, should not exceed 20 m.

To bypass roofs of complex shape, for example, on a building with an extension, when the roof planes converge with an internal corner, it is advisable to place the riser in the corner without using through corner elements. If the corner is involved, then the length of the gutter “around the corner”, when viewed from the funnel, should not be more than 10 m.
Based on the stated rules, the points of drains and funnels, as well as gutters, are distributed on the “top view” plan of the house, marking areas with the same slope. If possible, you should distribute the elements so that you have to cut less gutters and use whole elements of three meters each.

It is important to consider the design of the funnel in the gutter kit used. This can be an overhead element that is attached to a regular gutter with a hole cut in the bottom, or a special tee to which the gutters and riser pipe are connected using connectors.
The minimum permissible slope is established by a set of rules and is equal to 1 mm for each linear meter of the gutter. Manufacturers, however, recommend a slope of 3-5 mm per meter for PVC drainage systems and 2-4 mm per meter for metal structures.
The outer edge of the gutter is located 2-3 cm below the roof plane. The edge of the roofing material that forms the roof canopy should be located above the middle of the gutter. This way there will be less risk that the melting of snow and icing in the winter will tear off the gutter.
The vertical pipe is lowered so that the lower edge of the elbow, directed towards the drainage funnel or the outer edge of the blind area, is at a height of 20-30 cm.
Calculation of materials
The cross-sectional area of the gutter is set according to SP17.13330.2011 equal to 1.5 cm 2 per 1 m 2 of roof area. Having distributed the gutters, it is enough to take the length of the largest section, multiply by the width of the roof slope and calculate the cross-sectional area of the gutter. You have to choose from round or square sets. The area will have to be clarified in the technical documentation, since in the store they are mainly sorted only by width (90-150 mm) and height.

To find out the cross-section of the riser pipes, you need to calculate the average annual volume of precipitation falling on the roof of the building according to the instructions of SP 32.13330.2012, and then select the appropriate pipe diameter in accordance with the requirements of SP 30.13330 for throughput from the table for ventilated risers.
You can use the tables provided by manufacturers of drainage systems, where the effective roof area is first calculated, and then the appropriate size of the system is selected depending on the average annual precipitation in the area where the building is located.
Effective roof area: S = (A + B/2) · C, where A is the width of the horizontal projection of the roof slope, B is the height, and C is the length of the roof.
When the standard size of the drain has already been determined, you can proceed to the selection of kit elements.
For a riser on a straight wall you will need:
- gutter funnel;
- two elbows for supplying to the wall;
- one elbow for the lower outlet;
- two fastenings for each pipe and one for the gutter funnel.
The upper elbows are connected by a connecting pipe with seals, and the main part of the drain is formed by straight sections of pipe. To bypass the protrusions on the wall, you will need an additional four elbows and two connecting pipes.

At the junction of the pipe and the gutter, you need a tee or a piece 300-400 mm long with a hole in the bottom for an overhead funnel.
Gutters are connected to the tee. The number of troughs is already determined at the distribution stage. The sections should be arranged so as to obtain the number of complete gutters with a minimum of waste.
The ends of the gutter are closed with plugs. For a hip or roll roof, you can combine all the gutters with corner elements instead of caps. The number of selected elements is selected accordingly.
Based on the number of joints between the gutters and with the tee/funnel, the number of connectors with a seal is calculated.

Each individual gutter element is fastened with brackets at the ends, retreating from the edge by 150 mm, and along the remaining length the fastenings are distributed at a distance of no more than 600 mm from each other, which corresponds to the standard pitch of the pitched roof rafters.
To fix a standard three-meter gutter, six brackets with a basic pitch of 500 mm will be required. Each tee separately requires two fastenings on both sides.
Installation of gutters
The best option is to fix it with brackets on the eaves board, but if it is not there or the board is not designed for additional load, then the brackets should be secured to the sheathing and rafters before laying the roofing material or to the walls. All types of fastenings can be alternated if necessary. The range of available fastenings should be clarified in advance in the selected drainage system.

Procedure:
- From the side where the gutter will be laid at the highest point, on the opposite edge from the funnel, fasten the bracket so that the central axis along the gutter after installation is strictly under the edge of the roof, and the outer edge is lowered below the roof plane by 20-30 mm, a distance up to the end of the roof should be no more than 150 mm. Tie a long piece of thread or twine to the installed mount.
- Mark the position of the tee with two vertical lines.
- The second bracket should be secured, moving 150 mm away from the mark for the tee. Lower it in relation to the first bracket to maintain the desired slope. Tie a thread from the first fastener, indicating the required level for the distribution of the remaining fasteners.
- Secure the fasteners for the tee and funnel.
- Distribute and fix the intermediate brackets taking into account the position of the gutter joints.
- Start installing the elements from the tee and funnel and then all the gutter elements.
The gutters must be laid with a gap of 10-15 mm to compensate for thermal expansion and fixed with connectors. When all gutter elements are secured, you can proceed to installing vertical risers.
 The edge of the gutter is closed with a sealed plug
Pipe fastening
There are two main types of fastenings: for brick and wooden walls. In the first case, a single-point anchor fastening is implied, in the second - a V-shaped support plate with two fastening points spread apart. In both cases, the pipe is fixed with a clamp.
For anchoring, you should first mark on the wall the places for drilling holes for fastenings:
- an elbow approaching the wall from the side of the gutter funnel;
- two fasteners for each pipe section, departing from the ends by approximately 150-200 mm;
- the lower bend completing the drain.

In the case of a V-shaped fastening, first a clamp with a bracket is put on each pipe and elbow, a vertical drainage system is assembled on the wall, drilling holes in the wall and fixing the fastenings with self-tapping screws.
To compensate for thermal expansion, the connection into the socket is not made all the way, leaving a gap of 10-15 mm. In order not to miss this moment, it is advisable to check the depth of the socket in advance and set the appropriate marks on the pipes.
There is no need to use O-rings or sealant to connect pipes on a straight section of the path - only when connecting tees.
Learn more about the installation process of ready-made drainage systems in the video:
Avoiding Obstacles
To avoid obstacles along the riser, elbows with a 30° rotation and connectors between them are used.
If it is a protrusion in the wall, then you will need four elbows and two connecting pipes. It is more convenient to first assemble two elbows and a connector, secured along the protrusion, and then connect them to the upper part of the drainage system and continue installing the lower section.
If a “step” is formed on the wall, only two elbows will be needed. It’s easier to secure the pipes along vertical sections and then mount the elbow.

It is better to take the distance from the elbow to the corner of the protrusion equal to approximately 1/3 of the diameter of the pipe or equal to the offset of the brackets used.
To avoid obstacles along the gutter installation route, corner elements for internal and external rotation are used. The elements, like the gutter itself, should be fastened taking into account the general slope, going around the edge of the roof along the contour, and not in a straight line between the extreme positions.

After installation, you should check the operation of the drain by supplying water under pressure to the uppermost points of the gutters. It should flow evenly along the entire length of the channel towards the funnel and down the pipes.