You can find anything you want in fishing and hunting stores, and boats are no exception.
But many people want to make a swimming device themselves, because it is interesting and inexpensive.
Do-it-yourself boats have a number of advantages over factory-made options:
- Lightness of design. Such a device made of plywood will be much lighter than wooden or metal structures;
- Stability on water. For such a boat, solid sheets of plywood are used, and its shape is ideal for launching;
- Low cost. You will only need to spend money on pieces of plywood, glue, varnish and boards;
To ensure the safety of the structure, you need to use only high-quality materials. The plywood must be solid and without damage. The price of the first varieties is slightly higher, but reliability is also important.
For people who are skilled in carpentry, the work will not be difficult. It will take a week and a half if you make the boat in free time, then a couple of full days.
But only a professional can do the design with his own hands, because you need to accurately calculate the load capacity, capacity, nose shape and other nuances.
Assembly of the structure
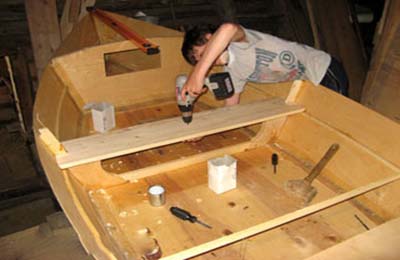
When you have the materials and drawings, you need to start working. The first step will be cutting out the parts from plywood. For this, it is best to use a jigsaw. It is important to cut exactly to size, otherwise the design will not fit together.
Then the frames are glued to the rear side; these parts will be very heavy. If the watercraft requires a motor, then the rear side is strengthened.
The next step will be to attach the transom to the sides and bottom. The sheathing parts must be secured with glue.
After assembling the structure, you need to prepare aerosil and epoxy resin. These substances are mixed 1 to 1. The resulting substance is used to seal seams. Also for this purpose, inside the boat, the seams are sealed with strips of fiberglass.
Important: this type of work uses very toxic substances, so you need to work outside, or in a ventilated area, and using special means protection.
When the glue dries, you need to install the frames. Then you need to install seats, luggage compartments and other elements. After the vessel has dried, it is necessary to proceed to the final stage, which is sanding and sealing with fiberglass and epoxy mortar.
This is followed by the process of painting the structure, this will help further protect the vessel from the influence of water and give it a good appearance.
Painting consists of:
- Degreasing of all parts of the vessel;
- Treatment of wooden elements with impregnation;
- Surface putties. This will mask all defects;
- Primers. To do this, you can use boiled drying oil;
- Application of paints and varnishes. To do this, you can buy any paint, but special waterproof materials for plywood will help increase the service life of the boat;
Prices
Building such a craft with your own hands is an interesting and creative activity for people who like to do things themselves. The main thing is to adhere to the dimensions indicated by the drawings.
It is possible that during this process there will be mistakes that need to be redone. But the result will be an excellent and inexpensive boat. It is best to store this product on dry land. This boat is perfect for use on calm lakes and rivers.
Going out to sea or rafting down mountain rivers is prohibited. You also need to carefully monitor the seams and the integrity of the structure; if there are problem areas, they need to be sealed.
If treated with care and properly stored, such a watercraft will last a long time and will help you have a great time fishing, or just while walking along a pond.
DIY plywood boat. How to make a boat from plywood. DIY boat. How to make a boat with your own hands. How to make a boat from plywood. And then an interesting idea came to me: shouldn’t I make a boat myself? Well, that’s basically something for everyone to decide for themselves. But I liked the idea. And I came across several sites on this topic. It was on one of them that I found an interesting constructor. A certain “WORKLOG” for the production of a small, but quite real boat.
Material - FSF plywood 6mm, 10mm, covered with fiberglass.
The seams are glued with epoxy glue and reinforced with glass tape.
The plywood is impregnated with the antiseptic composition against rotting and fungus "BIOSTOP".
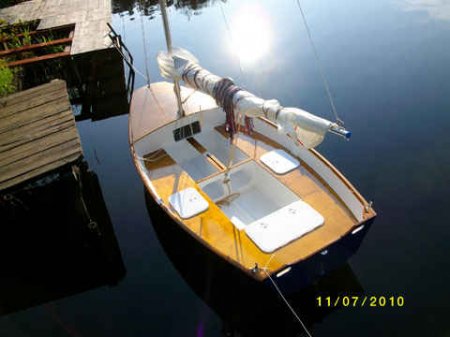
The boat is coated with 2-component epoxy primer and painted blue.
The lower part of the body is painted White color, cans (seats) and deck are varnished, Italian-made hatches (sealed, with rubber seal, mounted on silicone and stainless steel fasteners).
Mast made of AMG6 45mm pipe, sails (mainsail and jib with total area 7.5 m2) made in the sailing workshop UA-SAIL, mast braces from a cable with a diameter of 3 mm, oarlocks, under oarlocks, cleats, etc.
Length 3.37m
Width 1.53m
Side height at midship 0.5m
Freeboard height 0.37m
Hull draft 0.13m
Draft with centerboard 0.8m
Sailing rig 7.5 sq.m.: mainsail 5.5 sq.m., staysail 2 sq.m., possible installation of a spinnaker 5 sq.m.
Load capacity 230kg for use with sails, and 400kg for oars or motorized
Maximum outboard engine power 5 hp.
The estimated weight of the dinghy when fully armed is 85-90 kg.
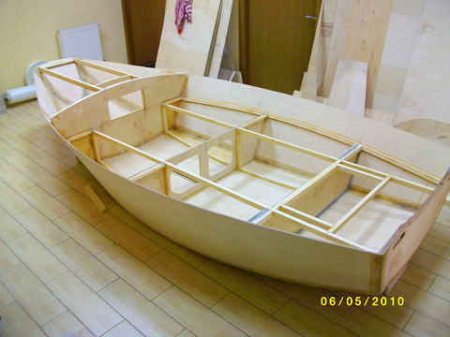
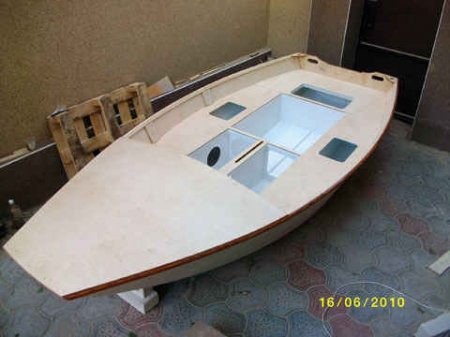
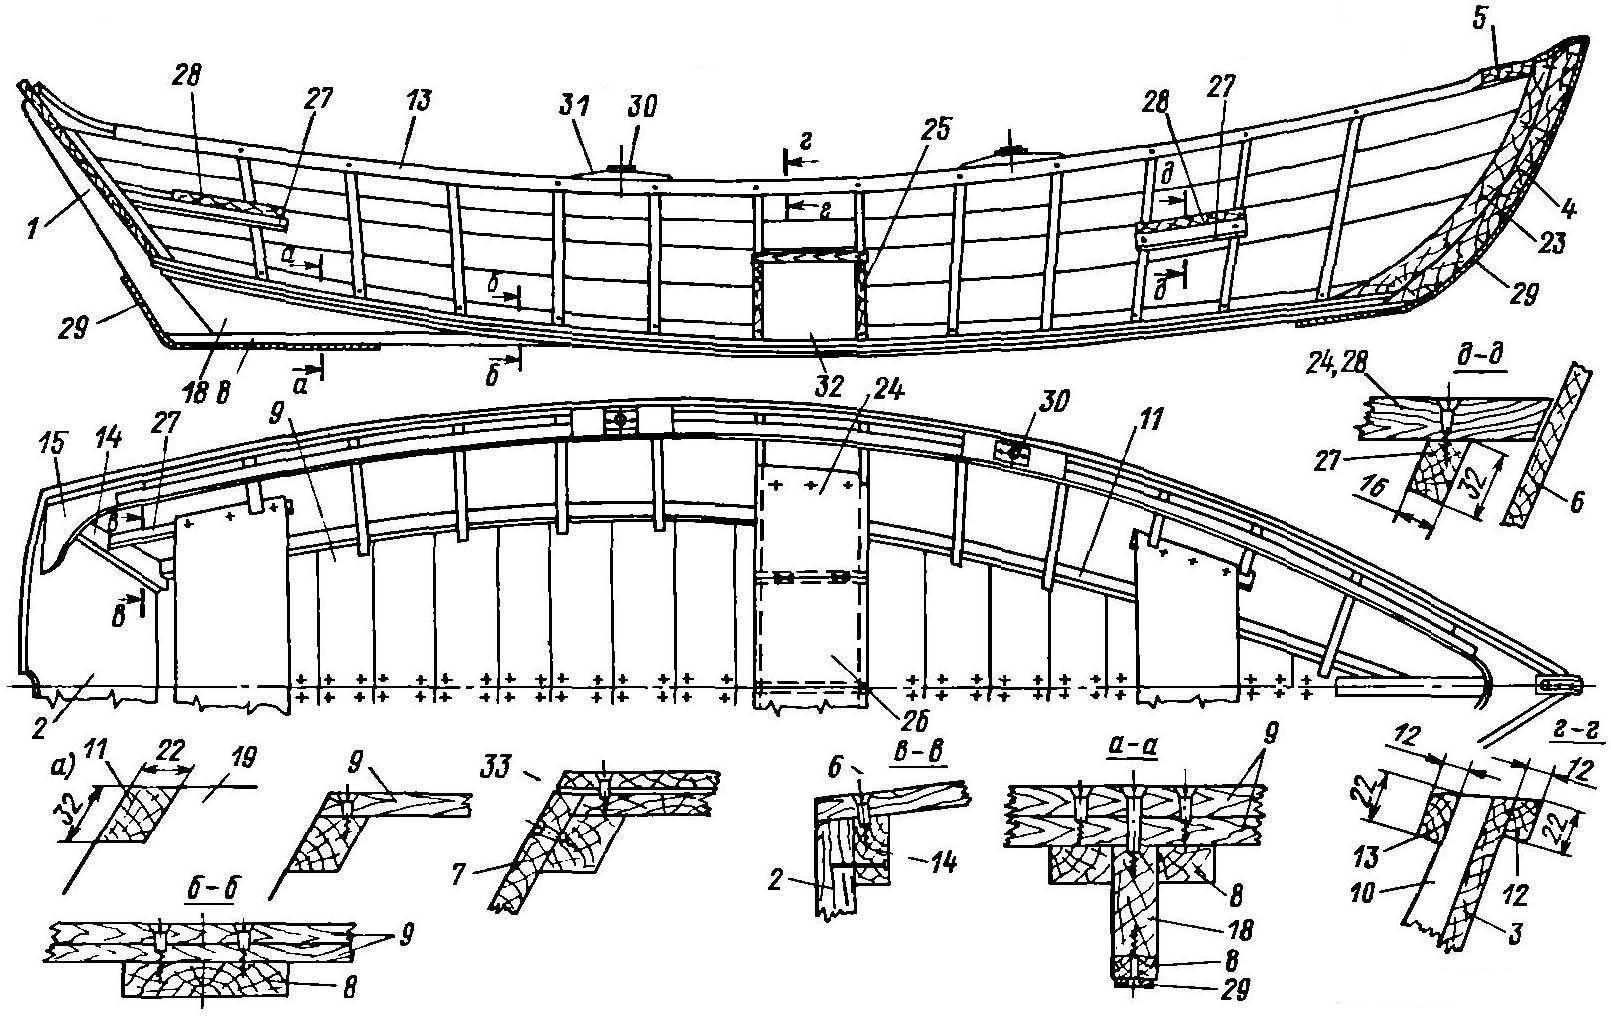
The body blanks were cut from FSF 6mm plywood. Frames and forespigel made of 10 mm FSF plywood. Transom made of 2 layers of 10mm FSF plywood. The bottom blanks were glued together using overlay strips. The outside seam is taped with fiberglass.
The side blanks were glued end-to-end using fiberglass: on the outside in 2 layers, on the inside in one layer.
The case was assembled using copper clips with a diameter of 2 mm. The seams on the outside are taped with 60mm glass tape using CDA-HD epoxy glue.
The bottom along the keel line is glued in three layers: two layers of fiberglass with each overlapped by 2 cm and one layer of glass tape.
Under the glass tape you can see the stainless steel screws with which the transom was additionally secured.

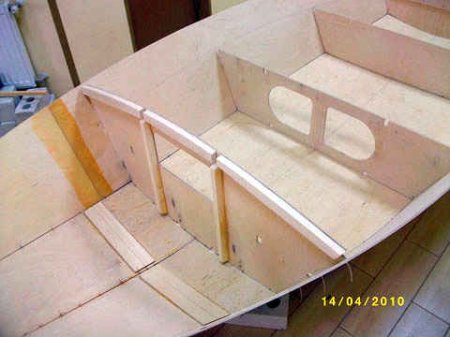
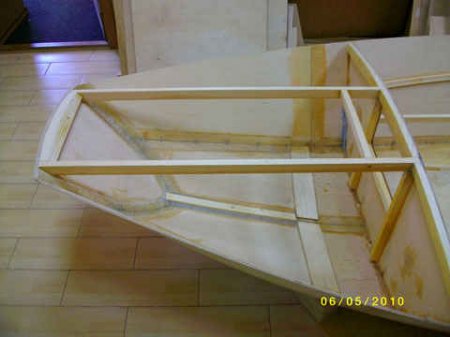
The side stringers were glued on. They were fastened with screws, which were removed after polymerization of the glue, and the holes were filled with putty made of epoxy glue and Aerosil.
From the inside, in the bow, the forespigel and the bottom along the keel are glued with 2 layers of fiberglass and one layer of glass tape.
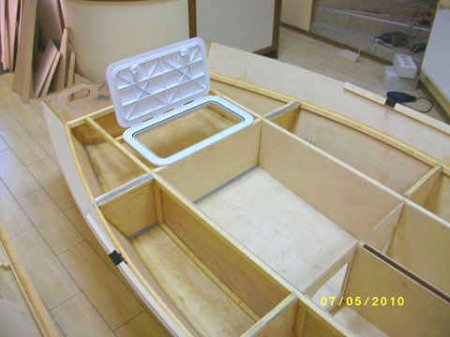
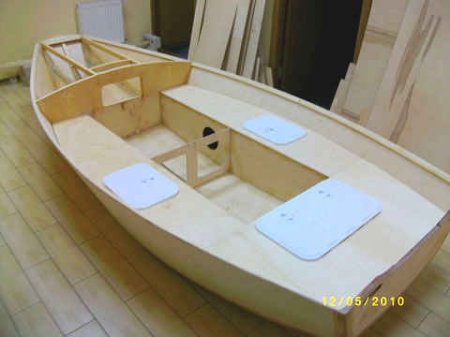
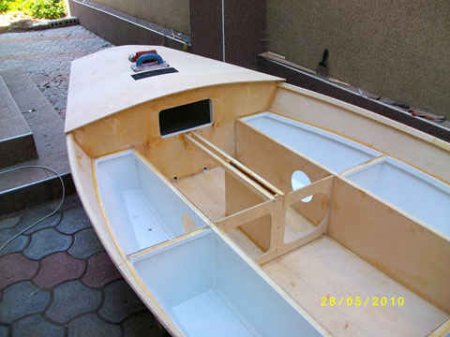
It was decided to sheathe the cans completely to make the dinghy unsinkable when capsized. For this purpose I ordered plastic sealed hatches.
Therefore, I had to glue a stinger on the bottom, and side strips on the frames.
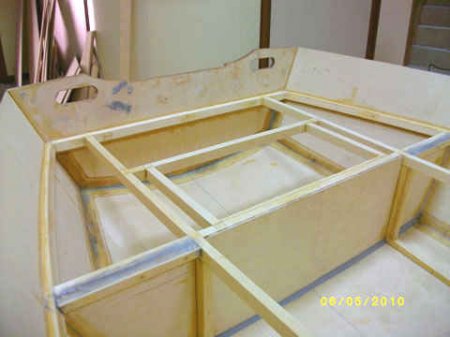


The side cans are coated with epoxy primer.

All compartments that will be closed were painted in two layers.

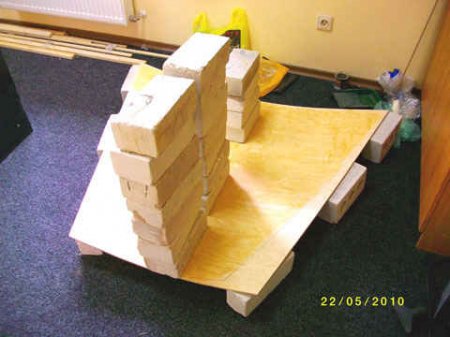
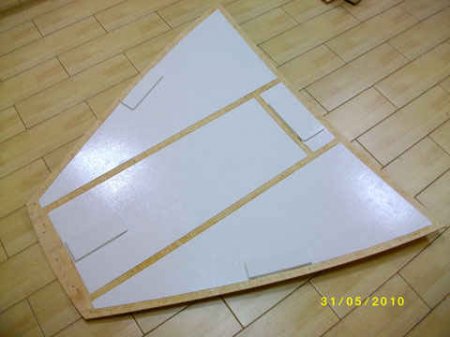
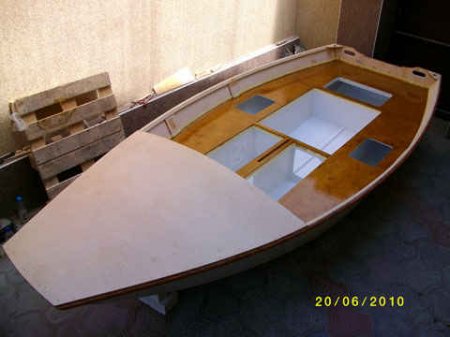
The front deck, pre-cut to excess, was placed on brick linings, moistened with water with a roller, a weight was placed on top and heated with a hairdryer in order to have a curved appearance. This will make it easier to install it on the case.
It was decided to lay the fabric from one side to the other, overlapping the bottom - I didn’t want to spoil the excess fabric. The necessary pieces of fabric were cut off, taking into account the overlap of the subsequent layer on the previous one. Although the fabric contained a direct silane lubricant, I annealed it with an industrial hair dryer for better impregnation. This was not done in vain; you will see the result of pasting with such a fabric, devoid of any lubricant, below.

The epoxy adhesive was applied using a low nap roller. This allows you to apply glue to a large surface quickly and evenly. Never apply too much glue in the hope that it will saturate the fiberglass and the excess will come out. Otherwise, you will get a wavy surface, which will cause a lot of trouble with puttying.
After gluing each strip, the fabric was smoothed with a wide spatula. After finishing the pasting and waiting a couple more hours until the epoxy began to polymerize, a layer of epoxy glue was applied to the pasted surface using a roller. The surface took on a more or less even shape. It took 7 hours to paste the body. With an assistant, things would move faster.

The next day, having removed obvious defects (protruding threads, moss along the edges of the fabric) using the scraping method, I began to putty the body. In general, you can talk a lot about puttying fiberglass, but there is one unshakable rule - puttying fiberglass does not mean removing irregularities, otherwise you will remove the fiberglass or damage its base (was it worth bothering with pasting at all?), but filling the recesses and depressions with putty.
This is where they remember that they put a lot of glue under the fiberglass and initially made the surface wavy like the sea. The more carefully you perform the pasting, the less headache with puttying. Experience comes with practice. and the surface after my pasting requires 2-3 thin layers of putty. The photo shows that the surface with putty made of Aerosil and epoxy resin applied in one layer is quite smooth and even.
For gluing, a modified CDA-HD epoxy resin was used with a long polymerization period and low heat generation during this process, which allows mixing large volumes without the risk of resin boiling.

Since we also have to deal with the production of kits for self-built boats and in order to avoid dust in the room, cleaning the hull after each puttying, it was decided to take the hull out into the yard under a canopy. With the help of comrades and under the strict guidance of your humble servant, the body was brought into the light of day. It was sanded with sandpaper and puttied a second time. I was pleased with the result. Tomorrow I will decide whether it will be necessary to putty a third time, or whether only certain places require puttying.
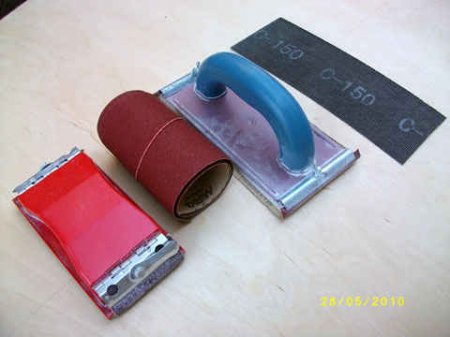
I decided that two layers of putty would be enough. The body was sanded with #60 sandpaper. These tools were used for the job. No grinding machines can replace manual labor in terms of the quality of the final result. I spent two days cleaning the hull to an eggshell state.
The deck was adjusted to size. Pre-bending the plywood made this work easier - for adjustment, I fixed it with only three screws, one at the front and two at the back corners. Excess plywood was removed with a belt sander.
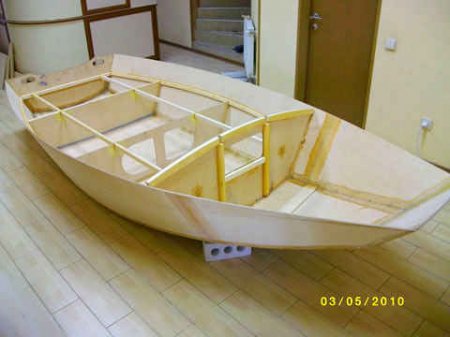
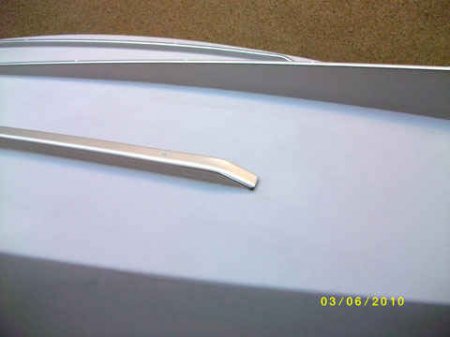
On the bottom, along the keel line, slats were prepared and glued. This will give additional rigidity to the bottom and will provide a place to attach the bottom steps.

Reinforcements made of 10 mm plywood were glued to the lower part of the deck to accommodate the cleats, mast and stays. The areas where the glue will be applied were sealed with masking tape. The deck was impregnated with BIOSTOP antiseptic, after drying it was painted in two layers.
The bottom steps and keel were manufactured and adjusted to size.
Holes were previously made for fixing with screws for gluing. A 20x15mm rail was used for the central redan, and 30x15mm for the side ones. These dimensions are due to the fact that the keel was made of 10mm plywood, glued in half (20mm). In the future, to protect the slats from abrasion, aluminum thresholds 20mm and 30mm wide, which are used for fastening carpets and linoleum, will be screwed onto them. Construction stores have a wide variety of such profiles.
The work area where the epoxy glue will be applied was covered with masking tape. Don’t be too lazy to do this every time you work with glue - this will save you the tedious cleaning of glue residue and save time.

As you can see, the gluing area does not require further processing, and the adhesive seam looks very aesthetically pleasing. Tomorrow the screws will be removed and the holes will be filled with a mixture of epoxy resin and aerosil.

Today, aluminum profiles were purchased at the nearest building materials store to protect the bottom rails from wear. After 2 hours of work, the profile was adjusted to the required size and bent at the edges in the form of runners. I also decided to additionally protect the centerboard well, so I had to glue strips to it, on which protective strips would also be attached.
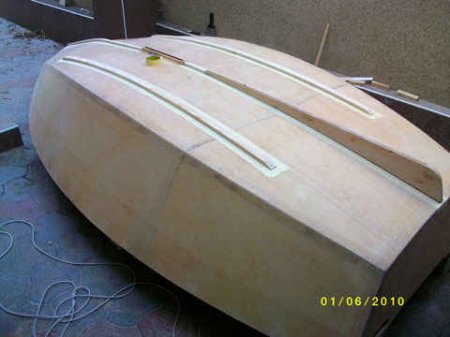
Having completed the priming and sanding of the hull, the hull was re-edged and the deck was glued in place. Fixation was carried out with stainless steel screws. The screw heads were puttied with a mixture of epoxy resin and Aerosil. Since we plan to varnish the deck, we had to limit the places where we putty the screw heads with masking tape.

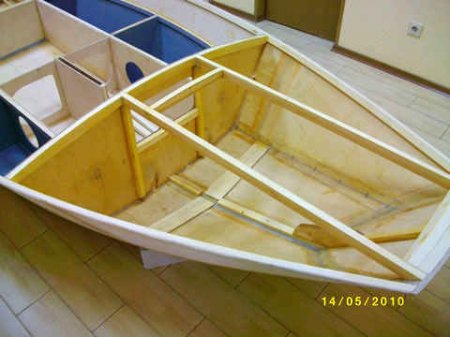
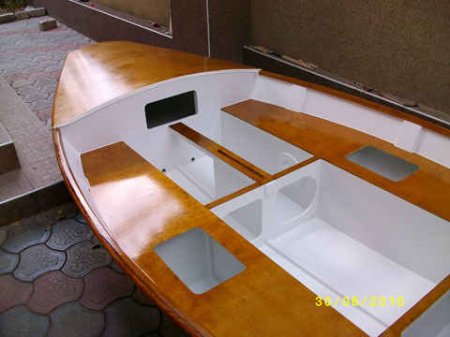
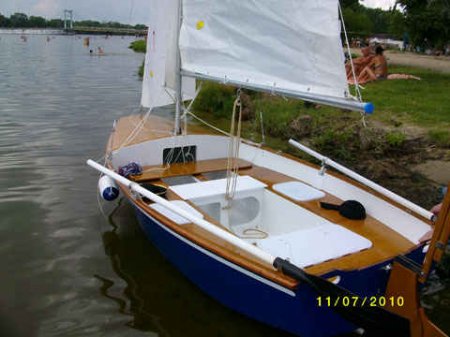
In the 9 days since the last photos, the boat has acquired some new features. As you can see, the fender beam, overlay strips on the centerboard well and the middle frame were glued in, the cockpit was soaked in antiseptic, primed and painted in 3 layers. The cans were sanded with 250-grit sandpaper to apply the stain and varnish. I decided on oak. Samples of this tone look quite decent, but doubts have crept in about what color to paint the body. Initially I planned to paint it white, but after thinking about the fact that the boat should have an elegant and attractive appearance, I am more and more inclined to paint the hull blue and the bottom white. This color scheme will give a contrast between the blue hull of the boat, the white cockpit, the banks and the varnished front deck.

The cans were given two coats of oak-toned stain and three coats of polyurethane varnish.
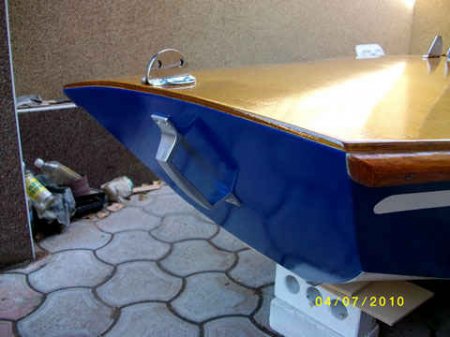
The bottom along the chine line was covered with paper masking tape to create a smooth border between the side and the bottom. The beams were also covered with masking tape. The sides, transom and forespigel were painted blue with three layers of paint.
After the paint had dried, white stripes were applied to the sides. To make them even with the least effort, 30mm wide paper masking tape was used. First of all, I glued the first strip of masking tape from the fender. Then I glued the second strip butt to the first tape, and then glued the third strip of masking tape to the second butt. After this, the second strip was removed, thus obtaining an even side strip for applying white paint. In order for the edges of the white stripe to be rounded, I bought some ORACAL film and printed four 30mm wide strips with rounded ends on it on a printer (done in AUTOCAD). Then I cut out these “masterpieces” of design with scissors and glued them along the edges of the places where it will be applied. white stripe. I applied 2 layers of white paint and after it dried, I removed the masking tape and ORACAL film.
The deck was sanded with #120 and #200 sandpaper and covered with two coats of stain. After the stain had dried, I sanded it again with sandpaper No. 200 and coated it with three layers of polyurethane one-component yacht varnish. After the first two layers had dried, before applying the third, I sanded it with sandpaper No. 300, wiped the surface from dust with a damp rag and degreased it with white spirit.
The seats were covered with paper, and masking tape was glued along the contact line to the side to create an even transition line between the paint on the sides and the varnish on the seats. I caught my eye in a hardware store acrylic paint on a water-soluble base from DUFA. That is, while the liquid is diluted and washed off with water, but after drying (30 minutes) the water reaches only one place. The surface after drying is hard but elastic. In the evening I read on the Internet that these are now used for painting cars. After that, I regretted that I had not come across this product earlier, and would have covered the bottom with this paint.


All parts were secured with stainless steel screws. The hatches were sealed with silicone for sealing. To discourage the desire and temptation to dismantle any of the installed parts, the screw heads were filled with epoxy resin.


I installed the stay puttens (for attaching the bow guy on which the jib is attached) and mast steps (the base of the mast attachment).

A handle was installed on the forespigel to pull the boat ashore. Fixed with stainless steel screws and epoxy. I couldn’t find a suitable one anywhere, so I bought an aluminum one at the store. door handle and painted it with chrome paint. Then, if I find somewhere, I’ll cover it with chrome using an electrochemical method.
![]()
An oarlock with an oarlock inserted into it.
At the end of the side, the sub-key is secured with four stainless steel screws. The slots of the screw heads are sealed with epoxy glue so that they cannot be removed.
![]()
At the bottom of the front frame two drain plugs with rubber seal. Mounted on silicone and stainless steel screws.

Front side can with the sealed inspection hatch cover removed with a bayonet lock (rotating the lid 60 degrees in one direction or another allows you to install or remove it) The front cans are completely sealed and have a volume of 35 liters each.
In general, the hull has seven separate compartments (bow, two front side, two rear side, aft, and the cockpit itself), which gives greater survivability to the hull in emergency situations. The total volume of hermetically sealed compartments is about 180 liters or 180 kg of positive buoyancy when the boat hull is completely flooded with water.

A tiller was installed on the steering wheel. Consists of two parts connected by a hinge. All pieces of iron are made of stainless steel.

Once upon a time, the shores of lakes and ponds were completely strewn with wooden boats of various sizes and designs. Of course, there were rubber ones, but there were few of them and they served patched and patched for many years. It was even rarer to find duralumin products produced in small batches at that time.
Punts of our rivers
Those times have sunk into oblivion, and with them the good old traditions of building simple boats by hunters and fishermen themselves. Now inflatable boats have firmly taken their place. They turned out to be more mobile, lighter and more convenient.
True, in some places far from large populated areas, you can still see ones made by yourself. So I've been using it for many years.
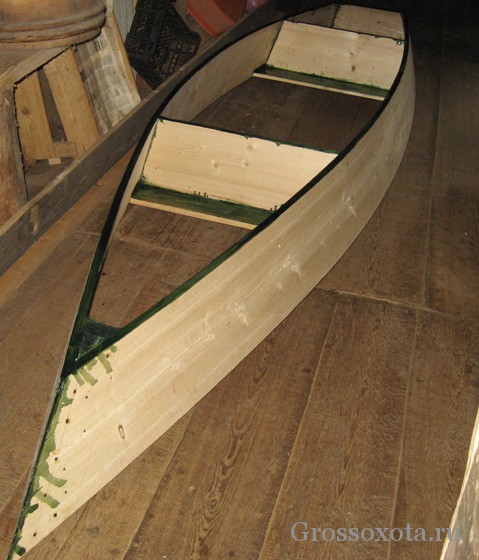
The boat, equipped with one loose oar, with a sharp wedge-shaped bow, strong wooden sides, is excellent for moving both along narrow rivers and through dense thickets of reeds, which allows it to be successfully used for fishing and hunting.
Such boats were generally built according to a single principle, but in different regions they had a number of features. For example, some had a wooden bottom, others rubber, and still others tin.
If for some reason you need just one, then you can make it yourself at home. There is nothing complicated in making it, although the first time it may not turn out exactly what you would like.
Preparation of material
So, let's begin. Before construction begins, you need to take care of its most important parts - the sides. For this purpose, long, wide, not thick, preferably without knots, pine or spruce boards are selected. They must lie for at least one year in a dry place, on a flat surface with slight pressure on top to avoid their bending.
We inspect the prepared boards again for defects - cracks, falling knots, etc. Then we measure the required length (here, as well as further, specific dimensions of the parts of the boat will not be given, since all this is at your discretion) with a small margin and file each of them at an angle of 45 degrees - this will be the bow part.
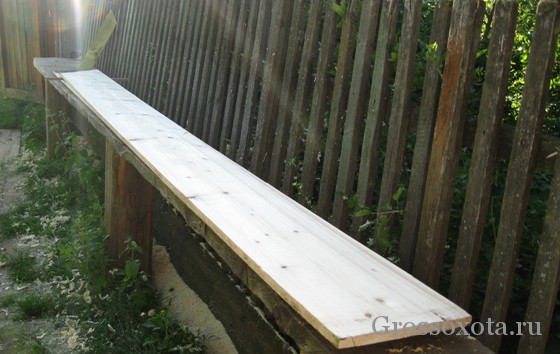
Next, they need to be planed, and chamfered from the sawn ends so that the boards pressed against each other in the bow do not have a gap.
We impregnate these areas, and subsequently all others that will not be available for painting after assembling the structure, with a protective layer of antiseptic.
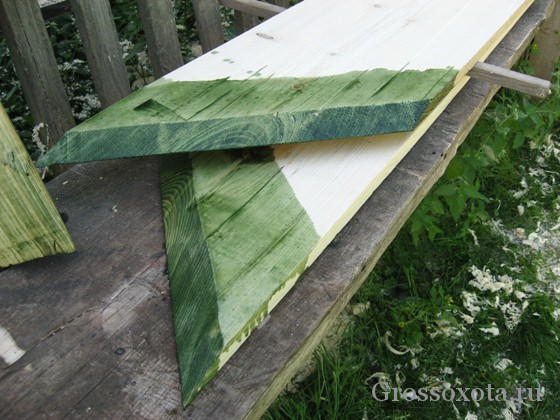
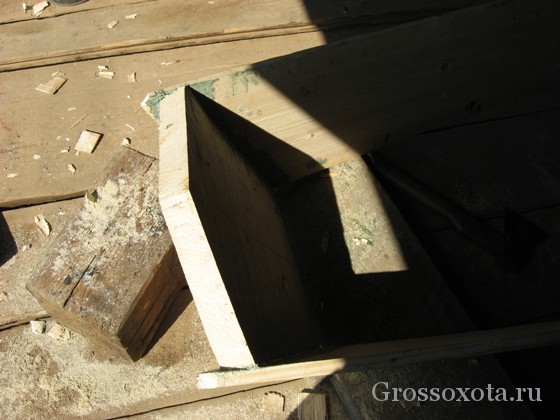
After this, we proceed to making the base of the nose - a triangular block. Its length should exceed approximately 1.5 times the width of the sides of the boat. The timber is also planed and covered with a protective layer.
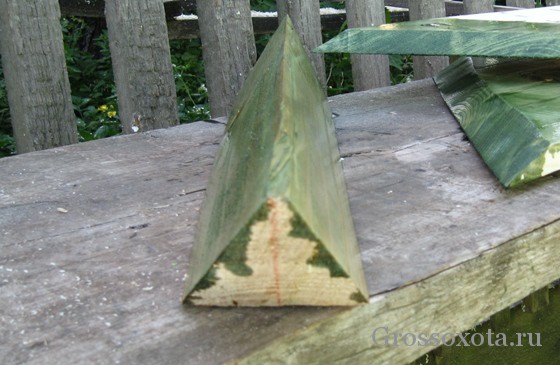
Don't forget to leave a margin at the top and bottom, then after assembly, all excess will be cut off.
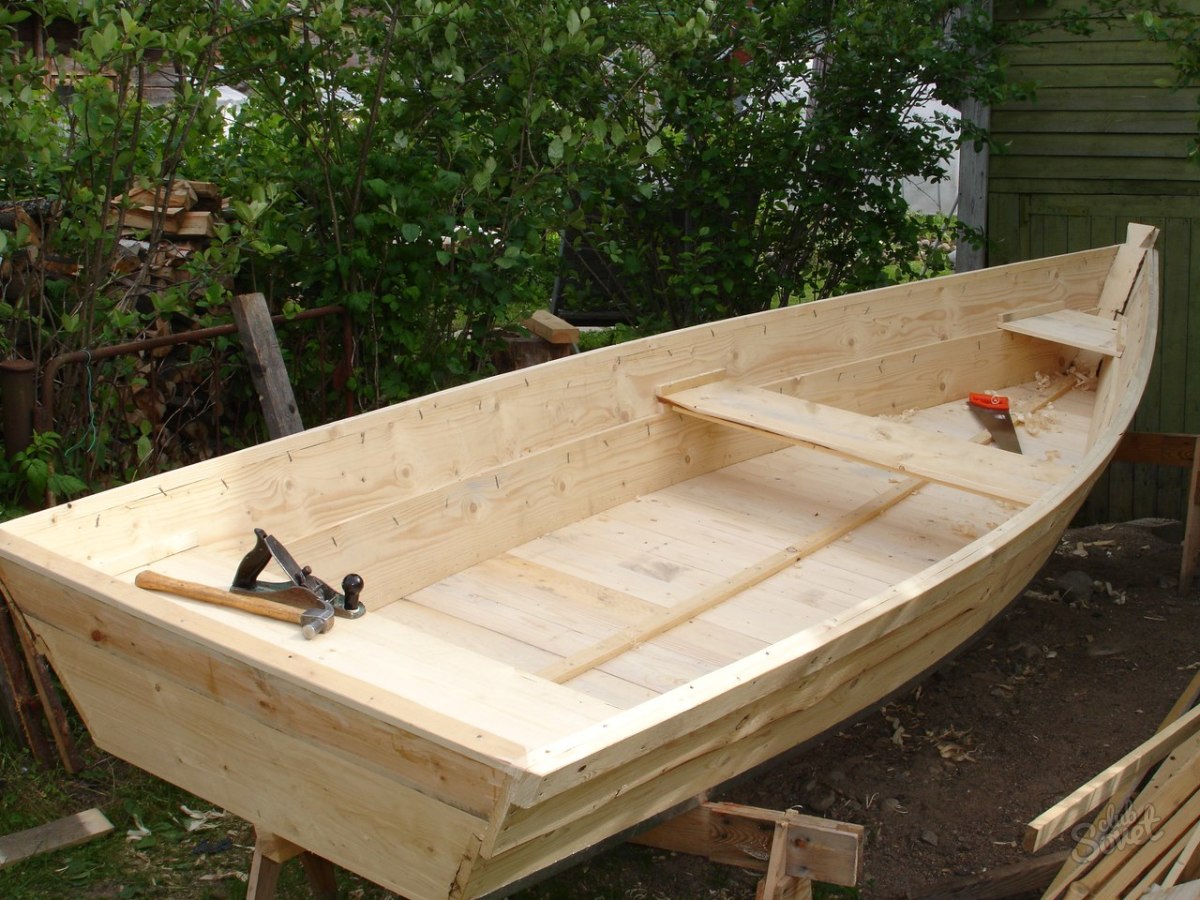
Initial assembly stage
Having prepared these elements, we proceed directly to assembly. We start from the bow, firmly connect both sides and the triangular block with screws or nails.
We cut off the protruding parts at the top and bottom flush with the sides.
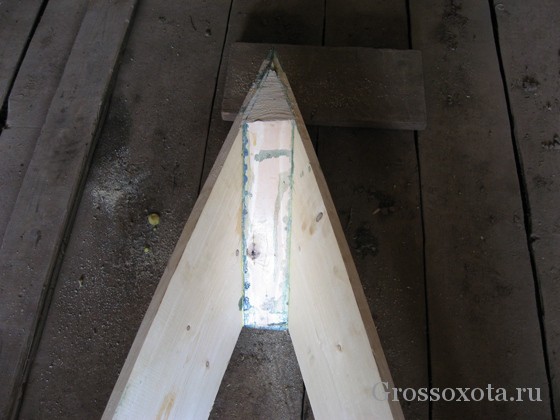
It must be exactly the same height as shown in the photo, otherwise the boards may burst during bending. The spacer angle should also not be made too large.
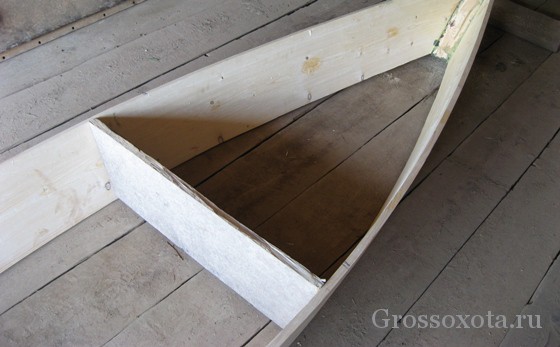
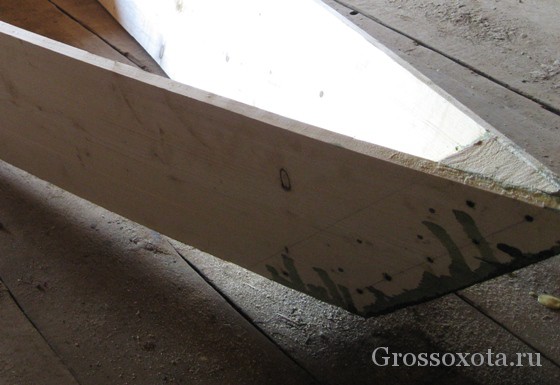
Having installed the spacer, we begin to bend the sides; here you will need a couple of assistants or a rope. Having bent to the required distance, we apply the “back” and determine where and how much to chamfer so that the sides adhere to it without gaps.
So, removing it little by little, we adjust it until we achieve the desired result.
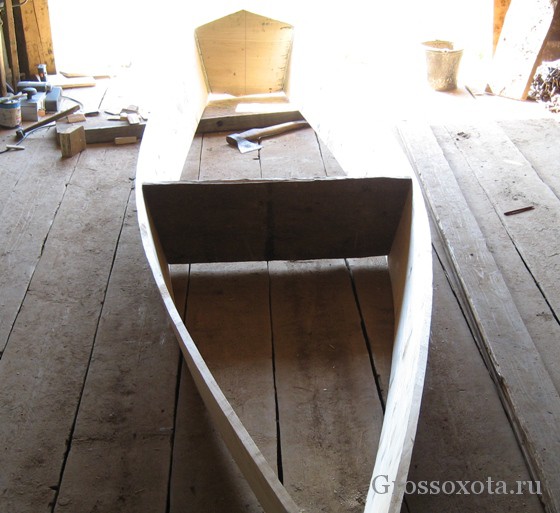
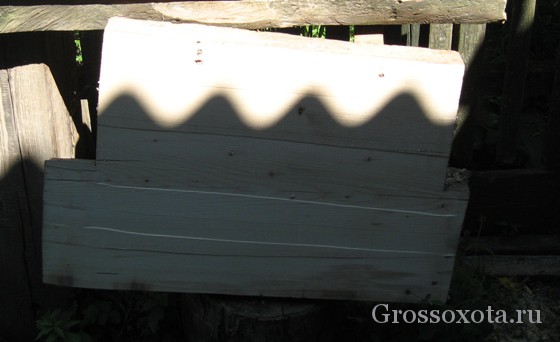
Having achieved it, we nail down the sides and cut off the protruding parts from below, and from above as you wish. I made it in the shape of a triangle.
Then we proceed to install the permanent braces and seats. Their number and location is at your discretion. When fixing them (and in general, in other places), be sure to first make a hole with a small drill in order to avoid the appearance of cracks.
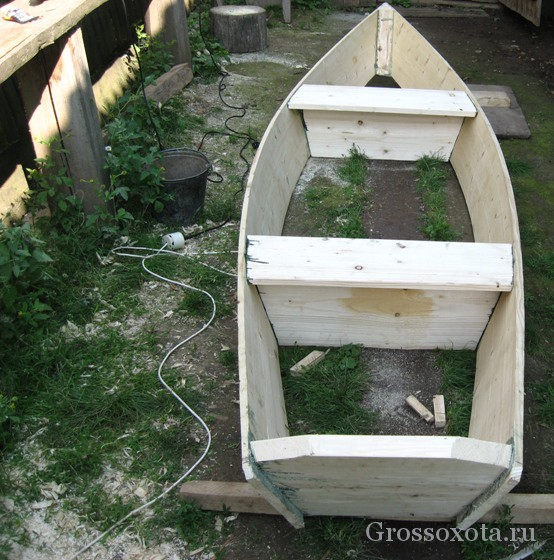
We complete the very important initial stage by chamfering the bottom of the sides, spacers and applying a protective coating to them.
See the next part for the continuation of construction.
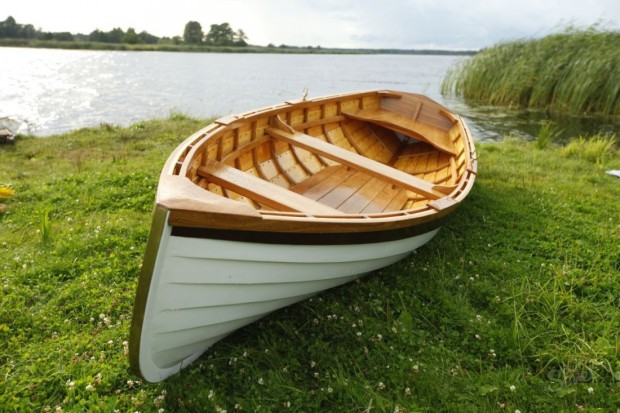
A wooden boat is an indispensable thing for lovers of hunting, fishing, and also for tourists. After all, overcoming small water obstacles (ponds, rivers, lakes) can often become an insoluble problem. But buying a wooden boat is not always possible, since the pleasure is by no means cheap. Therefore, as a way out, there is the opportunity to build a boat with your own hands.
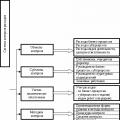
What types of ships are there?
A boat is a small vessel that has no deck, no deckhouse, no superstructure. In fact, it is just a hull, which includes a frame and plating, the presence of which ensures the waterproofness of the vessel. The front part of such a schooner is called the bow, the rear is called the stern, and the sides are called sides. The bow and stern (or just the bow, as, for example, on a punt) are pointed.
Depending on what material they are made of, they are divided into the following groups:
- From fabric.
- Boats made of wood.
- Made from plywood.
- Made of plastic.
- Of steel.
Vessels made of fabric (inflatable) are not reliable. They do not tolerate sudden temperature changes and are easily damaged. Because of this, their operation can be life-threatening. Other types of such vessels are much more reliable.
Plastic schooners boast relatively light weight, so transporting them is not difficult. With proper care, they will serve their owner for many years.
But the most reliable are, of course, metal vessels, however, due to too much weight, moving them to a body of water is not always easy.
Wooden boats are lighter and more durable, and if necessary, they can be made independently. However, to extend their life for many years, they require careful care (application of moisture-repellent compounds).
Compared to wooden ones, plywood schooners are much more durable and moisture resistant. But building a boat with your own hands using plywood as the main material can be difficult.
DIY wooden boat
The first thing you will need to build such a vessel is a drawing. If you have sufficient knowledge and skills in this area, you can draw it yourself. For a beginner, it’s easier to take a ready-made option, which is easy to find on the Internet by searching for “wooden boat diagram.”
So, the drawing of the future vessel is ready. All that remains is to stock up on materials and tools and proceed directly to assembly. What kind of wood are boats made from? Pine or spruce boards are best suited for this. Don't forget to make sure there are no knots or cracks on them!
Assembling the hull should begin from the bow. To do this, you will need to connect two sides, the edges of which are filed at an angle of 45°, and a triangular base block using nails or self-tapping screws.
After that, we move on to installing the struts and seats. The number of seats may vary, but everyone decides for themselves.
Now you can move on to making the bottom. Place the hull of your wooden boat on a sheet of tin and trace the outline so that the part can be cut out. When the bottom blank is in your hands, start attaching it to the sides. Don't forget to apply a layer of sealant to the bottom edge of the sides for more reliable protection against leaks. Then start attaching the bottom with nails or self-tapping screws, gradually moving from the center to the edges. Excess tin should be carefully cut off and the edges bent by tapping with a hammer.
To make it comfortable to walk on the tin bottom, make a wooden flooring, although this is not necessary.
An important part of the boat is the keel. It is he who is responsible for the stability of the vessel and safety when turning. The keel is installed along the center line of the bottom of our schooner.
Don't forget to cover the finished vessel with two layers of antiseptic and paint it.
That's all, your DIY boat made of wood and tin is ready!
How to assemble a wooden punt boat with your own hands?
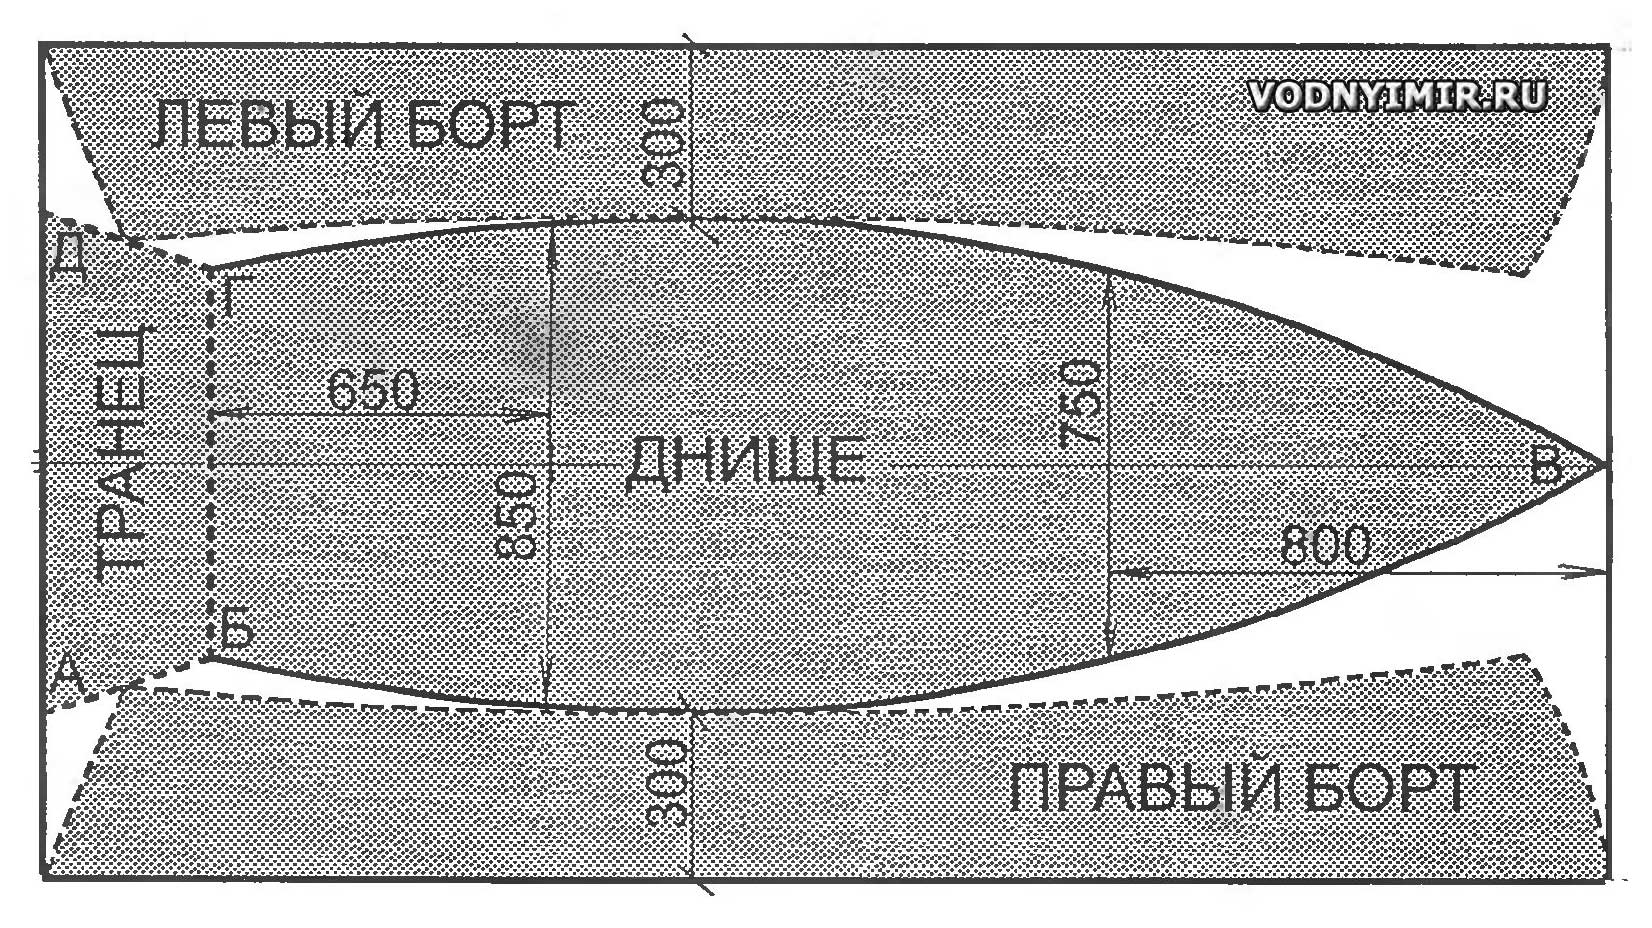
A punt is a vessel that is perhaps the easiest to manufacture. It is an amateur boat, and due to its characteristically flat bottom it is very convenient for swimming in shallow water.
When choosing a drawing of a punt boat made of wood, decide on its dimensions. Typically, a punt has a length from 1.8 to 3.8 m, a width of 1 – 1.5 m, and a side height of 0.5 m.
It is best to use plywood as a material. And in accordance with the diagram, we cut out the necessary parts from it using an electric saw or jigsaw.
There are two options for assembling a wooden punt boat: with vertical sides or slightly narrowed ones, as required by the classic design. Choose what you like best. Having decided, you can safely begin building the building. All parts are fixed using metal wire.
When the body is ready, you need to attach the bottom to it using clamps or metal wire. For reliable sealing, the bottom should be filled with resin.
All seams are glued with fiberglass coated with epoxy resin.
In fact, making a punt is not much different from building a wooden boat. The only difference is in the structure of the bottom. After all, it’s not for nothing that the punt has such a name. The keel is not an indispensable attribute of this vessel. Therefore, a punt is an ideal option if you need to cross shallow bodies of water.
***
Thus, it is quite possible to make a wooden boat with your own hands. This will save you money and can also be a lot of fun. There is nothing complicated here, if you understand it thoroughly. And the construction of a wooden boat itself does not require any fantastic knowledge and skills.
A well-made schooner will greatly diversify your leisure time, make hunting, fishing or hiking unforgettable, and will help you get to places you never dreamed of going to.
A wooden boat is not a cheap pleasure. But if you are willing to work hard, you can create your own river transport with your own hands, saving a decent amount.
Prepare a diagram or drawing indicating dimensions. Perhaps, in your browser’s search engine for the query “wooden boat diagram”, among the proposed options you will find a suitable one, otherwise you will have to either combine the found options, or calculate it yourself, or seek help from a specialist. Based on the drawing, clearly determine the amount of materials needed. For the sides, choose high-quality pine or spruce boards - wide and long, without knots or cracks. Before building a boat, these boards must lie for a year on a flat, dry surface under pressure. Immediately before work, carefully inspect each board for defects. Start creating the bow of the boat:- Measure the required length of the board, saw off the edge on the nose side at an angle of 45°, and plan it. Bevel the sawn edges so that when you press, there is no gap between these boards. Coat these ends with a protective antiseptic.
- Make the base of the “bow” of the boat - a triangular block (its length is one and a half times the height of the boat). The block must be planed and treated with an antiseptic.
- Assemble the “bow” of the boat: lubricate the two sides and the base block with wood glue, firmly fasten them with nails or self-tapping screws.
- File off any excess excess at the top and bottom.

- Install the spacer in the right place, helpers slowly bend the side boards using a rope, and you apply the edges of the boards to the back board blank and make marks on them where and how long to chamfer so that all parts are connected without gaps, then remove the chamfer and try it on again. Adjust it several times to eliminate any gaps.
- Treat the joints with an antiseptic, fasten the sides with wood glue, as well as nails or screws.
- Saw off the excess at the bottom of the rear side, shape its top (arc, triangle, trapezoid, straight).
- Install permanent braces and seats. Before fastening them, you need to make holes in the sides with a small drill, this will prevent cracks from appearing.

- For the bottom you will need a galvanized sheet. Place the boat bottom down on it, circle with a marker with a margin of 1.5 cm and cut out with metal scissors.
- Turn the boat upside down, chamfer the sides and spacers on the side adjacent to the bottom. Treat the edges with an antiseptic. Wait for the impregnation and wood glue to dry.
- Apply silicone sealant continuously to the underside of the sides, lay special threads or tow on it in two rows, this will protect against leakage.
- Lay and level the cut metal blank of the bottom and attach it with galvanized self-tapping screws with a press washer or nails (1.8x32), moving from the middle of the boat to the edges.
- In places where the metal protrudes more than 5 mm, trim off the excess. Tap along the entire perimeter with a hammer, bending the sheet onto the side. Also protect the bow with tin. homemade boat, having previously treated it with sealant and laid the thread.

This is not the only option for creating a wooden boat with your own hands, however, the entire operating principle and features of creating a floating craft are revealed here.