The more intensively technology develops, the more you want to be closer to nature and use only environmentally friendly, natural materials. Reed insulation is an affordable and reliable method that has been used for hundreds of years. This lightweight and inexpensive material, it is used to insulate walls, as well as attic floors and attics.
Thanks to its tubular structure, reeds provide thermal insulation as insulation in buildings at the proper level. An insulating layer 15-20 cm thick retains heat as effectively as laying a wall with one and a half bricks. In addition, reeds are characterized by good sound insulation - The noise from the street will be practically inaudible.
 If you make insulation from reeds, it will not only retain heat, but will also allow air to pass through, allowing the room to “breathe”. He not susceptible to destruction by fungi and microorganisms. Also in such insulation rodents don't breed, as they die upon contact with it. Due to the low weight of the material, when insulated with reed reeds, the load on the foundation is minimal, which allows it to be widely used for construction purposes.
Advantages of reed insulation:
- environmentally friendly material;
- high thermal insulation rates;
- dries quickly after getting wet;
- natural inexpensive material;
- does not get lost or cake due to the special structure of the stem;
- easy to install;
- provides good sound insulation.
What reed-based materials are there and what are their characteristics?
The reeds must be properly prepared. Only stems of young plants are used. During frosts, the leaves separate on their own; it is optimal to harvest the material at a temperature of -7°C. Production harvesting of reeds for insulation takes place in winter. After mowing, reeds are used for the production of building materials:
- slabs (mats);
- mats (mats)
- sheaves of reeds.
Reed slabs are used for insulating walls and ceilings, laying roofs, and building decorative fences. They are made no artificial additives. In production, the reed is pressed on special installations, stitched and trimmed. Depending on the location of the stems, the shields are produced transverse and longitudinal. The length of factory plates is 2.4-2.8 m, width 0.55-1.5 m, thickness - from 30 to 100 mm, density - 175-250 kg/m³, depending on the degree of pressing. The service life of reed slabs is about 50 years.

Matting - used as roofing, for finishing ceilings, walls, and as a decorative material. Using a matting hide surface irregularities and defects. This is a product that is made using special weaving. The reeds are tied together in one row. Due to the close fit of the stems, the canvas is not translucent. The thickness of the mat is 0.7 cm, it is stitched across the slab with galvanized wire 2 mm thick.

Sheaves are used as roofing material and for decoration. For sheaves, reeds with a height of 1.6-2 m and a diameter of up to 7 mm are taken. The circumference of the sheaf is 60 cm. They are fixed with polypropylene twine and packed into bales. A roof made of this material is resistant to temperature changes, moisture, hail and rain. It will last about 50 years.

Disadvantages of kamyshite

Despite the many advantages of reeds, it also has a disadvantage - it is highly flammable material. Thanks to special means this problem can be easily dealt with. Inexpensive and effective method- treatment of the reed stem with solutions such as “Bishofite”, “Fire Retardant”.
Making reed slabs for insulation with your own hands
Mats are made not only in production. Reed slabs for insulation are also made at home. Work begins after the onset of frost. The reed is cut with a sickle, after which the panicle and remaining leaves are removed. The stems are collected into sheaves with a diameter of 40-45 cm. It is easier and more convenient to make large slabs with your own hands.
Before starting work, a frame is made from wooden planks. Pegs are driven inside the frame at a distance of 5-12 cm. The reed stems are fastened in the frame opening. The sheaves are connected gradually, securing them with rope or galvanized binding wire. The bundles used must be of the same volume.

Insulating walls with reeds is not difficult. The easiest way is to attach the slabs with nails to cross-bars pre-installed on the wall. There is another method: a frame is built from a thin wooden beam, reed slabs are placed in the openings and securely fixed and clamped.
Insulating the attic floor with reeds

Increasingly, reeds are being used in houses to insulate attic coverings. To do this, take reed slabs, which are simply laid apart on top of the floors.

It is better to make two layers so that the second overlaps the joints formed by the first.
To improve the thermal insulation effect, a vapor barrier film is placed under the slabs.
Using reeds for thermal insulation of buildings, you can save up to 50% of heating costs in winter. And in summer, this natural material will help keep the house pleasantly cool.
Large heat losses in the room and cold air blowing from the ceiling are a consequence of incorrect or poor-quality thermal insulation. Heat loss through the ceiling can reach 20%, since the heated air rises, and if there is no obstacle on its way that can keep it indoors, it will be “blown out”, just like your budget. Ceiling insulation measures must be carried out during the construction of the house. But if for some reason this did not happen, or the old thermal insulation has become unusable, you will have to do everything again. What are the ways to insulate a ceiling, how best to implement them in this or that case, what materials to use - these are the main questions that arise for owners. At the same time, it is important to do everything correctly so that the insulation does not become damp, condensation does not accumulate on the surface, and mold or mildew does not appear. And for this it is necessary to understand the very essence of the work performed and the processes occurring in the insulation.
Why and how to insulate the ceiling
What is meant by ceiling insulation? If it blows from above, from the side of the ceiling, we say “we need to insulate the ceiling,” but what actions are meant by this? In fact, there are several technologies, and which one is suitable in each specific case depends on the starting conditions.
In a private house, the ceiling insulation is always done from the upper room: be it the attic, the next floor or the attic. Laying thermal insulation material on top of the ceiling or in the voids of the ceiling ensures heat retention inside the room. At the same time, the height of the insulated room does not decrease, additional finishing of the ceiling is not required, and there is no need to install thermal insulation directly above the head, because it is not so easy to fix, and particles will penetrate into the living room. But the most important thing is that the processes occurring in the ceiling and thermal insulation material ensure warmth and dryness of the room and materials, condensation does not form and the insulation does not get wet.
What is the principle of attic insulation? It's no secret that the best insulation is air. All modern thermal insulation materials are essentially air enclosed in one way or another in a form. But how can you use air for insulation without paying for it? Our ancestors acted very wisely when they built houses with a gable roof and an extremely cold attic, which had two windows in the gables. Our climate allows us to play this situation to our advantage. The gable roof retains snow well, which also serves as insulation. A roof covered with snow retains heat so well that even if it is -25 °C outside, the temperature inside the attic is about 0 °C. The air trapped in the attic is an ideal insulator, the characteristics of which can be changed depending on the time of year or weather by opening and closing gable windows and ventilating the room. The floor of the attic was always insulated with bulk natural materials; together with air, this made it possible to maintain the temperature inside the heated room at +20 - +25 °C. Another advantage of insulating the floor in the attic is that the material does not become damp and can be dried by ventilating the room.
Extremely important! In order for the attic to serve as a heat insulator, the roof slope cannot be insulated from the inside. This will cause the snow on the roof to melt and icicles to form on the eaves. In addition, the structure of a non-insulated roof is always open for inspection and repair.
Important! An attic that is insulated on all sides and has heating is no longer an attic. This is an attic, more suitable for the climate of warm countries Western Europe. The design and operation of the attic has its own rules.
In the apartment multi-storey building everything is a little different. It is not possible to insulate the ceiling or floor of the upper floor. And the problem of a drafty ceiling most often occurs among residents of the top floor. What to do? The only option is to insulate the ceiling from the inside of the room, although this is not recommended, there is no other choice.
When insulating the ceiling, it is important to remember this rule: each subsequent layer in the direction from the room must have greater vapor permeability.
Below we will look separately at ways to insulate an attic from the outside and inside.
Insulation of the ceiling from the outside (from the upper room)
Insulating the ceiling from the upper room involves laying heat-insulating material on top of the ceiling or in its voids, if any. As mentioned above, this is done in private houses and cottages. The type of insulation material and the technology for laying it depend on whether the floor is wooden or concrete. For flooring on beams, which is a wooden floor on joists, lightweight backfill materials or roll-type materials are suitable. But for insulating a concrete slab, dense mats or slabs, as well as heavy backfill materials, are used.

One of the most ancient and time-tested methods of ceiling insulation is insulating the attic with sawdust. In some regions, you can buy sawdust for next to nothing or even get it for free if there is a woodworking plant nearby. Quite often, the company itself does not know where to put the sawdust, so stop by and take it at least every year. It is better to pour sawdust on top of wooden floors.
The only drawback of this method is that the sawdust burns. Therefore, several in various ways insulation with sawdust.
Method 1. All the cracks in wooden floor coat the attic with clay, a little liquid. Sprinkle sand on top. If the clay suddenly cracks somewhere, sand will immediately be poured into the crack, and the integrity will be preserved. To protect sawdust from mice, add a layer of slaked lime mixed with carbide. Next comes the main layer - sawdust. For different regions, the thickness of this layer may be different, but the minimum is 150 - 200 mm, 250 - 300 mm is considered optimal. Since sawdust is a flammable material, a thin layer of waste slag is sprinkled on top of it, especially around hot communications - a chimney, for example. Nothing is laid on top. You can only lay out the boards for ease of walking in the attic.
Method 2. The floor surface must be protected from moisture. This can be done in two ways: the first is to lay a waterproofing film on the wooden floor that can allow steam to pass through from the side of the room, the second is to coat the entire floor with clay in the same way as in the first method. Then you need to mix sawdust with cement. To do this, take 10 parts of sawdust, approximately 1 - 2 parts of cement and 1.5 parts of water. First, sawdust is mixed with cement, then water is added. The sawdust must be slightly wet for the cement to adhere to it. The resulting mixture can be poured from above onto the attic floor or poured between the floor beams onto the subfloor. A layer of 200 mm will be enough. It is necessary to start doing all this work in the spring, so that the sawdust and cement have time to dry well over the summer (they take a long time to dry).
Important! It’s easy to check whether the sawdust has dried or not: just walk on it. Dried sawdust will not sag, but will slightly crunch.

Method 3. Similar to the second method. Only instead of cement, clay is used.
Method 4. Similar to the first method. There is no need to sprinkle slag on top. The sawdust can be spread on top with clay, only not very liquid, so that it does not spill deep inside.
Considering that expanded clay is a rather heavy material, it is not recommended to insulate wooden floors with it. There is too much risk that the wooden deck will fail. Ceilings with concrete floors are insulated with expanded clay.
First of all, the surface of the concrete floor must be covered with a vapor barrier film. It should be laid with an overlap, and the joints should be taped. An overlap is made on the walls, approximately 40 - 50 cm. Wooden rafters and the chimney also need to be covered with a vapor barrier film.

Next, crumpled clay is placed on the film. And already on top - expanded clay. For better thermal insulation, use a mixture of large and small fractions of expanded clay. Then the fine grain will fill the voids, and the backfill will be more uniform. For cold climates, the expanded clay layer should be 50 cm. The 15 - 20 cm recommended in some sources will not save the situation. It is precisely because expanded clay needs to be covered in such a large layer for high-quality thermal insulation that it is rarely used.
A light cement-sand screed with a layer of 50 mm is placed on top of the expanded clay. The solution should be thick enough so as not to spill deep into the backfill. This way, the attic will have a fairly strong floor, and it can be used for storing something or as a boiler room. A big plus is also the complete fire safety and environmental friendliness of this method.
Clay is an ancient building material whose applications are varied and multifaceted. Clay itself is not used in insulation, since for effective thermal insulation its layer must be simply colossal - 50 - 80 cm. A wooden ceiling cannot withstand such a weight, and such a thickness of backfill is simply impractical; it is better to choose a modern material.
Therefore, to insulate the ceiling, clay is used in a mixture with sawdust.

First, the floor is covered with a vapor barrier film that does not allow water to pass through. Next, you can prepare a clay-sawdust solution. Water is poured into a large barrel, to which 4 - 5 buckets of clay are added. The clay is then mixed in water until the water turns a dirty color and the clay almost dissolves. Next, part of the resulting mixture is poured into a concrete mixer and covered with sawdust. As mixing progresses, more water is added. As a result, the solution should be neither liquid nor thick.

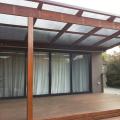
An excellent option for insulating the ceiling in the attic wooden house- mats made of reeds. Modern reed mats, tied with twine or wire, are simply laid staggered on top of the floors. It is better if there are 2 layers, the second of them will overlap the joints of the mats of the first layer, removing “cold bridges”. The disadvantage of this method is the fire hazard.

For those who want to insulate the ceiling with natural materials, seaweed is suitable. In coastal regions, this material can be bought for pennies, and if you really want, you can order delivery to another region. The advantage of ladders from seaweed the fact that mice do not breed in them, they are hypoallergenic and even medicinal, as they are saturated with iodine and sea salt, the vapors of which are beneficial and also do not support combustion and do not smoke. Insects and microorganisms do not grow in algae.
Seaweed is not afraid of moisture, so there is no need to vapor barrier the floor. The ladders are laid directly on the ceiling or floor in a layer of 200 mm. You can install a floor on top or lay boards for ease of movement.

Ecowool or cellulose wool is a modern material that is positioned as natural. To reduce flammability, it is treated with fire retardants or boric acid. Ecowool absorbs moisture, so there is no need to lay a vapor barrier film.
Ecowool is laid immediately on wooden or concrete floors. This requires a special blowing installation, thanks to which all the cracks are blown in, the insulation layer becomes monolithic and saturated with the air contained inside. For most regions of the Russian Federation, a layer of ecowool of 250 mm is sufficient, but in colder regions it is better to make 400 - 500 mm.
The technology for insulating the ceiling with ecowool sometimes includes spraying water. It is needed in order to speed up the process of lignin formation. Then after 1 - 3 weeks a crust appears on top of the ecowool. Due to the fact that this material tends to cake, it is always necessary to take a margin of 5 - 15%.
Penoplex is a representative of the family of extruded polystyrene foams. This material is stronger than polystyrene foam, which means it can be used to insulate concrete floors before pouring a concrete floor on top. A good option for insulating the ceilings of the first or second floor of a low-rise private house.
It is not recommended to insulate the ceiling with Penoplex if the floors are wooden. The fact is that EPS is absolutely not a “breathable” material. As a result, moisture will accumulate in wooden structures, which will lead to the appearance of mold and mildew.
Before laying Penoplex on a concrete floor, the latter must be checked for unevenness. First, the surface is leveled, only then can a vapor barrier material be laid.

Then the Penoplex slabs are laid out. Be sure to take a running start. They are attached to the surface with special dowels with a mushroom cap. The joints between the plates are filled with polyurethane foam. After the foam has dried, a cement-sand screed with a layer of 50 mm is poured on top. It will serve as a durable floor for the attic or second floor.
Ceiling insulation with mineral wool (Ursa)
The most popular modern material for ceiling insulation is mineral wool. One of the manufacturers of thermal insulation materials based on minerals or fiberglass is the Ursa company, whose product range includes both rolled items and rigid slabs.
Ursa mineral wool in rolls is good for insulating wooden floors; it is convenient to lay it between beams. But rigid mineral wool slabs are used for thermal insulation of concrete floors, although it can also be used for wooden floors.
Ceiling insulation with Ursa is carried out as follows:
For wooden floors. A vapor barrier material is laid between the floor beams. Its installation is mandatory, since mineral wool is afraid of moisture. The film is spread with an overlap, and the joints are taped, an overlap of 15 - 25 cm is made on the walls. Next, rolls of Ursa mineral wool with a thickness of 100 to 250 mm are laid between the beams, depending on heat loss calculations. The material must enter the space with force. To do this, it must be cut with a small margin of 2 cm more than the distance between the beams. Then there are two ways: the first - you can leave the mineral wool open, but then it will be impossible to walk on the floor, the second - you can make a wooden floor on top, leaving a gap of 3 mm between the mineral wool and the floor boards. The advantage of mineral wool is its fire safety.

For concrete floors. The concrete surface is leveled and then covered with a vapor barrier film. Mineral wool slabs are laid on top, always spaced apart. Next, a wooden floor or flooring made of boards, plywood, etc. is installed. It is not recommended to screed over mineral wool, since concrete has low vapor permeability, which means that the main rule of thermal insulation will not be observed.
Ceiling insulation with foam (polyurethane foam)
Polyurethane foam is a modern material that is advertised everywhere as the most ideal insulation for ceilings and attics. The advantages of this material are non-flammability, good adhesion, neutrality to microorganisms and insects, waterproofing and soundproofing properties, resistance to temperature fluctuations, and the absence of cold bridges. The disadvantage is complete vapor tightness; this has a bad effect on the microclimate of the room.

Ceiling insulation with polyurethane foam is carried out only by an organization specializing in this. The material is sprayed under high pressure so that it is blown into all the cracks and envelops protruding elements - columns, etc. The layer is usually 10 - 12 cm.
Insulation of the ceiling from the inside
An extremely undesirable measure is to insulate the ceiling from inside the room. In addition to reducing the overall height of the room, there is an extremely high risk of heat-insulating material or its evaporation entering the room, as well as the likelihood of mold and mildew appearing in the insulation. But if there is no other way out, you will have to at least take into account a number of restrictions: do not use mineral wool and form a ventilation gap between the insulation and the ceiling finish.
Ceiling insulation with extruded polystyrene foam (Penoplex)

EPPS is a good option for insulating a concrete ceiling. First, the sheathing is nailed onto which the drywall will later be attached. The height of the sheathing beam should be 2 - 3 mm greater than the thickness of the insulation. The pitch between the slats should be equal to the width of Penoplex minus 1 - 2 mm. Next, the insulation is stuffed between the sheathing; it must fit in with force. For greater reliability, it must be secured to the ceiling with dowels. Then plasterboard is attached to the sheathing and a suspended ceiling is obtained. Instead of drywall, you can install a suspended ceiling.
Penofol is foamed polyethylene, one side of which is foil-coated. Its thermal insulation properties are not that great, but if the heat loss is not too great, it may be sufficient.

It is necessary to fill the ceiling with a lath, to which Penofol is attached, with the foil side facing the room. It can be nailed to the sheathing. It is necessary to create a ventilation gap on both sides of this material, so another sheathing is placed on top of it, to which drywall is attached. A stretch ceiling option is also possible.
The second way to insulate a ceiling with Penofol is to use it in combination with Penoplex.

In addition to the Penoplex insulation method described above, Penofol is applied to the sheathing, and only then plasterboard.
Insulation of the ceiling with heat-insulating plaster mixtures

For some unknown reason, the option of insulating the ceiling with special heat-insulating plaster mixtures is not popular. But in vain. This is an excellent material for insulating concrete ceilings. Plasters are absolutely environmentally friendly, decorative, do not suffer from moisture and steam, do not burn and are not afraid of fungus or mold. Among the materials from UMKA there are items that can be used indoors.

Insulating the ceiling with white agglomerate of cork tree bark is an environmentally friendly natural method of insulation. The plug is convenient to use during installation suspended ceiling Armstrong type, secured to the sheathing. The use of a vapor barrier is not necessary, since cork is not afraid of moisture.
The methods of ceiling insulation described above are the most common, but the general list does not end there. There are many other natural and synthetic materials that can be used to insulate the attic of a private home. When choosing this or that method and material, be sure to take into account the overall concept of your home. For example, insulating the ceiling of an environmentally friendly wooden house with Penoplex or Penofol is at least stupid. To keep the wood dry and give it the opportunity to “breathe,” you need to choose natural, vapor-permeable materials, such as seaweed, reeds, sawdust or ecowool. And for a house made of concrete, foam concrete or brick, EPS and polyurethane foam are perfect.
The cheapest (free) insulation is reeds or cattails. Reed is a natural, environmentally friendly and fairly effective insulation material. Currently, it is becoming increasingly popular.
Reed insulation can be used to insulate the walls and partitions of barns, chicken coops, livestock buildings, as well as the ceilings of residential buildings with a relative air humidity of no higher than 70 percent.
In regions where reed plants grow, the production of reed has been established. In Russia total area reed thickets cover approximately five million hectares. On average, about 36 million tons of reed plants are collected from this territory. Such regions can be considered Western Siberia, the Volga region, the Dnieper region, and the Northern Caucasus.

Sheaves are made from reed stems by pressing and fastening with wire or rope. To insulate walls, reeds are knitted into sheaves. The sheaves are then secured to each other with wire or rope. The resulting insulation is placed between slats nailed to the walls. Afterwards, the insulation is covered with cardboard, plywood, fiberboard, MDF, etc.

If reed insulation is used as insulation in stone walls, then it must be attached to wooden slats treated with an antiseptic solution, which in turn are attached to the masonry using wire or fasteners, which are laid during the construction of the stone wall.
The advantage of reed insulation:
- Reed insulation can completely replace brickwork;
- Does not lose for a long time physical properties and does not cake;
- Does not corrode;
- It has high moisture resistance, and if it gets wet, it dries quickly;
- It is an environmentally friendly material;
- Rodents and insects are not infested;
- Simple and convenient use when carrying out insulation work;
- Reeds can also be used as a decorative element of the interior or to create fences around areas.
At high humidity, in order to prevent rotting and fungal damage, reed insulation is impregnated with a five percent solution of ferrous sulfate. And in order to reduce breathability and ensure the necessary fire safety, they are plastered with clay or lime. This plaster is simple and easy to apply and lasts for a long time, and then as a finish with inside use wallpaper or paint.
Zotov A.
SHARE WITH YOUR FRIENDS
P O P U L A R N O E:
Possible malfunctions of Erisson, ERC TVs

The article below presents possible malfunctions of the Erisson TV, the causes of the breakdown, faulty elements, as well as solutions and repair secrets.
TV circuits ERISSON, E.R.C. can be downloaded for free in the tab: .
Choosing reliable roofing material
Roof- this is one of the expensive and significant elements of the house, so this issue must be taken responsibly.
For today roofing materials a large assortment.
Let's take a look at a few of the top quality, top-selling products today.
 Solar power plant — modern way power supply to our home. The question of using alternative energy sources arises for many people. And this is not surprising, because the constant rise in electricity prices makes us think about this more and more often. So the question arises: why not use free, inexhaustible natural resources - wind, sun, water? Let's talk today about solar energy, or more precisely about a solar power plant.
Popularity: 5,759 views
Ordinary materials clay and sawdust can become high-quality and incredibly cheap insulation for a private home. Environmental friendliness, accessibility, and versatility are not the only advantages of the product. The composition can be used both for arranging the roof and ceilings, and sawdust can be easily replaced with reeds - whatever is more accessible to anyone. Let's look at how to insulate a ceiling with clay yourself, what is needed for the work, and what are the features of the technology for laying insulation.
The material has a number of undeniable advantages:
- low cost;
- ease of transportation;
- non-flammability - clay does not burn itself, does not spread or support combustion;
- resistance to rot, bugs, rodents;
- when lightweight fillers (sawdust, reeds) are included in the composition, the weight of the raw materials is reduced, there is no weight on load-bearing walls;
- environmental cleanliness;
- good adhesion to wooden elements;
- preservation of the original properties for a long time, even if the mass is dry, it can be soaked and reused;
- plastic material fills cracks, small crevices, and voids well on surfaces of any shape;
- all work can be done with your own hands;
- high levels of heat resistance and waterproofing.
On a note! As the mass dries, it becomes compacted, resulting in a hard flooring. Therefore, there is no need to cover the attic floor with boards.
The material also has disadvantages:
- Not the most effective way to reduce heat loss. Clay itself has insulating properties, but it is better to use it in combination with the main thermal insulation material.
- When composing the mixture, it is necessary to strictly observe the proportions, otherwise the composition will begin to crumble when it dries.
- Even with the addition of lightweight components, the mixture remains heavy. To prevent additional load from damaging the floors, the structures need to be strengthened.
Advice! The material should be properly prepared. It is best to collect the clay before the onset of frost, wet it thoroughly and leave it in this state until spring. The clay should freeze. Only after thawing can sawdust (dried) be added and kneaded.
Application of clay
The material is used quite widely, which is explained by a number of positive qualities. The insulation is suitable for floors of small buildings: houses, garages, utility buildings. Due to its fire resistance, insulation can be used to insulate buildings with a high degree of fire hazard, for example, for baths and saunas.

In its pure form, the material is practically not used, since it takes a long time to dry and weighs a lot. To reduce weight, various components are added, but the thickness of the layer cannot be reduced, as this will affect the thermal insulation performance.
Important! The solution is prepared with sawdust, straw, chopped reeds and other natural ingredients. The laying layer is at least 30 cm, drying in natural conditions for up to 25 days. To provide the required temperature regime, work is recommended to be carried out in the warm season.
Methods for insulating the ceiling from the outside
Let's look at how to insulate a wooden ceiling coated with clay. You should know that after completion of the work it will be very difficult to redo the thermal insulation, so it is better to observe technological details.
First prepare the base:
- Clean the ceiling from the old coating. Remove not only the dilapidated layers of insulation, but also remove sharp parts and elements so as not to damage the waterproofing film.
- Clay insulation is performed from the attic side. The composition must be laid on the load-bearing floor beams. The clay is leveled to the level of the top edge of the beams.
- If the mixture is laid out on the flooring (floor), first, logs are installed that will divide the surface into separate cells. The height of the log beam must be equal to the height of the future insulation layer (at least 30 cm).
- To provide thermal insulation during the construction stage, immediately nail 5x5 cm cross-section slats to the beams from below with a gap of 2 cm. Cover the slatted structure from below with a plywood shield. Apply clay insulation, let the mixture dry, remove the panels and move to another area - spread the composition over the entire area of the room. Sometimes owners use boards instead of slats, laying them without gaps. The result is a flat ceiling surface suitable for finishing cladding, but the option with boards is a little more expensive.
- Now lay sheets of thick cardboard on the subfloor and cover with thick film on top. The film is laid out with an overlap of 20 cm, the seams are fastened with tape. It is important to insulate the cardboard as much as possible since the clay will be wet.
Important! Before laying clay, the chimney should be insulated. Hot areas should not come into contact with clay insulation - this will lead to cracking and deformation of the entire layer.

And don’t forget about electrical wires and communications - the elements are protected by corrugated pipes and laid out in the right order.
Materials, tools for work
The master will need the following set:
- container for soaking clay;
- containers for the finished composition;
- buckets;
- wooden grater for compaction;
- concrete mixer;
- water;
- spatulas;
- slats, boards;
- clay;
- cardboard;
- plywood;
- hammer;
- nails;
- film;
- scotch.
Advice! If you treat sawdust with antiprene in advance, dry it and mix it with dry lime, this will reduce the fire hazard and repel rodents.
Preparing the mixture
In order for the composition to be of high quality, you need to choose the right clay. Fatty varieties are suitable, which, when combined with water, turn into a plastic mass that is slightly slippery to the touch. This substance fits well on a plane, is leveled and has high thermal insulation qualities.

If you choose clay collected at the bottom of reservoirs, you can get a silty mixture that does not have compressive strength. The low stickiness of the silty composition is a minus; it is difficult to mix clay with sawdust, they “peel off” without forming a dense, uniform layer of insulation.
On a note! To determine the type of clay, for example, in the garden, you need to take a little material, slightly moisten it and squeeze it - if your fingers remain sticky and greasy, then the clay will do. If the lump crumbles, it is better to buy quality material.
How to prepare the composition:
- Dilute the clay and water in a large container and leave the mixture for 24 hours until the mixture soaks. Then stir, evaluate the viscosity - it should turn out no thicker than liquid sour cream. If necessary, add water.
- Pour everything into a concrete mixer, add sawdust in a ratio of 3:1 (3 parts clay water to 1 part sawdust).
- Stir until smooth. To assess the quality, place a stick in the concrete mixer - it should stand level in the mixture and not fall.
On a note! If there is no sawdust, then chopped reeds are used. Insulating the ceiling with clay and reeds is also considered quite effective. You should take dry leaves and stems, cut in advance or crushed in dried form.
Laying out insulation material
There are no particular difficulties - lay out the mixture in even layers, adhering to the boundaries of the formwork cells. The layer thickness is 25-30 cm. It is permissible to make the layer smaller, but only with a high-quality insulated roof.

During the laying process, the mixture is compacted. It is important to pay special attention to the areas of joints with walls, in the corners. After finishing work, allow the mixture to dry. After 3 weeks, inspect the surface; if there are cracks, rub it with the same composition of clay and sawdust. Dry it again and you can cover the insulation with boards, but it is permissible to leave the clay floor without covering.
Important! In the summer without precipitation, 3 weeks are enough for the clay to dry; if the summer is rainy or work is carried out in the off-season, more time should be given. The easiest way to level the mixture over the cell area is to use the rule.
Before starting to insulate the surface using natural material, read the recommendations of the masters:
- to evaluate the plasticity of the raw material, moisten a little clay and roll it into a thin rod, wrap it around your finger - if the clay is good, the rod will not break;
- squeeze a piece of wet material, no water should drip from the composition, and the tape itself will be squeezed out into thin strips without crumbling;
- to find out the amount of silt in the clay, roll the wet material into a ball, flatten it and slam it down a little with your palm - water forms, but the color is the same, the clay is good, and if the shade has changed, there is a lot of silt.
And a little advice to reduce the cost of materials: if the garden clay is of average quality, you need to add some water and a little PVA glue during the mixing process - this will make the finished composition stronger.
4 9 078 0
The issue of alternative energy sources is more relevant today than ever. In order to pay less for drowning, you need to use it less. You can heat a room less when it is well insulated. Now there are many ways and different means. Our task: to achieve maximum results at minimum costs. The optimal solution is reeds! When insulating with reeds, your costs will be: time and labor. Current trends indicate the growing popularity of the material due to its environmental characteristics and cost. Below we offer step by step instructions reed blanks for insulation.
You will need:
The word “reed” refers to ordinary reeds (common reed, Phragmites australis), growing along the banks of reservoirs, in river mouths or in wetlands of meadows. As a rule, high-quality reeds grow in floodplains of rivers and lakes. Reed can be called an elite material, since abroad it is an expensive pleasure (the cost is reflected in transportation and the lack of specialists). For our country, reed is new, but forgotten old, because it is distributed almost everywhere. 
The reeds, so to speak, “fall asleep” with the beginning of autumn, but retain an upright position, and the reeds acquire a golden brown color. With the first frost the leaves fall off. After this, collection can begin.
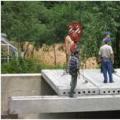
The ideal time for harvesting reeds is winter, when the water recedes and everything is covered with ice.
At this time, fairly strong ice forms. Of course, you can collect reeds with a special harvester, but we are counting on an economical option, so we are considering manual collection. So, armed with a regular scythe or sickle, we dress warmly for the ice.
The stems are trimmed at the ice level by moving the plow across the ice at an angle. For the same purposes, you can use a well-sharpened shovel. The reeds are cut as close to the ice surface as possible, since the stem is strongest in the butt, lower part. Reed reeds reach a height of 1.5–2 m with a stem thickness of no more than 25–30 mm. Mature reeds - light yellow in color - are suitable for harvesting. We clean each stem from excess leaves to make an even straw and dry it. Reeds should be stored in exclusively dry rooms.  Reed is a renewable resource. Its regular mowing not only does not harm nature, on the contrary, it cleans the external environment. If the reeds have survived the winter, it is quite acceptable to collect them in the spring. Usually, in the spring, dry plants are burned (although this is prohibited by environmental protection services) so that young plants can quickly grow in their place. But if you find yourself in a place where last year’s reeds are still standing, then please mow them, but not on the ice.
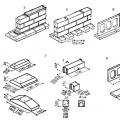
We form mats from dry reeds. To do this, you can use a homemade installation, as shown in the photo.  It is advisable that the mats be in the air, but under the roof.
We place the reeds tightly in a vertical position and stitch them with a needle, which can be made from any strip of metal, no more than 3 mm thick. The photo shows an aluminum needle. For stitching we use regular thread for twisting bales. It can be purchased in markets and specialized stores.  The resulting mats are approximately 1m ˣ 2m in size. The size depends on the installation and the length of the reed.
  The size of the mats depends on the installation and the length of the reeds.