The pages of our website provide a very conditional classification of types of wood carving, which seems to us as close to the truth as possible.
Flat grooved thread
A characteristic feature is a flat main background into which elements are embedded, i.e. all carving elements are below the background level.
- contour carving is obviously the simplest carving, which gave rise to all other types.
- staple (nail-like) thread - can be considered as a subtype of contour thread, since it is not particularly complex. The pattern is created by various combinations of brackets of different directions and sizes - semicircular notches on a flat background.
- black glaze carving(carving on black varnish) - the workpiece is covered with black varnish or paint, and then lines are cut on it. This is how the pattern is created. The characteristic play of contrast sometimes conveys interesting stories.
- geometric carving - basic elements - geometric shapes are obtained from multiple combinations of pegs and pyramids.
Relief carving
A characteristic feature is that the main background is at the level of the picture or significantly below it. The carved elements are not cut into the background, as in types of flat carving, but, on the contrary, rise above the background.
- flat-relief carving - background at the level of the picture (sometimes this type of carving is called flat-relief with a cushion background)
- deaf- (sometimes called a flat-relief carving with a selected background) the background is selected, but how deep in relation to the design determines the subtypes of this carving
- bas-relief- not very deep, the pattern has low relief
- high relief- much deeper, the pattern has a high relief
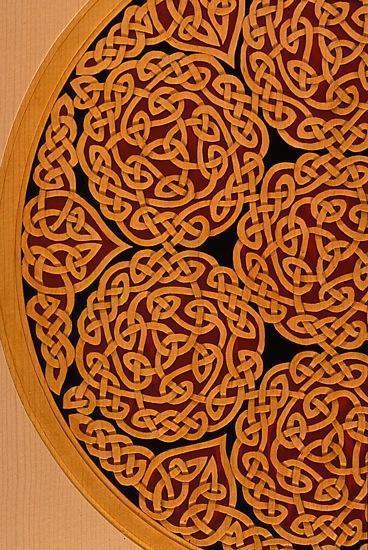
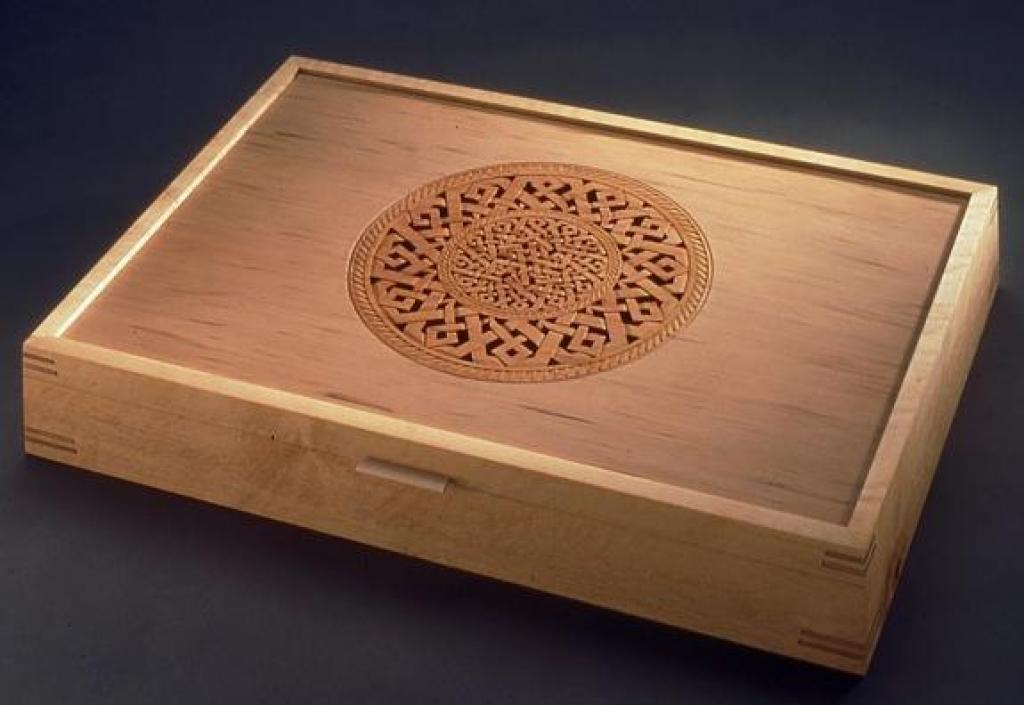
- - originated in the village of Kudrino on the Abramtsevo estate, therefore it has both a single and a double name. It is characterized by a special pattern that cannot be confused with any other.
- Islimi is a special carving, characterized by deep sampling and embossing of the background. Distributed mainly in Central Asia.
- Tatyanka is a relatively new type of carving, invented at the end of the 20th century by our compatriot. The carving received its name in honor of the author’s wife. The carving is relatively simple and very rich in plant elements. If desired, it is available to carvers of any age, there are no restrictions.
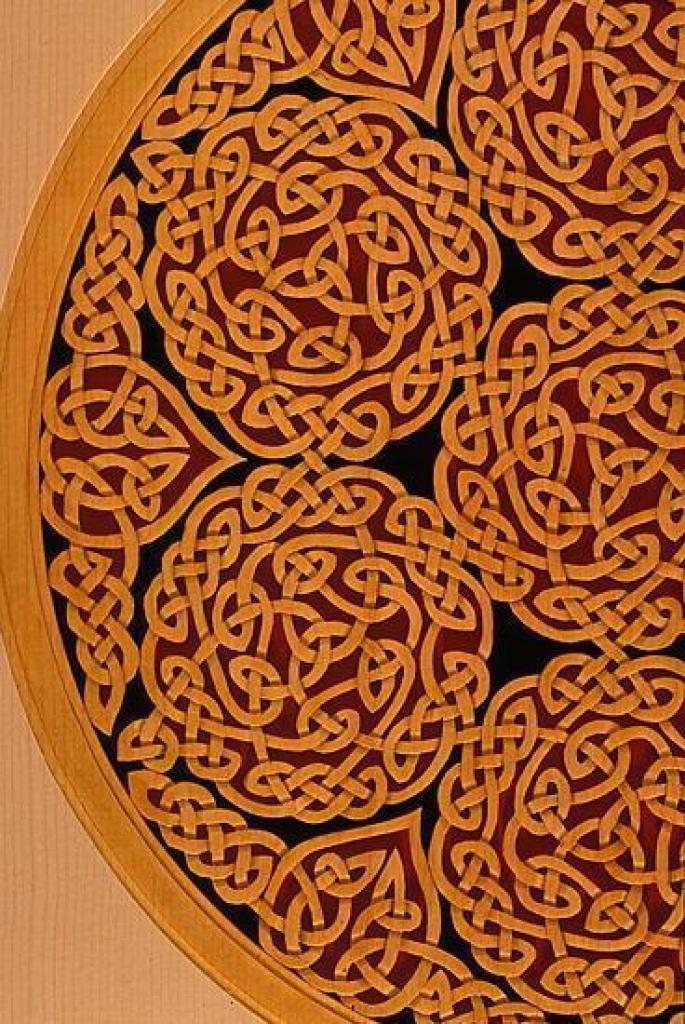
Through thread
From the name it is clear that such a thread has through holes, mainly the background areas are removed. For its apparent airiness, lightness and similarity to lace, it is often called openwork carving. It has two slightly different types:
- slotted- background areas are cut through with chisels
- sawing- areas of the background are sawn through with a saw or jigsaw (in this case we can talk about
In Russia, wood carving was called carving. Drawing is a sign; words were also used: vyzoroche, patterned.
Ancient images of grass patterns - in the Byzantine style. Not earlier than the 16th century, fryashchina (Fryazhsky herbs) appeared - herbal decorations borrowed from Italy.
anonymus, CC BY-SA 3.0In the second half of the 17th century, German carvings appeared in Russia, figured, with Gothic motifs. In 1660, this carving was used to decorate the royal dining room, built according to the design of the German architect Dekenpin.
Rezi were painted with bright colors, sometimes covered with gold leaf.
 GrahamBould, CC BY-SA 3.0
 Modern carving
Nowadays, wood carving does not have a strict classification, since different types of carving can be combined in the same product.
Conventionally, we can distinguish types of threads:
- through thread (this includes cutting and slotted threads)
- blind thread (all subtypes of relief and flat carving)
- sculptural carving
- house carving (is a separate direction, since it can combine all three of the above types).
- Chainsaw Carving (Performing primarily sculptural carvings using only a chainsaw.)
The conditional classification of thread types is as follows:
Through thread
It is divided into end-to-end and invoice, has two subtypes:
- Slotted thread - (through sections are cut with chisels and cutters)
- Saw thread (actually the same thing, but such areas are cut out with a saw or jigsaw).
A slotted or saw-cut carving with a relief ornament is called openwork.
Flat grooved thread
Flat grooved carving is characterized by the fact that its basis is a flat background, and the carving elements go deep into it, that is, the lower level of the carved elements lies below the background level. There are several subtypes of such carvings:
- contour thread is the simplest, its only element is a groove. Such grooves create a pattern on a flat background. Depending on the chisel you choose, the groove may be semicircular or triangular. The semicircular one is cut with a semicircular chisel, and the triangular one is cut with a corner cutter, corner chisel or knife in two steps.
- staple (nail-shaped) thread - the main element is a bracket (outwardly similar to the mark left by a fingernail when pressing on any soft material, hence the name nail-shaped) - a semicircular notch on a flat background. This notch is made with a semicircular chisel in two steps: first, the chisel is deepened into the wood perpendicular to the surface, and then at an angle at some distance from the first cut. The result is a so-called bracket. Many such brackets different sizes and directions and creates a drawing or its individual elements.
- geometric thread:
- triangular pitted thread
- double tapping thread
- square recess thread
- black varnish carving - the background is a flat surface covered with black varnish or paint. As in a contour carving, grooves are cut into the background, from which the design is built. Different groove depths and their different profiles give interesting game chiaroscuro and contrast of a black background and light cut grooves.
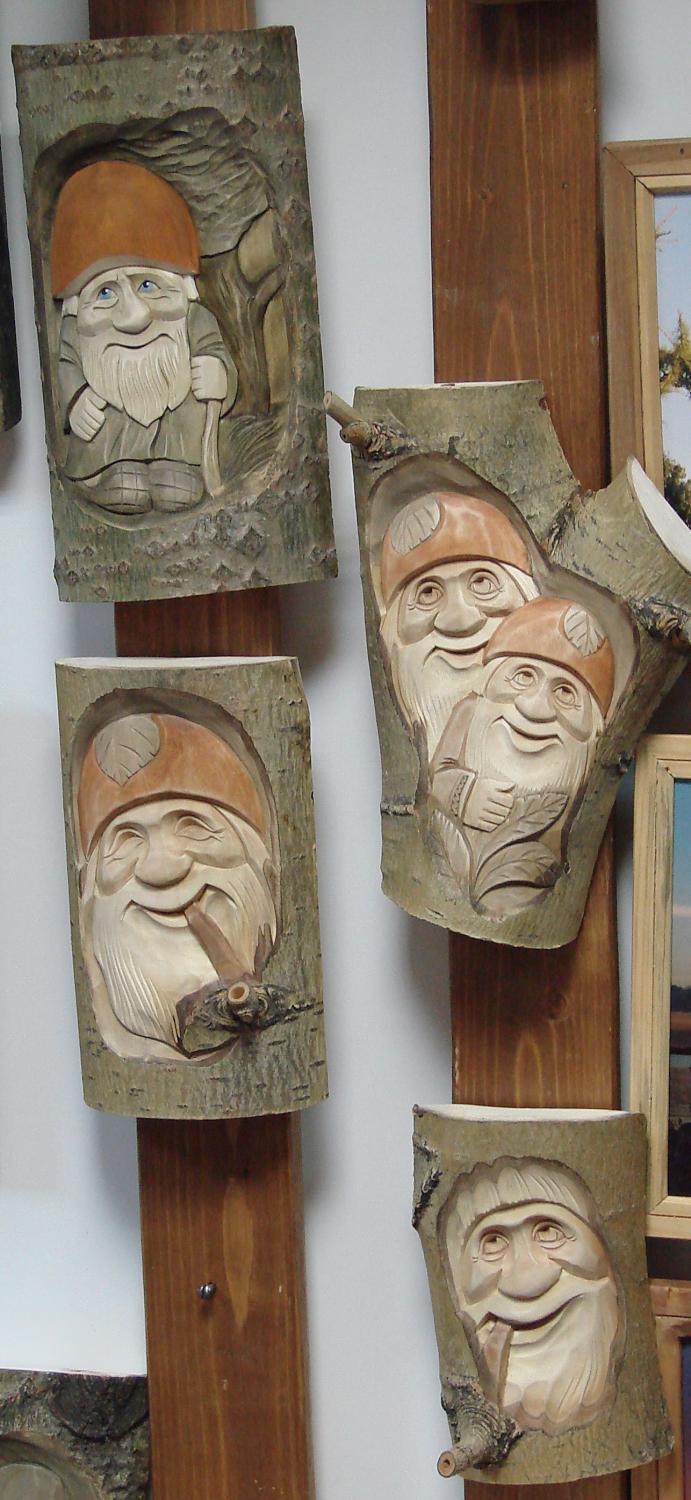
Relief carving
Relief carving is characterized by the fact that the carving elements are located above the background or at the same level with it.
 Sergeev Pavel, CC BY-SA 3.0
 As a rule, all carved panels are made using this technique. There are several subtypes of such carvings:
- flat-relief carving with a cushion background - can be compared with contour carving, but all the edges of the grooves are rolled up, and sometimes with varying degrees of steepness (from the side of the picture more sharply, from the side of the background gradually, sloping). Due to such littered contours, the background seems to be made of pillows, hence the name. The background is flush with the design. Flat-relief carving with a selected background - the same carving, but only the background is selected with chisels at a lower level. The contours of the drawing also become shaved.
- Abramtsevo-Kudrinskaya carving (Kudrinskaya) - originated in the Abramtsevo estate near Moscow, in the village of Kudrino. The author is considered to be Vasily Vornoskov. The carving is distinguished by a characteristic “curly” ornament - curling garlands of petals and flowers. The same characteristic images of birds and animals are often used. Like flat-relief, it comes with a cushion and a selected background.
A distinctive feature is the presence of sculpture - images of individual figures (or groups of figures) of people, animals, birds or other objects.
 User:MarisaLR, GNU 1.2
 In fact, is the most complex look carving, because it requires the carver to have a three-dimensional vision of the figure, a sense of perspective, and maintain proportions.
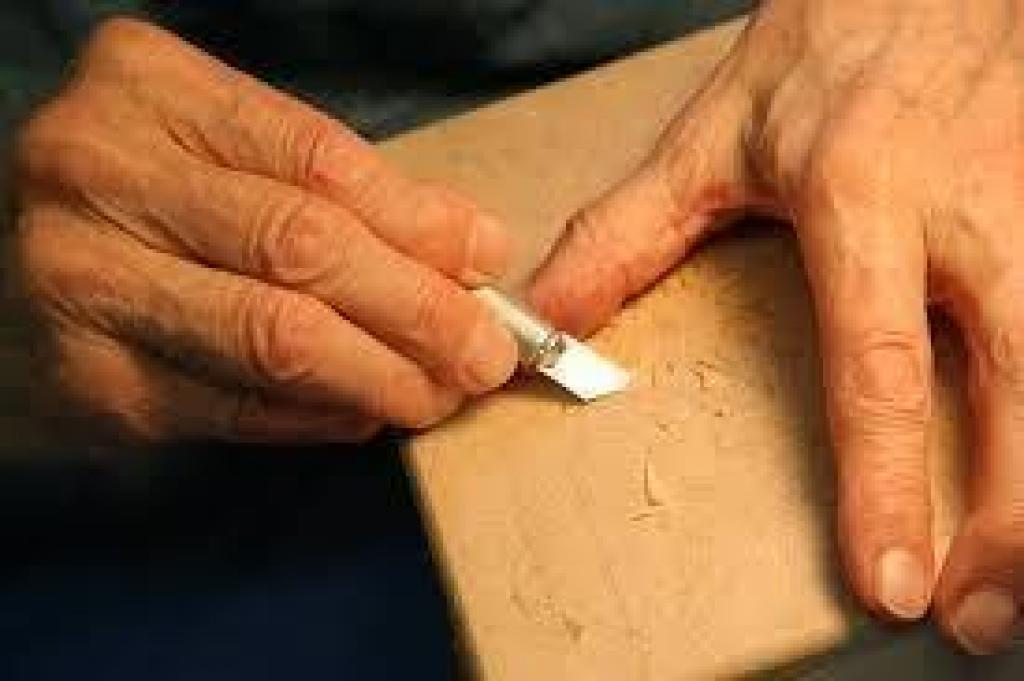
About the tools
There is no universal tool for wood carving. This craft involves the use of a whole range of different knives, chisels, chisels, vices, cutters and hacksaws.
 Ervinsomogyi, CC BY-SA 3.0
 The main requirement is that all tools must be of excellent quality so that you can easily carry out carving work of any complexity.
The cutting tool should be made of good steel, light and comfortable, perfectly sharpened so that wood cuts like butter, and it should be kept in perfect condition.
Photo gallery

Carving in folk traditions.
Carving on a flat surface in the form of braids and straight lines, cloves, gorodtsev and icon cases, grooves, stars, poppies, fungi, gags, etc. An example of this ancient carving is the royal place in the Assumption Cathedral.
Development
At the end of the 15th century, the monk of the Trinity-Sergius Lavra Ambrose combined eastern, western and traditional Russian ornaments in his works and had a huge influence on the development of carving in the 15th-16th centuries.
In German
New instruments and German names and terms have appeared: gzymzumbi, sherhebel, sharheben, foundkhtebl and so on. Appeared in carvings and furniture cornices, gzymzas, splengers, krakshtyns (brackets), transoms, captels, tsirotnye grasses, frufts and so on. The craftsmen began to make carvings according to German workshop face books - that is, according to samples and drawings.
Features of the technology
In wood carving, the master must know, first of all, the structure of the tree and understand the characteristics of the species. Next, he must take into account the location of the fibers, since the thread runs both along and across them. IN different types For carving, both preliminary drawing and carving “from imagination” can be used.
Separate subspecies
It is considered a separate subspecies. The art of chainsaw carving, which is becoming increasingly popular both among carvers and connoisseurs of beauty, can also be considered a type of sculptural carving.
IN Lately The creation of sculptures on various copy-milling machines is also becoming increasingly popular, the most affordable of which is the Duplicarver.
Famous Russian carvers
K. A. Gogolev, N.I. Maksimov, V.V. Yurov, S. Badaev, M.A. Pronin, A.Ya. Chushkin, A.A. Ryzhov, I.K. Stulov and many others.
Klim Mikhailov is one of the most famous and talented carvers of the second half of the 17th century in Moscow.
Wood carving has existed for many centuries, new directions, types and subtypes of carving appear, but there is no single classification of types of carving. We have summarized the classic and new types of carving. House carvings occupy a special place in the classification of types of carvings. It practically concentrates all types and subtypes of carving.
1. House carving: the origins of wood carving can be traced back to ancient times. With the development of the Russian state, the art of wood carving also develops. Carvings decorated palaces, churches, icons, houses, wooden buildings, interior items, furniture, household items, musical instruments, toys, souvenirs, and amulets. The reign of Peter 1 turned out to be favorable for the development of wood carving in Russia. Under Peter 1, shipbuilding received its greatest development, since wood in those distant times was the main material for creating the Russian fleet. The bows of ships were decorated with figures - images of animals and birds - a dragon, an elephant, a lion's head or a horse. These images symbolized the power, strength and courage of the sailors. A skillfully carved figurehead is not only a worthy decoration for a ship, but also, as it was believed, a symbol of good luck for sailors. This type of carving is called ship carving or baroque carving. “Having come ashore,” wood carving found wide application in wooden architecture, the manufacture of wooden utensils, in home decoration and various decorations.
House (ship) carving received its greatest development in the late 19th and early 20th centuries. At the same time, the carving was not of the same type, it was performed using different techniques - which made the decor of the decorated products more imaginative, richer and more picturesque.
2. Saw thread: in the second half of the 20th century wooden buildings In rural areas and in the city, saw-cut carvings made using a thin jigsaw file have become widespread. Of all the variety of types of carving, it is the most widespread and accessible. Saw thread has several subtypes: through, overhead, openwork. In all subspecies, the background is cut out or removed.
3. Flat wetting thread and its subtypes: the most common, accessible, not requiring special premises and large material costs is flat-cut thread and its subtypes.
4. Contour carving: the name itself suggests that in this carving technique a contour, contour drawing is made. Contour carving is used to create not strict geometric shapes, but free patterns that are drawn on the workpiece with a cutting tool. In this case, various lines can be used: straight lines, curves of arbitrary curvature, wavy, spiral, etc.
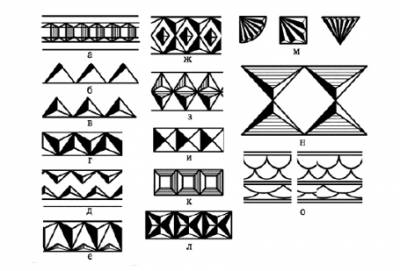
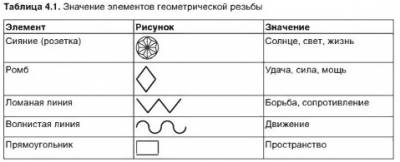
5. Geometric carving: the main subtype of flat carving, which is based on two components - a plane and a recess made on it. It is called geometric because it is based on all sorts of geometric elements - triangles, polygons, circles, rhombuses, squares, ovals. By combining the simplest geometric shapes, you can get an amazing pattern, where every element, every stroke is precisely drawn. Complex carving elements are formed from geometric shapes: ladders, swirls, beads, snakes, shines, pegs, various combinations of which with each other create geometric carving motifs, and the combination of motifs forms a geometric ornament.
6. Staple carving: The basis of staple carving is a staple notch or staple cut, shaped like a nail. Therefore, staple thread is often called marigold thread. Bracket carving is a type of flat carving and, in combination with other types of carving, is used to decorate boxes, cutting boards, decorative panels, household spatulas.
7. Wrinkled carving: used for finishing and decorating elements of flat-cut carving. A special feature of this carving is that the surface of the product is decorated with wrinkles-rays. Each ray is an acute-angled groove, originating from a center point. From the center, the groove smoothly turns into an expanded wrinkle, reaching the greatest width and depth of the outer end of the beam. There is a path to immortality for wood carving: preserving skill, experience, and carving techniques. Teach young people to carve wood. In villages and cities. After all, houses are built from wood, from logs. It is in Russian traditions to build from wood, cut lace on wood, decorate their houses carved platbands, porches. Folk art is a true value. Wood carving is an integral part of it. Russians should not forget how to carve wood. Creating beauty with your own hands is in the blood of our craftsman people.
Materials and tools used
Various types of wood are used for wood carving. The choice of one species or another depends on the purpose and shape of the item being decorated and the type of carving. Of the deciduous trees, linden is often used for carving. Linden wood is easy and clean to cut and is less susceptible to cracking and warping. Due to its low hardness, linden is not used for making furniture, so its use is limited to small household items. Alder wood is also easy to cut, warps little, accepts finishing well and is imitated to resemble other species, such as mahogany. All this makes it suitable for all types of work. An excellent material for carving is birch wood. It is harder than linden and alder and is more difficult to cut, but the quality of the carving is better. Birch wood can be painted and finished well. Its disadvantages are the ability to easily absorb and release moisture, as well as a tendency to warp and crack, which does not allow its use in large products. Birch can be used to make applied carved decorations and parts of furniture and other products. For carving small items - dishes, souvenirs - poplar and aspen wood is used.
Oak has long been used for large decorative carvings and for the manufacture of carved furniture. Oak carving is complex and labor-intensive due to the high hardness of the wood and its tendency to chip, but it is very expressive and decorative.
Beech wood is close to oak in hardness, but it chips less because it is more uniform. Beech can be easily painted with aqueous solutions of dyes and finished. Beech is used mainly for small carvings. Walnut wood is the best material for carving work. It cuts perfectly in all directions, rarely chips and allows for the most precise carving. Walnut wood is well finished and especially polished. It is used in the manufacture of furniture both for carving on solid wood and for applied carving in combination with other species. For highly artistic carvings of small forms and sculptures, walnut wood is also considered the best material. For small items decorated with carvings, rarer types of wood are also used: apple, cherry, etc. Coniferous wood used for carving is pine, spruce, cedar, and yew. Decorations for platbands, icons, cornices, and gates have long been carved from pine. This carving is large, so the unevenness in the density of the layers of early and late wood of coniferous species does not complicate the work. Spruce is easier to cut than pine, but it has more knots and is very hard, so it is less often used for carving. Harvesting wood for carving work should be done from October to January, when the movement of sap in the trunk stops and the danger of wood cracking and damage by fungi and insects is reduced. Boards intended for carving are dried to a moisture content of 8-10%, making sure that cracks and warping do not form. Boards intended for carving work are first cut into blanks on circular saws, then cut to size on jointing and thicknessing machines. Wide blanks are obtained by gluing individual bars or planks with PVA dispersion. In this case, it is necessary to select wood plots so that the cut and direction of the layers are the same. An incorrectly glued blank of bars with opposite directions of wood layers makes the work of the carver more difficult, reduces the artistic value of the carving, and when painted with water-based dyes, bars of different shades are obtained. Before carving, the surface of the workpiece is leveled by scraping. Do not sand the surface with sandpaper, as abrasive grains can get into the pores of the wood, which will quickly dull the tool.
Any wood reacts very sensitively to changes in environmental humidity. This property is one of the disadvantages of timber.
At high humidity, wood easily absorbs water and swells, but in heated rooms it dries out and warps. Drying wood is a very long and troublesome task. It is very difficult to dry hardwood that has a heartwood. Even dead wood after sawing into short ridges and debarking is covered with numerous cracks. The core is especially valued, the wood of which is harder and drier, and its pores are filled with a special preservative. When the ridge dries, first the sapwood cracks, and then the core. To preserve the valuable core wood, the sapwood is trimmed with an ax and the ends are greased with putty. Without sapwood, heartwood dries quite well, with almost no cracks. Steaming speeds up the drying of wood. Place raw wood in a suitable-sized vat, pour a little water on the bottom, cover it and place it in a heated oven of a gas or electric oven, tightly closing it with a damper. Steamed wood not only resists cracking, but also takes on a deep brownish-golden color. Boiling in oil. Small pieces of wood are boiled in cottonseed oil, drying oil or any vegetable oil.
Cookware made from wood steamed in oil is very water-resistant and does not crack even with everyday use. Boiling in a brine solution speeds up the drying of small pieces of hardwood. Raw wood is placed in a saucepan or boiler, poured with a saturated solution of table salt and simmered over low heat for about 3-4 hours. After this, dry at room temperature for about 2-3 weeks. This method is especially suitable for hardwood. Drying finished products in sand you can achieve an interesting decorative effect. A layer of clean river sand is poured into a suitable container, the product is placed and covered with a new layer of sand. In this case, the product should not touch the walls. After this, the container without a lid is placed under a flooded Russian stove. The drying effect is achieved by the optimal distance of the container in relation to the fire. Drying grain in Rus' was well known. In the spring, a few weeks before sowing, the workpiece or product was buried in the seed grain, which absorbed moisture from the wood. Then the workpiece was taken out and dried at room temperature.
Drying on a cement or concrete floor is based on the ability of cement stone to intensively absorb moisture. The wet wood is laid on a dry concrete floor and after 2-3 hours it is turned over so that alternately one side or the other is adjacent to the cement floor. Drying in manure, shavings, polyethylene and in air is also used.
The natural type of drying is atmospheric, airy. It is necessary to dry the wood in the shade, under a canopy and in a draft. It is better to choose a drying place in the attic of a house, a barn or a specially constructed shed. When dried in the sun, the outer surface of the wood quickly heats up, but the inner surface remains damp. Due to the difference in stress, cracks form and the wood quickly warps. After atmospheric drying in warm, dry weather, the wood moisture content is 15-20%. Blanks intended for interior decoration can be moved to a heated room and dried. When drying products, cracks often occur. The best way to seal a large crack is to insert a piece of the same wood into it. If it is impossible to select a piece of wood from the same blank, then select a piece of the same color, located far from the core of the trunk and oriented in the same way towards the center. After the glue has dried, the joint is planed and cleaned with a plane. Small cracks are usually sealed with sawdust-based putty.
Tools for successful work A woodcarver needs a well-equipped workplace, appropriate tools and equipment. To work, carvers need a dry, bright room with constant temperature and humidity. The walls and ceiling of the room should be painted in light colors. The equipment of the carver's workplace depends on the nature of the carving work being performed. When making small items, carving can be done on a regular table. A workbench is suitable for large-sized products.
The workbench or table is placed so that the light falls from the front and left. The best
lighting - natural, without direct sunlight. With artificial lighting, the light should come from two or three sources so that there are no sharp shadows on the workpiece. The workshop requires one carpentry workbench to prepare the material for carving, as well as a sharpening machine and a table for sharpening and dressing the tool. For wood carving, various shapes of chisels or chisels are used. Straight chisels with a blade width of 3-30 mm are used mainly for cleaning the background in relief carvings; sometimes they are used in contour carvings. Bevel chisels, also called cutters, are the main tool for making geometric carvings. They are used both when performing rough work (cutting wood with a full blade) and when cleaning threads with the tip of a knife. It is advisable to have several knives with different shapes tip: from sharp (30°) to rounded. Cranberry chisels are distinguished by a short blade 2-15 mm wide and a long neck, curved near the blade. The shape of the canvas may be different. They are used when making high-relief carvings, as well as for cutting in hard-to-reach places. Straight cranberry is used to clean the background in the relief carving. Semicircular chisels with blade width 3-
30 mm, depending on the radius of curvature, are of the following types:
Sloping with a large radius of curvature;
Medium or semicircular;
Steep with a small radius of curvature.
This is the main tool for performing all types of carving, except geometric, where these chisels are used only for cutting semicircular holes. Corner chisels with a blade width of 5-15 mm are used when cutting narrow lines-grooves. In cross section, the chisel forms an angle of 50-70°. Such chisels can be made in the form of cranberry. Ceramic chisels, 2-3 mm wide, are close in shape to steep semicircular chisels, but their profile is deeper. Cerasics are used for cutting narrow veins. Semicircular shavings are used for working on wood in hard-to-reach places. Rasps are used for surface treatment. The coins are metal rods, at one end of which there are notches in the form of a grid, dots, and stars. They are used for embossing the background mainly in Kudrin carving. In addition to the main cutting tool, the carver also needs auxiliary tools: marking tools, tools for drilling, sawing. Supporting tools also include:
Mallets for hitting the handle of a chisel when cutting out the background, cutting off relief in large carvings;
A rotary hammer or drill with a set of drills for drilling holes in slotted threads and drilling deep places in relief threads;
Jigsaw and files for cutting out the background in the slotted thread.
In addition, the carver may need carpentry tools when preparing parts for threading: a plane, jointer, scraper, etc.
Basic technological techniques and operations of wood carving
The process of making carved products can be divided into the following stages:
Project development;
Procurement and preparatory operations;
Direct carving;
Finishing of carved products;
The project development stage may include the process of forming an artistic concept and the process of changing or clarifying some finished sample. This also includes the development of sketches, drawings and the like. Often the carver himself has to think through the design of the product, manufacturing and assembly technology, as well as design the necessary devices.
All this also applies to the design stage. Procured and preparatory operations include, for example, the following types of work:
Wood harvesting;
Wood drying;
Selection of material;
Processing of blanks and manufacturing of threaded products;
Marking blanks for threading;
Sharpening tools, etc.
Sketching and Modeling: Sketching and modeling of future carved products occupy an extremely important place in the carver's robot. Of course, not all people can draw like artists, but often this is not required. In addition, it has been noted that drawing abilities can develop, you just need to show patience and perseverance. At first, in carving, you can get by with ready-made samples, gradually starting to make your own changes and modifications to them. Then, as you accumulate skills and experience, move on to completely independent works. The carver needs to study issues of composition and perspective, techniques of geometric constructions, and various types of proportions. To do this, read the relevant literature and get to know each other practically. When performing complex types of carving, one design is not enough. Sometimes, to clarify the shape of the relief, the figure shows sectional details. However, this does not always help. In such cases, it is recommended to make a model of the future carved product in a material that is easier to process - clay, plasticine, plaster.
The model makes it possible to feel the volume, clarify the relationship of parts with each other and with the background, clarify the carving technique, and determine what tool will be needed for the job. At home, it is most convenient to use plasticine for modeling - it does not dry out, is always ready for work, and does not get dirty. The model can be executed in a generalized form, without detailed detailing. It is enough if it conveys the main, most important elements of the future product.
Enlarge and reduce the sketch. Quite often, a carver needs to change the scale of a sketch he has made or an illustration in a book. The following main methods can be used for this:
Changing sizes “by cell”;
Redrawing a drawing using a pantograph;
Photocopying.
Translating and resizing a drawing is very easy to do using photocopying. In modern conditions, this is the cheapest, easiest and fastest way.
Wood processing techniques already in the 10th – 12th centuries. was quite developed. Most of the buildings and wooden carvings, showing the considerable skill of carpenters, carvers, turners and joiners, have come to us already from the 19th century. Types of thread
- House (ship) carving
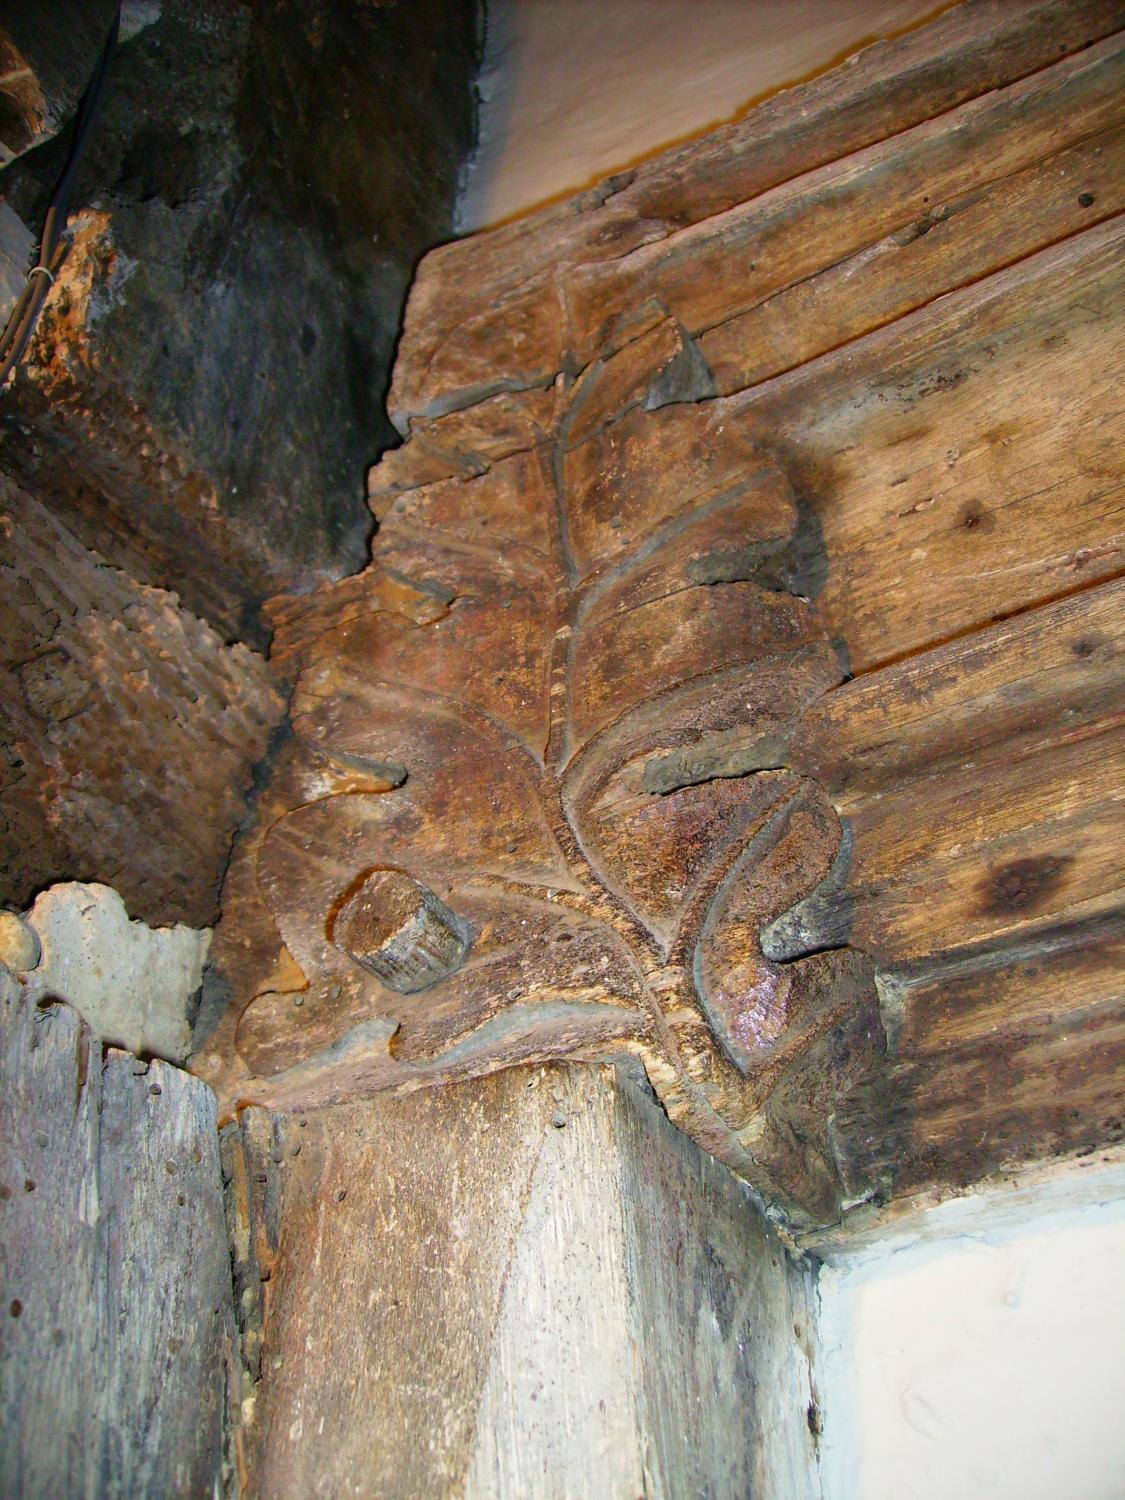
In the 20-30s of the 19th century. In the peasant architecture of the Gorky region and the Middle Volga region, the so-called blind relief carving spread. This is a carving with an uncut (blank) background and a high relief pattern. She moved to the huts from the Volga ships.
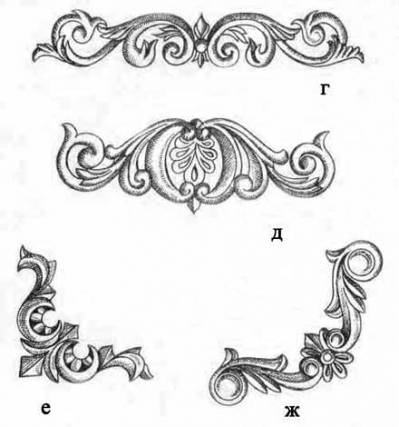
House (ship) carving has a free character. Throughout the board there is usually a richly and freely developed plant pattern, the leaves curl in steep counter spirals, they are connected and at the same time separated by images of a multi-petaled flower, visible as if from above, so that all the petals are arranged in a circle or fit into a circle.
Solid relief carving in the 19th and first half of the 20th centuries. used to decorate furniture - cabinets, tables, mirror frames, cases for floor and wall clocks.
A master carver must be proficient in all types of carving, including those that are used extremely rarely.
- Openwork carving
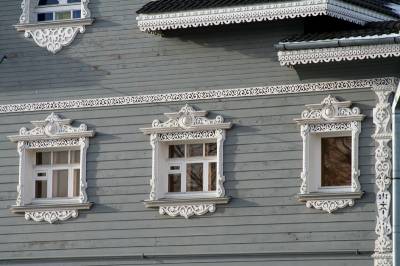
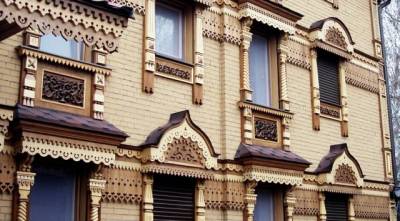
In the middle and second half of the 19th century. In Russian wooden buildings, both rural and urban, openwork, saw-cut carving, performed using a thin file - a jigsaw, has become widespread.
Openwork saw-cut carving decorates the pediments of houses, covers window frames, frames of entrances, etc.
Openwork carving very effective, it is like wooden lace. Many ornamental and decorative motifs of Russian solid, relief carving were transferred into openwork carving. There are also conventional, generalized, geometrized images of female figures in saw-cut carvings, very similar to images in Russian folk embroidery and lace.
Houses with openwork carvings preserved from the last century can be found in many cities of our country. There are especially many ancient buildings with carved decorations in the Siberian city of Tomsk.
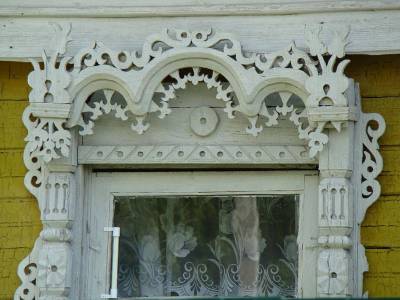
Folk craftsmen always had a sense of proportion, which is why only certain parts of the building were decorated with openwork carvings: window and door frames, piers, end boards. On sunny days, when the shadow from the slotted frames covers the smooth walls of houses like dark lace, the expressiveness of the openwork carving intensifies. But even on cloudy days, the carving details stand out with a clear pattern against the general background of the wooden structure.
But not only for the sake of beauty, carpenters sewed all kinds of overhead parts onto the house. Each of them has a specific practical purpose. For example, a pier is a board that covers the ends of the beams sticking out from under the roof so that they fit into their ends. moisture did not penetrate, destroying the wood.
The end board, which was nailed to the ends of the log frame, has the same purpose. The window casing covers the joint between the window frame frame and the logs of the frame. In North Russian huts, the junction of two piers was covered with a so-called brush, the lower end of which was decorated with openwork carvings. The so-called towels were also carved - the lower ends of the piers protruding from under the roof.
In our time openwork house carving continues to be used to decorate rural wooden houses, country houses, gazebos, canopies, and towers on children's playgrounds.
The main tool used for drilling holes in a board is a brace. They mainly drill large holes. This is a reliable, proven carpentry tool. A more convenient option is a rotator with a ratchet, which allows you to turn the ring to lock the chuck and change the direction of its rotation when clamping or releasing it from the drill.
Wood drilling tools:
- brace,
- drill and flat center drills,
- holder with replaceable flat drills
Holes with a diameter of 10 mm or more are drilled using special flat drills - peroks. In addition to regular blades, there are universal ones on sale with removable cutting blades. The kit includes 7 drills with widths of 14, 16, 18, 20, 22, 25 and 32 mm. If it is not possible to purchase flat wood drills in the store, you can make them yourself. Make plates with cutting edges from an old saw blade 1.5-2 mm thick, which can be easily processed with a file.
When cutting, the canvas is broken along the deep marks applied. The marks are applied with a scraper, file or some other hard metal tool. Make the holder from a bolt or rod with a diameter of 8 mm.
Having secured the rod in a vice, use a hacksaw for metal to make a cut from the end side. Drill a hole perpendicular to the cut. Punch a hole in the plate at the appropriate distance from the top edge.
Connect the plate to the holder with a rivet. If you want to make the holder universal, cut a thread in its hole and select the appropriate locking screw. The universal holder is constantly clamped in the rotary chuck, and when drilling holes of different diameters, only the plate drills are changed. Before starting drilling, mark the center of the future hole with an awl.
Small holes are drilled with a drill or drill bit. If you are unfamiliar with a drill, look at the picture of one.
Openwork carving is often called sawn carving, since its technique is based on sawing shaped openings in the board. Saws for cutting curved workpieces along the outer contour are called rotary or circular. The width of the circular saw blade is from 4 to 15 mm.
Narrow blades are used when cutting workpieces that have steep bending lines, and wider blades are used for large ones, with smooth, slightly curved or straight contours. Unlike a conventional joiner's bow saw, the blade must be turned outward. This makes it possible to make cuts in different directions, almost without changing the position of the saw machine.
You can make a circular saw machine yourself from birch or beech wood. Depending on the size of the workpieces being cut and the length of the blades you have, bow saws can have a variety of sizes. The circular saw consists of two posts that are inserted into lugs hollowed out in the thickened ends of the spacer. Holes are drilled in the lower parts of the racks into which peg handles turned on a lathe are inserted. The handles should rotate with some effort.
On the opposite side, longitudinal cuts are made at the end of each handle into which the blade is inserted. The tension of the canvas occurs due to the twisting of the bowstring, which tightens the upper ends of the spacers. The bowstring is made from 10-1 2 turns of hemp or linen twine. Instead of twine, a rod with threads cut at both ends is also used to tighten the upper ends of the racks.
The rod is passed through the holes in the racks and, after putting on metal washers, wing nuts are screwed on both sides. The stands of a homemade circular saw are usually made elongated - this makes it possible to cut curved lines at a considerable distance from the edge of the board. And the saw blade together with the spacer is shortened. This saw is much more convenient to work with than a standard one.
All saws mainly have three types of teeth: isosceles, rectangular and inclined. If the saw is intended for sawing wood across the grain, then its teeth should be isosceles triangles, but if along, then inclined.
Circular saw, moving along curved lines, intersects wood fibers at a variety of angles. What tooth shape should a circular saw have? The most universal saw turned out to be a saw with a rectangular tooth shape, when one of its edges is located at a right angle to the blade. To increase the maneuverability and ease of movement of the circular saw, the tooth spread must be made quite large.
Curvilinear blanks from planks no more than 10 mm thick are cut out with a small circular hacksaw or jigsaw.
The main tool for cutting internal openings in a workpiece is hacksaw saws with narrow wedge-shaped blades, the so-called triggers. Using hammers you can cut out blanks along the outer contour. In addition to the usual triggers of different sizes, universal ones with removable blades are used.
The thickness of the trigger blades is 1.5 mm, length 325-530 mm, width at the handle 20-40 mm, the shape of the teeth is rectangular. Move the saw through one tooth: even teeth to the right, and odd teeth to the left. They sharpen at different points, that is, first through one tooth on one side, and then, turning the blade, on the other side.
If you couldn’t buy a trigger, you can make it yourself from an ordinary hacksaw or an old saw blade 1.5 mm thick. The hacksaw blade is cut so that an elongated sharp wedge is obtained.
If the teeth of the hacksaw you are using are rectangular in shape, then the excess metal is cut off from the side of the butt, but if they are of a different shape, then you need to cut off the part of the blade on which the teeth are located, so that you can then cut out new teeth on this edge. You can cut the canvas as follows.
Clamp the blade in a vice between two boards so that only the part that needs to be cut protrudes. Run the tip of the scraper along the edges of the boards along the canvas several times until a sufficiently deep scratch is formed. Apply the same mark on the other side of the canvas.
Then use a hammer to bend the protruding part of the canvas. Usually the canvas breaks easily exactly at the risk. Smooth out the resulting rough fracture with a file.
Secure the canvas with clamps on a workbench. To avoid accidentally touching the teeth with a file, nail a metal plate 3-4 mm thick along them on a workbench.
First, remove the metal from one side of the blade with several passes of the file, and then from the other. Usually, before planing, the cross-section of the saw has the shape of a rectangle, and after that it has the shape of an acute triangle or a highly elongated trapezoid.
When sawing, the butt of such a blade is not pinched by wood fibers and the saw easily moves through the cut. The wider the cut made by the saw, the easier it is to change the direction of the blade. This is especially necessary when cutting sharp bends. To get a wide cut, the saw blade is well spread.
For openwork carving use boards 15-25 mm thick from aspen, pine, birch and alder. Since birch wood is affected by fungi in the open air, openwork patterns cut from it must be covered with a protective layer of oil paint. When choosing a material, it is necessary to prepare well-dried boards without cracks, warping or minimum quantity knots. The smooth surface of the boards is obtained by planing.
Typically, any sawing pattern consists of several repeating elements. For each of them you need to cut out a life-size template from thick thick cardboard, textolite, or plywood. Soak the cardboard template several times with drying oil and dry for 24 hours. Our drawing shows a pattern of a 5-shaped curl - the most characteristic element of house carving.
When cutting lines with different steepness, different sections of the blade are alternately involved in the work. Very steep lines with a small radius of curvature are cut out with the tip of the trigger, that is, its narrowest part.
As the steepness of the line decreases, the middle part of the saw comes into operation, and if the line being cut is almost straight, the wide part of the saw, located closer to the handle, comes into operation. After cutting out the openings on the carved board, eliminate all kinds of flaws and inaccuracies with a knife with a narrow blade and chisels.
- Geometric carving
Geometric carving is varied in its techniques and the visual effect it produces. Here, the most commonly used triangular-notched carving is distinguished, the very name of which suggests that its basis is made up of recesses of different sizes, each of which has three edges.
Behind it comes a nail-like carving, in the form of deep holes, and a contour carving. All the variety of cutting on a particular object was achieved by endlessly combining and varying these basic techniques.
Currently, geometric carving has moved to new objects: caskets, boxes, ladles.
Geometric carving- one of the most ancient types of wood carving, in which the depicted figures have a geometric shape in various combinations. Such carving is performed in the form of straight and arcuate elements using a jamb knife and semicircular chisels. This type of carving is popular because of the ease of execution and the small set of tools used during the work. At the same time, this carving does not require, as with relief carving, special knowledge of the theory of design. Another advantage of geometric carving is the shallow depth of the carved pattern, which does not disturb the composition of the product itself.
The main types of patterns in geometric carvings:
A. Chain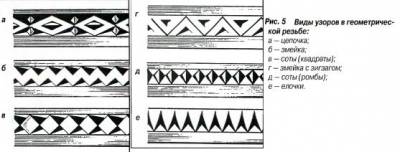
b. Snake
V. Honeycomb (squares)
Mr. Snake with zigzag
d. Honeycombs (diamonds)
e. Christmas trees
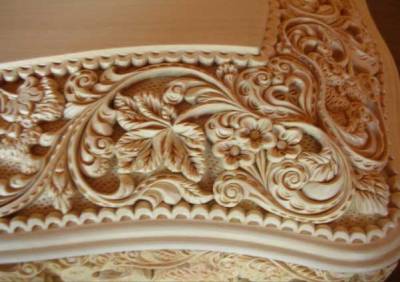
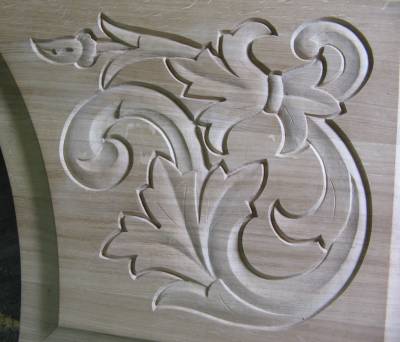
- Flat relief carving
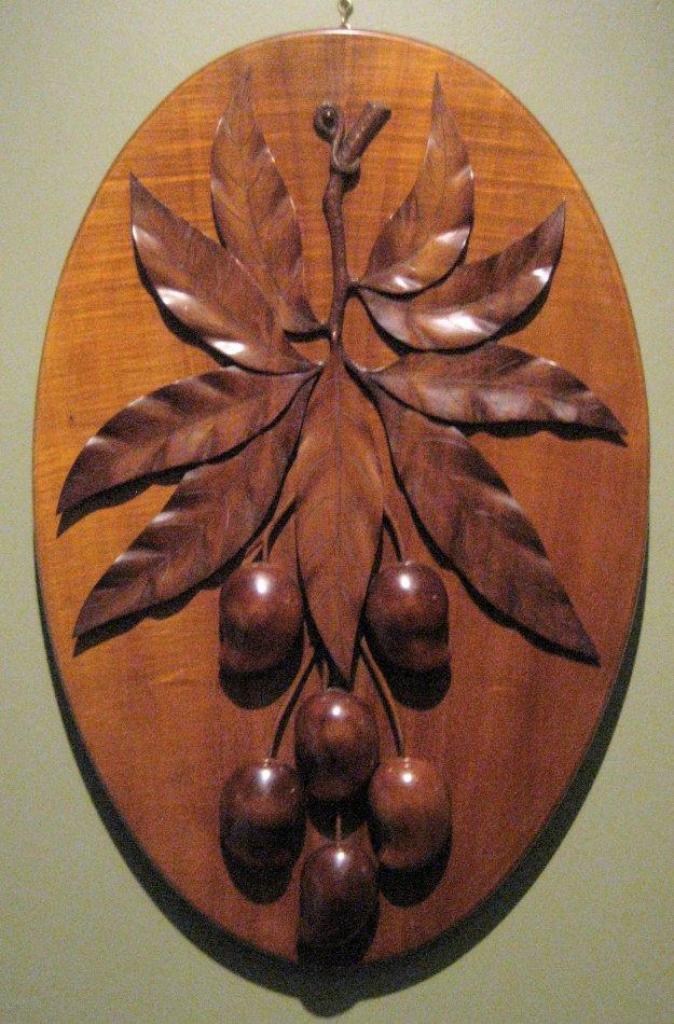
The second most important type of carving, very ancient in origin and widespread, was flat-relief carving. The very name of the carving shows that its basis is a flat relief.
This means that a design, usually a free plant one, is revealed on the surface of a board or household item by selection, i.e. deepening the background around the future pattern. The background deepens slightly (0.5-1cm), the drawing itself remains flush with the board.
To give it greater liveliness and softness, the edges of the pattern revealed in this way, mainly images of leaves, berries, birds and animals, are slightly rounded or rolled up.
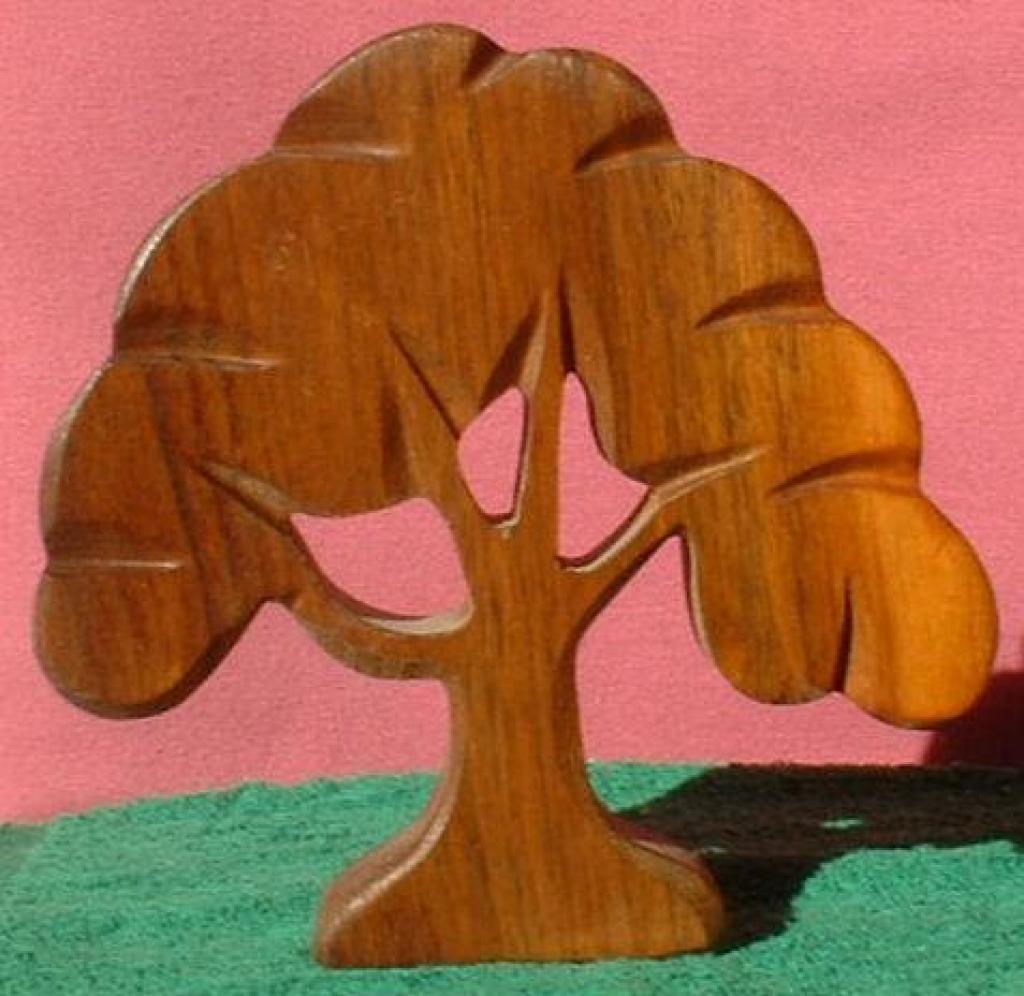
- Sculptural carving
Along with flat-relief and high-relief carvings (house, ship), three-dimensional and sculptural carvings have become widespread.
In the old days, beehives in the form of human or animal figures were carved by master carvers, usually from a whole wooden block.
Sculpture- one of the types of fine art, the task of which is to recreate images of people, animals, significant social and historical events in plastically expressive forms.
- Wood carving
For many centuries, Russian craftsmen, using a knife and an ax, built wooden palaces, churches, peasant huts, and created household utensils decorated with carved patterns. As a result, certain traditions, types and techniques of wood carving developed. Due to its relative simplicity, slotted thread has become most widespread.
Incised wood carving is a carving with a completely selected background. It can be geometric, contour, oval, and if done well and cleanly, it gives the product openwork and lightness, especially to platbands, cornices and fences.
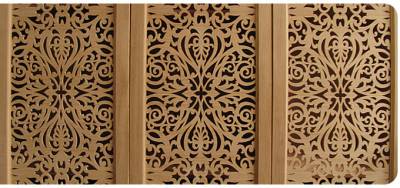
Carved wood carving can be done both in the technique of flat-relief carving (with a flat ornament) and in the technique of relief carving. Flat slotted carving was often used to decorate antique Russian furniture. When using such carvings in cabinets and screens, bright fabric is placed under it as a background.
The background in the slotted thread used to be removed with a chisel or saw, but now they have been replaced by a jigsaw. In the latter case, the thread is called kerf. Since this operation is mechanized, kerf threads are used in the mass production of furniture.
Carved carving with a relief ornament is called openwork. Such carvings were widely used to decorate furniture in the Baroque and Rococo styles at the end of the 17th and 18th centuries.
It is easier to cut out the ornament of a slotted or applied thread than to choose a background with notching of contours in a blind thread. The edges of the ornament are not always smooth and clean, therefore, they are rounded off by cutting off a narrow chamfer along the edges or choosing narrow fillet-recesses. House carving does not require particularly careful execution, since it is often visible from afar.
House carving is mainly done by sawing and drilling. Marks left by tools are rarely cleaned, and wood scuffs are often not taken into account. However, many carpenters try to make such carvings as cleanly as possible.
Holes in the workpiece or part are drilled or cut with round chisels, small and large, which depends on where the part should have a hole. To protect the part from chipping, its back side should be pressed tightly against a smooth board.
The parts are sawed in this order. First of all, drill a hole, then insert a jigsaw or hacksaw into it and saw through the marks. The workpiece can be laid on a workbench and sawed from top to bottom, but it is better to arrange a special stand from a thick board about a meter long.
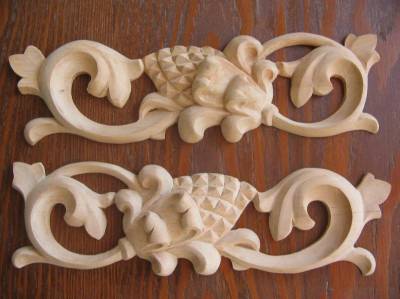
Overlaid wood carving- this is an ornament made with slotted carvings and glued or nailed onto a finished background, for example, onto a platband board or other part.
With this method of execution, an overhead thread turns out to be clearer than a blind thread and looks much better. In this case, the slotted thread must be done as cleanly as possible. It is not recommended to chamfer reverse side details, as it may give the impression that the carving is disconnected from the main background.
P sawing wood carving became widespread in folk art in the 19th century. thanks to the spread of the production of thin factory saw boards used for finishing work. The process of making sawn threads includes the following operations: preparing the board, applying a template, cutting or drilling holes, rough cutting the thread contour, finishing the contour, working out the relief and cleaning the surface.
To this day, in Russian villages and hamlets, as well as small provincial towns, you can see ancient houses with lacy wooden decorations that have been preserved since the last century. Only certain parts of the house were decorated with openwork cut carvings: window and door frames, piers, end boards. In addition to being aesthetically pleasing, the applied carved details on houses also had a practical significance. Thus, carved boards along the roof slopes - piers - covered the ends of the roofs sticking out from under the roof. Their purpose is to protect the bags from moisture penetration so that they do not collapse. The same function was performed by the end boards, which were nailed to the ends of the log frame. The window frames covered the joints between the window frame and the logs. In northern Russian huts, the junction of two piers was covered with a patterned towel, and the lower ends of the piers protruding from under the roof were also decorated with carvings. Such carvings were also used to decorate cornice valances, brackets, attics, attic window fillings, backs of chairs, beds, etc.
Saw carving or sawing is a patterned through wood carving based on a planar through ornament with zoomorphic and plant elements. In the case of fixing an openwork thread on the planes of entrance gates, gates, etc., such a thread is called a cut-over thread, regardless of the method of its fastening.
The widespread use of saw-cut carving in folk art is associated with the development of the timber industry in the 19th century, thanks to which thinner and cheaper saw boards began to be produced for finishing work. The process of making sawn threads includes the following operations: preparing the board, applying a template, cutting or drilling holes, rough cutting the thread contour, finishing the contour, working out the relief and cleaning the surface.
Pine and larch wood have always been and continue to be used for openwork carving. Birch, aspen and linden wood could also be used for elements decorating housing. Dried boards (usually ¾ inch thick (33 mm)) were smoothly planed into layers. To apply a design to the workpiece, they used templates or stencils that were created by the craftsmen themselves. That is why it is so difficult to find repeating patterns in the decor of wooden houses. After applying the design, the workpiece was fixed on a workbench with a preliminary placement of a tightly fitting board or shield under it. If the workpiece was thick, the holes were drilled using a hammer drill. They did not immediately drill through the entire thickness of the part. As soon as the tip of the drill reached the lower mouth of the workpiece, it was turned over and a hole was drilled. on the other side, which prevented the appearance of chips on the underside of the part. The workpiece was cut out with a bow saw or hammer along the outer contour. Then, using a hammer, holes were drilled where the edges of the board coincided with the contours of the opening. The internal curved contours were cut out with a hammer saw. in the work, different sections of the saw blade were alternately used. Very steep lines with a small radius of curvature were cut out with its narrowest part. As the steepness of the line decreased, the middle part of the saw came into operation, and if the line being sawed was almost straight, then the wide part of the saw, located closer to the handle, came into operation. A jigsaw was also used to cut out the contour of the thread, leaving a small allowance for further processing. If the design of the ornament contains circular or curvilinear elements, then they were cut out with a saw only if the radii of curvature allowed. In other cases, they rough-sawed in broken straight lines in order to then give the desired shape using straight, semicircular, sloping and curved chisels and different types skins.
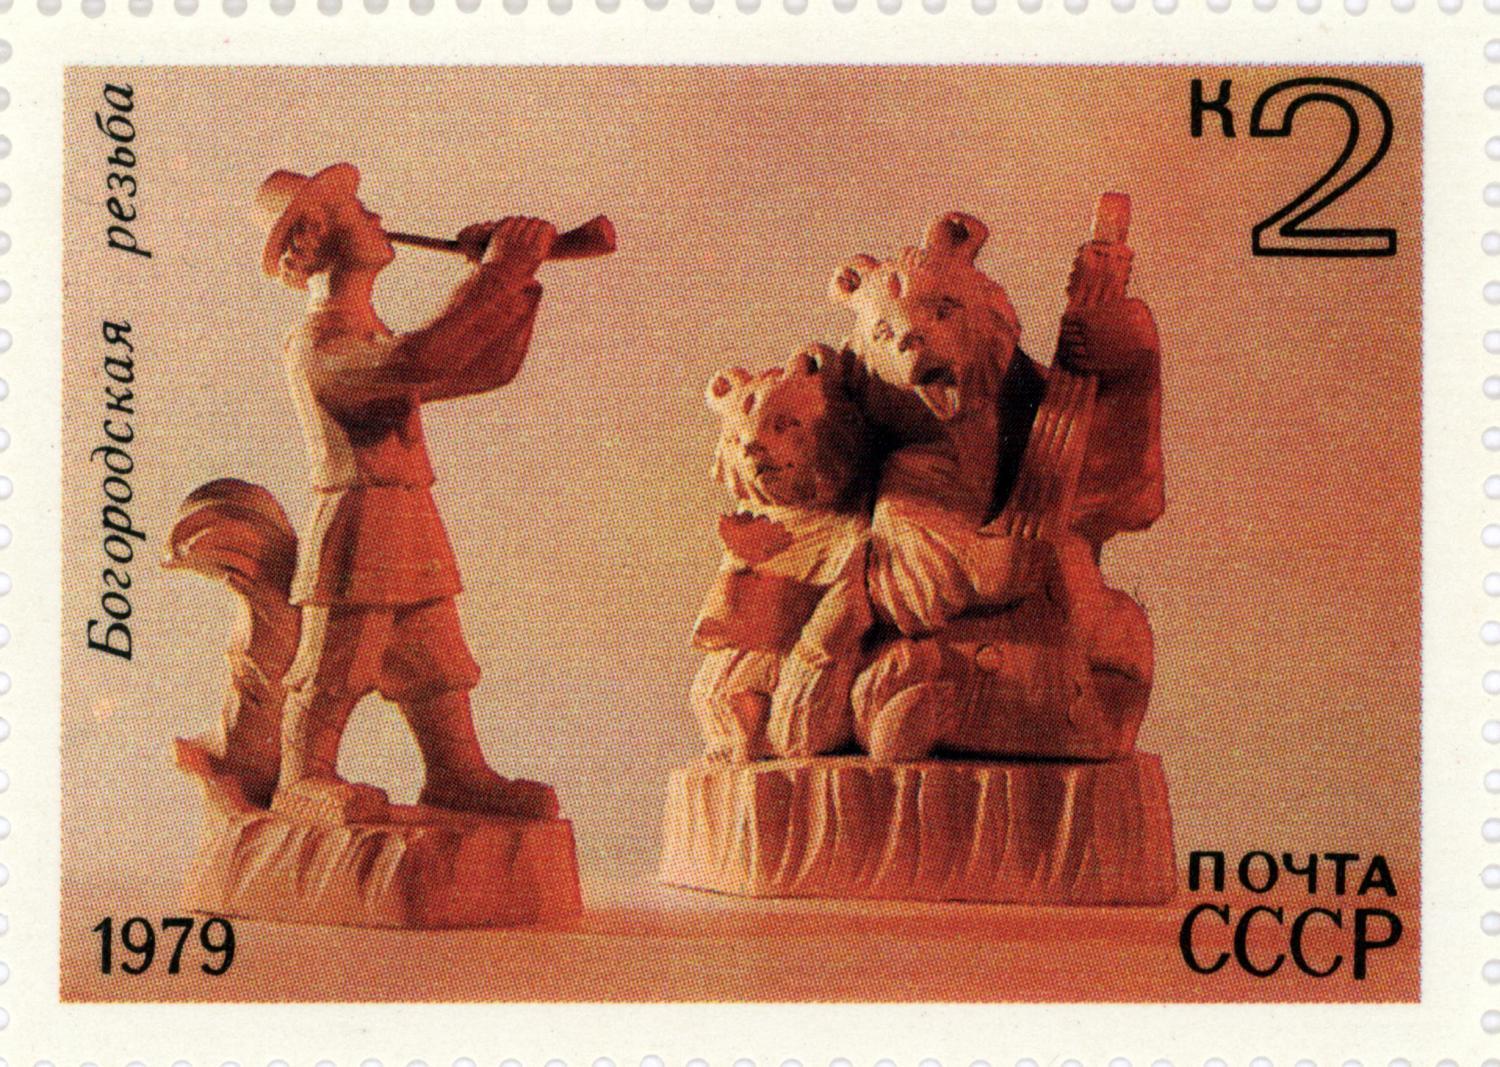
The outline was cut clean with a cutter, straight or semicircular chisels. To obtain smooth cuts, the chisel was held at an angle to the surface and cut with light sliding cuts. In narrow places, the material was removed with a Bogorodsk knife.
They finished the work by cleaning the carvings with rasps or sandpaper; sometimes the edges of the ornament were slightly curved, visually softening the outline.
Nowadays, sawn house carving continues to be used to decorate rural wooden houses, country houses, gazebos, shady canopies, and towers on children's playgrounds.