From a certain angle
Sub certa specie
Latin-Russian and Russian-Latin dictionary of popular words and expressions. - M.: Russian Language. N.T. Babichev, Ya.M. Borovskaya. 1982 .
See what “Under a certain angle of view” is in other dictionaries:
1. Scope and composition of the concept. 2. Class determination of memoir genres. 3. Questions of reliability of M. l. 4. Techniques for examining M. l. 5. The meaning of memoirs. 6. Main historical milestones of M. l. 1. SCOPE AND COMPOSITION OF THE CONCEPT. M. l. (from French... ... Literary encyclopedia
A form of culture associated with the subject's ability to be aesthetic. mastering the life world, its reproduction in a figuratively symbolic way. key when relying on creative resources. imagination. Aesthetic attitude to the world is the premise of the artist. activities in... ... Encyclopedia of Cultural Studies
BIBLICAL HERMENEUTICS- a branch of church biblical studies that studies the principles and methods of interpreting the text of the Holy Scriptures. The Scriptures of the OT and NT and the historical process of the formation of its theological foundations. G. b. sometimes perceived as the methodological basis of exegesis. Greek word ἡ… … Orthodox Encyclopedia
- (Fr. Pavel) (1882 1937), Russian philosopher, theologian, art critic, literary critic, mathematician and physicist. He had a significant influence on Bulgakov’s work, especially noticeable in the novel “The Master and Margarita”. F. was born on January 9/21, 1882 in... ... Bulgakov Encyclopedia
CINEMA- CINEMATOGRAPHY. Contents: History of the use of cinematography in biology and medicine.....................686 Cinematography as a method of scientific research.............. ......667 X-ray kiematography.............668 Cinematic cyclography...............668... ... Great Medical Encyclopedia
Already the first researchers of the chemical action of light noticed that silver chloride received different shades, depending on the color of the operating light and the method of preparing the photosensitive layer. In 1810, the Jena professor Seebeck noticed ... Encyclopedic Dictionary F.A. Brockhaus and I.A. Ephron
Leopold, von (Sacher Masoch, 1836 1895) German-Austrian writer, Rusyn by origin, son of the Galician police president. Being a historian by training, Z.M. left his university work early and quickly became one of the most popular... Literary encyclopedia
Faculty of Liberal Arts and Sciences (Smolny Institute) Founded [] ... Wikipedia
Faculty of Liberal Arts and Sciences (Smolny Institute) ... Wikipedia
A collection of Jain authoritative texts that were codified by a council in the 5th century. Shvetambara representatives of one of the two main movements of Jainism, but retain the common Jain heritage in a minor “sectarian” edition. Like... ... Philosophical Encyclopedia
Reading Location ... Wikipedia
Books
- Aspect analysis of a lesson in elementary school, Roza Gelfanovna Churakova. The book reveals the conceptual foundations of aspect analysis of a lesson. primary school. By aspect analysis, the author understands a detailed and comprehensive consideration of the lesson as a whole under...
- The theory of knowledge of modern natural science: based on the views of Mach, Stallo, Clifford, Kirchhoff, Hertz, Pearson and Ostwald, Kleinpeter G.. G. Kleinpeter, an Austrian philosopher, a student of E. Mach, believed it was necessary to give a complete and holistic presentation of the theory of knowledge. According to the author, this work generally coincides in…
Today's conversation is, to some extent, a continuation of the topic “Vertical text”. In addition to text written horizontally and vertically, we may need to write text, for example, at a certain angle, or even make it “lying” or tilted. We will talk about all this today.
The tool “Draw an inscription” will help us. Let’s open the “Insert” tab of the top menu and focus our attention on only the two functions it contains: “Shapes” and “Inscription”:
Both of these functionalities contain the same tool (option) “Draw an inscription”. Let’s expand on the contents of the “Shapes” functionality and see where the “Draw Label” tool is located:

So, the “Draw Lettering” tool is located in the “Basic Shapes” section of the shape set. If we once used this tool or some shape, then these shapes are reflected in the top section, with the name “Last used shapes”.
Now, without leaving the “Insert” tab, move the mouse cursor to its “Text” section and click the “Inscription” icon and in the window that opens, pay attention to the “Draw inscription” option:

This is still the same instrument. So, we have two options for activating the tool, no matter which way we go. Confirmation of the activity of the “Draw Label” tool will be a modification of the cursor - it will turn into a crosshair of two small lines:

By clicking and holding the left mouse button, we will create a field for text - draw a rectangle. The cursor will automatically be inside the rectangle, and we can start entering text:

So, the text entry is completed, you can start rotating it:

Last time, when we talked about “vertical text,” we rotated the text by grabbing the top Green colour marker. Today we will act differently. I'll add two more lines of text to the box as an example.
The moment we finished drawing the field for the future text and released the left mouse button, significant changes occurred in the top menu. Completely independently (automatic mode), the options of the “Insert” tab were replaced by other options of the other “Format” tab:

But let's take a moment to rotate the text and pay attention to the field within which we place the text. The visibility of the field should not bother us, since we can make it invisible.
Why do we need to make the field invisible? And so that if text is written on a background with a color other than white, the working area of the field is not visible.
So, let's make the field transparent using some of the options in the top menu's Format tab. Our task is to make the field truly transparent (now it is white) and remove its outline.
Let's start by removing the outline. To do this, expand the contents of the “Shape Outline” option and select the “No Outline” option from the list:

Now let’s make the field transparent, that is, reduce the white fill to zero. To do this, select the “Shape Fill” option and in the list of options that opens, select the “No fill” option:

This option may not always suit us, for the reason that “no fill” means the absence of a fill with a color other than white, as well as a gradient fill and a texture fill. That is, the field remained white as it was. In this particular case, this is an unnecessary action. Now I will place a triangle under the text, and we will make sure of this:

In order for the field to become truly transparent, we need to make other settings, and we will now make these same settings.
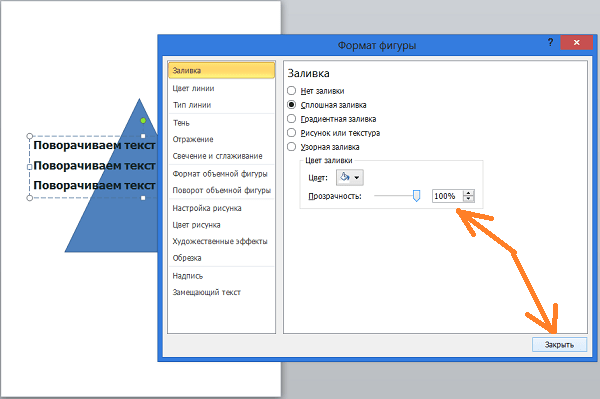
If the text field is not selected, then click in the text area to select it (the field is captured by markers). By left-clicking on the arrow in the lower right corner of the “Shape Styles” section of the “Format” tab, we will expand the additional settings window called “Shape Format”:

This window displays the settings that the field currently has. The field is filled with a solid white fill of 100% because the transparency level is 0%:

In order for the field to become completely transparent, we need to move the transparency slider to the right until a value equal to 100% appears in the window line. If we move the slider smoothly, we can observe how the text field becomes more and more transparent:

Having set the transparency level to 100%, click the “Close” button:
And here is the result of our actions:

Now let's move on to text rotation, as well as its tilt.
In order to rotate the text the way we want, we must, without leaving or collapsing the “Format” tab of the top menu, turn to the “Shape Effects” option:

And in the list of actions that opens, select the item “Rotate a volumetric figure”:

A new detailing window will open for us, where we will select the item “Rotation parameters for a volumetric figure”:

And now, finally, we get to the settings window:

In the lines where we currently see zero values for the text rotation angles along the X, Y, Z axes, we set the desired values by observing how the text rotates or tilts. We can set angles along all three coordinate axes, two or one. Or we can use the icons with blue arrows located in two columns to the right of the lines for entering numbers (tilt and rotation values). All we have to do is left-click on these very icons and look at what happens to the text:

In order to get into this window even faster, we need to left-click inside the text to select it, and then click the small arrow in the lower right corner of the “Shape Styles” section:

You should always first select text created using the Draw Text tool so that the required Drawing Tools Format tab appears in the top menu. And after it appears in the top menu, left-click on the name and expand the contents.
And this is the right window at our service:

And so that we can start setting parameters, we need to select the already familiar “Rotate volumetric figure” option:

We don’t necessarily have to enter the angle values into any lines of the coordinate axes or click the icons with blue arrows to the right of the value entry lines. We can use the templates, a set of which is located at the top of the parameter settings window:

Let's left-click on the arrow-button to expand the list of blanks and select one or the other blank, while simultaneously observing how the text behaves. I'll change the page orientation to landscape and increase the font size to make the changes easier to see:

By clicking the up and down arrows we can make the text in perspective:

If, for example, we set the X axis to 180 degrees, then our text will be “back to front”:

For additional influence on the text, in the same window we can use the “Inscription” option:

Well, in conclusion of today’s conversation about how to rotate text at an angle, as well as how to tilt text, I want to draw attention to important point. In order for us to twist the text like a pizzaiolo with dough, there should be no checkmark in the box labeled “Keep text flat”:

Often, a home craftsman urgently needs to take some kind of measurement or make markings at a certain angle, but he does not have either a square or a protractor at hand. In this case, a few simple rules will help him out.
Angle 90 degrees.
If you urgently need to construct a right angle, but there is no square, you can use any printed publication. The angle of the paper sheet is a very precise right angle (90 degrees). Cutting (punching) machines in printing houses are set up very precisely. Otherwise, the original roll of paper will begin to be cut at random. Therefore, you can be sure that this angle is a right angle.
What if there is not even a printed publication or it is necessary to construct a corner on the ground, for example when marking a foundation or a sheet of plywood with uneven edges? In this case, the rule of the golden (or Egyptian) triangle will help us.
The golden (or Egyptian, or Pythagorean) triangle is a triangle with sides that relate to each other as 5:4:3. According to the Pythagorean theorem, right triangle square of the hypotenuse equal to the sum squares of legs. Those. 5x5 = 4x4 + 3x3. 25=16+9 and this is undeniable.
Therefore, to construct a right angle, it is enough to draw a straight line on the workpiece with a length of 5 (10,15,20, etc., a multiple of 5 cm). And then, from the edges of this line, start measuring 4 on one side (8,12,16, etc. divisible by 4 cm), and on the other - 3 (6,9,12,15, etc. divisible by 3 cm) distances. You should get arcs with a radius of 4 and 3 cm. Where these arcs intersect with each other and there will be a right (90 degrees) angle.
Angle 45 degrees.
Such angles are usually used in the manufacture of rectangular frames. The material from which the frame is made (baguette) is sawn at an angle of 45 degrees and joined. If you don't have a miter box or protractor at hand, you can get a 45-degree angle template as follows. It is necessary to take a sheet of writing paper or any printed publication and bend it so that the fold line passes exactly through the corner, and the edges of the folded sheet coincide. The resulting angle will be equal to 45 degrees.
Angle 30 and 60 degrees.
An angle of 60 degrees is required to construct equilateral triangles. For example, you need to saw such triangles for decorative work or accurately install a power miter. An angle of 30 degrees is rarely used in its pure form. However, with its help (and with the help of a 90 degree angle) an angle of 120 degrees is constructed. And this is the angle necessary to construct equilateral hexagons, a very popular figure among woodworkers.
To construct a very accurate pattern of these angles at any moment, you need to remember the constant (number) 173. They follow from the ratios of the sines and cosines of these angles.
Take a sheet of paper from any printed publication. Its angle is exactly 90 degrees. From the corner, measure 100 mm (10 cm) on one side, and 173 mm (17.3 cm) on the other. Connect these dots. This is how we got a template that has one angle of 90 degrees, one of 30 degrees and one of 60 degrees. You can check it on a protractor - everything is accurate!
Remember this number - 173, and you will always be able to construct angles of 30 and 60 degrees.
Squareness of the workpiece.
When marking blanks or constructions on parts, in addition to the angles themselves, their ratio is also very important. This is especially important when making rectangular parts or, for example, when marking a foundation or cutting large sheets of material. Incorrect construction or marking subsequently leads to a lot of unnecessary work or to the appearance of large number waste.
Unfortunately, even very precise marking tools, even professional ones, always have a certain error.
Meanwhile, there is a very simple method for determining the rectangularity of a part or construction. In a rectangle, the diagonals are absolutely equal! This means that after construction it is necessary to measure the lengths of the diagonals of the rectangle. If they are equal, everything is ok, it really is a rectangle. And if not, you have built a parallelogram or rhombus. In this case, you should “play” a little with the adjacent sides in order to achieve exact (for this case) equality of the diagonals of the marked rectangle.
Since ancient times, after mastering the tools of labor, man began to build a dwelling from wood. Having gone through evolution, man continues to improve the construction of his home for thousands of years. Certainly modern technologies simplified construction and provided ample opportunity for imagination, but basic knowledge about the properties of wooden structures is passed down from generation to generation. Let's look at ways to connect wooden parts.
Let's look at the methods of joining wooden parts that novice craftsmen encounter. Basically, these are carpentry joints passed down from generation to generation, these skills have been used for centuries. Before we start joining wood, we assume that the wood has already been processed and is ready for use.
The first basic rule that should be followed when connecting wooden parts is that a thin part is attached to a thicker one.
The most common methods of joining wood, which will be needed during the construction of personal buildings, comes in several types.
End connection
This is one of the most simple ways connections (cohesion). With this method, it is necessary to fit the surfaces of the two elements being connected as tightly as possible. The parts are pressed tightly against each other and fastened with nails or screws.

The method is simple, but to obtain the quality of the product, several conditions must be met:
The length of the nails should be such that, having passed through the entire thickness of the first workpiece, their sharp end would penetrate into the base of the other part to a depth equal to at least ⅓ of the length of the nail;
The nails should not be located on the same line, and their number should be at least two. That is, one of the nails is shifted upward from the center line, and the second, on the contrary, downwards;
The thickness of the nails should be such that when they are driven in, a crack does not appear in the wood. Pre-drilling holes will help to avoid the appearance of cracks in wood, and the diameter of the drill should be equal to 0.7 of the diameter of the nails;
To obtain the best quality of connection, the surfaces to be joined must first be well lubricated with glue, and it is better to use moisture-resistant glue, such as epoxy.
Overhead connection
With this method, two parts are placed on top of each other and secured together using nails, screws or bolts. Wooden blanks, with this joining method, can be placed along one line or shifted at a certain angle relative to each other. In order for the angle of connection of the workpieces to be rigid, it is necessary to fasten the parts with at least four nails or screws in two rows of two pieces in a row.
If you are fastening with only two nails, screws or bolts, then they should be placed diagonally. If the nails have a through exit through both parts, followed by bending the protruding ends, this connection method will significantly increase the strength. Overlay connection does not require highly qualified craftsman.
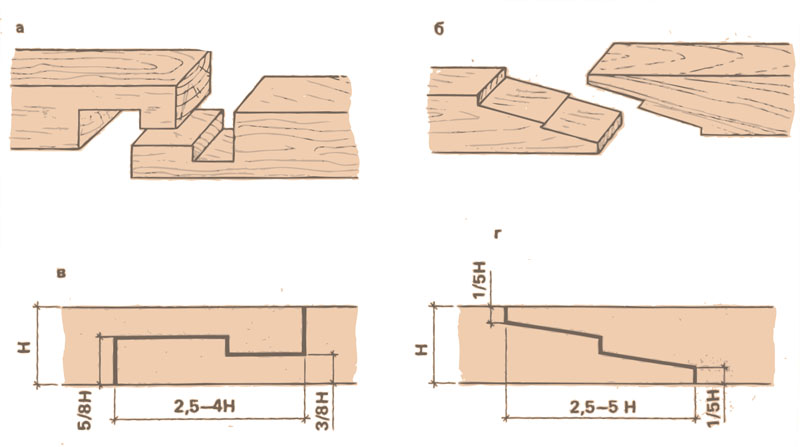
Half-tree connection

This method is more complex; it requires certain skills and a more scrupulous approach to work. For such a connection, a sample of wood is made in both wooden blanks to a depth equal to half their thickness, and a width equal to the width of the parts being connected.
You can connect parts into half a tree at different angles.
It is important to follow the following rule:
So that the sampling angle on both parts is equal, and the width of both sampling strictly corresponds to the width of the part. If these conditions are met, the parts will fit tightly to each other, and their edges will be located in the same plane. The connection is secured with nails, screws or bolts, and glue is still used to enhance strength. If necessary, such a connection can be partial. That is, the end of one of the workpieces is cut at a certain angle, and a corresponding selection is made in the other part. This connection is used for corner joining. In this case, both tenons (samples) are cut at an angle of 45 degrees, and the joint between them is located diagonally.
Length splicing
This splicing of bars and beams along the length has its own characteristics.
As a rule, splicing is simple for vertical supports.
But it’s a completely different matter when the beam or beam at the splice point is subject to bending or torsion loads, in which case simple fastening with nails or screws will not do.

The spliced parts are cut at an angle (into an oblique overlay) and compressed with bolts. The number of bolts depends on the applied loads, but there must be at least two.
Sometimes additional overlays are installed, for example, metal plates, preferably on both sides, top and bottom; for strength, you can additionally fasten it with wire.
Cleat
This connection is used for flooring or for sheathing boards. To do this, a tenon is made in the edge of one board, and a groove is made in the other.
With this splicing, gaps between the boards are eliminated, and the sheathing itself takes on a beautiful appearance. Appropriately processed lumber is supplied to the retail chain, where it can be purchased in finished form.

An example of such materials is floorboard or lining.
Connection “socket-spike”
This is one of the most common connections of wooden parts.
This connection will provide a strong, rigid and neat bond.
It goes without saying that it requires the performer to have certain skills and accuracy in work.

When making this connection, you need to remember that a poor-quality tenon connection will not add reliability and will not have a beautiful appearance.
A tenon joint consists of a groove hollowed out or drilled in one of the wooden parts, as well as a tenon made at the end of another element being attached.
The parts must have the same thickness, but if the thickness is different, then the socket is made in the part that is thicker, and the tenon is made in the second, thinner part. The connection is made using glue with additional fastening with nails and screws. When screwing in a screw, remember that pre-drilling will make the process easier. It is better to conceal the screw head, and the guide hole should be ⅔ of the diameter of the screw and 6 mm less than its length.
One of the very important conditions is the same humidity of the parts being connected. If the elements being connected have different humidity levels, then when they dry, the tenon will decrease in size, which will lead to the destruction of the entire connection. That is why the parts being connected must have the same humidity, close to operating conditions. For external structures, humidity should be in the range of 30-25%.
Using wood to decorate buildings.
Choice of wood.
In carving, for making large crafts with large elements, they often use coniferous wood, as the main one. They are affordable, and the striped texture can be used in ornaments.
Used as a background for applied and slotted carvings fir.

Valuable material is cedar, its soft, beautifully textured wood with a pleasant yellow-pink or light pink core color. The wood is easy to cut, cracks little when dried and is resistant to rotting.

Wood pears used for highly artistic carving details, as it is durable and does not warp easily from atmospheric influences.

Poplar, the wood is very soft and light - used for making carved decorative columns or background panels for attaching overhead carvings.

It is good to use wood to make chains from round rings apple trees. This wood is used in small crafts and in applied carvings. In this case, the springy properties of the apple tree are used.
Wood is also used linden trees. Very light, well planed, drills and sands well.

carving from oak labor-intensive to manufacture due to its hardness.

But oak is not afraid of moisture and does not warp. Products made from natural wood are very beautiful, but they are expensive. To reduce the cost of the product, veneering is used. For example, veneered doors are made, according to the client’s order, “in oak.” We get beautiful doors that look similar to natural ones, but at a much lower price.
In geometry, an angle is a figure that is formed by two rays that emerge from one point (called the vertex of the angle). In most cases, the unit of measurement for angle is degree (°) - remember that a full angle, or one revolution, is 360°. You can find the angle value of a polygon by its type and the values of other angles, and if given a right triangle, the angle can be calculated from two sides. Moreover, the angle can be measured using a protractor or calculated using a graphing calculator.
Steps
How to find interior angles of a polygon
- For example, a triangle has 3 sides and 3 interior angles, and a square has 4 sides and 4 interior angles.
-
Calculate the sum of all interior angles of the polygon. To do this, use the following formula: (n - 2) x 180. In this formula, n is the number of sides of the polygon. The following are the sums of the angles of commonly encountered polygons:
- The sum of the angles of a triangle (a polygon with 3 sides) is 180°.
- The sum of the angles of a quadrilateral (a polygon with 4 sides) is 360°.
- The sum of the angles of a pentagon (a polygon with 5 sides) is 540°.
- The sum of the angles of a hexagon (a polygon with 6 sides) is 720°.
- The sum of the angles of an octagon (a polygon with 8 sides) is 1080°.
-
Divide the sum of all the angles of a regular polygon by the number of angles. A regular polygon is a polygon with equal sides and equal angles. For example, each angle of an equilateral triangle is calculated as follows: 180 ÷ 3 = 60°, and each angle of a square is calculated as follows: 360 ÷ 4 = 90°.
- An equilateral triangle and a square are regular polygons. And at the Pentagon building (Washington, USA) and road sign"Stop" shape of a regular octagon.
-
Subtract the sum of all known angles from the total sum of the angles of the irregular polygon. If the sides of a polygon are not equal to each other, and its angles are also not equal to each other, first add up the known angles of the polygon. Now subtract the resulting value from the sum of all the angles of the polygon - this way you will find the unknown angle.
- For example, if given that the 4 angles of a pentagon are 80°, 100°, 120° and 140°, add up these numbers: 80 + 100 + 120 + 140 = 440. Now subtract this value from the sum of all the angles of the pentagon; this sum is equal to 540°: 540 - 440 = 100°. Thus, the unknown angle is 100°.
Advice: the unknown angle of some polygons can be calculated if you know the properties of the figure. For example, in an isosceles triangle, two sides are equal and two angles are equal; In a parallelogram (which is a quadrilateral), opposite sides are equal and opposite angles are equal.
Measure the length of the two sides of the triangle. The longest side of a right triangle is called the hypotenuse. The adjacent side is the side that is near the unknown angle. The opposite side is the side that is opposite the unknown angle. Measure the two sides to calculate the unknown angles of the triangle.
Advice: use a graphing calculator to solve the equations, or find an online table with the values of sines, cosines, and tangents.
Calculate the sine of an angle if you know the opposite side and the hypotenuse. To do this, plug the values into the equation: sin(x) = opposite side ÷ hypotenuse. For example, the opposite side is 5 cm and the hypotenuse is 10 cm. Divide 5/10 = 0.5. Thus, sin(x) = 0.5, that is, x = sin -1 (0.5).
Count the number of sides of the polygon. To calculate the interior angles of a polygon, you first need to determine how many sides the polygon has. Note that the number of sides of a polygon is equal to the number of its angles.