Radiators and coolers - it’s not even that interesting to write about this, because all this has been in any computer for a long time and this will not surprise anyone. Liquid nitrogen and all sorts of systems with a phase transition are another extreme, the chances of encountering which in the household of an ordinary person are almost zero. But “dropsy”... in the matter of cooling a computer, this is like a golden mean - unusual, but affordable; It makes almost no noise, but at the same time anything can cool down. To be fair, it is more correct to call the water cooling system (water cooling system) the water cooling system (system liquid cooling), because, in fact, you can pour anything inside. But, looking ahead, I used ordinary water, so I will use the term SVO more.
Quite recently, I wrote in some detail about assembling a new system unit. The resulting stand looked like this:
A thoughtful study of the list suggests that the heat dissipation of some devices is not just high, but VERY high. And if you connect everything as is, then inside even the most spacious case it will be at least hot; but as practice shows, it will also be very noisy.
Let me remind you that the case in which the computer is assembled is, although not very practical (although every time I am convinced of the opposite), but very presentable Thermaltake Level 10– he has his drawbacks, but for his appearance alone he can be forgiven a lot.
At this stage, the motherboard was installed in the case, a video card was installed in it - first in the topmost PCI slot.
Radiator/pump/tank installation
One of the most interesting stages of work, which took us the most time (if we had immediately followed the easy path, we would have completed it in half an hour, but first we tried all the difficult options, because of which all the work took a total of 2 days (of course, far from complete).The water cooling system is very similar to the one used in cars, just a little larger - it also has a radiator (usually more than one), cooler, coolant, etc. But the car has one advantage - a solid oncoming flow of cold air, which plays a key role in cooling the system while driving.
In the case of a computer, heat must be removed by the air in the room. Accordingly, than larger sizes radiator and the number of coolers are better. And since you want a minimum of noise, effective cooling will be achieved mainly due to the surface of the radiator.
And the essence of the problem was as follows. On Skype, we previously agreed on the opinion “we’ll hang it on the back of the radiator in 2-3 sections - it’s more than enough!”, but as soon as we looked at the body, it turned out that everything is not so simple. Firstly, there really wasn’t enough space there for a three-section radiator (if you attach the radiator to the hole where the blow-out cooler of the case is supposed to be installed), and secondly, even if there was enough space, there would be no way to open the case itself - it would get in the way "door" of the system compartment :)
In general, we counted at least four options for installing a radiator in the Thermaltake Level 10 case - all of them are possible, each would require a different amount of time and each would have its own pros and cons. I'll start with those that we considered, but which did not suit us:
1. Installing the radiator on the rear (away from the user) side, that is, on the removable door.
Pros:
+ Possibility of horizontal and vertical installation of any radiator, even for 3-4 coolers
+ The dimensions of the case would not increase much
Minuses:
- You would have to drill from 4 to 6-8 holes in the door
- Removing the door would be very inconvenient
- With a horizontal arrangement, a radiator with a non-standard location of the hole for filling the liquid would be required
- If installed vertically, the hoses would be very long and with a large bend
- The case will be on my left (on the windowsill), and I don’t need warm air from the coolers in my face :)
2. Installing the radiator on top, on the “casing” of the power supply compartment. Pros and cons are identical
3. Installation of a two-section radiator inside the system compartment

Pros:
+ Ease of solution
+ Externally there would be no changes
+ The system compartment door would open without problems

Minuses:
- Only a 2-section radiator would be suitable (this is not enough for the hardware config)
- In this case, there would be no place for the cold air to come from, and I didn’t want to push warm air back and forth.
- There would be difficulties in “arranging” the pump and reservoir
- Even if you use ultra-thin coolers, all SATA connectors would be blocked (if they were brought out to the user, and not to the side, then this problem would not exist)
In general, we tried all these options to one degree or another - we spent a lot of time searching for the necessary components, trying them on, etc.
The latest option turned out to be a rather unusual solution - maybe not the most beautiful at first glance, but really practical. This is the installation of a radiator on the back side of the case through a special adjustable adapter with a scissor-type mechanism.

Pros:
+ Didn't have to drill anything
+ Possibility to hang ANY radiator
+ Excellent airflow
+ Access to the motherboard connectors was not blocked
+ Minimum hose length, minimum bends
+ The design is removable and transportable
Minuses:
- Not the most presentable appearance :)
- Opening the system compartment door is no longer so easy
- Quite an expensive adapter
Why did we come to this option last? Because during the search for the previous three options, we completely accidentally found an adapter that everyone had forgotten about, but it wasn’t available in the online store) Looking at the only (last) copy of the mounting frame Koolance Radiator Mounting Bracket, I thought “Whatever they won’t come up with!” The point is this: 4 “cone nails” are inserted into the holes for attaching the rear blow-out cooler to the body, onto which a special frame is hung.

The design of this frame is such that its length can be changed by twisting the clamps, and it is removed by mixing two parts of its body (so that the holes open up and it can be removed from the “studs”) - I bent it!) It’s much easier to understand everything from the photo.

The frame is metal and very durable - I was convinced of this when we tested a 3-section (for 3 coolers) radiator. Nothing dangles or sways, everything hangs tightly, but in the “unclamped” case the door opened quite well - this option completely suited me!

There were a huge number of radiators to choose from - black, white, red... What surprised me most in this matter was the 4-section TFC Monsta, capable of removing up to 2600W of heat (this is apparently an SLI of four 480s)! But we are much simpler people, so we decided to stick with the radiator we tried on - Swiftech MCR320-DRIVE. Its advantage is that it combines three components at once - a radiator (MCR320 QP Radiator for three 120mm coolers), a liquid reservoir and a pump high pressure (MCP350 Pump, a complete analogue of a “regular” pump Laing DDC). In fact, with such a piece of hardware for the SVO, you will only need to buy additional water blocks, hoses and other little things that we already had. The pump operates from 12V (from 8 to 13.2), producing a noise of 24~26 dBA. The maximum pressure created is 1.5 bar, which is approximately equal to 1.5 “atmospheres”.

There were three candidate coolers for the radiator: Noctua, Be Quiet And Scythe. As a result, we settled on Indonesian ones (with Japanese roots) Scythe Gentle Typhoon(120mm, 1450 rpm, 21 dBA) – these turntables have been in great demand among many users for several days. They are very quiet, and the quality of bearing balancing is simply amazing - the cooler will spin for an unnaturally long time even with the lightest touch. The service life is 100,000 hours at 30°C (or 60,000 hours at 60°C), which is enough to obsolete this system unit.

There was a review of these “typhoons” on the FC Center - I advise you to read it. Protective grilles were placed on top of the coolers to prevent children from putting anything vital into the fans.


Let's try the resulting design on the system unit - it looks very unusual) But look how convenient it is - to get inside the case (or remove the cooling system), you just need to press one “button” and the entire structure is, in fact, already disconnected. We squeeze the mounting frame and have full access to the insides - it’s more than spacious, because we didn’t pile anything in there. Maybe I didn’t describe the most convenient option, but... considering that after assembling the computer you practically won’t have to climb inside, and good cooling is much more important, then I consider our decision to be correct.

The assembled structure weighs 2.25 kilograms, and with liquid and fittings, probably all 3 - looking ahead, the frame from Koolance was able to handle even this weight, for which it deserves respect and respect :)
Finish line
All that’s left to do is install all the components, “tie it with water” and test the resulting computer. It all started with the installation of fittings - beautiful pieces of iron (in the form of “herringbones”), which are installed through special gaskets (and sometimes, when the thread of the fitting is very long, through special spacers) into the corresponding hole in the water block or tank - we used a small adjustable wrench to tighten it , but here it is also important not to overdo it.
In addition to the fittings, special plugs were installed in two holes of the video card water block:

After that, we thought about the route along which the water would flow. The rule is simple - from less heated to more heated. Accordingly, the “output” of the radiator is connected first to the water block of the motherboard, from there the output goes to the processor, then to the video card, and only then back to the input of the radiator to cool. Since the water is the same for everyone, the temperature of all components will be approximately the same as a result - it is for these reasons that multi-circuit systems are made, and it is for this reason that it does not make sense to connect all sorts of hard drives, RAM, etc. to one circuit.

The role of the hose went to red Feser Tube(PVC, operating temperature from -30 to +70°C, burst pressure 10 MPa), for cutting which a special predatory tool was used.

Cutting the hose straight may not be that difficult, but it is very important! Almost all hoses were equipped with special springs against bends and kinks in the hose (the minimum radius of the hose loop becomes ~3.5cm).

On each hose (on both sides) in the fitting area you need to install a “clamp” - we used beautiful Koolance Hose Clamp. They are installed using ordinary pliers (with brute force), so you need to act carefully so as not to accidentally hit something.


 It's time to work on connecting the "inner world" with the "outer world." In order to be able to remove the radiator-reservoir-pump (for example, to open the case or for transportation), we installed so-called “quick release valves” (quick-release valves) on the tubes, the principle of operation of which is outrageously simple.
When we turn the connection (like with BNC connectors), the hole in the tube closes and opens, thanks to which we can disassemble the “dropsy” in less than a minute, without any puddles or other consequences. A couple more expensive but great looking pieces of hardware:


Expenses
5110 - EK FB RE3 Nickel water block for motherboard3660 - EK-FC480 GTX Nickel+Plexi water block for video card
1065 - EK-FC480 GTX Backplate Nickel for video card
2999 - Enzotech Stealth water block for processor
9430 - Pump/radiator/reservoir Swiftech MCR320-DRIVE
2610 - Two Release Coupling Valve
4000 - Koolance Radiator Mounting Bracket Adapter
1325 - Three Scythe Gentle Typhoon coolers (120mm) for radiator
290 - Four EK-10mm High Flow Fitting
430 - Thermal paste Arctic-Cooling-MX-3
400 - Nine Koolance Hose Clamp
365 - Nanoxia HyperZero Liquid
355 - Feser Tube
Such a high price in this case is due to the fact that fullcover water blocks were used for VERY hot pieces of hardware, all the heat from which must be dissipated by an appropriate radiator. For more simple systems such solutions are simply not needed, you can also do without decorative overlays and any quick-release valves - in such cases you can easily meet half the cost. The price of the average dropsy is 12-15 thousand rubles, which is 4-5 times higher than the cost of a really good processor cooler.
Switching on and working
After all the system components were connected, it was time for the “leak test” (leakage test) - coolant was poured into the radiator (twice distilled Nanoxia HyperZero red water, with anti-corrosion and anti-biological additives) - the circuit entered the order 500 ml.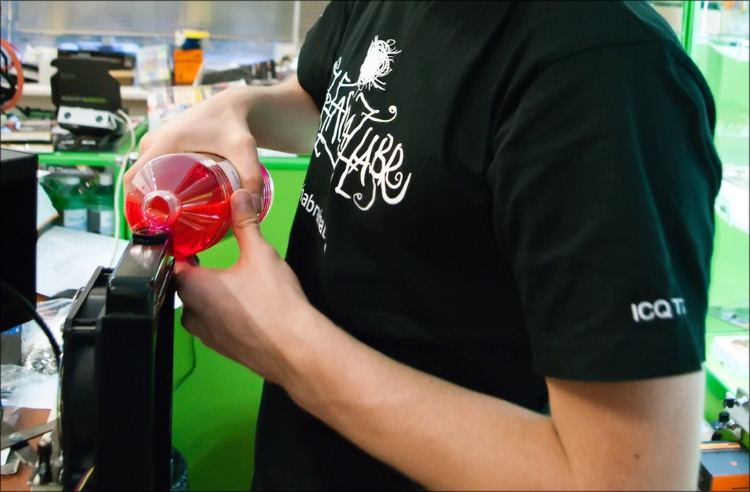
The guy in the habramike is filling up the radiator)
Because It is impossible to exclude the possibility that something was connected to the computer components incorrectly; it was decided to separately check the operation of the water cooling system itself. To do this, all the wires (from the coolers and from the pump) were connected, and a paperclip was inserted into the 24-pin connector of the power supply for “idling”. Just in case, we put napkins underneath to make the slightest leak easier to detect.
Press a button and... everything is as planned) Honestly, before this I had only seen dropsy (besides the Internet) at various exhibitions and competitions, where it was very noisy; therefore, I subconsciously prepared for the “murmur of a stream,” but the noise level was pleasantly surprising - for the most part, only the pump’s operation could be heard. Initially, there were “hissing” sounds - due to air bubbles located inside the circuit (they were visible in some places in the hoses). To solve this problem, the plug of the radiator tank was opened - the air gradually escaped from the circulation of the flow and the system began to work even quieter. After adding fluid, the plug was closed and the computer worked for another 10 minutes. No noise was heard from the power supply cooler or the three on the radiator, although their air flows made themselves felt.
Having made sure that the system was fully operational, we decided to finally assemble a test bench. Connecting the wires took no more than a minute - it took much longer to find the monitor and the wire to connect it, because... everyone worked on laptops;) The phrase “Reboot and select proper boot device or insert boot media in selected boot device and press a key” became a balm for the soul - we inserted one of the “working” SSD drives (with Windows 7 on board) - It's good that the new computer accepted this option. For complete happiness, we just updated the drivers for the chipset and installed the drivers for the video card.
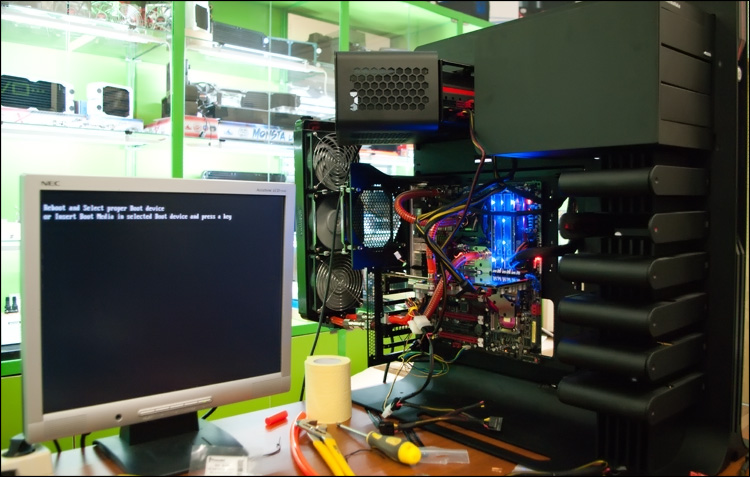

Launching the diagnostic monster Everest, where on one of the tabs we find the temperature sensor readings: 30°C was valid for all system components - CPU, GPU and motherboard - well, very pleasant numbers. The equality of the numbers led to the assumption that cooling in idle mode is limited by room temperature, because the temperature in ordinary dropsy cannot be lower than this. In any case, it is much more interesting to see what the situation will be under load.
15 minutes of “office work” and the video card temperature rose to 35°C.
We start by checking the CPU, for which we use the program OCCT 3.1.0– after quite a long time in 100% load mode, the maximum processor temperature was 38°C, and the core temperature was 49-55°C, respectively. The temperature of the motherboard was 31°C, the northbridge - 38°C, the southbridge - 39°C. By the way, it is very remarkable that all four processor cores had almost the same temperature - apparently, this is the merit of the water block, which removes heat evenly from the entire surface of the processor cover. 50+ degrees for 4-core Intel Core i7-930 with a TDP of 130W – hardly any stock air cooler is capable of achieving such a result. And even if it is capable, then hardly anyone will like the noise from its operation (the Internet says that the temperature of this processor is 65-70 degrees with a Cooler Master V10 cooler - the one with a Peltier element).
Out of habit, the video card was warmed up with the program FurMark 1.8.2(in common parlance “donut”) - it was hardly possible to whip up something more resource-intensive and informative.

In addition to Everest, the program was also installed EVGA Precision 2.0. At the maximum available resolution (with maximum smoothing), we ran a stress test with temperature logging - after just 3 minutes, the video card temperature settled at 52 degrees! 52 degrees under load for the top (currently) NVIDIA GTX 480 video card based on Fermi architecture is not just great, it’s wonderful!)

For comparison, the temperature of a video card under load with a standard cooler can reach up to 100 degrees, and with a good non-reference cooler - up to 70-80.
All in all, temperature regime everything is fine - under load, the coolers blow almost cold air out of the radiator, and the radiator itself is barely warm. I won’t talk about overclocking potential in this article, I’ll just say that it exists. But something completely different is much more pleasant - the system works almost silently!
The end
You can talk for a long time about the result, but I liked it, as did everyone who had already watched it. Whatever one may say, in the Thermaltake Level 10 case I managed to assemble a more than productive config that will be relevant for a long time. Moreover, a full-fledged water cooling system installed almost without problems, which, in addition to good cooling of the filling, gives +5 appearance. Speaking about the temperature regime, we can safely talk about a solid potential for overclocking - now, even under load, the cooling system is operating far from its maximum capabilities.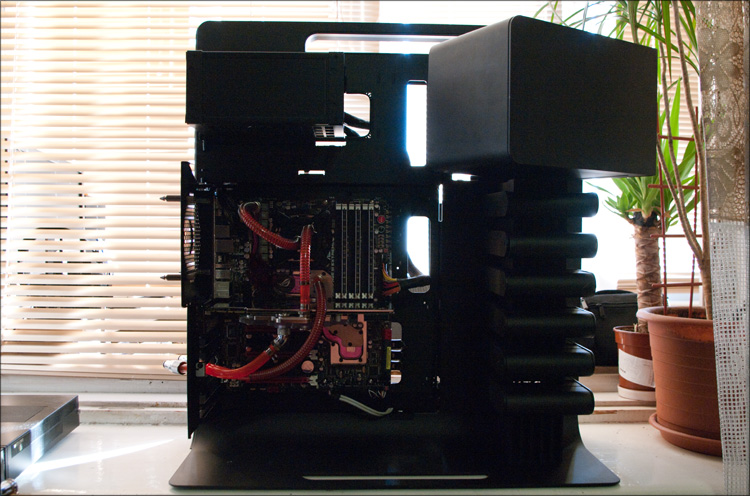
I forgot to write about another important plus - interestingness. This is probably the most interesting thing I've ever done with hardware - no other computer building has brought me so much pleasure! It’s one thing when you collect ordinary “soulless” computers, it’s a completely different thing when you understand all the responsibility and approach the matter with all your heart. Such work takes far from 5 minutes - all this time you feel like a child playing with an adult construction set. And also an engineer-technologist-designer-plumbing-designer, and just a geek... in general, the interest is greatly increased!

Good luck and frosty freshness!
Tags: Add tags
Every year, computer hardware manufacturers introduce new models of their products, which become more powerful, which means hotter. Conventional air cooling cannot cope with heat dissipation. Overheating the device may cause damage. Better suited in such cases water system cooling for PC.
What is a water cooling system for a computer?
Modern processors and video cards have performance under load that conventional fans with a radiator cannot cope with. The standard equipment only has air system, but it will only help when idle. For truly powerful chips, you need a water cooling system for your computer. It is a set of elements that transfer heat from the device through water to the cooling element. Water cooling for PC consists of:
- water block (water block);
- hoses and fittings;
- radiator with cooler;
- reservoir with pump (not present in all assemblies).
Advantages and principles of operation
Water is heated at the point where the block is connected to the element, and is transported through hoses to the radiator, where coolers cool it and again direct it to the chip. According to statistics, such liquid systems lower the processor temperature by 20-30% (and sometimes 50%) more effectively than air systems. There are two types of SVO:
- internal – all elements are located inside the PC case;
- external - the cooling part is located outside the system unit.
Such modding is available only to owners of desktop computers, because it is not physically possible to install such systems on a laptop, but the latest generations of gaming models already include SVO. The main advantage of liquid cooling is that water has a much higher thermal conductivity than air. Good tower coolers create noise, take up a lot of space and may not be installed on all motherboard formats (especially mini-ATX).
The cost of the water version is higher than the similar one air type, but inside the case it takes up much less space. The popularity of such systems is steadily growing along with the development of technology. You can install it not only on the processor, but also on the video card, the chipset of the motherboard. For example, the GTX 980 Ti video card is already released together with the SVO in the kit.
How to choose the right water block for your processor

When selecting a cooling fan for a PC, pay attention to the size of the radiator fans, their number, the possibility of installing them inside the case, and the material of the water block. Waterblock is a special heat exchanger that takes heat from the element and transfers it to water. The better it does this, the more efficiently the cooling occurs, so an aluminum water block is poorly suited for such purposes. The best choice would be the copper option - it will absorb and release heat better.
You should seriously think about choosing a water block if you are not buying a ready-made water block kit, but individual elements from which you will assemble your own system. This option is relevant if you want to connect the cooling for the processor and video card into one circuit at once. If you buy a ready-made kit, then all of them are now sold with a copper water block.
Best Water Cooling Systems – Review
You're unlikely to find a ready-made water-cooled PC case, so you'll have to install it yourself. Below are the most popular cooling systems with their main parameters. The most important ones include: noise level, water block material, supported processor socket formats, rotor rotation speed. As a rule, SVO options from stores support all modern connectors from AMD (AM3+, AM3, AM2, FM2, Fm2+) and Intel (LGA1356/1366, LGA2011/2011-3, LGA775, LGA1150/1151/1155/1156)
| Name | Water block material | Number of fans | Radiator material | Max. rotation speed, rpm | Noise level, dB |
| DeepCool Captain 240 | aluminum | ||||
| Arctic Cooling Liquid Freezer 240 | 4 (2 on both sides of the radiator) | ||||
| Cooler Master Nepton 140XL | |||||
| DeepCool Maelstrom 240T | |||||
| Corsair H100i GTX | |||||
| Cooler Master Seidon 120V VER.2 |
Where to buy and how much does PC water cooling cost?

It’s easier to find water cooling in an online store of computer components or hardware hypermarkets. Sales are carried out by specialized retail outlets, but it is rare to find a wide range of SVO. The price of water cooling for PCs has a wide range, here are the approximate cost levels of popular models:
- DeepCool Captain 240 – from 6500 RUR;
- DeepCool Maelstrom 240T – from RUR 5,000;
- Corsair H100i GTX – from 9400 RUR;
- Cooler Master Seidon 120V VER.2 – from 4500 RUR;
- Arctic Cooling Liquid Freezer 240 – from 6700 rub.
Find out also what it is and how it works.
Video: how to make a DIY SVO for PC
DigitalRazor, a Russian manufacturer of premium gaming computers, informs you about the acquisition of the Meijin brand with the right to use the trademark and domain names www..meijin-gaming-pc.ru.
ABOUT MEIJIN
Meijin, founded in 1995, is the first Russian computer company that began promoting water-cooled gaming computers in the early 2000s. The first deliveries of luxury gaming cases and Silverstone media centers to Russia, the first certified SLI and 3-WAY-SLI gaming systems on NVIDIA chips, the first serial computers with custom water cooling, the first computers with SSD instead of HDD!Anatoly Yasinsky, founder and CEO Meijin: “We were the first in the Hi-End PC market in Russia, in fact, we created this market. At the end of the 90s, competition in the PC market was such that companies fought for every dollar - they competed only on price. Nobody thought about the beauty of the computer or setting its maximum performance, as well as, incidentally, reliability. The cases were made of the cheapest plastic costing 20 USD and kept under the table. We took a certain risk, offering customers fundamentally different computers for fundamentally different money "And they were right - there were quite a lot of people willing to pay for quality. Now this is the norm, and this is very cool!"
DigitalRazor
Konstantin Schwartzburg, the head of the DigitalRazor company comments on this event: “From the first days from the inception of the idea to the creation of a company for the professional assembly and personalization of gaming computers, we were largely guided by Western experience, at the same time, the Meijin company served as a domestic example for us, as the oldest and most experienced player in this segment. Only two years have passed since the launch of the DigitalRazor brand into a separate division, and I can proudly say that the acquisition of such a monumental name is another round of company development for us. Our professionalism and unique solutions in the field of building powerful and productive computers are now also available to Meijin customers. The companies' areas of activity largely coincide; any visitor to the website www..meijin-gaming-pc.ru can find a suitable gaming computer model in the DigitalRazor line.Often, after purchasing a computer, the user is faced with such an unpleasant phenomenon as loud noise coming from the cooling fans. There may be malfunctions operating system due to heating to high temperatures (90°C or more) of the processor or video card. These are very significant shortcomings, which can be eliminated with the help of an additional water cooling installed on the PC. How to make a system with your own hands?
Liquid cooling, its positive properties and disadvantages
The operating principle of a computer liquid cooling system (LCS) is based on the use of an appropriate coolant. Due to constant circulation, the liquid flows to those components whose temperature conditions need to be controlled and regulated. Then the coolant flows through the hoses into the radiator, where it cools, giving off heat to the air, which is then removed outside the system unit using ventilation.
Water cooling installed on a PC is much more efficient than air cooling
The liquid, having a higher thermal conductivity compared to air, quickly stabilizes the temperature of hardware resources such as the processor and graphics chip, bringing them to normal. As a result, you can achieve a significant increase in PC performance through system overclocking. In this case, the reliability of the computer components will not be compromised.
When using SZhOK, you can do without fans at all or use low-power, silent models. The computer operation becomes quiet, making the user feel comfortable.
The disadvantages of SJOC include its high cost. Yes, a ready-made liquid cooling system is not a cheap pleasure. But if you wish, you can make and install it yourself. It will take time, but will not cost much.
Classification of cooling water systems
Liquid cooling systems can be:
- By type of accommodation:
- external;
- internal.
The difference between external and internal LCS is where the system is located: outside or inside the system unit.
- According to the connection diagram:
- parallel - with this connection, the wiring goes from the main radiator-heat exchanger to each water block that provides cooling for the processor, video card or other component / element of the computer;
- sequential - each water block is connected to each other;
- combined - this scheme includes simultaneously parallel and serial connections.
- According to the method of ensuring fluid circulation:
- pump-type - the system uses the principle of forced injection of coolant to water blocks. Pumps are used as a supercharger. They can have their own sealed housing or be immersed in coolant located in a separate tank;
- pumpless - the liquid circulates due to evaporation, which creates pressure that moves the coolant in a given direction. The cooled element, heating up, turns the liquid supplied to it into steam, which then becomes liquid again in the radiator. In terms of characteristics, such systems are significantly inferior to pump-type SZhOK.
Types of SZhOK - gallery
When using a serial connection, it is difficult to continuously provide refrigerant to all connected nodes. The parallel connection diagram of the LCC is a simple connection with the ability to easily calculate the characteristics of the cooled units. A system unit with an internal LCC takes up a lot of space inside the computer case and requires high qualifications during installation. When using an external LCC, the internal space of the system unit remains free
Components, tools and materials for assembling SZhOC
Let's select the necessary kit for liquid cooling of the computer's central processor. The composition of the SJOC will include:
- water block;
- radiator;
- two fans;
- water pump;
- hoses;
- fitting;
- liquid reservoir;
- the liquid itself (you can pour distilled water or antifreeze into the circuit).
All components of the liquid cooling system can be purchased in the online store upon request.
Some components and parts, for example, a water block, radiator, fittings, and tank, can be made independently. However, you will likely have to order turning and milling work. As a result, it may turn out that the SJOC will cost more than if you had purchased it ready-made.
The most acceptable and least expensive option would be to purchase the main components and parts, and then install the system yourself. In this case it is enough to have basic set metalworking tools to perform all necessary work.
Making a liquid PC cooling system with your own hands - video
Manufacturing, assembly and installation
Let's consider the manufacture of an external pump liquid cooling system for a PC central processor.