Even when the kitchen has an excellent faucet, the faucet may require repair at any time.
Repairing the faucet yourself or calling a professional - it depends on your knowledge and skills.
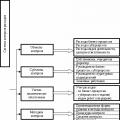
If you nevertheless make a choice in favor of self-repair, then you need to know that the technology depends on the type of kitchen faucet: double-valve or single-lever.
Therefore, before starting work, you need to read the instructions on how to repair the mixer.
The entire process of repairing a kitchen faucet is presented in the video.
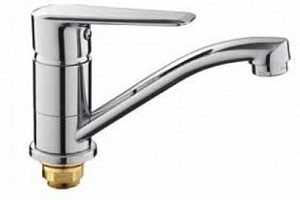
A single lever faucet is the most common design with a single rotary handle. Simplicity, convenience and reliability explain the popularity of such cranes.
The device is designed as follows: the tap is controlled by a handle - up and down movement sets the water supply pressure, left and right - the temperature.
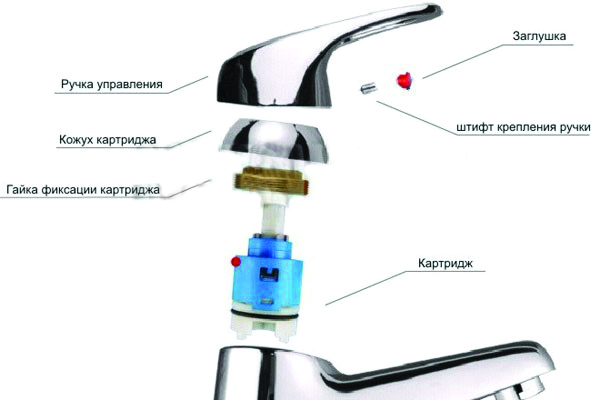
Before you begin repairing a single-lever mixer with your own hands, you need to disassemble the faucet device.
The peculiarity of the mechanism is that almost all parts are part of the cartridge, which is non-separable.
Therefore, these spare parts cannot be replaced individually; installation of a new cartridge is required.
Let's look at the most common defects single lever tap.
Very often there is poor water pressure. This may happen due to a clogged aerator. If clogged, you need to remove the aerator, clean it and put it back.
If a crack or chip forms on the body, the ball mixer is repaired in a certain way: a sealant is applied to the damaged area, but the sealant will only help for a short time and will still have to be done very soon.
Often, repairs to a single-lever faucet may be required as a result of the rubber gasket on the sink being worn out.
To change the rubber seal, you need to remove the faucet from the sink.
You need to remove the device from the sink using careful movements without damaging anything. To do this, completely shut off the supply of cold and hot water, then the tap opens and the water drains.
After this, the inlets are unscrewed from the tap, after which you can disconnect the mixer from the sink. To do this, you need to remove the fixing nut; most often it is located under the sink.
The rubber ring will likely be out of shape or cracked. In such cases, replacement is definitely required.
When purchasing a new gasket, it is important to choose the correct diameter: the gasket must fit into the groove with some force. The process is presented in detail in the video.
If, after installing a new gasket, the faucet continues to malfunction, it means that the cartridge has failed. A leaking kitchen faucet can be caused by a clog.
If there is such a problem, a complete replacement of the cartridge is necessary.
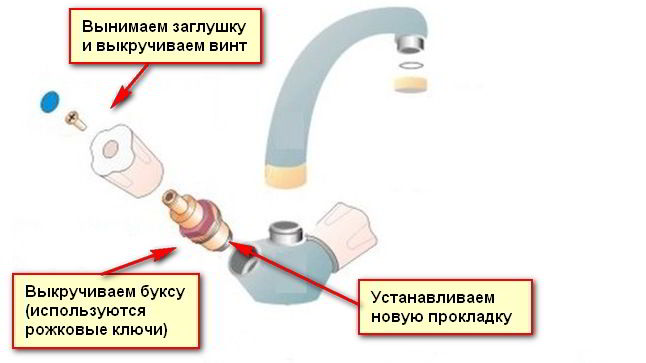
Installation of a new cartridge consists of the following steps:
- shutting off and draining water;
- removing the faucet from the sink;
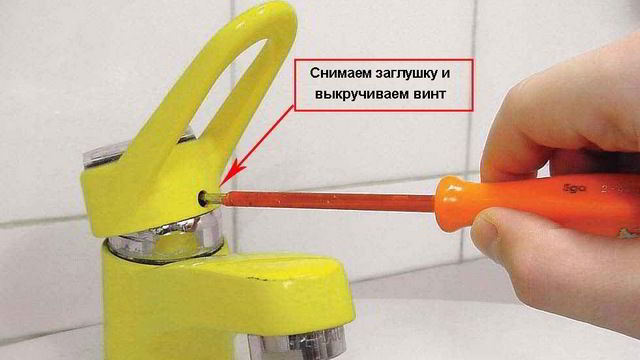
- removing the decorative plug using a screwdriver;
- unscrewing the screw;
- removing the lever;
- removing the cartridge, installing a new one;
- crane assembly.
The screw located behind the decorative plug must be unscrewed on the main body. The lever and cap must be removed, and then the cartridge must be removed.
Then the cam washer is unscrewed with an adjustable wrench to check the cartridge for damage.
You need to inspect the springs supporting the rubber seals. If they are damaged, parts need to be replaced.
And if the space between the ball and the valve seat is clogged, the cartridge is replaced with a new one.
After these steps, the device should work, and repair of the ball mixer should not be required in the near future. Replacement of the cartridge is shown in detail in the video.
How to repair two-valve faucets?
Despite various innovations, two-handle faucets are still very popular in the kitchen.
The design of two-valve devices comes in two types: with a worm mechanism and with a valve axle box with ceramic discs.
The latter type in the kitchen is more reliable, so repairs are rarely required.
If a valve with a worm drive leaks, the main reason for this is a worn gasket covering the inlet. It needs to be replaced with a thick rubber gasket.
Repair of a mixer begins with dismantling the tap. Therefore, first of all, the valve body is unscrewed by turning it counterclockwise.
After this, the old part is removed and a new one is installed. Then the fume tape is wound under the thrust edge, and the crane is assembled. More details about the repair are presented in the video.
If after replacement the leakage resumes, then the reason is a rough seat - the stop point rubber seal. To eliminate leaks, the seat is ground.
To do this, a cutter is inserted into the place of the worm gear and turned with a drill. When the roughness is eliminated, a new gasket is installed.
If the problem of faucet leakage in the kitchen occurs with the faucet axle, then to eliminate it you need to tighten the lock nut on the body.
The next common malfunction of a two-valve faucet is oil seal leakage, which occurs due to wear of the stuffing box packing. In this case, the oil seal is replaced or sealed.
To do this, you need to disassemble the mixer and try to tighten the stuffing box more tightly. If after this the water does not flow, then the tap can be assembled, and if the fault remains, then a replacement is made.
To do this, you can use a string dipped in car oil or a piece of rubber tube.
If the faucet is a modern model, then the necessary part can be purchased in the store.
The packing should be laid clockwise. It is recommended to compact each layer with a screwdriver.
The main thing is not to overdo it to avoid excessive compaction. The bushing should be tightened by 2-3 threads.
Since the design of the faucet is quite simple, repairing the faucet with your own hands does not have any difficulties. The main thing is to perform every action carefully.
How to repair a thermal mixer?
A mixer with a thermostat is an innovation in the world of modern plumbing. Thermal mixer is a programmable design that can maintain a given water temperature.
Some devices with a thermostat can also regulate water pressure, which is also programmable.
Such devices have two regulators. One sets the temperature, the other sets the water pressure. Such devices can be electronic or mechanical.
Electronic models are equipped with an LCD screen that displays the water temperature. These faucets are powered by a battery or AC adapter and have push-button or touch controls.
There are models with an infrared sensor that operate at a distance.
Mechanical devices are equipped with standard regulators, which can be presented in the form of a lever, valve or handle.
The device with a thermostat consists of a valve that mixes water and is regulated by a special cartridge that responds to temperature changes.
The cartridge is made of bimetallic plates or consists of wax. When the temperature changes, the cartridge either expands or contracts. The temperature is set using a control screw or button.
A fuse is installed on the control screw to prevent water from heating above 80°. When disconnected cold water The device automatically blocks the supply of hot water.
When supply is restored, mixing of hot and cold water continues. This way, a device with a thermostat prevents burns.
In fact, repairing a faucet with a thermostat can only be done by a specialist; few people can repair such a device on their own.
In addition, it is quite difficult to determine the presence of faults.
For example, the water supply may stop completely, but this does not indicate a breakdown; most likely, as mentioned above, hot or cold water is not supplied, and the water blocker automatically turned on, since in this case it is impossible to mix the water to the set temperature.
Accordingly, the problem will resolve itself when the water supply is resumed.
When operating a faucet with a thermostat, it may seem that the device is faulty, since the water pressure is very weak. However, this is not an indicator of failure.
A decrease in water pressure may be associated with a decrease in pressure, as a result of which warm water flows instead of cold water, and the thermostat closes the flow of hot water, reducing the overall temperature.
As a result, weak pressure is observed.
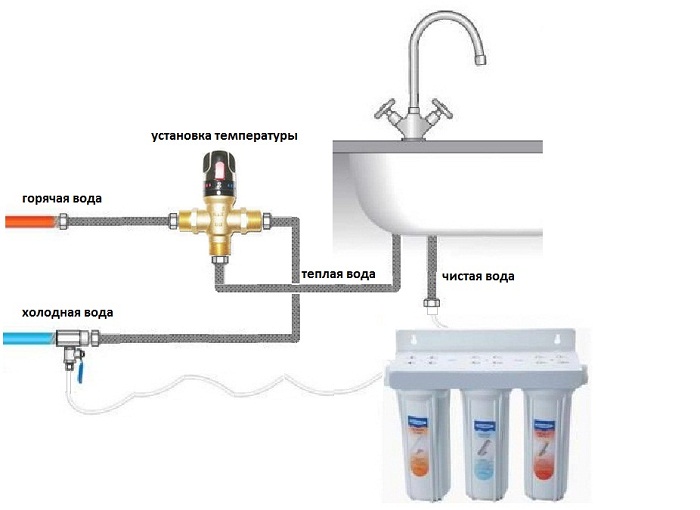
The main cause of failure of such a faucet is blockage. Therefore, such faucets are necessarily equipped with a cleaning filter for two water flows: hot and cold.
If this condition is met, then repair of the thermal mixer will not be required.
Leaking water from a kitchen faucet irritates the nervous system and wastes resources. During the day, 20-30 liters of water flows out of a faulty tap. Every day the interval between falling drops is shortening. And after two to three weeks, the annoying drops are replaced by an uncontrollably falling stream. Water leakage increases tenfold and reaches 5-6 cubic meters per month. Do-it-yourself kitchen faucet repair will help prevent pointless expenses. To do this, you don’t have to be a plumber; the main thing is not to be afraid to delve into the essence of the problem.
Preparatory work
A visual inspection of the crane will help determine the nature of the problem and the appropriate method to eliminate it. Leakage of water from the gander with the valves closed indicates wear of the valve-axlebox. Leakage at threaded connections is eliminated by replacing rubber gaskets or sealing tape. Cracks in the housing and supply hoses require restoration or replacement. Flushing the aerator will help increase the flow of water in the kitchen.
You need to start repairing a faulty faucet yourself by turning off the water supply to the device. Emergency valves should be looked for in the kitchen or at the entrance of the pipeline to the apartment. Locking equipment that has not been used for a long period of time may not be able to be turned. To develop it you need to use lubricants.
The use of impact tools to unlock locking equipment is prohibited. Such actions lead to the splitting of metal elements and failure threaded connections.
Repairing a kitchen faucet requires a primitive set of plumbing tools, such as:
- Pipe, adjustable and open-end wrenches
- Flathead and Phillips screwdriver
- Hexagon (for disassembling the lever valve)
- Pliers

It is impossible to repair a kitchen faucet with your own hands without consumables. You should prepare rubber or thick leather, tape, rags, etc. in advance.
Single lever mixer repair
The main element of lever devices is a non-separable cartridge. If the unit fails, the entire unit is replaced. It is impossible to repair it with your own hands. If the device is operating normally and the problem is a leak, it is most likely caused by worn o-rings. Repair of a single-lever faucet is carried out according to the following scheme.
Use a screwdriver or something sharp to pry off the decorative plug located on the body. Hidden underneath is a hex screw that secures the lever. It is not advisable to use a screwdriver and a hammer to remove the lock (if you do not have a key). The consequence of such actions is damage or flaring of the fastening bolt.
After unscrewing the lock, you need to remove the lever and the cap. Doing this with your bare hands is sometimes problematic. You can loosen the lever with moderate blows of a hammer. To prevent damage to the housing, a wooden attachment must be used.
Next, the washer-cam is unscrewed, after which the remaining parts of the valve are removed. The O-rings are located under the cartridge. The new gasket should be slightly wider than the space provided for it. The sealing ring should fit into place with force.
To avoid repeated repairs of the crane, it is important to inspect all components for defects. If necessary, replace a worn cartridge or sagging springs. All parts are cleaned of plaque, which also causes leaks. After troubleshooting, the mixer is assembled in the reverse order. Fasteners should be clamped sensitively; excessive force will lead to thread breakage.
Repair of two-valve tap
In two-valve models, mixing water to the desired temperature in the kitchen is done manually. The main unit of such equipment is the crane - axle boxes. Modern mixers use two types of faucets: “worm” (with a rubber gasket) and ceramic. Each equipment has its own advantages and disadvantages.

Repair of a “worm” crane axle box
The flow of water in a worm-type device is held back by a rubber gasket. As the seal wears, the seal between it and the mixer body is broken. To shut off the water supply, you have to tighten the valve harder each time. As a result, the gasket quickly “shrinks”, becomes damaged and ceases to cope with its task.
It is not difficult to make a seal yourself and install it on the mixer. The troubleshooting algorithm is as follows:
- Use a sharp object to pry up and remove the decorative valve plug
- The screw located inside is unscrewed with a screwdriver
- The valve is removed, the axle box is removed (open-end wrenches are used)
- Based on the model of the old gasket, a thick leather or rubber gasket is cut out and a new one is installed. Or use the factory gasket.
- Reassembly of removed elements
Another sign of wear on the rubber seal is a hum in the pipes when high blood pressure in the pipeline. Noise occurs as a result of gasket resonance.
Attention! The consequence of constant pinching of the valves is a breakdown internal thread. In this case, you will need to completely replace the unit.
Repair of ceramic crane axle box
The installation of such equipment in the kitchen is due to its ease of use. Ceramic plates have a long service life. But on the other hand, they are very sensitive to water blockages. In the absence of preliminary water purification, small particles penetrate into the mixer, which have an abrasive effect on the ceramics. The sealing of the plates is broken and a leak forms between them.
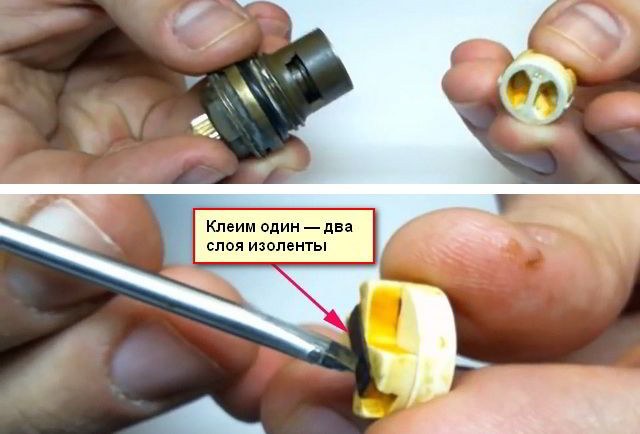
Sometimes a malfunction of the valve axlebox is caused by wear of the gasket that presses the rotary ceramic pair. As a result of the weakening of the rigidity of the seal, the pressure force on the plates decreases. Clogging accumulates between them, preventing the plates from pressing tightly. Water leaks through the cracks formed. The problem is solved by the “increasing” method. One or two layers of electrical tape are glued to the gasket. It is important not to forget to make holes for water movement.
In some cases, repairing a unit turns out to be impossible or impractical. Installing a new axle box will eliminate the leak in the kitchen. The procedure for repair work with a ceramic mixer is similar to the algorithm for removing/installing “worm” devices.
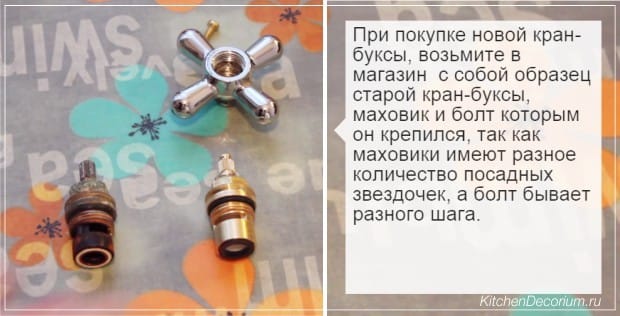
When purchasing new spare parts for a crane, it is advisable to have old parts with you as a sample.
Other faults and solutions
Under pressure, water finds vulnerable spots and seeps into them. In the kitchen, leaks can form at the threaded connections of the faucet with the supply hoses. The reason is wear of the gaskets or insufficient amount of sealing materials. The solution to the problem is to replace the cuff and wind the sealing tape. You can partially stop the flow of water from the body of the supply hose using electrical tape.

In places where the hull and gander are damaged, a “fountain” may form. In such cases, you can only make temporary repairs with your own hands. Cold welding or liquid metal is suitable for sealing cracks. Silicone glue (sealant) is ineffective in such matters.
If there is weak pressure from the tap, the aerator will need to be cleaned. The part is located at the end of the gander. It is advisable to replace a severely rusted tip. If the degree of clogging is not critical, it is enough to rinse the aerator. In single-lever systems, an additional metal mesh is located inside.

In order for the faucet in the kitchen to serve as long as possible, and its repair to be a rare occurrence, it is important to follow several operating recommendations:
- The valves must be tightened sensitively
- Do not use impact force on faucets (beat with a hammer, hands, etc.) to eliminate leaks
- Seals and O-rings must be replaced if they show any signs of wear.
- To troubleshoot problems, use high-quality parts and materials
- It is advisable to install a filter on the supply pipeline
Repairing a kitchen faucet with your own hands will save you from long waits for a plumber. Saving financial resources is also important. Repairing a kitchen faucet yourself will help you gain confidence in your abilities, gain practical experience and invaluable knowledge.
The kitchen tap provides us with water dozens of times a day. It is not surprising that it fails more often than in the bathroom. Before calling a plumber or buying a new faucet, you should try to repair it yourself. Often it is not such a difficult task to fix a kitchen faucet.
Basic malfunctions of the kitchen faucet
If you are reading this article, then one of these breakdowns has occurred with your faucet:
- The faucet is leaking, water is dripping from under the handle;
- Water drips from the spout even when the valves are closed;
- When opening the mixer, a humming sound appears in the pipes;
- The water jet is too thin;
- The single-lever mixer operates in jerks;
- Water flows out from under the union nut on the spout;
- The tap lever does not lock in the desired position;
- Leak in the flywheel area (valve structures).
What is needed for repair
Before you start repairing a kitchen faucet with your own hands, you need to prepare all the tools and necessary faucet components.
You will need:
- Hex wrench;
- Adjustment key;
- Cutter knife;
- Screwdriver and hammer.
Repairs also require additional materials - dry rags, lubricant. And if the faucet leaks, you will have to buy additional spare parts: a new cartridge or its parts (for a single-lever mixer), sealing rings, a faucet axle (for a two-valve design).
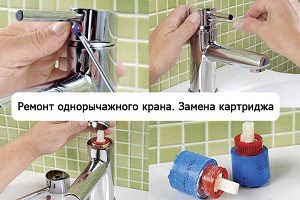
Repairing a single lever ball mixer
There are four reasons why a faucet needs to be repaired:
- Cracks, chips caused by mechanical damage to the body;
- Blockage in the cartridge between the seats and the ball;
- Gasket wear;
- The aerator is clogged or rusty.
What to do if a defect appears on the case? You can try to repair it by cold welding - sealant (putty). But this is still a temporary measure, and soon you will still have to change the mixer.
If the problem is low water pressure, then most likely the cause is a clogged aerator. Then you need to take it out, clean the mesh, for example, with a toothbrush, and then install it back.
Let's look at the problems more seriously.
When the faucet leaks without visible damage, then the issue is most likely a violation of the integrity of the gasket or a broken cartridge. In this case, complete disassembly of the kitchen single-lever mixer is required.
How to disassemble the tap? First, turn off the water and let the remaining water flow out of the tap. Then study the structure of the single-lever kitchen faucet in the photo.
Step-by-step photo repair instructions:
- The screw on the main body is unscrewed. It is usually hidden behind a decorative plug that needs to be removed with a screwdriver, as shown in the photo.
You can disassemble and repair the device even if you don’t have a hex wrench at hand. To do this, carefully tap the fastening nut with a hammer on a screwdriver.
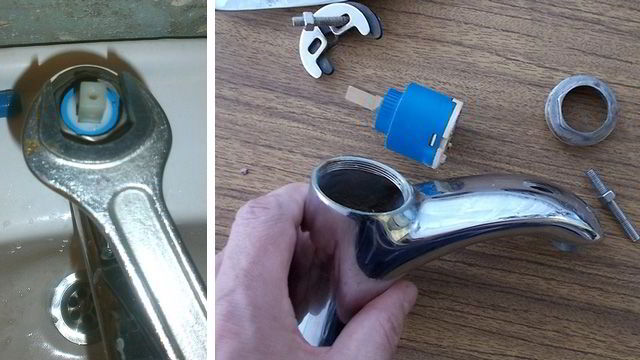
- The lever and cap are removed, and now we need to remove the cartridge and inspect the entire device for defects. To do this, unscrew the cam washer using an adjustable wrench.

- The disassembled faucet is inspected for defects: the gasket, the surface of the ball and the springs supporting the rubber seals in the holes are inspected. Loose springs and worn taps are replaced if necessary. At this stage, you need to clean all parts from accumulated water deposits.
- Most often, a leak from a faucet occurs due to a blockage formed between the ball and the valve seats in the cartridge. In this case, you just need to change it. The whole difficulty of this task lies in making the right choice cartridge, and repairing the mixer yourself is not at all difficult.
When going to a plumbing store to buy a new cartridge, take the old one with you so as not to make a mistake with the size, because the cartridges are not standardized - they are produced in a variety of diameters and materials.
Installing a faucet in the kitchen in 5 steps with photos
Installing and replacing a faucet in the kitchen with your own hands in 5 steps - for experienced and beginners. How to fix a faucet: remove the old faucet, install a new one and connect it correctly. 
We install the new cartridge so that its holes align with the holes inside the mixer body. Then screw the washer back on (first with your hands, then tightly, but not too tightly, with a wrench).

- We check the quality of our work by running water. If it does not leak, then we proceed to install the cap, and then the lever - we tighten the screw in it and fasten the plug.
How to change the gasket in the mixer? This is also quite easy. You need to remove the old O-rings and replace them with new ones, to which we first apply a little plumbing grease.
For all rubbing parts of the product, non-toxic silicone-based lubricant should be used. This will double the service life of structural elements.
How to repair a mixer tap of this type? It is necessary to disassemble and replace worn elements - axle box or gasket.
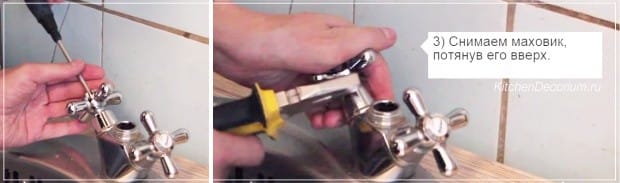
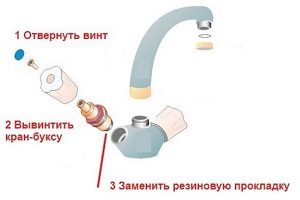
Work order:
- The water is completely shut off, after which the valve flywheel is moved to the operating position so that excess pressure does not act on the parts.
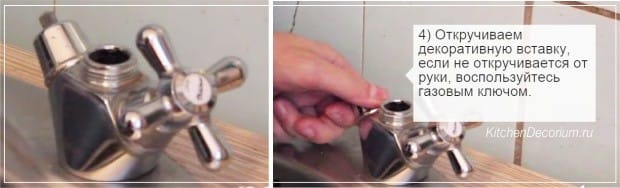
- Next, you need to disassemble the structure - to do this, remove the decorative caps and remove the screw that secures the flywheel. To do this you will need a screwdriver. Next, the old crane axle box is replaced with a new one of a suitable size, and the structure is put back together.
![]()

And sometimes, in order to adjust the valve tap, it is enough to just tighten the stuffing box, as shown in the video:
Used as packing (for old faucets) :
- Rubber tube of appropriate dimensions;
- Burlap threads;
- Twine impregnated with drying oil.
If you see that the threads on the parts have worn off, this means that it will most likely not be possible to repair the faucet and it’s time to update the plumbing.
Replacement of the packing is only necessary when the bushing is tightly tightened and there is still a leak.
Being able to repair your kitchen faucet yourself is a great way to save money. However, not always repairs can completely restore the efficiency of the faucet, and it is not uncommon to have to change the faucet in the kitchen, dismantle it and install it.
Note:
- The most durable structures are considered to be made from heavy metals(brass);
- The lowest quality are Chinese or Turkish silumin products;
- The convenience of the single-lever device is obvious - it can be opened with one free hand. It is also easier to repair, since the design contains fewer spare parts.
- Faucet repairs can be prevented. More often main reason faults are caused by contaminants coming from the water main. Therefore, installing special filters rough cleaning water will help you keep your faucet intact longer.
A leaking faucet in the kitchen can cause a lot of inconvenience. Not only is the moment in itself not pleasant, but there are also additional costs.
There are two ways to solve this problem - call a plumber or fix the faucet yourself. Tools and spare parts are available at any hardware store.
All that remains is to get ready for repairs.
Preparatory work
 When a faucet drips, don't panic right away. We need to take it and do some repairs. Moreover, it does not present much difficulty.
To repair a crane, you first need to carry out a number of preparatory measures. They are not difficult, but required. Otherwise, very serious troubles may arise.
To repair a crane you must:
- turn off the water supply to the tap;
- prepare the instrument;
- prepare spare parts (repair kit);
- prepare clean rags;
- find a diagram of the faucet or watch a video about the repair.
Two-valve
 Double-valve faucets in the kitchen are the most common. Over time, they experience dripping or leakage of water. This occurs due to the destruction of the gasket or stripping of the threads on the valve stem. To fix these problems, you need to disassemble the faucet.
When changing the sealing gasket you must:
- unscrew the valve;
- get out the old gasket;
- install a new one;
- assemble the crane.
It is important to note: When disassembling the faucet, great efforts should not be made so as not to damage the faucet.
It is advisable to wrap the surface in contact with the wrench with a thin cloth so as not to accidentally scratch it. Replacing a rod with a broken thread is carried out in the same sequence as replacing the gasket. After assembling the faucet, leaks or dripping water disappear.
Sometimes at such taps, water runs and even splashes at the drain connection. This happens because its fastening has become loose and the gasket has worn out. Troubleshooting is easy. It is enough to remove the drain and replace its gasket.
When assembling, tighten the nut tightly, but not too much. The rotary drain should move easily, without jamming. By the way, two-valve faucets installed in the bathroom and washbasin are repaired in exactly the same way, since their structure is absolutely the same.
Plumber's advice: When choosing a gasket for both the valve and the drain, it is better to give preference to a vinyl one.
Ball
 Ball valves are simpler in design because they are controlled by one rather than two shut-off elements. It is not difficult to repair a single lever ball valve with your own hands. Figuratively speaking, all repairs will come down to cleaning it.
The repair procedure will be as follows:
- unscrew the screw of the decorative plug and remove it;
- remove the handle and top part of the faucet;
- replace the damaged cartridge;
- remove the ball and replace it with a new one if necessary;
- Clean the inside of the faucet.
Reassemble the tap in reverse order. After cleaning, the faucet starts to work easily and without leakage.
Ceramic
 These cranes are based on ceramic discs and crane axle boxes. They are simpler in design and more reliable. If such a faucet leaks, then it is enough to slightly tighten the lock nut on the body. If the tap continues to leak, you will have to change the axle box. There is no difficulty in this, you need to be careful.
The operating procedure is as follows:
- carefully pull out the plastic plug;
- remove the flywheel;
- unscrew and remove the axle box;
- clean the inside of the faucet;
- install a new axle box;
- assemble the crane.
Assembly is carried out in reverse order. As a rule, the assembled crane works flawlessly. In practice, it has been observed that such cranes can operate for years without breakdowns or repairs.
Note: in ceramic water taps no rubber seals. The water supply is regulated by shifting the holes on the ceramic discs.
Disassembling the Frap ball mixer
 Disassembling the Frap faucet is quite simple.
It is no different from others in the same series:
- remove the handle;
- Turn the ring with the recess so that the mixer locks into place;
- carefully remove the chrome dome;
- unscrew the plastic ring located on the four-tooth ring;
- check the cleanliness of the ring seats;
- carefully remove the old ball, slightly lifting it;
- we check the ball for the cleanliness of the hole located in it;
- if the hole is clogged, replace the ball with a new one;
- check the ball seals;
- after replacing them all seats lubricated with special lubricant;
- Carefully assemble the tap in the reverse order.
Esko
 Czech Esko cranes appeared on the market not so long ago, but have already managed to win the sympathy of buyers. Like all modern faucets, they have a built-in ceramic cartridge. It is convenient to use because it is controlled by a half-turn handle. It makes only half a turn from opening to closing the water.
The manufacturer provides a ten-year warranty on Esko cranes. Despite the high quality of workmanship, this kitchen faucet sometimes breaks down. The reason for this, on the one hand, is the high operational load, on the other, neglect of the manufacturer’s recommendations.
In any case, if the faucet breaks, you need to make repairs. It is easy to repair. Exactly the same as all similar faucets with a ceramic cartridge. The only difference is in the form of the tool. In order to unscrew this tap you will need a special star screwdriver. It can be purchased at any auto parts store. The process of replacing a cartridge does not contain any new nuances.
Expert advice: It is imperative to install a water filter in front of the inlet tap.
Over time, any, even very high-quality faucets from well-known manufacturers, unfortunately, fail.
The majority of breakdowns occur due to the poor quality of our cold water, which contains many impurities. Including mechanical ones. As a result, the rubbing parts, especially the gaskets, quickly wear out, and the faucet does not hold water and leaks.
To restore, sometimes simply disassembling the faucet and replacing the gasket is sufficient. On almost all cranes, such simple and inexpensive repairs can be done with your own hands.
Watch the video in which a specialist clearly shows how to fix a dripping faucet in the kitchen with your own hands: