In this article I will try to describe in detail how a gable roof is built. This form is practically the simplest, suitable for a private house, and its construction, from the point of view of monetary costs, is more profitable compared to other more complex roof configurations.
- in the second case, the rafters rest on the floor beams of the floor below. Gable roof performed according to this option will be described here.

Let's take a brick box house as an example. Its dimensions are 8x8 meters, height 3 meters. The construction of any roof with your own hands begins with the installation of maeurlat (Fig. 1). Methods for attaching it to the walls were described in the article, which you can read
We install the Mauerlat flush with the inner surface of the walls. It should be bricked up on the outside so that it is not visible. In this case, the upper surface of the Mauerlat should be 2-3 cm higher than the top surface of the facing brick, so that the entire load from the roof is transferred only to the Mauerlat. No need to load.

Next we install the floor beams. We do this in the sequence shown in Fig. 2. First of all, we install the beams indicated by the numbers 1,2,3,4. Their extension determines the width of the cornice. We usually take it from 40 to 50 cm at the request of the customer. As beams we use a beam, the cross-section of which is determined by making a simple calculation described in detail. In our case, it will be a beam of 100x200 mm.
After securing the outer floor beams, we pull the string along the upper plane and set the remaining beams, if necessary, tightening the Mauerlat under them, or, on the contrary, placing thin plywood (you just often order timber with a height of 200 mm, and they deliver it from 190 to 210 mm, this is what we have on our sawmills equipment). We select their pitch taking into account the pitch of future rafters. When using 50x150 mm floorboards as rafters, take a step of 60-70 cm (it is better to take 60 cm, since roofing insulation has this width).
Having installed all the long beams, we install the short ones (Fig. 2). Their step is enough to take about 1 meter. This diagram is slightly different from what we are used to seeing in similar pictures. We came to it after the gable ebb on one of our first roofs sagged, although the ebb fillers were quite securely fastened. In this scheme, the possibility of sagging is completely eliminated.
 We fasten all beams to the mauerlat with 150 nails; you can also use metal rafter corners and self-tapping screws. In general, the use of various fasteners for rafter connections makes the work easier. This is especially convenient for an inexperienced person; there is no need to make complex cuts and nicks. We have already talked about this in the article ““.
After installing all the beams, we lay (without fastening) boards on them, maybe floorboards, maybe inch boards. They are needed simply to walk on them calmly. In order not to clutter the drawing, I did not show them on it. The next step is to install the ridge beam.

First of all, we place racks made of 50x150 mm boards level or plumb and fasten them with temporary spacers. In Fig. The 3 spacers are shown on one post only, again to avoid cluttering the drawing. The pitch of the racks is no more than 3 meters. First we place the outer ones, then, pulling the laces between them, we place the intermediate posts. After the entire truss has been erected, the intermediate posts can be removed and you can easily create living rooms on the second floor.
The height of the racks is selected depending on the shape of the roof you want to achieve. I usually advise customers to take it equal to the height of the first floor along the facade (the distance from ground level to the mauerlat). This proportion is also shown in the figures.
Having installed the racks, we place the ridge beam on them and literally fix it with a couple of screws. We use a 50x200 mm board (in principle, 50x150 mm is also possible).

Now we move on to the installation of rafters. First we need to make a template from a 25x150 board. To do this, apply it to the end of the ridge beam and to the beam (Fig. 4) and draw two lines. Having sawed off a board along them, we get a rafter template.
Of course, it is very good when the foot of the house is laid out with high geometric accuracy and the floor beams are also installed. Then we can cut all the rafters at once according to the template and calmly install them. But to be honest, this is quite difficult to achieve, and even more difficult when a new roof is being installed on an old house.

In this case, we first make only the top cut on the rafter according to the template. Then we take the resulting workpiece, apply it to the desired beam and mark the bottom cut, as they say in place. All rafters are installed in this way (Fig. 5). Please note that after installing one rafter, we immediately install the opposite one in order to quickly remove the lateral load on the ridge beam (otherwise it will bend).
When the length of the roof slope is large and a standard 6-meter board is not enough, you can go in two ways. The first (I think it is preferable) is to order longer boards at the sawmill. Of course it will cost more. For example, at the end of autumn 2012, 1 cube of 6-meter boards cost about 5,500 rubles, and 1 cube of 7.5-meter boards cost 7,000. But installing rafters is easier and faster than using the second method.
 The second method requires splicing two boards. This can be done by sewing on them a piece of board of the same section 1.5 - 2 meters long. See the figure for how this is done. It is better to make the joint at the bottom, and an additional stand must be installed under it.
We attach the rafter to the ridge beam with two or three nails. For fastening to the floor beam, we Lately We use metal mounting plates and screws and add a couple of nails. Sometimes we use staples. By the way, I have seen many times how people use staples, but they do it incorrectly. The bracket must work in tension. Below in the left photo - how not to do it, on the right - how to do it.


Having strengthened the truss, we begin to work on the gables. First, we install additional posts that will serve as the frame of the pediment (Fig. 7). The accuracy of installation is controlled by a string stretched along the bottoms of the rafters. Then we make a window opening (Fig. 8). You can make it any size and configuration you want. Please note that in the picture, the post standing in the center of the window (supporting the ridge beam at the beginning) was simply cut. It no longer bears virtually any load. Having finished with the frame, we sheathe the pediment with an inch (for example, 25x150 mm) (Fig. 9).

The next step is to hem the eaves boards around the entire perimeter of the house. The front board (sewn to the ends of the floor beams) is made from a 25x200 mm board. From the bottom to the cornices we sew two belts from a 25x100 board (Fig. 10). They are more than enough to secure the soffit when finishing the exterior.
Now if we are going to mount drainage system and use metal holders for gutters; they need to be installed on the footrails right now (under the waterproofing film). Moreover, it is also advisable to cover the front boards with siding at this stage. Then it will not be very convenient to do this. I didn't show this in the picture. In addition, we now only use plastic gutter holders that are attached directly to the front board. They are more convenient and can be installed after the roof is assembled.

Next we proceed to the sheathing. First of all, using a construction stapler, we attach the first strip of waterproofing film to the rafters (Fig. 11). It is more convenient to work if you already have scaffolding installed around the perimeter of the house. In any case, you will have to install them when you are doing the roofing, drainage, and sheathing the eaves with siding.
Having secured the film, we nail the counter-lattice slats (25x50 mm) to the rafters. The need to use a counter-lattice is described in detail here: . Do not forget to leave space for the overlap of the subsequent waterproofing strip.

Then we make the sheathing. Now I will not focus on the rules for its installation. This topic is for a separate article. In addition, any roofing is accompanied by instructions that describe in detail how to make the sheathing specifically for this material (the pictures schematically show the sheathing for metal tiles). I will try to prepare a new article on this topic in the near future.
In this way we cover the entire roof (Fig. 12). After this, all that remains is to make the gable overhang and gable ebb. The sequence here is:

Using self-tapping screws, we attach the wind board of the gable overhang (25x150 mm) from below to the protruding ends of the sheathing (Fig. 13);

We insert and secure with self-tapping screws the fillets of the gable overhang (board 25x150). The distance between them is approximately 1 meter (Fig. 14);

We sew two belts to the fillies from below (board 25x100). There are also enough of them to subsequently cover the gable overhangs with siding (Fig. 15);

From pieces of 50x150 boards of the required length we prepare triangular fillies for the gable ebb according to the figure (Fig. 16). Then, having secured them to the stems, we also nail two belts (25x100) to them.
This completes our roof. What happened in the end and what will happen after completion roofing works and covering the gable and eaves with siding is approximately shown in Figures 17 and 18.


When building a private house, the question often arises not only about choosing its layout, but also regarding the selection of the optimal roof structure. Most often the owners new construction choose a gable roof because it is easy to install and does not require complex calculations. But you can often find houses with a four-slope system, which also has many advantages. That is why the question arises: is a gable roof or a hip roof better? We will try to answer this in our article.
The peculiarity of such a roof is that it consists of two slopes, resting on the load-bearing walls of the building and connecting to each other at the ridge. They are also called tongs. The triangular part of the walls of the house, which is located under two slopes and is formed by them, is called a pediment.
This design is good because it is possible to install a full-fledged window in the pediment to illuminate the attic or attic space, which is successfully located under such a roof structure.
The traditional opinion that gable roofs do not have architectural attractiveness and diversity is erroneous, because there are many varieties of such systems and techniques that make it possible to achieve the originality and beauty of the structure. Here are some of them:
- In dual-slope systems, it is not necessary to make the slopes of equal length and install them at the same angle. You can significantly diversify the structure by making an asymmetrical gable structure. In this case, the slopes can be at different angles and different lengths. An additional advantage of this option is the advantages in terms of home layout and increased energy efficiency.
- The slopes can be made with a break in the central part, which will not only provide advantages when planning an attic, but also achieve an original image of the building.
- By installing attic and dormer windows and making slopes at different levels, you can significantly improve the aesthetic qualities of the building.
Advantages and disadvantages

When deciding which roof is better, a gable roof or a hip roof, you need to consider the advantages and disadvantages of each of them. Thus, the positive qualities of gable roof systems include the following:
- Practicality due to the free space under the roof, where you can arrange an attic or a large attic for installing technological equipment. An additional advantage in this regard is sloping gable roofs, which can significantly expand the usable area of the attic.
- The roof of 2-pitch systems is quite durable and reliable due to the effective drainage of rain and melt water from its surface.
- The installation of such a roof can be done independently, since no complex technological solutions are required.
- We can say that this is the cheapest roof structure. Only a lean-to system can be cheaper, but it is more often used for utility and temporary buildings.
- This roof structure is considered easy to use and repairable.
Among the disadvantages are the following:
- The angle of the slopes and the height of the entire structure are directly related to the dimensions of the house. The larger they are, the more significant the consumption of materials for arranging the roof.
- Construction costs may increase if equipment is needed in the attic space. In this case, it is necessary to carefully insulate and insulate the structures, strengthen the load-bearing elements and achieve optimal dimensions of the roof space. All this entails additional costs.
- Extended attics cannot be illuminated by window openings in the gables, so you will have to install attic windows. This increases the complexity of the design and requires additional funds.
Four-slope system

When deciding which roof to choose, you need to consider the hipped structure in detail. Thus, a hipped roof consists of two trapezoidal slopes and two triangular slopes, called hips. In such systems there is no need to erect gables if we are talking about a hip rather than a half-hip structure, which, like hipped roofs, belongs to the 4-slope variety.
The half-hip roof has two trapezoidal slopes connecting at the ridge, and two shortened triangular slopes. They are usually 2 or 3 times shorter than their trapezoidal counterparts. In this case, under the shortened slopes it is necessary to make a trapezoid-shaped pediment. You can make full-fledged windows in it to illuminate the under-roof space.
The hipped version of the hipped system is a roof with four triangular slopes converging at one point. This option is more often used in regions with warm and mild climates. They are more complex to design and install, so they are not so common.
Advantages and disadvantages

The advantages of 4-pitch roof structures include the following:
- A half-hip or hip roof allows you to create a more functional, spacious and better-lit attic space.
- Such buildings are more attractive and original. By choosing a suitable roofing covering and embellishing the roof with dormers and dormer windows, you can get a rather beautiful and unique structure.
- Roof structures with four slopes are the most reliable and durable.
- A hip roof can withstand wind loads and snow pressure much better than all other roof structures.
- You can maintain a comfortable temperature in your attic or loft by providing even heating on all four sides. It will also retain heat well.
Among the disadvantages are the following:
- To build such a roof requires complex calculations and some skills, so you will have to contact qualified specialists.
- Due to the large area of the slopes, the weight of the entire structure increases, and this requires the construction of strong load-bearing walls and a reliable foundation.
- If such a roof is built in regions with a cold climate, then it needs thorough insulation, which significantly increases the final cost.
- An attic under a hipped roof will cost more due to the need to build walls around the perimeter of the roof space, thoroughly insulate the structure, and also install many attic windows, because there will be no gable openings.
Comparison

Now let’s summarize and compare these two roof systems based on basic indicators:
- Weather resistant. The best in terms of resistance to wind and snow loads is considered to be a 4-pitch roof. It is more durable and can easily withstand extreme loads. But its high heat transfer does not allow the use of these systems in northern latitudes without additional insulation.
- Design. Gable structures with bowls are decorated with attic and dormer windows, weather vanes and platbands, balconies and windows in the pediment. We can say that this is a classic of the architecture of private houses. But 4-pitch systems are made more laconic, since the abundance of parts and elements on them looks ridiculous. Four-slope structures are the standard of European brevity. Such a house looks more solid and respectable, and is easier to sell. However, multi-slope gable roofs can give it good competition.
- Design nuances. If you decide to order a turnkey house, then you should choose a hip or hip roof, since they are an indicator of the balance of the project and require a reasonably organized local area. Gable roofs are more suitable for regions with a lot of rainfall, since only they protect the space in front of the house from snow and water.
- Finance. The costs of laying walls in houses with a hipped roof will be less, but the costs of roof structures will increase. That is why the statement that a 2-pitch system will be cheaper is erroneous if we take into account the total estimated cost of a residential building.
Important: the difference in the price of roofs is 30%. That is, gable systems are almost a third cheaper. But if we take into account the costs of constructing and arranging the gables, the difference is practically not noticeable.
It is also worth remembering that the weight of the roof in a hipped system is distributed more evenly, but during construction and design you will need to hire professional craftsmen. For gable roofs, consumption roofing material less due to the small amount of waste, which cannot be said about the hipped variety.
On a variety of buildings you can see a roof with two slopes. They choose it for a reason - it is a relatively simple and comfortable way to build a roof, reliable and beautiful to look at. But there are many subtleties that both builders and customers must take into account when creating it.


Advantages and disadvantages
The stability of the walls and the strength of the foundation, the elegance of the design of the designers can bring joy only in one case - when there is no “drip” from above. Technologists and engineers have put a lot of effort into inventing many roofing options. But in terms of the ratio of pros and cons, the classic pair of stingrays still takes one of the first places. These are two surfaces placed at an angle and having support points on load-bearing walls. The use of a gable roof is equally good for a shopping pavilion, a country cottage, or an ordinary canopy over a car or the entrance to a house.


Rainfall flows down from such a roof almost instantly. The snow doesn't stay on it. And even the wind will not be able to expose the underlying parts roofing pie cabins, sheds, outbuildings.


Below there can be a comfortable attic or even a full-fledged residential attic with large rooms. Consumers can choose different designs, modify the length of the slopes and the steepness of each of them.


Country houses are equipped with gable roofs most often not only because of their resistance to weather conditions and comfort. The anti-vandal properties of such structures also set them apart from others. Disadvantages are revealed only during the construction of attics. It is necessary to install dormer windows and strengthen the rafters. But even taking these problems into account, this format can still be considered a universal type of roofing.


Varieties
It is important to understand that a gable roof is not something single and monolithic; in fact, this name hides a number of subspecies.
- Traditional symmetrical design(base is an isosceles triangle, slope exactly 45 degrees). It withstands the pressure of snow and rain flows well, but cannot be used for the attic.


- Broken type increases the efficiency of using attic space. At the top the slopes are relatively flat, but at the bottom they are sharply inclined. The inevitable consequence of such a choice is the complication rafter system.


- Roof without symmetry(such a “double slope” makes it possible to create only an attic of limited area). The main motive when choosing is an extremely unusual appearance.


- Asymmetrical multi-level(with different slopes) roof - in it the ridge is moved away from the center. The roof can serve as a canopy for a veranda or even a terrace located near the house.


Most practically used structures have inclination angles of at least 11 and no more than 45 degrees, because they are the most practical. In dry and warm climates, you can make the roof as flat as possible.


If the frequency and intensity of precipitation are very high, then you will have to build a steeper roof. But again, it has its own weak point - increased susceptibility to wind pressure.


Equipment of different slopes not only increases the area of the attic or attic, but also allows you to make their walls as straight as possible.
Asymmetry, if thought out properly and implemented technically competently, can become an attractive design solution. It has also long been noted that the difference in the parameters of the slopes increases the snow and wind resistance of the house. There is slightly less pressure than usual on the walls, rafters and foundation. And solar panels work much more efficiently on asymmetrical roofs. There is only one minus - the design and work will have to be entrusted to professionals.


Many gable roofs are equipped with dormer windows, which increase the attractiveness of the structure. The image of the house as a whole becomes more cheerful, the building acquires unique features. In a gable roof, windows in the shape of a quadrangle are often installed, although the number of shapes is simply impossible to count. Dormer windows are designed to replace doors for access to the roof during repair, finishing and emergency work, and in case of emergency.


A gable roof with short and long slopes requires the most careful measurement of all parameters and calculation of the necessary properties of the system. A hydraulic level can provide the necessary accuracy.
A roof with three gables is installed mainly on houses made in the shape of a square or rectangle. When equipping an attic, a separate roof is placed on it, and you can choose any type you like, including a broken one. Please note: the presence of three gables allows for enhanced lighting of the attic floor.


Quite a lot of roofs are made with a protrusion - this element helps organize canopies, awnings and cornices. A roof with a valley is equipped in cases where it is necessary to ensure that slopes forming a negative angle are connected to each other.
Such roofs can be made:
- in the shape of a cross;


- in the shape of the letter T;


- in the shape of the letter G.


Preparing a roof plan involves assessing its top view, in this case, all attic and dormer windows and points of connection of surfaces must be taken into account. Reflected in the plan of the roof over the terraces and verandas, for each surface and detail you need to write down the size. The master plan is divided into elementary figures; it must indicate where the main premises and extensions will be located. Only if this condition is met can it be guaranteed that all nodes, valleys, and protrusions will perfectly fulfill their tasks. If the size of the purlins changes, the angle at which the valley slopes is also adjusted.


Where such parts are located, the connecting slopes are covered with a continuous sheathing. When laying out waterproofing, it is recommended to place it in two layers, and then attach the valley to self-tapping screws. When the joints of the part are in a horizontal plane, the overlap is at least 10 cm, and ideally 30 cm. If the slope has only a slight angle of inclination, it is advisable to use an additional layer of waterproofing. A valley with a self-expanding seal is placed under the metal tiles.


A gable roof with a bay window can be quite inexpensive and quite beautiful. This element is placed on a reinforcing belt; to make it, they usually do not put one of the rows of bricks or blocks during construction. The belt will not only support the rafter beams, but will also strengthen the wall and reduce the pressure on the window lintels. The formwork can be made from old boards, and for the reinforcement itself a welded network with 5x5 cm cells is used.


The off-center shape is often chosen due to its increased energy efficiency. This valuable property is harmoniously combined with external attractiveness. Architects use a variety of tricks; original designs were especially popular in the middle of the last century. The most radical experiments, of course, did not justify themselves, but solutions in which one slope is directed to the south, and a different angle or length to the north. It is important not to forget in this kind of search that no one has yet canceled the careful calculation of wind and snow loads and the determination of the composition of premises.


The overall level of efficiency of a home, if everything is done correctly, is much higher than that of an ordinary house covered with a standard gable roof. Accurate calculations by the architects showed that if you introduce one angle steeper than 45 degrees, the unused space in the house will sharply decrease.
The original step is to imitate the roof of an ancient Russian tower. Moreover, it is much easier for modern builders than for their predecessors several centuries ago. Mathematics and effective computing programs come to the rescue, allowing you to calculate parameters as accurately as possible.


It is much more pleasant to install an attic under a pitched roof than under a regular one. A semi-dark nook almost right next to the ridge brings joy to few people, especially since sharply inclined slopes and sharp corners located inside and outside do not contribute to visual comfort. Instead of following the lead of designers who creatively play with a simple type of gable roof, it would be more correct to solve the problem radically. Roofing material with cut corners helps to cover those places where it is not possible to lay full sheets or rolls.


A popular type of gable roof is the gable form; it would be more accurate to say that this is an assembly of several roofs, each of which covers individual parts of the house and is mechanically connected to the others. The advantage of this solution is that it allows you to create both dormer windows and balconies. “Pliers” in the terminology of roofers are, of course, not a metal tool with sharp gripping edges, but pediments. The radical complication of the rafter system is justified by its external aesthetic appeal. To imagine what it all looks like, you need to look at any image of an ancient castle.


A gable roof can be not only steep, but also flat. The increased steepness of the slope strengthens the structure and makes its sophisticated strengthening less relevant. The need for lumber is reduced, and therefore overall costs increase. But if in a particular area there is a high probability of storms and hurricanes, or simply strong winds, it is better to choose a more flattened option. At the same time, a completely flat roof (angle of inclination 10 degrees or less) is also impractical - maintaining it and clearing snow often becomes a painful task.


It is important to consider that when choosing heavy finishing materials(corrugated sheeting and metal tiles) it is not recommended to make an angle steeper than 45 degrees. Then conventional fastening will be unable to prevent their rapid sliding along the diagonal slopes. And you will need to strengthen the fasteners and install additional elements. As a result, unnecessary expenses will appear - and this is not one, or even two thousand rubles (if you also take into account the work and complicated design).


You won’t be able to save money on building a completely flat roof either – you will have to create a particularly strong rafter system underneath it.


Device
Once the required level of roof pitch has been assessed, you need to understand its basic elements. And primary attention should be paid to such a detail as the Mauerlat. Builders use this word to describe a stable structure laid around the perimeter of the walls and used to secure the rafters. The Mauerlat ensures that the loads created by the roof overhang are distributed evenly to the limit. It also prevents various mechanical influences from tearing the roofing system away from the walls.


The protective characteristics of the Mauerlat are especially important when it comes to resisting gusts of wind. Some craftsmen and even architects consider it acceptable to construct roofs without this element, with direct connection of the rafters to the ceiling beams. But the simplicity of such a design results in the fact that 100% of the load is collected monolithically on the rafter supports. If everything is done correctly, these impulses are dispersed over a much larger area.
The Mauerlat can be made from:
- I-beam;


- channel;


- softwood timber.


The standard cross-section of the timber in such cases is 80x180, 100x100, 100x150, 150x150 or 200x200 mm. It is very simple to use; you just need to place a beam under the legs of the rafters.


When assessing the quality of wooden raw materials, one cannot ignore knots, which make up 2/3 of the thickness of the tree or more. Such defects threaten not only with the release of resin outward, but with a weakening of tensile strength.
Gable roof over lightweight frame house, which will not have to endure excessively heavy loads, can be placed on a Mauerlat made of connected boards. Some developers add steel pipes attached to the ends of the support part. The structures used must have a maximum cross-section that allows them to be passed through the rafter holes. Increased strength is no less important; it is even better to lay it in reserve. And you should not take pipes if you are not sure that they are made of high-quality steel.


The connection of the Mauerlat to the wall is carried out in strict accordance with technology that has been proven over decades. It is extremely rare to refuse a reinforced belt. And even if the building itself is strong and stable, it is still necessary. When there are aerated concrete walls below, it is worth spending time laying bricks or pouring plain concrete. These materials are less fragile and will avoid damage to the main part of the wall.


The size of the sealing belt is selected individually, taking into account the level of loads, including variable ones. But its width is always equal to at least the load-bearing walls.


A cornice (eaves overhang) must be present on any roof, and a gable roof is no exception. The purpose of such an element is to block water, which, when precipitation occurs, tends to penetrate into the space under the roof. Importantly, the cornice is one of the finishing elements, and when it is hemmed, the internal components of the rafters are covered.


The frame (box) for the construction of the cornice is made of a flat board that does not contain even single traces of bark and knots. An alternative to the cornice is the use of rafter extensions. You also need to think about covering the gables by at least 50 cm.


Please note: the internal structure of the cornice on the slope and on the pediment has little in common. If you do not want to delve into such subtleties, it is better to seek help from professionals.
Unlined overhangs have found their main application in the process of working on hip roofs; the hemmed type is most often used in combination with a hip roof with two slopes. The shortened format is compatible with absolutely any type of roofing structure.


The visor also extends beyond the main contour. Such a solution will reliably cover the wall and base from precipitation. It’s easy for people to hide there too: even if the rain pours like a storm, it’s always dry and comfortable under the forward part of the roof.


Calculations by architects and engineers show that a projection of 150 cm allows the wall to remain dry, regardless of the intensity and duration of the rain. But this is not the limit: the technical capabilities of modern builders allow them to build canopies twice as large. Such structures are used mainly as terrace organizers. On the hottest and hottest day, the overhang casts a shadow that protects the plants from the heat. You should not try to make such long visors yourself, the responsibility is too great.


The cross-sectional structure of a gable roof cannot be considered thoroughly studied., if we don’t mention the inclined elements of the rafter system. The slopes have struts that are firmly attached to vertically placed racks. It is not recommended to take boards for rafters with a cross section of less than 5 cm, and the width of the material is determined by its length. When calculating each part, attention is paid to how great the risk of its deflection under the influence of standard load is. An insulated gable roof implies an arrangement of rafter legs that requires a minimum number of cuts on the heat-insulating material.


Materials
Despite the availability of a wide range of roofing materials, a considerable part of developers unconditionally trust structures made from corrugated sheets. No wonder: it is he who combines those two qualities that many centuries have painfully tried to combine - high strength and aesthetic perfection. Russians especially value corrugated sheeting for its resistance to snow and ice, and for the minimal accumulation of solid sediment on the surface. Additionally, choosing blocks of two different colors will help to improve the design characteristics of a roof made of corrugated sheets.


It should be noted that even quickly falling raindrops still make a fair amount of noise. So that those living in the house do not feel like the inhabitants of a giant drum at such moments, they will have to shell out some money to purchase sound insulation. When the clouds go away and the sun comes out, another problem appears - extreme heat. To sunbathe, you need to take a pad of soft fabric with you and wear shoes everywhere. And if the corrugated sheet is damaged, corrosion will spread inside at amazing speed.


Typical fastening of a sheet involves screwing it to the substrate using 7 - 8 screws. These fasteners are placed in a checkerboard style, so the roof structure is held more firmly. It is prohibited to use nails to attach the corrugated sheeting, otherwise at the first strong wind it will go flying. The skates are pressed with screws to the tops of the corrugation every 3.5 - 4 cm. The ends must be covered with wind strips, screwing in the same screws in increments of 50 cm.


Important: you will have to work very carefully with a gable roof; this is an extremely dangerous type of repair. Even if the slopes are not steep, and the weather forecast indicates complete calm, you cannot climb up without a safety belt tied to stable parts of the buildings. All manipulations with the profiled sheet are performed exclusively with gloves; you cannot press it towards yourself or others.
Prohibited:
- throw damaged sheets from above, even after warning about this (scattering is unpredictable);
- leave the tool unattended;


- touch the profiled sheet and carry out any work with it without special clothing and safety glasses;
- bend sheets.


Gable roofing made of polycarbonate is installed almost exclusively over greenhouses and other secondary buildings. But even this circumstance and the high transparency of polycarbonate do not give the right to take its installation lightly! The advantages of this coating are ease of machining, excellent strength, and a variety of design elements. The absolute exclusion of corrosion and bacterial contamination will also please you. For installation, you will have to take self-tapping screws of a special type, which are able to compensate for the intense thermal expansion of polycarbonate.


The monolithic type of coating with a thickness of 1.2 cm is recognized as anti-vandal: the blow of a large hammer with great strength doesn't leave visible damage. Resistance to snow and wind will also be a tangible advantage.


The cellular variety cannot boast of such mechanical parameters, but it is much lighter. The rafter frame under both types of polycarbonate is created mainly from wood.
Honeycomb sheets are used for arched and dome structures, and if you need to make an arch of a significant radius, you will have to additionally install:
- supports;
- struts;
- profile stiffeners.


Straight polycarbonate roofs are built over open terraces, gazebos and small garden houses. The rafters for them are made from boards 4 cm thick. Wood processing is required antiseptic composition and fire retardants. But painting in one way or another is left to the discretion of the homeowners themselves.


Much more often than from polycarbonate, roofs are built from wooden beams. The most popular sizes of its blocks are 5, 8, 7-meter options. It is logical to use similar structures on houses that are generally made of timber - this will provide an ideal combination. It must be remembered that the high mechanical stability of such a material does not mean that it is permissible to load it with excess weight. Therefore, the first step when calculating a structure is to find out what the level of overloads may be. The side beams are pulled together on the top row - due to this, the pressure from the rafter joists is reduced.


The screed will have to be made in pieces measuring 15x10 cm. Siding is also used in finishing gable roofs (more precisely, their gables). Metal profiles are actively used as the main finishing material. When choosing it, you need to check the ratio of the width of the bottom shelves and the ridge (if the ridge is smaller, the water flow will be more active). You should also evaluate how correctly the side gutters are positioned and whether they are broken. Another important point– marking: the profile for walls and fences is not suitable for riding work.


When working with a gable roof, it is imperative to use additional elements.
When metal tiles are used, they solve three main problems at once:
- formation of a single whole instead of isolated blocks;
- prevention of penetration of moisture and foreign substances into the gaps of profile sheets;
- improving the decorative qualities of the coating.


The most important detail of a modern tiled roof is the ridge strip, which ensures the joining of slopes directed at an angle to each other. If there is no such strip, they are in different planes and a gap appears through which precipitation and wind can penetrate. On metal tiles, skates are most often placed in the form of a semicircle with a radius of 7-12.5 cm. A more universal solution is to use a trapezoidal or figured structure. In the last two cases, you can extend the wing by 15-30 cm, focusing on the shape of the roof and the slope of the slopes; The skate itself has a length of 200 cm in any configuration.


In addition to the ridge, you will need other parts to help complete the construction of the upper roof assembly. Plank caps (flat, conical or tent-shaped) are used exclusively for semicircular ridges. With their help, birds are blocked from visiting the under-roof space and it is possible to avoid its clogging.
The sealing underlay under the metal tiles helps ensure that the profile is pressed particularly tightly against the base of the roof. Thanks to this, both rattling sounds and the penetration of water into the under-roof space are excluded.


On a sloping gable roof, valley strips must be used, placed in negative angles. They will receive precipitation flowing from nearby slopes and direct it into the drain. The internal strip is placed under metal tiles or other profile sheets. The outer one is placed on an already formed roof, and this part must be elegant in appearance - otherwise it will not fulfill its function. The end or wind strip usually looks like a profile sheet bent in length; it is attached to the ends of the gable units.


The drip tray and the cornice strip are closely interconnected and act as additional parts of the drainage system. The adhesive strips provide a connection between the roof covering and the elements protruding beyond its contour. Even if there are no chimneys, there will definitely be antennas, intersections with walls, and so on. In Russian conditions it will not be possible to do without snow guards. Saving on any roofing components results in serious losses.


A metal roof with lightning protection is the only practical option. Protection against lightning damage is achieved by using special lightning discharge receivers made using pin or cable technology. It is advisable to consult with specialists to ensure reliable electrical contact of the roof along its entire length. The rafter system as a whole and each wooden fragment individually are always treated with fire-resistant reagents. The costs of such treatment are relatively low, and it allows you to minimize the likelihood of a roof fire.


Gable roofs are often created from profile pipe.
For the most part, such elements are awnings over:
- car parking place;
- outdoor recreation area and barbecue;
- swimming pool;
- terrace.


The pipe allows you to create an impeccably strong frame, and a corrugated sheet or polycarbonate is mounted on it. It is recommended to choose a flat piece of soil as a working platform. Covering the area with concrete or tiles will improve the decorative qualities, and placing it on an elevated area will help eliminate drainage problems.


The cross-section of the profile pipe is determined by how significant the structure is formed. If you take a 6x6 cm profile, it will no longer support canopies wider than 4 m and longer than 6 m. It is not at all necessary to choose round pipes for columns - if the parts are connected at right angles, square blocks will be even more practical. In addition to bolts and welding, clamps and threads can be used to mechanically connect parts. Do-it-yourself dyeing is no worse than branded dyeing, but 30-40% cheaper.


Some home craftsmen and even professionals believe that it would be best to cover the attic roof with clapboard. The advantages of this material are its environmental safety, comfortable price and excellent appearance.


Cedar wood has an excellent visual texture, in addition, it is also extremely beneficial for health.


Solid pine is strong and reliable, somewhat cheaper than cedar blanks.


It is also worth considering pine, oak, spruce or larch - each of these options has its own advantages.


Dimensions
Calculating the height of the roof is very important, and if you make a mistake in determining the dimensions of the ridge, you may encounter problems during use.
Whether the roof will be low or large depends on many subtleties and nuances:
- climatic parameters of the area;
- organization of the attic under the roof or its absence;
- type of laying material.


The heavier the coating being created, the steeper its installation should be. As the size of a single element decreases, the ridge rises higher. But we must not forget that raising the ridge inevitably entails costs, and the amount of costs increases rapidly. According to sanitary standards, a residential attic or an actively used attic cannot be less than 150 cm in height and 120 cm in length. An exception is made only for very complex structures.
- This is one of the simplest roof options used in the construction of small houses. It has two inclined slopes to the outer walls.
In this case, pairs of rafters leaning against each other are united by sheathing. Triangular walls, or tongs in other words, are formed at the ends.
Windows, called dormer windows, in them or on the roof slopes provide light and ventilation to the attic.
At first glance, it seems that in the construction of a gable roof and in its installation rafter frame there is nothing complicated, but in order to reliably protect the structure from any aggressive external factors, you will have to approach the work very carefully and responsibly, because mistakes in mounting the frame can hardly be changed later.
In this article you will learn how to make a gable roof, as well as how to install a gable roof.
The attic is a living space, located between the roof of the house and the ceiling of the lower floor.
It allows optimal use of free space as additional living space, but at the same time requires effective insulation and careful selection of roofing material to avoid high thermal conductivity in summer and increased noise levels during precipitation. You will see examples of attic design.
The attic has the same location, but in this case it is no longer residential. It does not require insulation and serious construction costs. The buffer space provides ventilation and serves as storage space.
Attic
Gable structure: mansard roof and what parts it consists of.
Gable mansard roof The rafter system ensures strength and reliability, which is a structure that includes a mauerlat, the rafter legs themselves, sheathing, beams, tie-downs, racks and other elements.
Roof support - Mauerlat- is a beam or log onto which the roof frame is attached. It plays a significant role in the entire structure, dispersing the load along the plane of the walls and preventing the slopes from moving apart under the influence of external factors.
The Mauerlat can be installed in three ways: using steel wire, anchors or studs. How to make an attic with a gable roof:

Rafter legs — these are the components of the roof, which at one end rest against the wall of the house, and at the other at an angle they close with the opposite rafter legs. They form the basis of the frame and the support of the future roof.
To effectively protect a structure from any weather conditions, the quality of the material from which they are made is very important.
ATTENTION!
When installing the structure, Monitor the quality of the material and be sure to treat the wood with insecticidal and protective solutions. Remember that a small number of beetle larvae eating wood can destroy a structure within a few years.
The bench is a beam, placed in a horizontal position on the supporting walls inside the building. All the pressure of the racks of the rafter system falls on him, which he, in turn, sends to the supporting wall.
When installing a beam, a beam with a cross-section from 100x100 to 150x150 mm is used.
Before attaching the bed, it is important to establish the position of the midline on which the bed will be located.
Measurements must be made relative to the Mauerlat, because with its help perimeter errors were corrected. From the side and gable mauerlats it is necessary to measure the distance determined by the project.
Under the beam it is worth carrying out a double .
The installation of the bed is carried out by fastening it to the internal walls using staples or wire twists, which can be pre-laid during the construction of the house or secured with anchors.
If the walls of the house are foam concrete or built from other lightweight materials, before installing the bench it is worth making an armored belt and releasing anchor fasteners, with the help of which it will be installed. If brick pillars are installed under the bed, it is also attached to the internal supporting walls.
Mauerlat

Plan of a gable structure
Tilt angle
 The choice of roof depends on a number of factors, such as the area you live in and rainfall patterns.
So, for example, the wind has a strong influence on the rafter system and roofing, and a slight increase in its angle of inclination will significantly increase the wind load. But a small angle is also unsafe - in this case, the wind will easily tear off the roof.
Snow, in turn, puts intense stress on the roof , when its slope angle is 30C, and at a slope angle of 45C, the load can be completely avoided, since precipitation rolls off the roof.
Obviously, for regions with strong wind activity, a roof with a slope of 30C is suitable, and for regions with heavy snowfall, the optimal slope is 45C.
The slope angle also depends on the material, from which the roof will be made. According to building codes, each roofing material requires its own minimum slope angle. For example, for this indicator it is 30C, and for tiles it is 22C.
In principle, the optimal roof slope angle can be calculated by the ratio of the size of the ridge to half the width of the building and multiplying everything by one hundred.
Rules for installing puffs
Tightenings are fastening composite structures, connecting the rafter legs from below, forming a triangle and preventing them from moving apart. They can be made from bonded boards or square timber, which should be cut to a reasonable length and nailed and pinned to the rafters.

Installation of puffs
The distance between the puffs should be equal to the distance between the rafters that they connect.
To ensure that the tie does not sag under the weight of its own weight, it must be connected to the ridge of the roof, the junction of two slopes.
Rules for installing racks
The racks are made of square timber and are located vertically under the ridge, transferring the load from it to the supporting internal wall. Resting on the beams, they serve to fasten the purlin, a horizontal beam that provides auxiliary support for the rafters.
Before installing the rack, it should be marked for subsequent fastening of purlins, crossbars and other elements of the rafter system.
When installing racks, be sure to ensure a tight fit between the edges of the articulated elements.. Gaps at joints should not be more than 1 mm. The presence of through holes is not acceptable.
The racks are mounted on dry and antiseptically treated surfaces supporting structures. If beams rest on the rack, it is necessary that the load on the racks is carried along the grain of the wood, and on the beams goes across.

Installation of racks
DIY gable roof: step-by-step installation
When preparing to build a gable roof with your own hands, you should decide will it be residential or non-residential, take into account the climatic and wind loads of the area and develop a plan, taking into account the dimensions of the house.
And now we will tell you how to make a gable roof with your own hands:
- The first stage is marked by the installation of a roof support - a Mauerlat - on the longitudinal walls of the structure. It takes on the entire load of the rafter structure and distributes it over the walls and foundation. The Mauerlat for a gable roof is prepared from timber or logs with a cross-section of 50×150 - 150×150 mm, pre-treated with insecticidal and protective preparations that resist fire and rot.
- If a bench is used during construction, then the next step is the stage of laying it.
- Then you can begin installing the racks and purlins. Depending on your project, it may contain one ridge purlin or have additional side purlins. Or it can be without them, but with racks supporting the rafter legs. To facilitate the work, it is advisable to build scaffolding. The racks must be prepared to be the same length, but if the heights of the walls of your house are not the same everywhere, then they will have to be cut out differently in order to lay the ridge girder in a horizontal position. In this case, the length of the racks must be measured using a rope stretched horizontally between the two extreme points.
- When installing racks, it is necessary to check the vertical position of the structure in two planes and pre-attach the racks with boards to the constructed scaffolding. Then the purlins can be attached to the racks. Next, after making sure that the racks and purlins are in the correct position, secure the nodes according to the design.
- Then you can begin installing the rafter legs. If, as a result of the preparatory work, the output is a flat horizontal surface, one marked rafter leg will be enough for you. Otherwise, if there are inconsistencies, you will have to mark each one by stretching a rope between the two outer rafter legs and cut out each intermediate rafter separately.
- The slats, equal to the length between the side planes of the rafter legs, are made to maintain the required pitch. In other words, it is necessary to subtract the thickness of the rafter legs from the step length stated in the project. Before attaching the rafters, which go end-to-end with the slats, the structure is carefully checked and only then secured. Next, fillies are installed - boards that extend the rafter legs in order to arrange the eaves overhang.
Do-it-yourself gable roof (drawings and photos below):

DIY gable roof step by step: photo diagram

Gable roof design with attic

Roof installation
Selection of roofing material

For roofs with a pitch greater than 20C, tiles and slates are ideal. Roofs with a lower slope will trap moisture in the gaps, which will damage the coating. durable and easy to repair.
Slate is also a reliable material. It is moisture-resistant, frost-resistant and fireproof. In addition, it is quite inexpensive and easy to install.
Roll materials are used for flat roofs or with an inclination angle not exceeding 30C, otherwise the material may slide under the influence of external factors.
Metal profiles and tiles are more often used on roofs with a slope greater than 10C. This is a fairly durable and lightweight material, but when using them on a flat surface, it is necessary to treat the joints with a high-quality sealant. The greater the angle of inclination, the less overlap should be between the metal profile sheets and. The same can be said for slate.
CAREFULLY!
The lower the roof slope, the denser the roofing material should be chosen.
Another option is roofing panels, already containing heat and vapor barrier. Their installation is simple, but they are very expensive.
Also, when installing a gable roof, it is important to ensure ventilation of the room below. And for pitched roofs, a drainage system is required.
How to make a gable roof of a house and from what materials depends on you. In conclusion, it is worth noting that It’s worth approaching the work competently and building a gable roof only with high-quality materials. Then the roof will be durable, reliable and resistant.

Comparative characteristics of roofing materials
Useful video
In this video you will learn how to build a gable roof:
In contact with
The roof becomes an important structure of the house. She completes the construction of the building frame, after which only finishing remains. The most common implementation scheme is with two slopes. You can make a gable roof with your own hands without much difficulty, you just need to understand the technology.
Roof structure
Before you begin installing a gable roof, you need to understand what it is. The design differs from all others in its pediments. The following varieties can be given depending on the method of assembling the rafter system:
- single-pitched - the pediments have the shape of a trapezoid or a right triangle;
- gable is characterized by triangular gables;
- hipped (hip) has no vertical edges.


The main elements of the gable roof system are:
- rafters;
- Mauerlat;
- crossbar;
- struts;
- racks;
- contractions (ties);
- sheathing;
- thrust bars and pads.

Rafters are the main load-bearing structures. When constructing with your own hands, it is important to choose the correct cross-section, otherwise an emergency situation may arise.
Preparing to start work
Before making a gable roof, you will need to select materials. Installation begins with the selection of wood. To build a reliable structure with your own hands that is resistant to external factors, you will need to follow the following recommendations:
 For construction, it is better to choose first or second grade coniferous species
 - It would be right to choose softwood materials (spruce, pine, larch are more resistant to rotting);
- the structure is assembled from wood of the first or second grade, the use of the third for critical elements is unacceptable;
- it is better to choose those lumber that are produced in the northern regions; the more complex the growing conditions of the tree, the denser its structure;
- they try to choose the material that was cut down at the end of the cold period of the year (February-March).
- load from snow cover (snow region);
- weight of the roof covering;
- rafter pitch;
- span (distance between reference points);
- insulation thickness.

A thermal insulation layer is required when designing a residential space – an attic – in the under-roof space of a house. Most often, do-it-yourself installation of mineral wool material is done to improve the thermal insulation characteristics. In this case, it is important to provide a ventilation gap between the heat insulator and the roofing. The height of the rafter leg should not be less than the thickness of the insulation. To increase the clearance, a system element such as a counter-lattice is introduced - a block that is nailed parallel to the rafter and increases its height.
The most convenient pitch of rafters for a private house is one that provides a clear distance between them of 0.58 m.
This allows you to correctly install mineral wool slabs without trimming or additional elements. For such a step, the following recommendations for the cross-section depending on the span can be given:
- span 3 m – rafter size 40x150 mm;
- 4 m – 50x150 mm;
- 5 m – 50x175 mm;
- 6 m – 50x200 mm.
It is important to know the following: load-bearing capacity and bending resistance are more affected by height than width. If necessary, increase the load-bearing capacity more effectively by increasing the height.
Another element whose cross-section will need to be selected is the sheathing. The most optimal value would be a thickness of 32 mm. With increased load, the value is increased to 40 mm.
The remaining components of the house's rafter system are assigned structurally, based on what lumber is available. But it is still worth taking into account the strength requirements.
Immediately after purchasing the material, before assembling the system begins, you will need to treat all the elements with special compounds yourself.
A gable roof, like any other roof of a house, needs the following types of protection:
- antiseptic, carried out without fail, helps prevent the processes of decay and the occurrence of mold and mildew (even if the installation is not planned some time after purchasing the wood, the treatment is carried out immediately);
- fire retardant, optional, but very important, it increases the wood’s ability to resist fire, thereby increasing the safety of the structure.
Installation of a house rafter system
To build the roof of a house with your own hands, you need to complete all the work in a certain order. Installing the elements is not difficult, but you need to control the quality of the components and connections. The most important areas are:
- fastening the Mauerlat to the wall;
- fastening the rafters to the mauerlat;
- fastening the rafters together.

To properly build a roof with your own hands, work should be done in the following order:
- Mauerlat installation;
- installation of rafters at the designed angle;
- fastening the legs at the top;
- fastening of load-bearing structures using racks, struts and contractions;
- installation of counter-lattice, sheathing, waterproofing;
- do-it-yourself insulation of the roofing system;
- installation of the bottom sheathing, installation of the roofing.
Attaching the Mauerlat to the wall
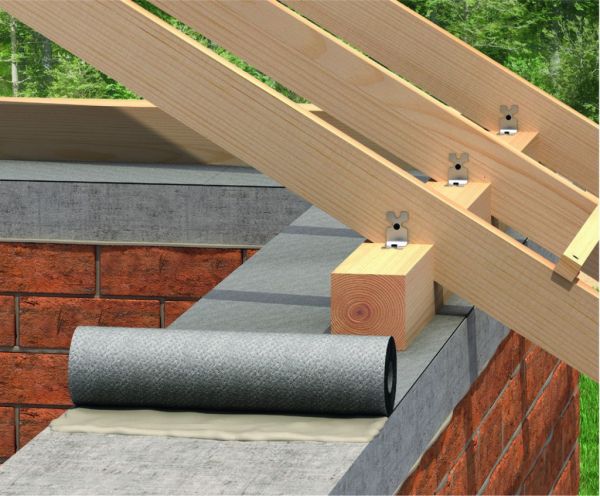
When installing it yourself, it is important to understand where to lay the Mauerlat. A beam with a section of 150x150 mm or 200x200 mm is installed on the inner edge of the external walls. It is important to ensure sufficient thermal insulation of such an area. The outer part of the fence in this area can be made of the same material as the walls.
In this case, the laying is performed at an angle equal to the slope of the slopes. The second option is to fill the space with expanded clay concrete. These methods are relevant for stone houses (brick, foam concrete, expanded clay concrete, etc.). If you plan to build a frame or wooden house the top frame or crown of the wall will act as a mauerlat.


You can do the job in several ways:
- Fastening with staples. To do this, wooden blocks are installed in the penultimate row of masonry, to which the lower part of the brackets will be attached, and the upper part is inserted into the mauerlat. Wooden plugs must be impregnated with an antiseptic.
- Fastening to wire. To carry out this option, you will need to lay a wire 3-4 mm thick in the masonry of the walls or a monolithic belt; its length should be such as to wrap the beam and twist the wire rod.
- Fastening with bolts or studs. The options are similar, but the first provides greater reliability. Fasteners are placed in a monolithic belt. After this, the timber is laid on studs or bolts. To make holes for them in the right places, lightly tap the Mauerlat. The resulting recesses will be places for drilling holes. After their preparation, the beam is finally installed in the design position and tightened with nuts.
When building a house, it is also important to know how to build up the Mauerlat. The standard dimensions of lumber are 6 m, and the walls can be longer. To connect two elements along the length, you will need to perform a direct lock. To do this, the lower part of one element is cut out, and the upper part of the other. Fastening is done with bolts. It is not recommended to cut at an angle in this case. Corner joints are also made using a straight cut.
The choice of method for attaching the Mauerlat largely depends on the material of the walls, or more precisely on its strength. For lightweight concrete, pouring a monolithic belt around the perimeter will be a mandatory step.
It is important to provide waterproofing between the wood and the stone material. For this purpose, roofing material, linochrome or waterproofing material are most often used.
There are two most common options for doing the work yourself when building a house:
- with a gash;
- without drinking.
In both cases, the rafters are additionally secured with metal corners on both sides. When using a system with a saw, you will need to process the timber at an angle corresponding to the slope of the roof of the house. When installing without cutting, you need to prepare a support beam with your own hands, which will not allow the system element to move across the Mauerlat. As an additional fixation, nails are hammered in and a twist of wire is inserted from the leg to the wall (this fastening can be done through one leg).
 2 types of fastening rafters to the Mauerlat
 In order to obtain detailed and visual information on how to install a gable rafter at home with your own hands, it is recommended that you familiarize yourself with the series “Knots of wooden roofs of residential rural buildings.” This album contains a large number of options for securing all elements, which will help you complete the installation without errors.