The first thing guests see when they come to your home is the porch and front door. This is where the main impression of the house as a whole is formed. The canopy on the facade is initially designed to protect the entrance and door leaf from rain and sun, but its decorative role is in the foreground.
To get a canopy over the porch of a private house as beautiful as in a magazine photo, you should approach its arrangement with all responsibility and seriousness.
Types of mini-awnings by installation type and design
The main purpose of the canopy over the porch is to protect the entrance doors and threshold of the house from rain, snow and sunlight. Canopies can be classified according to the type of installation, design, roofing and frame material, size and shape.
Methods of fastening awnings over the door
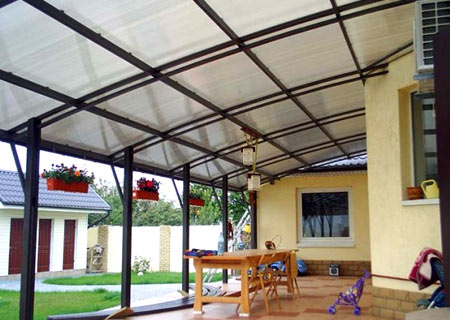
Usually a small canopy is hung over the door, commensurate with the dimensions of the porch. However, you can also build a wide canopy, which in the summer will serve as a terrace. Wide canopies with closed sides provide good protection from the wind.

Based on the type of installation, canopies are divided into two types:
- Supporting. These are massive structures that require reliable fixation. Such canopies are attached to the house on one side, and installed on metal or wooden supports on the opposite side.
- Mounted. Lightweight, small structures that are mounted directly above the door. Such canopies are easy to install, but often play more of a decorative role, because a small shelter is unable to protect, for example, from rain or heavy snow.

Photos of ready-made structures will help you make a canopy or canopy over the porch with your own hands. Looking at the work, it’s easier to decide what you want your canopy to look like. There are many roof design options.
Variety of shapes and design solutions
Single pitch roof. The simplest design is functional and without any special frills. Even a person with only initial experience in construction can do it. This shape is ideal for wide supporting canopies made of corrugated sheets or slate, as well as for open terraces. When constructing a lean-to structure, it is important to make a sufficient slope so that precipitation or leaves from trees do not accumulate on the roof.

Gable or tri-slope canopy. The “house” roof will decorate the porch in both classic and rustic style. Gable wooden or tiled porches look especially nice. Most often, such a porch is made with support pillars so that the structure can withstand the considerable weight of the roof. A three-slope canopy is a more complicated option gable roof. It is not so easy to make, but it also looks more interesting.

Semicircular visor. Previously, such visors were made of metal. Nowadays, as a rule, cellular polycarbonate is used for them. This material bends well, is easily attached to the frame and overall looks very presentable. The lightness of the design allows you to make it wall-mounted, and different colors of polycarbonate give scope for design delights. You can make a semicircular canopy over the door or a large-scale structure covering the entire facade.

Curly awnings. Building a porch with a custom roof will require extensive construction experience. Such canopies are complex in execution, but always attract attention and cause admiration. For their construction, roofing materials are chosen that are easiest to create complex shapes with, for example, tiles, cellular or monolithic polycarbonate.
The design can be very different - in the form of a simple or elongated dome, polygonal, concave or any other shape.

Variety of materials for the visor
What the canopy is covered with will determine its functionality and durability. The modern market offers a lot of options for roofing materials. Before you make a canopy over the porch with your own hands, you should familiarize yourself with their properties and only then make a choice.
Modern polycarbonate roofs
In recent years, this material has gained enormous popularity. Polycarbonate sheets come in different colors, so you can easily build a canopy that fits into the overall color scheme of the building.

Polycarbonate has a lot of advantages:
- transparency, due to which it practically does not obscure the facade of the house;
- variety of colors;
- light weight of sheets combined with sufficient strength;
- ease of installation;
- flexibility, which is important when building semicircular and complex-shaped canopies.

Despite all the advantages, polycarbonate also has disadvantages. Perhaps the main one is low impact resistance compared, for example, with tiles or corrugated sheets. The polycarbonate canopy can easily withstand snow cover, but can become wrinkled or even crack if a heavy branch falls on it.
You can make a canopy over the porch of a wide variety of designs from polycarbonate - flat, single-pitched, arched, gable, or any other shape you like.
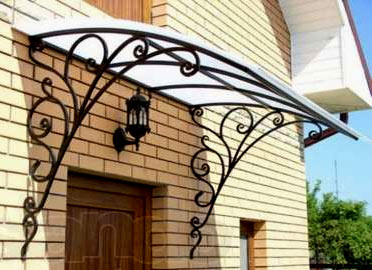
A hinged forged canopy with a polycarbonate roof is considered a classic.


Classic metal roofing
Metal tiles combine classic design and the latest technologies for the production of roofing materials. The metal base is responsible for strength and durability, and the polymer coating prevents corrosion.
Advantages of metal tile canopies:
- service life up to 45 years;
- strength;
- resistance to the external environment;
- easy installation.
Metal tiles have one drawback - their high price compared to other materials.

It is advisable to make tiled canopies at the stage of building a house, together with the main roof. The remains of tiles, which always remain after large-scale work, are quite suitable for the visor. In addition, the roof and canopy in the same style will look very stylish. Considering the considerable weight of the tiled roof, it is better to place the porch on supports.

Practical and reliable corrugated sheeting
Ordinary galvanized profiled sheets are not particularly decorative, but recently profiled sheets with a polymer coating in different colors have appeared on sale.
The roof over the porch made of corrugated sheets is distinguished by the following features:
- strength and impact resistance;
- relatively light weight;
- ease of installation;
- low price compared to other roofing materials.

Considering that the sheets have quite big sizes(width 0.75-1.0 m and length up to 12 m), corrugated sheeting is advisable to use for large-scale metal canopies over the porch of a house. It is not profitable to buy a full-size sheet for a compact canopy, so small structures are covered with scraps of corrugated sheeting left over from a large construction project or other materials are used.
Good old wave slate
Until recently, slate was almost the only and widespread roofing material. Now slate is not so popular, however, modern craftsmen continue to use it in construction.
Slate awnings are valued for the following qualities:
- resistance to environmental influences;
- heat-insulating properties (slate is little heated by the sun's rays);
- durability.
However, slate has a lot of disadvantages:
- heavy weight;
- fragility of sheets;
- difficult installation (due to their fragility, the sheets are not easy to cut and drill holes for fastenings in them).
When making a slate canopy over the porch with your own hands, you need to take into account its considerable weight, so you should definitely provide a strong frame and reliable fastening to the facade.

An alternative to traditional slate is plastic and euro slate. They also have a wavy sheet surface, but are more practical, weigh less and look more attractive, as they are produced in various color options.
Eco-friendly wooden canopies
Wood never goes out of style. The wooden canopy over the porch has not lost its relevance from ancient times to the present day. This design looks especially good in combination with a log house or a house with wooden trim.

The advantages of wooden canopies are obvious:
- environmental friendliness;
- highly decorative;
- reliable protection from the sun - it is always cool under such a canopy;
- simple installation process.
Unfortunately, wooden structures are susceptible to rotting and can be destroyed by bark beetles. In order for the canopy made by yourself from wood over the porch to last as long as possible, you will have to cover it with several layers of special impregnations.
Quite often, combined canopies are erected over the entrance, where the supports and beams are made of wood, and the roof is covered with corrugated sheets or tiles. Wood is ideally suited for the manufacture of figured or carved structures, because it is malleable to processing and in the hands of a master can turn into a real work of art.

How to build a canopy over a porch yourself
So, inspired by colorful photos of porch awnings, you decided to build your own structure. Where to start?
Design and important calculations
The whole process consists of several important steps:
- Drawing up drawings and approximate estimates.
- Frame construction.
- Installation of the frame on the facade and, if required, construction of additional supports.
- Roof sheathing.
All measurements must be present on the canopy drawing, because they will be used to calculate the consumption of the necessary materials. When designing the canopy, it is necessary to take into account the width of the front door. Another 30-50 cm is added to this figure and the minimum roof width is obtained. For example, if the front door is 90 cm wide, then the canopy is made at least 110 cm. Also, be sure to think about the angle of the roof - it should be 20-30 degrees.
The wider the canopy, the greater the slope.

Frames for canopies are made from wooden blocks, a metal corner or profile, and you can also order ready-made forged products, which only need to be covered with roofing material to your liking.

Stages of construction of a protective canopy over the door
When constructing a frame, the basic rule is followed - the heavier the roof, the more powerful the supporting structure should be. For lightweight polycarbonate canopies, even reinforcement with a diameter of 5 mm or more is quite suitable as a frame. And for massive slate or tiled roofs you will need bars or a metal corner with a cross-section of 5-10 cm.
The finished frame is attached to the facade with anchor bolts. The junction with the wall of the house is covered with a protective strip. If required, support posts are installed, which are usually not just dug into the ground for strength, but also concreted.
Construction work concludes with the installation of the roof. The method of fastening it depends on the material used. The polycarbonate is secured with self-tapping screws through thermal washers, and the ends are sealed with a special tape. Corrugated sheets and metal tiles are screwed with self-tapping screws on the corrugated sheet or, in extreme cases, with ordinary wood screws. The slate is nailed to the sheathing.

Regardless of which option for a canopy over the porch you choose, construction must be approached with all responsibility. Then the visor will become not only protection, but also a decoration of the house, and will also last for many years.
Canopy over the porch of a private house: photos of canopies made of different materials and installation stages
How to make a canopy over the porch so that it matches the design of the house and lasts for many years. Types and photos of visors made of various materials. Stages of construction with your own
Practical tips for choosing and installing a canopy over a porch
They say that theater begins with a hanger. And where does it start? a private house? Of course, with canopy located above the porch.
The canopy over the entrance to the house has the following functions:
- firstly, it provides a more comfortable entrance to the premises;
- secondly, it protects the so-called entrance group (door, steps, etc.) from the harmful effects of precipitation. This is especially true if the door is made of wood.
- thirdly, it gives the final emphasis to the exterior of the building, carrying an important decorative function.

It is stylistically correct to choose the color of the canopy, which is similar in shade to the design of the walls.
DIY canopy installation
Porch awnings can be installed for a variety of purposes. Some need them only to protect the entrance area, others plan to place an entire summer terrace under the canopy. And still others want to combine several types of buildings in one shed, allocating space underneath for parking a car.

To create a terrace, translucent materials such as polycarbonate or fabric are best suited if a canopy is required only in the hot season.
One of the simplest options for self-installation is a semi-arched polycarbonate canopy. Features of its installation are as follows:
- made of galvanized metal profiles,

or aluminum is welded semi-arched frame that needs to be attached to the wall with 6 or 8 anchors.
Supports will provide additional stability to the building.
To install them, you should dig holes for the foundation 0.8-1.5 m deep, level the supports and concrete them.
- After the composition has completely dried, curved transverse supports are attached to the pillars.
- The polycarbonate sheet is carefully marked, the required size of the material is cut out, bent to shape and attached to the frame and supports using self-tapping screws and thermal washers. The protective film is removed upon completion of all work.
Types of canopies
The variety of shapes, sizes and materials from which visors are made is truly enormous.
Features of designs of various shapes
According to its form canopies are:
The dome may be oblong.
The advantages of this type are a smaller surface area compared to canopies that have corners in their structure, and, accordingly, savings on materials.
And also - better air flow, which is important in areas exposed to strong winds.
The arched canopy is combined with semicircular steps.
Their advantages are natural water drainage and high resistance to loads (important when large amounts of snow fall). An additional advantage of the semi-arched type of canopy, called an awning, is the low cost of material.
- single-pitched. They are distinguished by ease of installation and water flow on only one side. One of the variations on the theme of single-pitch canopies is a canopy with a valance.
- gable. They have a greater degree of strength than single-pitch structures and are in perfect harmony with roofs of the same type.
Incorrect installation can result in snow accumulation.
They are also well suited in cases where the canopy material is glass.
- concave. The unusual design serves as a highlight of the exterior, and the type of surface ensures unhindered snow shedding.
Selecting canopy materials
The material for making the canopy is selected taking into account its harmonious combination with the overall ensemble of building elements, the weather conditions of the given region, as well as the design budget.
- tree. Eco-friendly, easy to cut, allowing you to create a masterpiece from it.
Only hardwoods (oak, walnut).
Easy to install and operate.
- metal. Galvanized iron is quite light in weight and looks beautiful on dome and arched canopies. However, its disadvantage is noise during precipitation.
- corrugated sheet. It is characterized by high fire safety and ease of installation.
You need to choose impact-resistant glass
The variety of colors, the ability to bend the sheet, the light weight of the structure and good compatibility with many other materials make this type of canopy universal.
- metal tiles.
It is most appropriate if the roof of the building is also made of this material.
It should also be remembered that the optimal angle of inclination of a lean-to canopy is 20-25°.
Violation of this rule will either lead to accumulation of snow if the slope is too flat.
Or to poor visibility when opening the door.
- concrete buildings. They are a major extension to the house, equipped with columns.
- fabric awnings. They are seasonal structures, characterized by low cost and ease of installation.
Types of canopies according to installation features
According to the type of visor fastening, there are:
- hanging elements. They are mounted on hangers and are well suited for canopies made of lightweight materials (glass, polycarbonate, corrugated sheets).

Some types of suspended structures have mobility. And they can go down or up depending on the need.

For a hanging canopy, a combination of forged elements and polycarbonate is ideal. If the structure is attached to a wall covered with foam plastic, it is first reinforced with aluminum mesh and re-plastered.

Heavy and large-sized canopies will need supports. The ideal material for supports is aluminum.

Concrete canopies give the building pomp and massiveness.
Also, a balcony or terrace can serve as a canopy over the porch, which adds elegance and chic to the building.

Canopies look very stylish, being an extension of the house, its integral part. In the resulting room you can place, for example, a greenhouse or a room for household needs.
Types of canopies over the porch of a private house and cottage: photos - options and prices for canopies over the front door made of polycarbonate, metal, wood, metal tiles; drawing, how to make it yourself, order and buy beautiful forged awnings
Instructions for installing a polycarbonate canopy. Overview of types of canopies, their advantages and disadvantages. And also how to choose the right canopy over the entrance.
Types of canopies over the porch and do-it-yourself installation technology
The front door in a private house or country house is often exposed to bad weather: rain, snow, hot sun, wind. For these purposes, a porch with a canopy is built. In addition to practical purposes, erecting a canopy over the porch with your own hands is an excellent opportunity to decorate the facade of the building and give it originality.
There are many varieties of this building, which differ in materials of manufacture and shape of the structure. In this article we will look at how to make a canopy over the porch so that it serves as a reliable and beautiful protection for the house.


Why do you need a roof over the porch?
A canopy over the front door is present in many homes. This structure is assigned several functions:
- protective. It is used as a structure that protects the front door from the scorching sun and moisture;
- ensuring the comfort of home residents. In bad weather, it is more comfortable to hide under a canopy, opening the lock of the front door;
- decorative If the canopy is designed to match the design of the house, it will decorate and complement the exterior of the building.

Original design of a porch with a canopy, photo
Visor device
All canopies, regardless of their shape and material of manufacture, consist of two parts:
- frame. This is the base frame on which the entire structure rests;
- external covering - roofing material.

Diagram of the structure of the canopy over the porch, photo
Types of canopies for porches
By installation method
Depending on the design of the product and the method of its installation, canopies are divided into supporting and suspended. Hanging canopies are small in size and are fixed on the outer wall of the building. Support structures more massive, therefore they are installed on metal pipes or wooden beams.

Canopy mounting options
Canopies over the porch can be of various shapes:
The structure can also be open (without side walls) or closed (fenced with blank walls that protect the area in front of the front door from bad weather). The photo gallery will demonstrate various options for visor configurations.


Based on materials used
The frame of the hinged porch structure is most often made of metal and wood. Wood is a cheaper material, easier to process, but will not last long. Metal products have a long service life, but to make such a canopy over the porch with your own hands you will need certain skills and special tools.
Thus, rolled metal is often used to make visors. The base parts are either assembled by welding or bolted. In order for the metal frame to last longer, before installation it should be well sanded, primed, and then painted.
Attention: the metal base for the canopy is quite heavy, this should be taken into account when drawing up the canopy project.
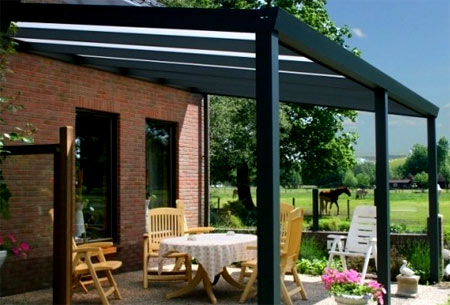
Aluminum tubes and angles are lighter. The material bends well, is easy to cut, and does not require additional processing.

Canopy over the porch made of metal (aluminum base)
The visors on the forged frame look luxurious. They amaze with their variety of shapes and configurations - carved leaves, climbing stems, strange flowers... The forged canopy over the porch is a real work of art. This is both a beautiful and reliable material that will add style and originality to any visor.
Please note: forged products are complex handmade work, so they are not cheap.

Various forged canopies over the porch, photo
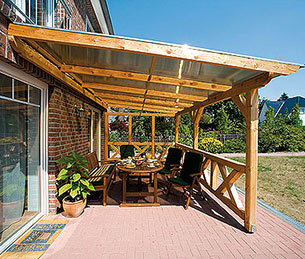
A mansion made of logs or covered with boards will harmoniously complement the canopy over the wooden porch. This is an environmentally friendly material that will emphasize the individuality of the building.
Note: you should not be afraid that a wooden frame will not last long - there are special protective agents and impregnations that protect the wood from rotting.

Wooden canopy over the porch, photo
Canopy Covering
The materials for covering visors are also striking in their diversity. Most often they are selected under the roof of the house, but it is not necessary to adhere to this rule.
A lightweight and durable material suitable for almost any coating is polycarbonate. From this material you can easily make a canopy over the porch with your own hands. It is flexible and plastic, which allows you to make canopies for the veranda of any shape, even arched.

Canopies over the porch made of polycarbonate have a wide range of colors, which allows you to implement any design design
Coverings made from corrugated sheets (corrugated sheets) look very practical and beautiful. This is a sheet of galvanized steel, profiled for greater rigidity. It is used for external coatings. Canopies over porches made of metal tiles have similar qualities. But since this roofing material is quite heavy, structures made from it are made primarily of support, single- or double-slope.
Advice: when making a canopy over a porch made of metal tiles, take into account the pressure of the roofing material when making the frame.

Profiled sheet, canopy over the porch, photo
Construction technology
How to build a canopy over a porch? First you need to decide on the materials. It will be easiest for a novice builder to work with polycarbonate, so let’s consider its installation. It is better for novice builders to start with a simple structure without bends, with a slope for water drainage.
Design
Before making a canopy over the porch, you should calculate its dimensions and make a design drawing. This will give a visual idea of what the porch of a private house with a canopy will look like after construction, and will help calculate the amount of necessary materials and decorative elements.
The canopy over the porch should not be too narrow, as it will not protect from wind and rain. The optimal length of the overhang is 80 cm, and its width should exceed the doorway by 40-50 cm. To ensure that precipitation does not linger on the roof of the canopy, it should be slightly sloping.
Please note: the supporting structure of the porch canopy is constructed separately and is installed ready-made.

Drawing of a canopy over the porch, photo
Preparatory stage
Immediately before installing a canopy over a polycarbonate porch, you should clear the construction site and prepare all the necessary materials:
- sheets of cellular polycarbonate with a thickness of at least 10 mm so that the canopy roof is stable;
- metal profile pipes;
- welding machine;
- screwdriver and drill;
- self-tapping screws;
- tape measure, level, pencil.

Cellular polycarbonate and special self-tapping screws with a thermal washer for its fastening
Installation procedure for a polycarbonate porch canopy
First, using a tape measure, a building level and a pencil, markings are made on the wall of the house. On it, according to the drawing, the main details of fastening the canopy frame are noted.

Marking for installation of the visor base
Next, the structure frame is made from profile pipes. It has a triangular shape. The pipes are connected using a welding machine. The base is assembled on the ground in whole or in part (this depends on its size and weight).
The frame of the visor can have several jumpers; the longer it is, the more there should be. They significantly increase the rigidity and stability of the canopy structure.

Manufacturing scheme metal frame porch canopy
Then holes are made in the pipes for bolts, and the structure is attached to the wall of the building. This is done using self-tapping screws or anchor bolts. In order not to burden the structure, polycarbonate sheets are attached after installing the base. The base of the visor should be secured in four places: at the top and bottom of each edge of the product.

Attaching the hanging frame to the wall
After installation, the canopy frame is primed and painted. After this, the installation of polycarbonate sheets begins. A special sealing tape is installed at the ends of the product, which is inserted into a profile installed at the end of the frame.

Installation of polycarbonate sheets
To properly secure polycarbonate sheets, use this diagram:

Options for how the polycarbonate canopy roof is fixed
After installing the canopy, you should seal the seams where the canopy meets the wall. This will protect the front door from moisture. For these purposes, you can use a metal strip.

After removing the protective film from the product, the canopy is ready for use. If you have experience, you can even build a round structure.

Polycarbonate canopy for porch, semicircular
The porch is the face of every home. It gives the building uniqueness and originality. Therefore, it depends on its design appearance mansion. And the roof of the structure will not only serve as an additional decoration, but also as protection from bad weather. There are many materials for its manufacture, and a variety of designs (from simple to more complex) allows you to install it yourself. With a little effort, you can create a practical and beautiful architectural element.
A beautiful canopy over the porch, photo examples of wrought-iron, wooden, metal awnings, as well as tips on how to make a canopy over the porch with your own hands
How to build a canopy over a porch with your own hands? Installation technology with photo examples. Examples of design of forged canopies over the porch, made of metal tiles,
How to build a canopy over a porch with your own hands - ideas and step-by-step instructions
Owners of private houses often face the need to build a canopy over the porch. There are many types and modifications of this architectural detail - from elegant canopies over the entrance to the house to a spacious covered terrace along the entire facade. Even a novice builder can build a simple structure on his own. The main thing is to choose the right materials and design, as well as securely attach the structure to the house so that it does not collapse under the weight of snow in winter.

What to give preference - a canopy or a canopy
Although these two designs are very similar, there are still some technical differences. If vertical support beams are usually installed for a canopy, then the canopy is attached directly to the wall of the house. Therefore, you need to pay attention not only to the shape and materials of the extension itself, but also to what the main building is built from and whether it will be possible to securely attach the frame to the wall or whether additional supports will be needed.

It is worth considering where you plan to place the extension, and what is more important to you – aesthetics or functionality. After all, a beautiful and elegant forged canopy may look out of place above the entrance to the utility room, and a bulky wooden canopy will spoil the exterior of the front entrance to the house. Also, when planning in advance, check whether the selected dimensions of the structure are appropriate and whether there is available space for construction.

Selection of reliable materials for construction
In the question of how to make a canopy over the porch, the first thing you have to decide on is what material the frame will be made of and what to use for the roof. In home construction, wooden beams and metal pipes or profiles are most often used for the frame, but each option has its own pros and cons:
- The wooden frame is easy to manufacture, it is easy to attach to the wall of the house, and the cost is relatively low. But wood is a short-lived material, and even after special treatment, such a structure will have to be regularly repaired or replaced.
- Metal structures are strong and durable. But to work with metal you need: additional equipment (welding machine), special fasteners and skills in working with such material.

Suitable for roofing are polycarbonate, roofing iron, metal tiles, corrugated sheets, ondulin, slate, glass - almost any available material. Often in home construction, remnants of the material used to cover the roof are used for a canopy over the porch. It is worth considering that the weight of the entire structure, and therefore the method of fastening, depends on the roofing material.
How to build a wooden canopy with supports over a porch
Wood is one of the most affordable building materials. In addition, it is easy to use, and if properly processed, a structure made of wooden beams can become a real decoration of the house. Therefore, it is not surprising that many owners who decide to install a canopy over the porch themselves choose wood for construction.

Drawing and calculations for a wooden canopy
Before you make a canopy over a wooden porch with your own hands, you need to prepare a drawing and correctly calculate all the dimensions of the parts. It is very important to check all the angles and lengths of the beams in advance, since during the construction process even a slight error will lead to severe distortion.
The dimensions of the extension are calculated individually. The height of the building must be sufficient for an adult to stand on the porch without bending. The roof slope angle should be within 25-35°. When calculating the length and width of the structure, you should focus on the dimensions of the porch - you can add 50-60 cm to the original dimensions on the sides and free edge.
Advice. To clarify the dimensions of the canopy, you can lay slate or corrugated sheets on the ground, taking into account overlaps, and measure the resulting rectangle. These will be the dimensions of the roof of the extension.

Materials and tools for construction
To build a canopy over the porch, you need to prepare the following materials:
- processed wooden beam 15x15 cm for supports and rafters;
- wooden beam 75x75 mm and board 25 mm for sheathing;
- roofing material (slate, corrugated sheeting, galvanized iron);
- anchor bolts, staples and screws for installing the sheathing;
- self-tapping screws and slate nails;
- shovel, hacksaw, screwdriver, hammer, paint, tape measure and plumb line.
Before attaching the canopy to the house, you need to clear the construction site, mark the installation locations for the supports, and treat the wooden parts with bitumen or another compound to protect them from moisture and rot.
Step-by-step instructions for building a wooden canopy over a porch
Installation of the support beam on the wall above the porch:
- The location for attaching the support beam is marked on the wall.
- Using a plumb line and tape measure, draw an even horizontal line.
- A 10 cm beam is secured to the wall with anchor bolts. You can pre-cut grooves in it for attaching the rafters, or you can attach the sheathing on top of the support beam or with staples.
- If the width of the porch along the facade exceeds 2 meters, then it is necessary to install additional vertical supports along the edges of the horizontal beam.
Installation of vertical supports:
- Dig wooden supports into the ground to a depth of 40-50 cm.
- The holes with supports are concreted.
- After the mortar has hardened, cut the pillars to the required height and lay the second support beam on them.
Advice. To ensure that snow does not linger on the roof of the canopy, experts recommend calculating the height of the free edge using the formula - 10 cm for each meter of length. That is, if the length of the porch is 2 m, then along the wall the height of the structure should be 20 cm higher than along the free edge.

- Rafters (beam 75x75 mm) are attached to the support beams.
- The distance between the rafters should be no more than 80 cm, since with a larger step in winter, under the weight of snow, the roof can be severely deformed.
- The rafters are attached to the support beams in grooves or with brackets.
- Sheathing boards are laid perpendicular to the rafters.
- The distance between the boards should be such that each sheet of slate or corrugated sheet rests on the board in 3 places - the top of the sheet, the bottom and the middle.

Laying roofing material:
- After the frame of the sheathing is ready, it is recommended to paint it or treat it with an anti-rotting compound.
- The slate is laid from the free edge. The roofing material is secured with slate nails.
- The finished canopy can be “ennobled”: install decorative railings or cover the sides with clapboard.

Wooden canopy over the porch
Another option for making a canopy over the porch with your own hands is to build a wooden canopy. The small structure can be easily assembled by yourself and then mounted above the porch on the wall. Such canopies can be of a wide variety of shapes - single-pitch, arched, gable, curly. But for a novice master, it is better to opt for a simple single-pitched frame.

Before starting construction, it is necessary to calculate the dimensions of all parts according to the drawing. The width along the façade should be 50 cm greater than the width of the porch, and the length along the slope should be at least 70 cm. For consoles and crossbars, you will need a wooden beam with a cross-section of 75x75 mm; for lathing, thinner slats - 40-50 mm - are suitable. It is better to make the inclination angle of the visor approximately 30°. All parts must be treated with drying oil or painted before assembly.
The console of such a frame consists of three bars:
- the vertical one is attached to the wall and is the basis for fixing the strut and horizontal crossbar;
- the front support beam of the sheathing is attached to the horizontal crossbar;
- The strut serves as a support for the entire visor.

The rear support beam is attached to the ends of the vertical bars. To attach the sheathing, you can select grooves in the rafters or simply cut off the ends of the slats at the desired angle and screw them onto the rafters with self-tapping screws. You can cover such a canopy with slate, galvanized iron, corrugated sheeting or ondulin. To reduce noise from rain, it is recommended to lay roofing material or mineral wool under the roofing material.
Anchor bolts are used to attach the wooden canopy to the wall. It is worth considering that the fasteners must fit into the wall at least 2/3 of their length - then the canopy will not move away from the wall and will be securely fastened to the facade. For a strong fixation, it is better to attach not only the consoles to the wall, but also the upper support cross member of the sheathing.
Polycarbonate canopy - how to make it yourself
Polycarbonate structures stand out not only for their beauty. These are strong, reliable and durable structures that are easy to assemble even for inexperienced builders. Therefore, it is not surprising that many owners of private houses want to install a polycarbonate canopy over their porch instead of the old wooden canopy.

What you need for a polycarbonate visor
To install a polycarbonate canopy with your own hands, you will need the following materials and equipment:
- frame drawing (calculate the dimensions of the parts in advance using your measurements);
- metal pipes or corners for making a frame;
- polycarbonate for roofing;
- welding machine, grinder, drill;
- screws, brackets, anchor bolts.

The dimensions of the polycarbonate canopy should not be very large; it is enough if the roof protrudes from each side of the porch by 25-30 cm. It is better to take cellular polycarbonate for an arched canopy, with a thickness of 6 mm. Monolithic polycarbonate more suitable for straight structures. The size of the polycarbonate sheet is calculated according to the dimensions of the frame - the roofing material should protrude from the sides by 10-15 cm, along the free edge - by 20 cm.
Stages of installation of an arched polycarbonate canopy
It’s not difficult to make your own polycarbonate canopy on a metal frame. The main thing is to have necessary equipment and welding experience. The frame is assembled on the ground and only then attached above the porch.

- According to the prepared drawing, it is necessary to cut out the parts for the frame and mark them.
- To make arches on pipes, use a grinder to make deep notches of ¾ of the diameter at regular intervals, then bend the parts with an arc.
- Connect the arcs together with crossbars. In total, you will need 4-5 crossbars - two connect the edges of the arches, the rest are evenly distributed along the length.
- Two long pipes are welded along the length for rigidity; along the free edge of the arch, instead of a pipe, a forged patterned element can be installed.
- Vertical consoles are attached to the wall edge of the arch by welding or connecting corners.
- To give strength to the frame, struts must be installed from the free edge of the arch to the console supports.

Before covering the frame with roofing material, you need to decide how to attach the canopy to the wall of the house. If you plan to use anchors, then you need to drill holes for bolts on the console supports and the wall arch, attach the frame to the facade, mark the mounting points on the wall, and then drill the wall according to the marks.
To fasten with brackets, mark the location of the canopy on the facade, install the brackets and fix the frame on them.
The final touch remains - polycarbonate sheathing. This material bends well and is easy to attach yourself. The polycarbonate is secured to the outer and central crossbars with screws and a thermal washer. Experts recommend making holes for screws 5 mm larger than the diameter of the fastener - this will avoid distortions and deformation of the visor.

Options for attaching canopies to the wall
Information on how to build a canopy over a porch will be incomplete if you do not consider the issue of mounting the structure to the wall of the house. From correct fastening the frame to the wall depends on the reliability of the extension itself and its service life. There are several options:
- welding to built-in fittings;
- mounting on brackets;
- fixing the support beam to the wall with anchor bolts.

With built-in fittings everything is simple - segments steel pipe or rods are laid in the wall during the construction of the house, and the frame is welded to them. But other options need to be considered in more detail, since they are the ones most often used for light awnings over the porch. The pictures below show how to screw awnings directly to the wall of an already built house.

Figure (c) shows how to attach the rafters with staples to a support beam fixed to the wall with long anchor bolts. In Fig. (a) shows a U-shaped bracket, such as is used for light awnings. Figure (b) is a diagram of fastening the rafters in the grooves of the support beam (1 – support beam, 2 – canopy rafters, 3 – anchor bolt, 4 groove of the support beam, 5 and 6 options for fixing the rafters with a pin and nail).
Important! If the length of the canopy exceeds 2 m or there is no confidence that the wall will support the weight of the roof, then pillars must be placed under the support beam.

Ideas for building canopies and canopies - photo gallery
Above are examples of the simplest canopies. But such designs can be more complex. The photo shows that the design of canopies in the yard depends on their purpose - for economic purposes (storing firewood, hay) they choose simple forms, but for recreation and decoration they erect real works of art.


A canopy over the porch is not only about protecting the front door from bad weather. It is also a decorative element that emphasizes the architectural style of the entire building. Elegant and massive, metal and wood, plastic and forged - the design of canopies in a private house in the photo is varied and depends only on the imagination of the master.
As you can see, even an inexperienced craftsman can make a canopy over the porch with his own hands. But if you are not confident in your own abilities or you need an exclusive version of the canopy, then there is always the opportunity to turn to professionals who will not only develop a project especially for you, but will also help with the installation of the finished canopy.
How to make a canopy over a porch with your own hands: construction instructions and photos
Review of models of canopies over the porch of a private house. Instructions for the construction of canopies and canopies made of wood and metal with a roof made of polycarbonate, slate,
In the hot summer months, you really want to hide in the shade from the scorching sun, but often the lack of trees near a new private house does not allow this. In winter, the owners suffer from snow drifts in the yard, which they constantly have to clear on their own or with the help of hired workers. A canopy to the house will help to get rid of such problems completely or at least partially.
Ready-made canopy made of metal profiles attached to the house
A canopy is a structure located, as a rule, near a building. The main weight load can be distributed between the wall of a private house and the supports or fall entirely on the constructed supports. In fact, a canopy is a roof without walls or attached to a wall.
Sheds are designed to solve a number of specific problems:
- Shading. In the hot season, canopy structures are designed to create shade in the recreational area, parking area or storage areas for any supplies.
- Rain protection. You don’t want to get caught in the rain and get wet during a picnic, and it will stay cleaner.
- Snow protection. You will be able to spend less of your personal time clearing snow drifts in the yard, in front of the porch, and cleaning your car after a snowfall.
As you can see, the canopy is very convenient.
 An example of a canopy for a house made of polycarbonate and metal poles
 Thanks to the development of construction, a design can be not only functional, but also very beautiful.
Among hanging structures, several main types are most widespread:
- metal,
- wooden,
- forged,
- stone.
Polycarbonate, slate, corrugated sheet or other roofing material can be used as a covering material.
The shape of the canopies can also be different. Today, there are multi-level decorative canopies, extensions to the house in the form of an extension of the roof, and simple hanging structures.
Visors
A special group is the canopy over the porch or window - the canopy. This is usually a small structure with two supports attached to the wall or ground surface in front of the porch.
Typically, canopies are made in the form of a welded frame made of metal or wood and covered with polycarbonate or corrugated sheeting.
 This is what a canopy for a house made of corrugated board looks like
 Entrance areas can also be decorated with a forged frame, then the canopy looks especially elegant and beautiful.
Material selection
Before making a canopy for your house, you should decide on the choice of basic materials for the structure. Each of them has its own pros and cons.
Wooden structures
Wooden canopies are not uncommon today. For their construction, 10x10 timber is usually used as supports, smaller timber and boards for roof sheathing. A decorative canopy can also be decorated with railings, which also increases the strength of the structure. The advantages of wooden canopies include the following:

On the downside, it should be mentioned that wood is a flammable material, so you need to monitor nearby fire sources. It is unacceptable to locate the barbecue near such a structure.
Wood can also rot when exposed to excess moisture. To prevent this from happening, special coatings are used: primers, varnishes and paints.
Metal constructions
Metal structures are pipes welded or otherwise secured to each other, covered with some kind of roofing material.
As supports, a round or profile pipe of sufficiently large diameter (at least 10 cm) and a metal thickness of at least 2 mm is usually used.
 An example of a metal canopy for a car area
 The advantages of such canopies include:
- High structural strength (provided by welding elements together).
- If you have a welding machine and certain skills, you can make a canopy structure yourself. This will also reduce the final cost of the product, since the price for welder services is quite high.
- The profile pipe bends quite easily using a special device - a pipe bender. Due to this, it is possible to produce quite elegant designs that are attractive in appearance.
- A metal structure will be lighter than a stone or wooden one. Metal does not absorb moisture and does not become heavier after heavy rains or melting snow.
However, the metal is susceptible to corrosion. Periodic painting of the surface of the frame will help to cope with this problem. Before applying a layer of paint, the metal surface must be primed.
Forged structures
Such designs, as a rule, consist of a metal frame base, decorated with forged elements. They are welded to the frame, providing not only an attractive appearance, but also increasing the strength of the structure. Wrought iron canopies have a number of advantages:
- look light and elegant;
- strong and durable (forged products have been standing near various ancient castles for centuries, without losing their visual appeal and pristine strength);
- relatively inexpensive (among the elite structures of canopies, forged can be considered quite inexpensive compared, for example, with a canopy with stone supports);
- design flexibility is another advantage. Due to the increased load, the product will not break, as could happen with a wooden one, but will only bend slightly.
 An example of a canopy for a house using forged elements
 Compared to wood or simple metal structures, a wrought iron canopy will be much more expensive. However, it is worth it when it comes to prestige and creating a representative image of the owner of a private home or a successful company.
Most likely, to build a forged canopy, you will have to resort to the help of a specialist. You can count the number of good blacksmiths on one hand, but if you find such a master, you will be satisfied with his work for the rest of your life.
Stone structures
Only very respectable citizens can afford to make stone structures the basis for a canopy. But such a contribution Money justified in some cases.
- Stone is an almost eternal material. It is not afraid of heat, cold, or temperature changes, so the structure will last for many years.
- The stone structures look very respectable and beautiful.
- The high strength of the canopy frame allows you not to worry about reinforcing it with additional elements.
 Stone is undoubtedly a very expensive material. Therefore, many people lay a metal structure as the basis of the frame, and on top of it they cover the surface with a finishing material that imitates the surface of natural stone. Building a canopy using this approach will significantly reduce the cost and speed up the construction process, while the appearance will remain at the highest level.
Preparing for installation
In order to make a canopy in front of the house, you need to prepare for the construction process. For convenience, it is worth dividing the entire preparation process into several stages.
Selecting a location
It should be remembered that if you are going to build a canopy in front of a porch or just against a wall, you will need to install fewer supports than if you were making a free-standing canopy.
 Original canopy for a house made of wood
 This must be taken into account, because an increase in the number of supports entails an increase in overall costs: for the construction of the foundation, for the purchase of material for the supports.
If you can’t attach the canopy to the wall, you should choose a place where it will be convenient to dig holes for the foundation (without plants and asphalt or sidewalk paths). You need to try to find a free space between the already landscaped area and a private house, if possible, and only then start arranging the yard.
Purchase of materials
Before purchasing material, it is worth carefully calculating how much of something you will ultimately need. For this purpose, possible structural designs are being considered. If you wish and have the ability, you can prepare projects yourself, but you should remember that this requires certain engineering knowledge. Otherwise, the structure may turn out to be flimsy and will not last long.
 Canopy for a cottage made of metal profile
 If you are not confident in your abilities, it is better to play it safe and order projects from a special construction organization. The price of the issue is high, but health and life are more valuable.
Having chosen the base material, supports, additional connecting elements, and fasteners are purchased. For wood and metal surfaces, it will be necessary to purchase a certain type of primer and paint (or varnish) to protect the frame from the harmful effects of sunlight and moisture. To construct the foundation you will need sand, crushed stone and concrete, as well as reinforcement if the base is solid. For welding you will need electrodes, for cutting parts you will need grinder discs, and to tie the frame together you will need angles, screws, bolts, etc.
When choosing a covering for a canopy, many people opt for canopies made of polycarbonate or corrugated sheets. Each of these materials has its own advantages.
 Ready-made canopy for the house made of wood and polycarbonate
 Thus, polycarbonate canopies look lighter and more elegant due to their transparency and high degree of flexibility. Structures made from corrugated sheets are much stronger and are not as susceptible to hail as products made from polycarbonate.
On the other hand, you can buy polycarbonate higher density(8 or 10 mm) to minimize the likelihood of material penetration.
However, corrugated sheet canopies are opaque and provide better protection from the sun in hot weather. Profiled sheets will also cost less. When choosing between these two materials, you need to weigh the pros and cons.
When purchasing material according to calculations, it is always worth adding an additional 10% of the total volume to the required quantity. Practice shows that unexpected costs of materials always arise due to errors in projects or difficulties encountered.
Tool preparation
The list of tools required for the job may vary depending on the selected canopy material.  During construction you may need:
- for pouring the foundation - shovels, concrete mixer, wheelbarrow;
- for level installation of supports and frame elements - level, square;
- for welding metal structures - a welding machine;
- to install a canopy made of metal or wood - a screwdriver, a grinder or a circular saw, a drill (especially if you plan to attach the structure to the wall).
A stepladder or tall ladder may also be needed for working at heights. If you have to lift up a solid welded metal frame structure, you will have to resort to the services of a manipulator.
The stylish design of the main entrance to a private house sometimes creates a much stronger impression than the cottage itself. One of the most important tasks when arranging the overall architectural style of a building is performed by the canopy over the porch. At the same time, an impressive design is far from the only function assigned to the visor. Its main task is to ensure protection of the front entrance from external adverse factors.


Regulatory Requirements
The canopy over the porch is not just part of the roof, it is an architectural component that is responsible for a number of important conditions for comfortable and safe living in the house.
- Helps ensure the greatest comfort when entering living spaces, allowing you to shake off raindrops from clothes and an umbrella or remove snow from your shoes while still on the porch.
- Provides maximum reliability - a properly constructed canopy can withstand not only the weight of falling precipitation, but also all kinds of vines, for example, wild grapes, which are often used to decorate the main entrance to a house.


- Forms effective drainage. This is very important for preserving the integrity of the entire facade of the building, which is why modern canopies over the porch include special engineering communications - water, flowing down the canopy, is poured into a storage tank and through an equipped liquid outflow system is discharged outside the residential building.
- Performs a decorative function. A stylish canopy of an unusual shape can become the main accent, emphasizing the unique architecture of the building, a bright note that gives the entire design completeness and conceptuality.


In order for the canopy over the door to serve faithfully for many years and not require repairs after a couple of years, it must meet basic technological requirements:
- the canopy must withstand heavy loads and pressure - when calculating, one should take into account the weight of the snow mass that falls on the canopy from the roof, as well as the dimensions of green spaces, which often wrap around the structure;
- optimally, if the structure effectively protects not only the porch itself, but also the front door of the building;


- a prerequisite for the effectiveness of the design is the equipment of a water drainage system, as a rule, it is made in the form of a storage tank, storm drainage system or gutter;
- the design of the canopy must be in harmony with the overall architectural appearance of the building, taking into account the peculiarities of its style and color scheme.


More precise requirements for canopies have been established current GOSTs and SNiPs, namely:
- canopies and canopies must be installed above each entrance, main or secondary, as well as on the doors of bathhouses and outbuildings;
- canopies should be made only from materials that are resistant to combustion;
- It is recommended to use those approved by sanitary authorities as finishing materials;
- canopies must withstand a load of at least 200 kg/m2.


Kinds
Canopies are made in a wide variety of options, but any configuration requires general compliance with a single stylistic solution of the exterior, therefore, when developing a canopy project, any detail, trifle, or nuance should be taken into account. As a rule, one of the following forms is chosen to construct a canopy.
- Flat canopy– most often used when decorating a country house or facade in a rustic or, for example, shabby chic style; to do this, you just need to put together several boards with each other and stylishly decorate them with decorative materials.


- Dome– has an original design, however, this is by no means the only advantage of this configuration. The undoubted advantage of such a coating is its compactness; the surface of such a visor occupies a smaller area than other types of options, however, it covers the same area. This means that much less materials are required for arranging the canopy, which leads to significant savings.
- Arched and semi-arched forms– such canopies are called “awnings”, they are very economical, because very little materials are spent on their arrangement. Such models are distinguished by natural drainage, and in addition they can withstand the pressure of snow masses.
- Gable canopy- the simplest design, which at the same time provides complete drainage.


- Three-slope option– organically combined with multi-pitched roofs, characterized by increased strength and wear resistance.
- Concave visor– a canopy of an unusual shape, which can become a stylish accent of the architectural concept.


Materials
Perhaps there are practically no restrictions on the materials from which the visor can be made. For a stylish canopy, metal, plastic, tiles and many other modern materials can be used. Let's take a closer look at each of them.


Polycarbonate
This material is widely used in the creation of canopies and canopies, as well as for the construction of fences. winter gardens and gazebos.
The use of polycarbonate for arranging a canopy has a number of advantages:
- the material is transparent, effectively scatters ultraviolet radiation, maintaining a safe level of normal illumination;
- polycarbonate is a durable composition that does not break or crack under powerful gusts of wind and pressure from snow masses;
- the substance is fire-resistant, it does not change its color when exposed to direct sunlight, does not rot, rust or deform;


- the surface of polycarbonate is considered an environment unfavorable for the growth of mold, dangerous fungi and insects;
- the material is flexible, so it allows you to mount canopies of various shapes, including semicircular and corner options;
- The modern market offers a wide selection of polycarbonate of various shades and plate thicknesses, thanks to which everyone can choose exactly the option that will best suit the design and overall style of the house.


The disadvantages of the material include poor resistance to ultraviolet radiation. That is why manufacturers coat it with special compounds, without which the canopy may become cloudy after a short time and deteriorate its performance characteristics.


Plastic
PVC plates are often used to equip an effective canopy over the porch. It should be noted that the consumer properties of plastic are similar to polycarbonate, however, its cost is several times lower. In addition, the material is lightweight, which greatly facilitates its installation. The disadvantage is a rather poor range of colors and fading in the sun, however, this drawback is successfully mitigated by multi-colored films, which are sold in any hardware store.


Metal
A stainless steel visor is considered relatively budget option. However, its construction requires at least minimal welding skills. If there is no such experience at all, then you can use nuts and bolts and rivets, although in this case it is necessary to periodically check the strength of the connections.
Canopy from of stainless steel characterized by durability and high strength, it is resistant to mechanical damage and temperature changes. Such a canopy can protect the main entrance for many years. Disadvantages include large dimensions and the need for regular anti-corrosion treatment.


Profiled sheet
This material is considered a good alternative to metal, as it combines its strength and durability with the manufacturability of modern processing. Such materials are coated on both sides with a layer of special protective polymers, which significantly increase its resistance to adverse external atmospheric factors and have an anti-corrosion effect.
In addition, corrugated sheets are produced in a fairly wide range of colors and textures. Therefore, home owners can not only choose the desired shade, but also, for example, emphasize the texture of wood or imitate stonework or the structure of a brick covering. In addition, this material is simpler than steel.


The disadvantages include the following:
- corrugated sheets do not transmit the light of the sun, so such materials should not be used when equipping spherical canopies;
- The corrugated sheet has relatively low impact resistance - in the event of, for example, hail, the integrity of the visor will not be compromised, but marks from impacts will remain.


Forging
Separately, it is worth paying attention to this type of metal visors, such as forged ones. These awnings are always extremely luxurious and elegant. They fit perfectly into the exteriors, decorated in a classic style, demonstrating the taste and status of the owners of the mansion.
Of course, forging is very expensive. However, in order to give the entrance a noble look, it is not at all necessary to build an entirely forged canopy; it is enough to add a few decorative elements that can transform the overall appearance of the building before your eyes.


The lack of material is associated with its installation. It is impossible to make such a canopy yourself, and it is better to entrust its fixation to the hands of professionals - otherwise the entire structure may simply collapse in winter under the weight of snow masses.


Tree
A unique material that is not suitable for every home. Wood canopies should be used when arranging houses made of natural wood, rough stone or brick. The advantages of wood are its environmental friendliness and safety. However, this material is afraid of water and fire, mold and fungi may appear in it, and insects often make their burrows in such structures.
That is why a wood canopy should be regularly treated with special fungicides and fire retardants, which allow the material to withstand all adverse environmental factors.


Metal tiles
Many designers do not consider the use of metal tiles a suitable option for arranging a porch, since it is a rather bulky covering.
However, the consumer properties of such canopies are extremely high:
- they are resistant to mechanical damage;
- resistant to temperature changes and exposure to direct sunlight;
- have a long service life;
- differ in decorative design.


Very often, metal tiles are replaced with bitumen tiles - they are much lighter, and in addition, they absorb sounds perfectly, which means they create additional sound insulation. This coating is often used in the countryside due to its low cost and ease of installation.


Glass
This material is used very rarely; it is not suitable for every home and not every family. Glass looks harmonious in homes furnished in a minimalist style; in all other cases, preference should be given to other materials. Well, besides, in families, for example, with children, it is better to refrain from using glass visors, since such a product can be damaged during active games with a ball and racket.


Design
General principles porch canopy designs are based on the combination of the canopy with the overall stylistic concept of the building facade, as well as with the tasks that you assign to the canopy. If you need the structure only to effectively protect the porch from wind and precipitation, then it is better to choose the simplest and most inexpensive canopy, as they say, “clean and tidy.” Such coatings are most often made of polycarbonate or metal profiles, however, other materials can also be used. The only thing that matters is the compatibility of color and design style with the overall decoration of the building’s facade and its color scheme.


Sometimes there is a need to design the visor in some special design– Russian, classical, hi-tech, half-timbered or chalet. For example, for a log house, an opaque wooden canopy would be appropriate, fully consistent with the style of a traditional Russian hut. However, a forged visor would be appropriate here.
When implementing high-tech ideas, you can use polycarbonate or glass, metal will emphasize the gothic style, and metal tiles will emphasize the classics.


Since the canopy is a fairly significant component of the entire facade of the building, it should represent a single architectural ensemble with the porch itself, railings and steps. In addition, the canopy can be decorated separately with decorative elements, for which lanterns and flowerpots are most often used. Sometimes a closed space is equipped with a canopy, which can be used as a recreation area.


Drawings and projects
The construction of the canopy requires the mandatory drawing up of a drawing of the future structure; the calculations are based on:
- the selected material, which should not only fit harmoniously into the overall design of the building, but also have a sufficient degree of strength and stability;
- type of canopy - flat, single-pitched, gable, arched, etc.;
- dimensions of the visor - its length, width and depth;
- location - the design for awnings over the main and emergency exits, as a rule, differs significantly.


Key points to consider when drawing up a drawing:
- the width of the canopy should be 50 cm larger than the doorway;
- The optimal angle of inclination for a pitched canopy is 20 degrees.
A drawing is really necessary when equipping a canopy. It will not only help you correctly perform all the necessary installation work, but will also allow you to calculate the required amount of materials.


How to do it yourself?
At first it may seem that building a canopy is very simple - nail the frame and lay down the main material. In practice, this is far from the case: installation can be done independently, but this requires at least minimal skills and experience in working with building and facing materials. Of course, if you just want it to “not drip on your head,” then nails and a hammer will be enough. But in order for the visor to provide effective protection and be a stylish architectural element, you should carefully consider all stages of the work, take care of a durable frame and choose the optimal shape.


The process will be much easier if the master has a ready-made sketch in his hands. Even if it was compiled with your own hands, it will in any case reflect all the pros and cons of the project.
Depending on the material used and working area, you can choose one of the following types of fastening:
- Suspended – fixation is carried out on special suspensions located just above the visor. This option is optimal for lightweight materials, for example, polycarbonate and corrugated sheets.
- Wall-mounted – mounted to the wall using supports.
- Supporting - contains “pillars” that rest against the foundation or the porch itself. This design is suitable for large visors.


At the first stage, a frame is constructed; most often it is made of a metal pipe with a triangular cross-section. To begin with, cut pieces of rolled metal of the required size, and then weld them to each other in accordance with the diagram: first I mount the U-shaped base of the frame, and then attach the basic elements.
Most often, the frame is made on the ground; in rare cases, additional components are welded onto the base, which is already suspended from the facade.


The total number of lintels during the construction of the frame largely depends on the material used, so if the canopy is made of corrugated sheets, then the slats should be spaced in increments of 30 cm. At the final stage of arranging the frame, the cornice film is attached, as well as elements of the drainage system (gutters and pipes) .


Making straight visors is not particularly difficult. It is much more difficult to create arched structures.
To make wavy canopies, pipes are cut with a very large margin, and then bent with a gas wrench or a special pipe bender. If you don’t have such tools in your home workshop, then we can recommend an ordinary grinder; it makes cuts along the entire surface of the pipe in increments of 30–40 cm, along which the pipe is bent until the required rounding is achieved, and then the cut areas are welded.


If the canopy is planned to be mounted from heavy materials, then the frame of the canopy structure should be additionally equipped with stops that stretch from the outer corner of the canopy to the wall at an angle.
The next step is to drill holes with which the frame will be attached to the wall. Usually the visors are fixed at the top and bottom on both sides - that is, there are 4 attachment points. However, if we are talking about metal canopies, then it is worth increasing the number of fasteners.


- additional bars are attached obliquely to the horizontal beam on both sides, which will become the frame for laying the outer covering;
- if the canopy has large dimensions, then the sheathing is first laid on the beams and only then the main roofing material;
- Let’s immediately make a reservation that on the basis of a wooden frame it is possible to construct canopies with straight, laconic geometry. It is not possible to install wavy and spherical canopy options.


Traditionally, canopies made of metal or corrugated sheets are made by professionals. They can independently install canopies made of corrugated sheets or plastic. The material is attached to the frame using steel screws and thermal washers. To do this, a hole is drilled on the main covering, through which it will be held on the frame. In this case, it is mandatory to make a rubber or silicone layer. Thermal washers should not be screwed in too tightly, as the sheets should be able to move slightly.
If initially in the project you did not provide for a veranda or terrace, a very convenient thing, and in a hot climate simply necessary, then you may well fill this gap by building an additional canopy for the house. With modern construction technology and the availability of materials, you can completely cope with the task with your own hands. Regardless of whether you use metal beams or wooden sheathing for the improvised one.
Canopy for the house
At least in constructive terms, everyone canopy for the house very similar to all others, but still, before construction, it is customary to distinguish them according to their future functional purpose; both the arrangement of the foundation and the calculated strength of all supports depend on this. The need to cover a certain area with a roof arises when you plan to make a summer kitchen next to the house, an additional fully glazed gazebo for autumn-spring tea parties. Or maybe you want to protect your car parked outside from rain and snow, or you want to protect the porch and front door area. A canopy may be needed even when the living room on the first floor is located on the sunny side of the house and gets very hot during the day. It is the canopy, like the visor of a hat, that helps solve this problem and improve the microclimate in the room.
Before building, you will need to visualize your project, enter the building into . We are not talking about using special computer programs; such a visualization can simply be drawn with colored pencils, but this technique will allow you to most clearly determine not only the dimensions, but also the material that you will use for construction.

Shed adjacent to the house, can be made of several basic materials: metal, wood or brick (we are talking about brick supports on which the flooring is already installed). If we talked about this topic 15-20 years ago, then almost every craftsman would have advised making a metal welded structure, covering the roof with corrugated sheets or tiles. Today, new favorites are emerging among building materials, which have won a large segment of the market for such buildings. We are talking about transparent polycarbonate, which is many times stronger than glass, capable of withstanding heavy loads of precipitation and wind without deforming or cracking, and at the same time transmitting a lot of sunlight. Now every self-respecting builder should know.

Polycarbonate can be bent, making the roof of the most bizarre shapes, plus, its installation is not difficult due to the light weight of the material, it can be processed with a standard set of tools, cut, sawed, drilled. Compared to traditional roofing coverings, polycarbonate has only one drawback - its cost. But, of course, if you do not spend it on construction, but use it for such a necessary and useful task as building a canopy for many years to come, then it will still be better to fork out for it. Just don’t save on it by buying regular polycarbonate, without a special coating that protects the material from ultraviolet rays. Otherwise, after the first season, cloudy spots may appear on the surface and it will become fragile.
Canopy in front of the house
By design canopy in front of the house It can be either installed on permanent supports or cantilevered. If everything is more or less clear with the supports, they are what is most often meant, but the cantilever varieties are more likely referred to as a process, because the console is attached directly to the house. The maximum size of such a canopy is 2 meters, but is this so small, is it possible to cover the porch and front door with a small canopy?

In fact, cantilever structures allow you to get a fairly large terrace for relaxing around the perimeter of the house, especially at that time of day when a two-meter panel or roof additionally receives maximum shade. In addition, today on the market you can find many offers of sliding cantilever structures, which, if necessary, you can extend even further, and after use, remove them to their original dimensions. Just remember that the two-meter limit is not made because the manufacturer is harmful, but for maximum wind protection of the structure. If the canopy is longer, then there is a risk that in a strong wind it will simply be torn out of place, thereby damaging the wall of the house to which it is mounted.

The canopy is large, long and wide, under which a car can hide and the whole family can have a get-together; of course, it cannot have a console design. There is no need to save money; you need to equip strong, permanent supports on which a full-fledged roof will rest, and the junction of the canopy with the residential building is closed when performing roofing work. Of course, the budget for such a building will be much higher, but taking into account the above, you will be able to make your family happy with a useful room for a long time.
Wooden canopy for the house

The design features of a residential building may require special constructive solutions. And if you to wooden house done, then it’s worth doing after all wooden canopy for house, although it will be somewhat more expensive and more troublesome to operate. After all, wood, as a material, has that special charm that still has a significant influence on the minds of dacha owners. And if, all other things being equal, you show them the choice of a metal canopy or a wooden one, then the majority will vote for the second option.

The peculiarity of working with wood is that the room is outdoor, which means that the wood will be subject to serious atmospheric loads. Especially if your site is located in a lowland or swampy area, then you will need to additionally process each support that is to be installed according to the project. The construction of a structure is not much different from the process. You need to start with the project, calculate future weight all supports and the roof to determine the foundation and number of beams.

Separately, it is worth mentioning the options for such crafts for the garden, which do not provide a continuous roof on top. Such buildings are built near modern town houses and cottages; due to their light weight, they are not at all difficult to construct and do not require such careful preparation and calculations. Upstairs, on the frame beams (mauerlat), simply lay transverse beams, which will provide quite a lot of shadow downwards. This design came to us from the architectural style of the Mediterranean region, where there is not much rainfall, but in the hot summer you want not only protection from the sun, but also air movement. If you want to get more shade, then it’s easy to cover such a roof with grapes or other climbing plants, or stretch fabric panels on top that can be easily hung up and removed.
Shed adjacent to the house
So, we will assume that the project shed adjacent to the house, you are ready, and you can begin construction work. It is necessary to mark the places for the pits of future supports; their diameter is about 20 centimeters and the depth is 50-60 (in any case, up to dense soil, be guided by your natural conditions). Each such pit is filled with up to a bucket of crushed stone, and then supports are inserted. You can also use special fasteners that are mounted inside the pit, and the beams are already attached to this fastener. The ultimate goal is to concrete supports that are level inside the hole, be it wooden beams or metal pipes. Note that the bars must be processed by special means, antiseptic impregnations, and pipes and profiles should be bought either aluminum or galvanized, which are not subject to rust, but when buying ordinary iron ones, it is better to cover their entire surface with a special primer.

Before equipping the site in the perimeter between the supports, it is worth laying electrical wiring and, if necessary, a water supply and sewerage system. After this, the floor is either filled with concrete screed or laid paving slabs, terrace board, or simply fill it with sand and gravel (for example, if you are just making a parking space for a car). After the concrete screed has dried, you can begin assembling the main structure.

We should start working on the wall of the building, to which one side of our future canopy will be attached. Special brackets are hung on it, onto which a transverse beam is mounted; it is this beam that will take on all the load-bearing loads of the entire structure. After this, you can start lathing.
Canopy in front of the house

Formation of sheathing canopy in front of the house begins with the formation of the top trim, which will become part of the future roof. At the ends of the supports that we had previously installed and concreted, transverse beams are laid, which need to be used to connect all the support pillars in unified system. That is, first the perimeter is connected, and then (depending on the size of the canopy and the number of supports), and then the internal beams are laid parallel to each other. For a metal profile, the connection method is welding, and wooden beams need to be tightened together with special corners. Do not forget to check the evenness of the corners and surfaces using a special level. The weld seams on the profile are processed; they need to be thoroughly cleaned and then covered with a layer of protective paint.

Polycarbonate is cut to the dimensions you need - this is the distance between adjacent beams with a small margin for the seam. But in fact, you can use a sheet of exactly the size that is convenient for you to mount, that is, you can even attach it across a row. Cellular polycarbonate has small cells on one side to remove condensate moisture; make sure that all sheets are positioned with the cells facing down. The sheets are connected to each other using a special H-shaped profile, which will allow the seams to be made neat and airtight, but the material must be fastened into the beams with special self-tapping screws with rubberized thermal washers. You should not connect the sheets very tightly, as the material will expand as the temperature rises. Be sure to leave a certain gap for the compression seam.
Today you and I have to choose a canopy over the entrance to the house. This is a very important process that can often change the appearance of the entire building from the front. The best photos you can imagine will be presented to your attention. Let us quickly begin to study the question posed.
What are they for?
The first thing you need to understand is why you need a visor at all. Moreover, above the entrance to a house or cottage. In fact, you can do without it.
A canopy or canopy is not only beautiful, but also multifunctional. You can just hide under it from the rain or the sultry sun. Plus, this design will protect the entrance to the house from moisture and snow.
Plus, the canopy over the entrance is also a part that complements the overall appearance of the house. Properly selected design (photo best options presented to your attention) will be able to add charm to even a not very attractive house. So, a canopy is a very useful “thing”.
What are they?
Before installing the canopy, you should figure out what it will look like. In general, they highlight several categories of canopies. They usually help you make a choice. What options can be offered?

A canopy over the house can be made from any materials. There is wood, metal tiles, polycarbonate, and metal. The main thing is that the product is in harmony with the overall picture of the building. For example, a forged canopy will not look very good against the background wooden house. This issue will have to be approached with special attention. And the decision on style and materials will be up to you.
Making the right choice
Canopy over the entrance, photo different options which can be seen below, as can already be understood, plays an important role. And you will have to try hard to choose the right model of this product. Usually people try to search the Internet for photos of ready-made options, and then show them to professional workers who will make the canopy. This is a very common technique. But how to make the right choice?
To start, visor dimensions. They shouldn't be too big. In addition, if you want to install a wrought-iron canopy, then professionals will have to work on its style. It’s not worth getting into this on your own. Also, if you choose a canopy with supports, then keep in mind that a small design will simply ruin the appearance of the product.
 Let's say we have decided on the sizes. Next comes the styling. Choice of materials and colors plays an important role. And it doesn’t matter whether it’s a forged canopy or not. As already mentioned, the materials and color should be in harmony with the house. If you have it painted green color, for example, there is no need to install a yellow visor. Get not a single design, but a real traffic light. Try to choose calmer and more relaxed colors and materials.
After you have made your decision, you can go to the company where you will order the product and describe it. It is advisable to draw. This is the only way you can get the forged visor (and not only that) that you wanted.
Contact a specialist
In truth, the canopies above the entrance are all the merit not of an ordinary person, a customer, but of a real professional himself. The point is that forged awnings very often ordered from designers. So to speak, design solution plays an important role in this issue. Especially if your taste is “not very good”.
Why is a forged canopy often completely “designed” by designers? The point is that such a design should look elegant and neat. And only professionals can cope with this task. People with a sense of style.
Forged visors are very popular among the population. Especially in private homes. They add majesty and a certain gothic style to the entrance. And this direction, as you know, is extremely loved by everyone. Especially in architecture. Therefore, a forged canopy over the entrance can help you add charm to an already pretty home. True, you don’t need to try to come up with a design for such a structure yourself. It’s better to turn to a real designer. After all, such people will be able to offer you not just a forged visor, but a real piece of art. Such that it will be impossible to repeat.
How to install: independently or not?
Let's say we chose an option and got it in our hands. But now the question arises: how to install it. Do you need to install a forged visor yourself, or is it better to just contact a specialist? This topic haunts many people.

Drawing conclusions
A forged visor is rather the work of craftsmen. And you don’t need to put it on your shoulders. The maximum you can do is choose a forged canopy on the Internet (find a photo), print the image and show it when ordering. True, this task is not an easy one. Sometimes the variety that a forged visor can offer simply confuses people. Or it forces them to choose one option or another for a long time.
If you don’t want to spend money on a wrought-iron canopy, you can always install any other one. For example, their polycarbonate. This option is not as beautiful as a forged visor, but, nevertheless, it is not inferior in quality. Your home will be beautifully decorated with any awning if you make the right choice and install it correctly.
Canopies and awnings over the entrance